
Podman is a container runtime that provides features similar to Docker. It’s part of the libpod library and can be used to manage pods, containers, container images, and container volumes. Podman was very different from Docker which uses the client-server architecture and required a docker daemon in order to run, while Podman doesn’t require any daemon to run and also can be run flawlessly without root privileges.
In this tutorial, we will show you the basic usage of Podman for managing containers, images, and volumes, and creating container images. In order to complete this guide, you must have podman installed. here are guides for different operating systems:
- Getting Started with Podman (Docker Alternative) on Rocky Linux
- How to Install and Use Podman (Docker Alternative) on Ubuntu 20.04
- How to Install Podman as Docker alternative on Debian 11
Prerequisites
- Ubuntu Server with Podman Installed
- Basic knowledge of Docker will make easier
1. Basic Podman Command
After installing Podman on the Ubuntu system, we must know how to check Podman itself. We need to check the version that is already installed on the system, the Podman system environment, and basic help usage.
To get the installed version of Podman on the machine, use the following command.
podman version
Any Podman version > 1.0.1 will be fine for this guide.
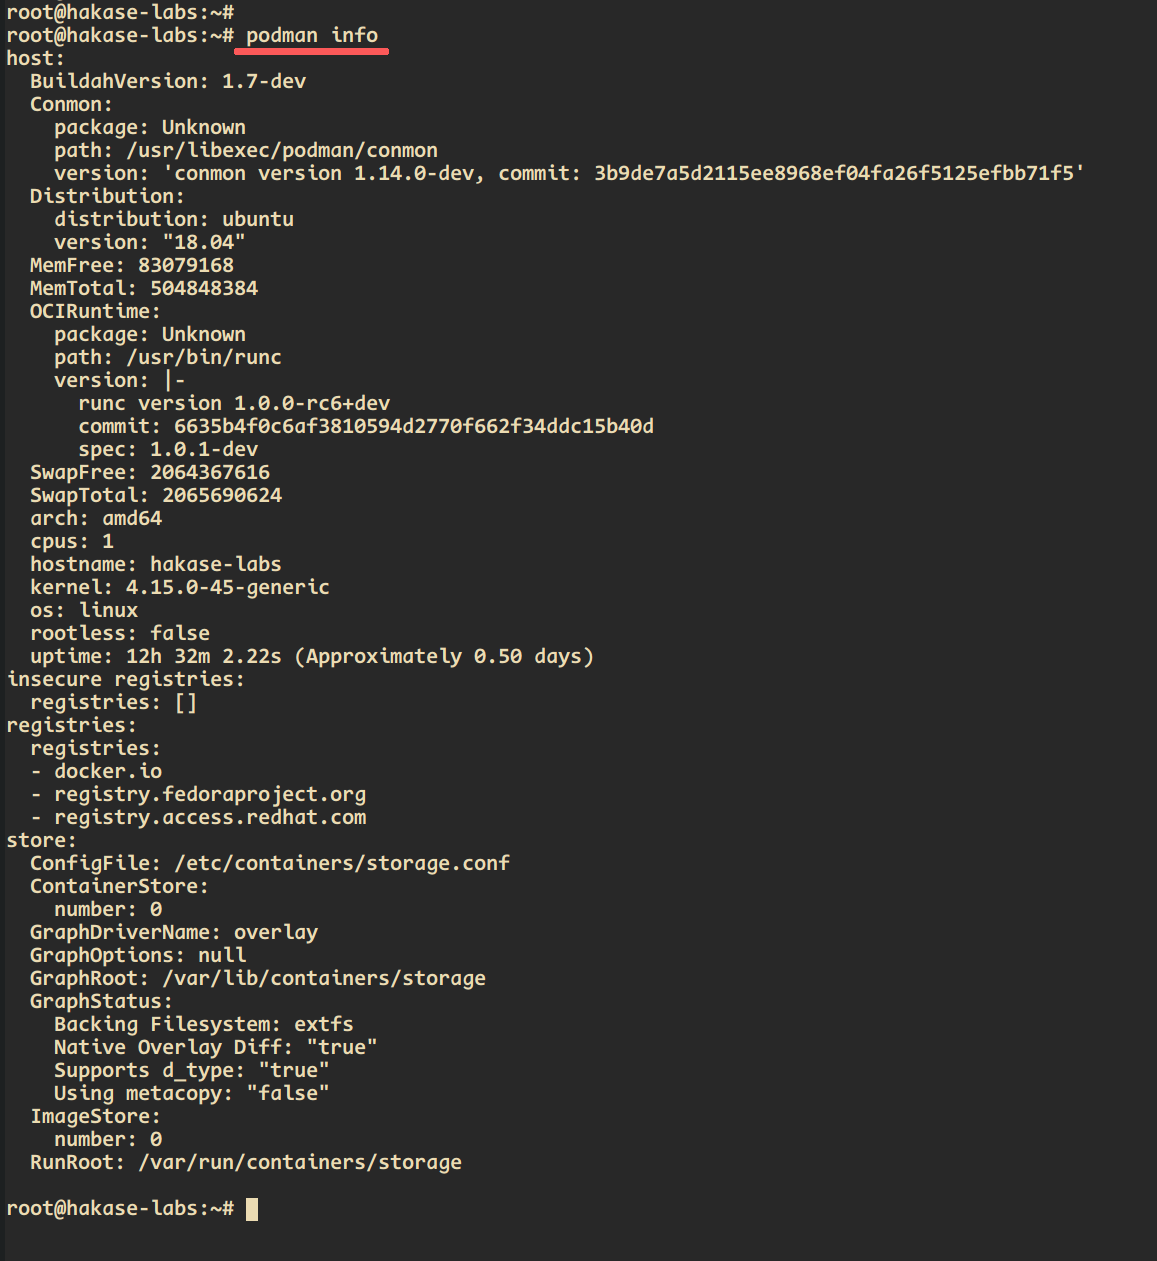
Now check the Podman environment setup.
podman info
And you will be displayed the system environment of the Podman installation. Including the Host packages info, Registries, and Storage.
Next, run the following command to show all available Podman command options.
podman --help
To display help for the specific command, you can use as below.
podman pod help
2. Manage Container Images using Podman
Now we’re moving to the container images management with Podman. There are some basic commands that you must know related to container image management, including a search for images, downloading images, showing available images on the local system, and removing images.
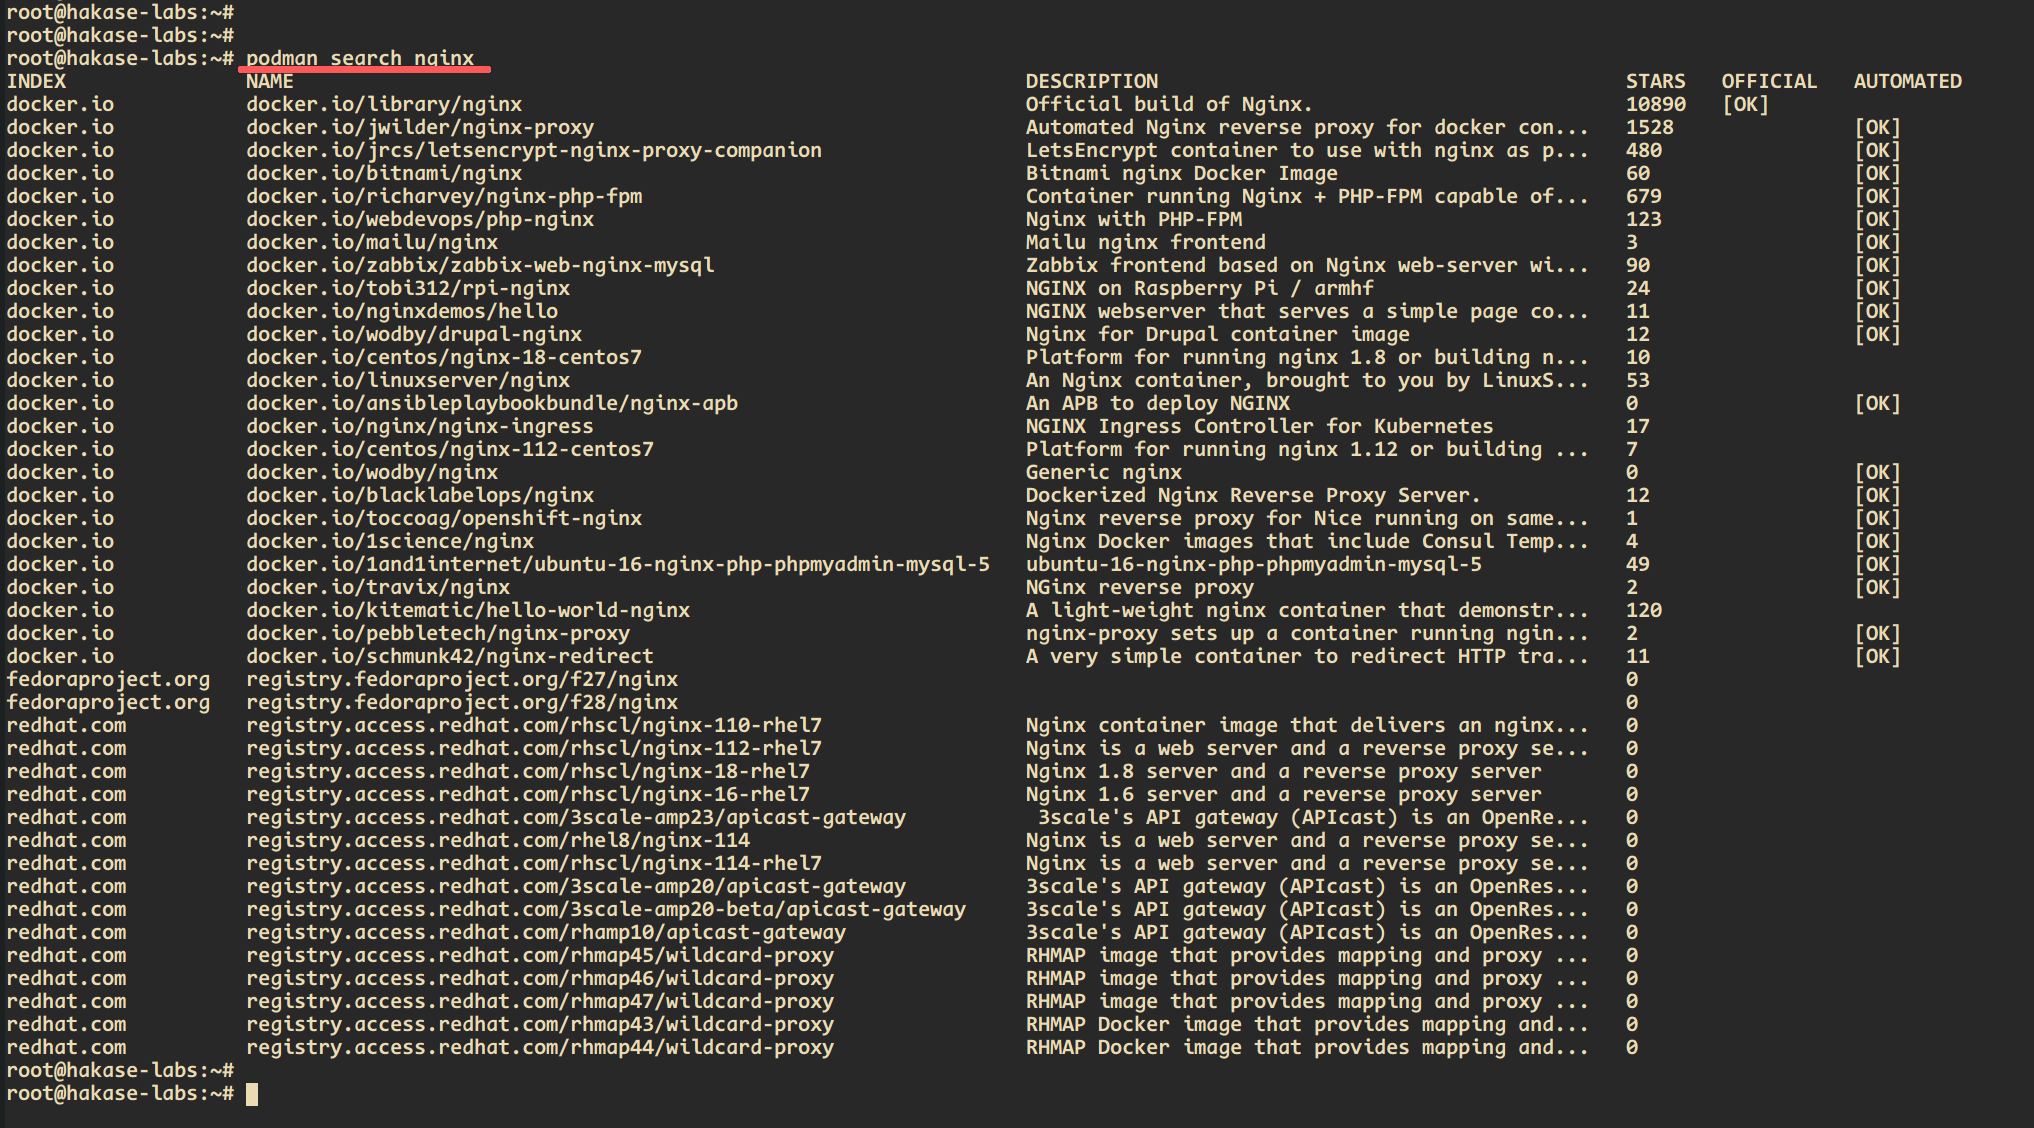
Run the command below to search an image.
podman search nginx
The command will search for images that contain the word ‘nginx’ on all available repositories that are already defined at the ‘/etc/containers/repositories.conf’ configuration file.
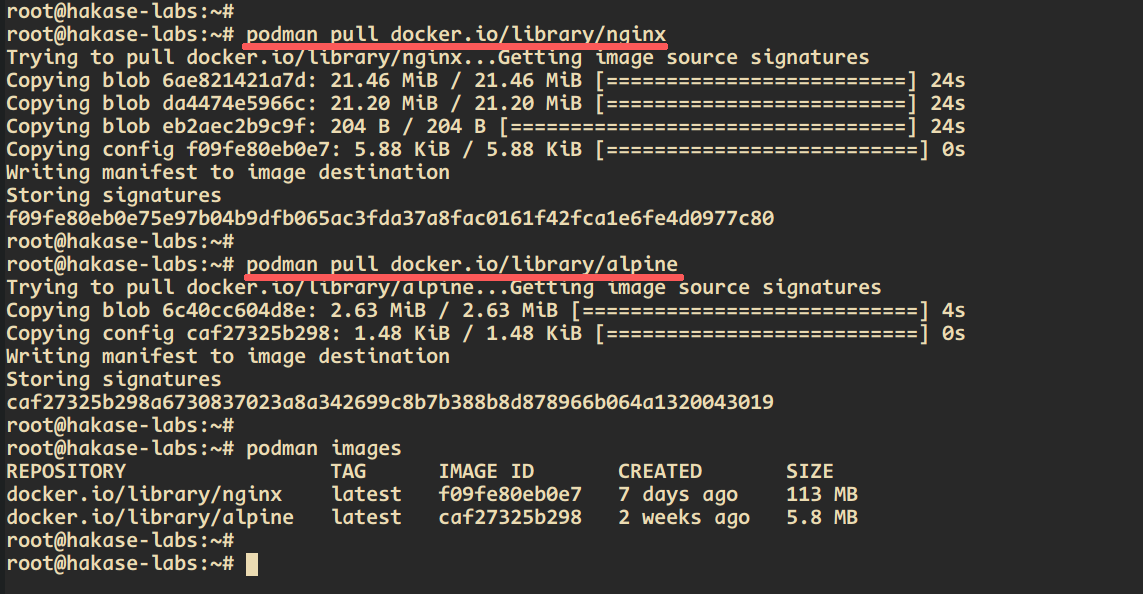
Now download some images using the ‘podman pull’ commands below.
podman pull docker.io/library/nginx
podman pull docker.io/library/alpine
Once it’s complete, check all available images on the server machine.
podman images
Now you will get the nginx and alpine images on the system.
To remove the alpine image, you can use ‘rmi’ option as below.
podman rmi alpine
As a result, you will only have the nginx container image on the system.
3. Manage Containers
At this stage, we learned about container image management. And the next step, we will learn how to create and manage containers with Podman.
To create a new container, we can use ‘podman run’ command as below.
podman run -d -p 8000:80 --name hakase-nginx docker.io/library/nginx
The command will create a new container named ‘hakase-nginx’ based on the nginx image and will expose the port 8000 on the host machine.
Details command options:
-d – keep the container running in the background and just print the container ID as a result.
-p 8000:80 – port mapping for container and the host system. Port 8000 on the host machine, and port 80 on the container.
–name hakase-nginx – specify the container name with ‘hakase-nginx’.
Now display all running containers on the system.
podman ps
And you will be shown the container called ‘hakase-nginx’ is up and running.
If you want to check all available containers, you can use the ‘-a’ option.
podman ps -a
Now you will get all available containers with different states.
After you get all the running containers on the host machine, we will show you how to check all processes inside the container, attach it to the running container, and stop and remove the container.
To check the process inside the running container using the following command.
podman top hakase-nginx
Now to attach and access into the running container, you can use the ‘exec’ command as below.
podman exec -it hakase-nginx /bin/bash
Inside the ‘hakase-nginx’ container, check the nginx version on it.
nginx -V
You will get the result as below.
Now type ‘exit’ to log out from the container.
Next, stop the ‘hakase-nginx’ container.
podman stop hakase-nginx
Then remove the container.
podman rm hakase-nginx
If you want to force stop and remove the running container, you can use ‘-f’ force for the option.
podman rm hakase-nginx -f
4. Manage Volume
Since version 0.12 the Podman has support for creating and managing local-only volumes. So, if you’re using the older version, you will not get this ‘podman volume’ command.
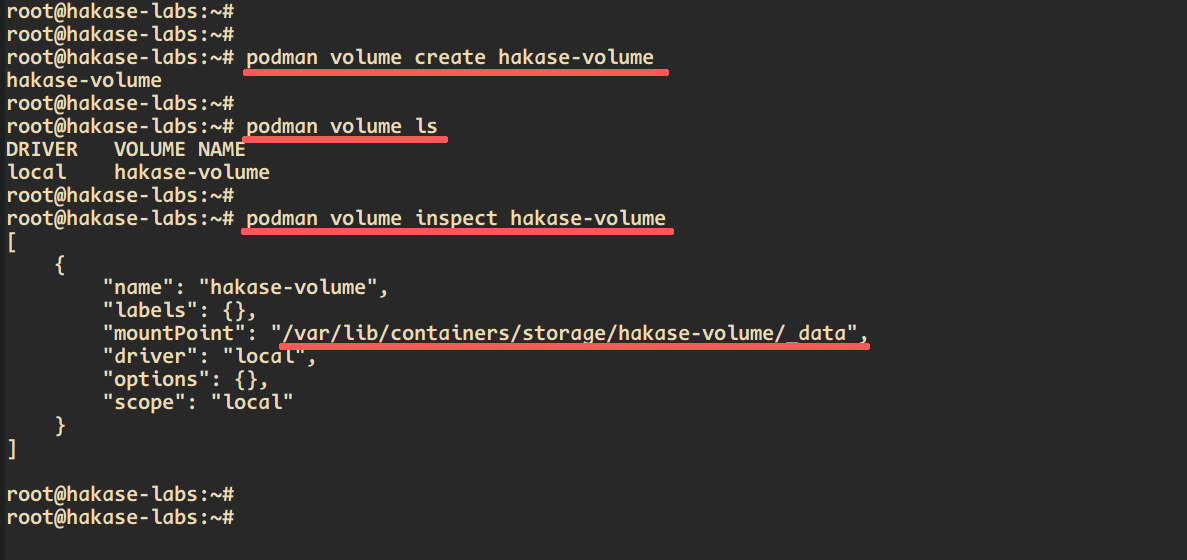
Now create a new local volume using the following command.
podman volume create hakase-volume
After that, display all available volumes on the system.
podman volume ls
And you will get the ‘hakase-volume’ on the list.
In order to check details about the volume ‘hakase-volume’, we can use the ‘inspect’ option as below.
podman volume inspect hakase-volume
And you will see the ‘mountPoint’ of the volume is to the local directory ‘/var/lib/containers/storage/hakase-volume/_data’.
Goto that directory and create a new index.html file.
cd /var/lib/containers/storage/hakase-volume/_data
echo "This is custom index and volume - Hello Podman
" > index.html
Now create a new container and mount the ‘hakase-volume’ into the container.
podman run -d -p 8000:80 -v hakase-volume:/usr/share/nginx/html --name hakase-nginx docker.io/library/nginx
Once the container created, check available volumes on the container using the following command.
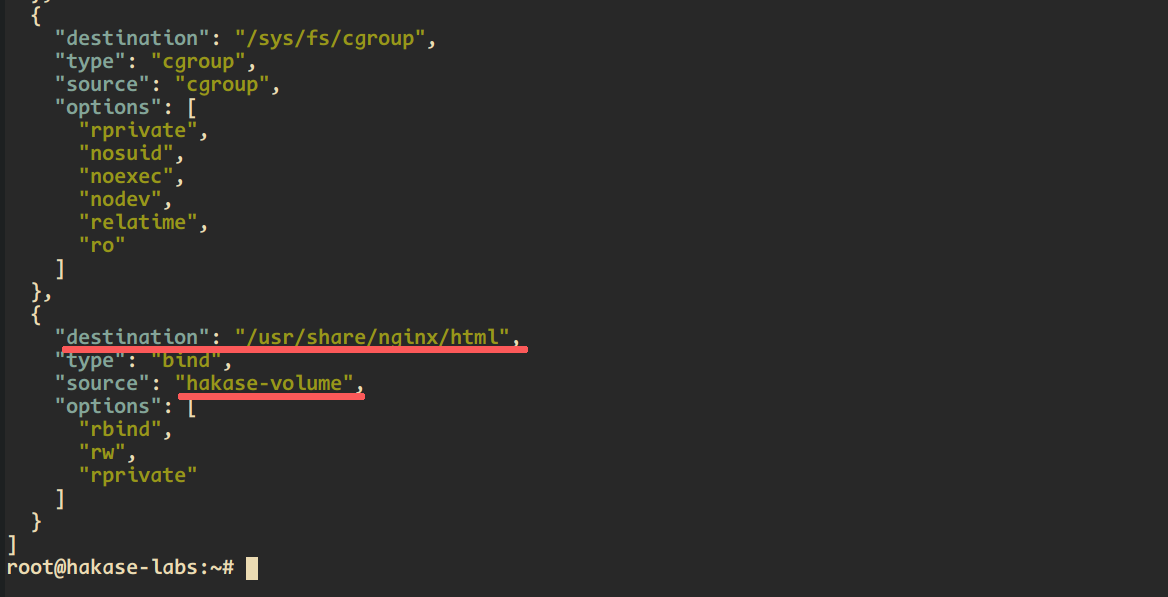
podman inspect -f '{{ json .Mounts }}' hakase-nginx | jq
At the bottom of the result, you will get the ‘hakase-volume’ on the container.
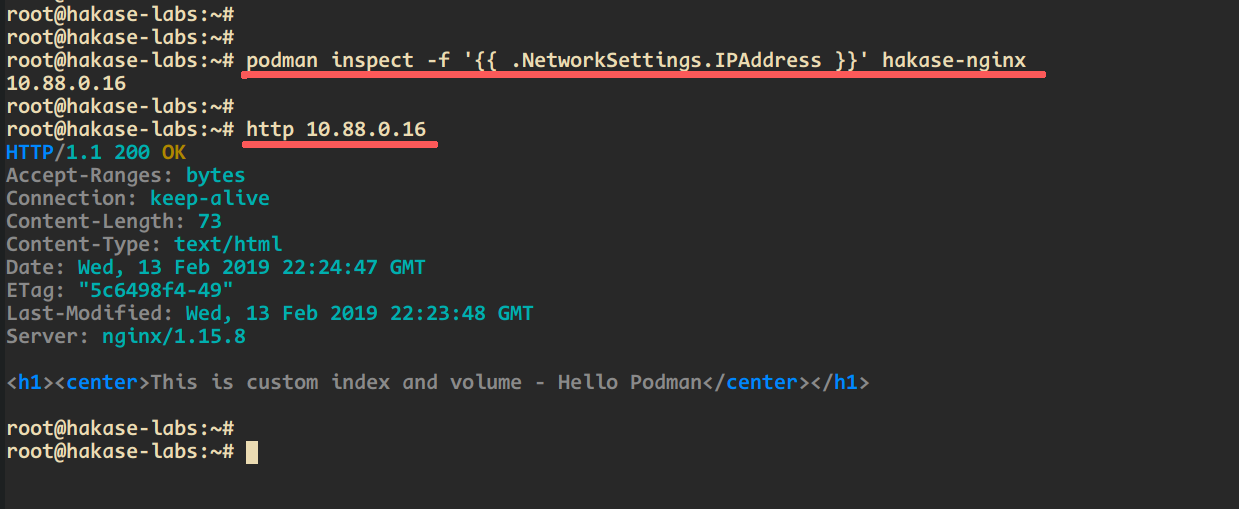
Next, check the IP address of the container.
podman inspect -f '{{ .NetworkSettings.IPAddress }}' hakase-nginx
Access the container on the HTTP port using httpie.
http http://10.88.0.4/
And you will get the custom index.html file that has been created on the ‘hakase-volume’.
Now if you want to remove the volume, you can use the ‘rm’ option.
podman volume rm hakase-volume
And the ‘hakase-volume’ will be removed.
5. Create Custom Images with Commit
Now we’re going to create custom container images using Podman. Basically, Podman allows you to create custom images based on the changed container or create new custom images using the ‘Dockerfile’.
In this section, we’re going to create new custom images based on the changed container through the ‘podman commit’ command.
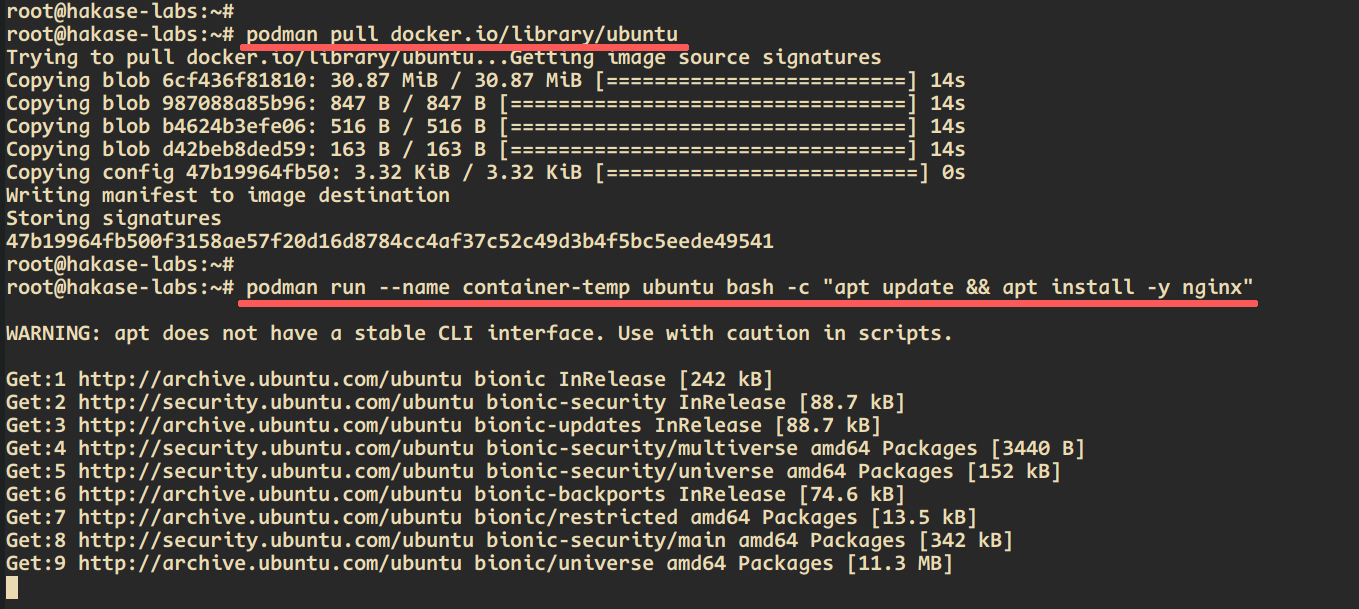
Download/pull the master image ‘ubuntu’.
podman pull docker.io/library/ubuntu
Now run the container based on image ubuntu. And inside the container, run the ‘bash’ command that will update repositories and install the nginx package.
podman run --name container-temp ubuntu bash -c "apt update && apt install -y nginx"
Wait for nginx installation inside the container.
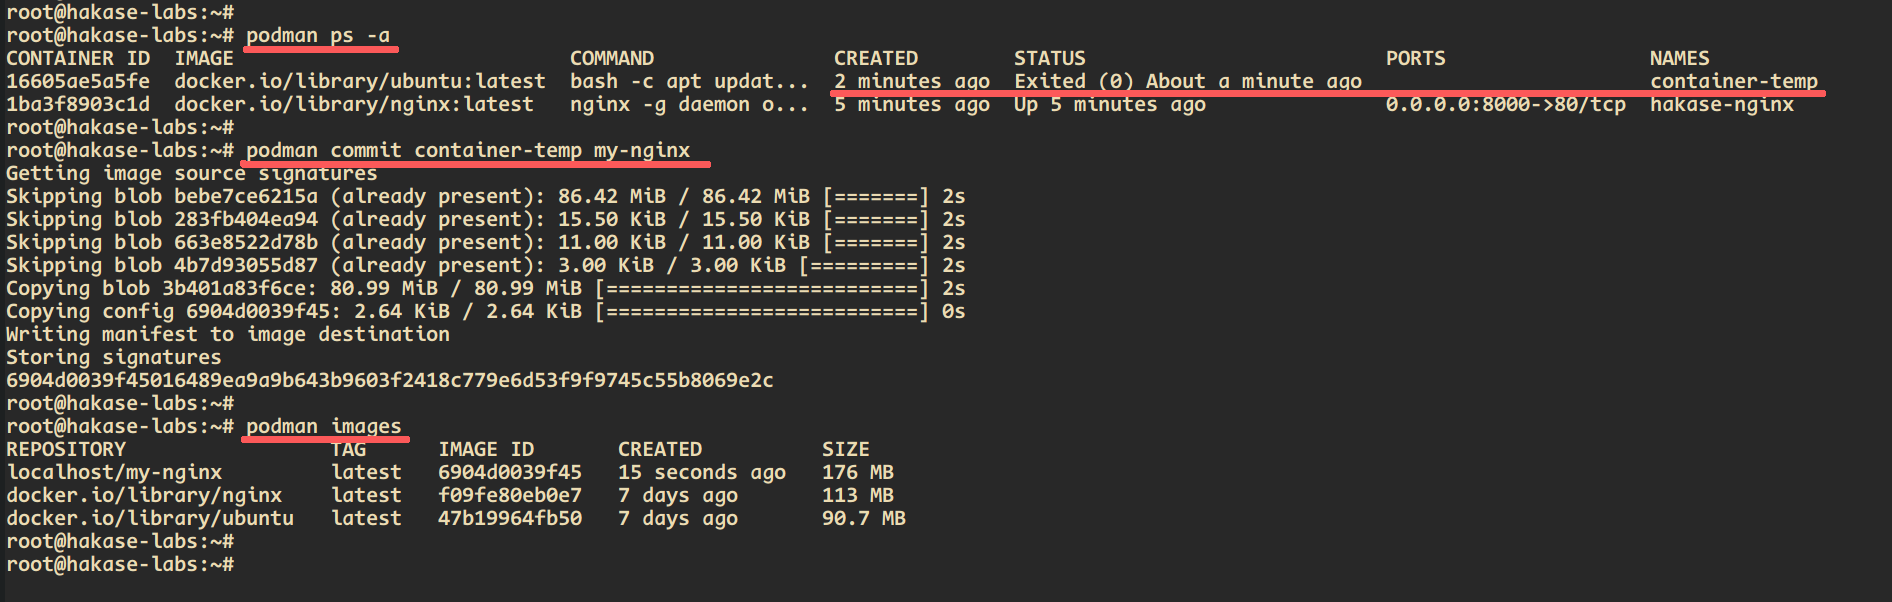
Once it’s complete, create a new custom image based on the ‘container-temp’ using the following command.
podman commit container-temp my-nginx
Next, check available images on the system.
podman images
And you will get a new image called ‘my-nginx’ on the list.
If you want to run the container based on the ‘my-nginx’ image, run the following command.
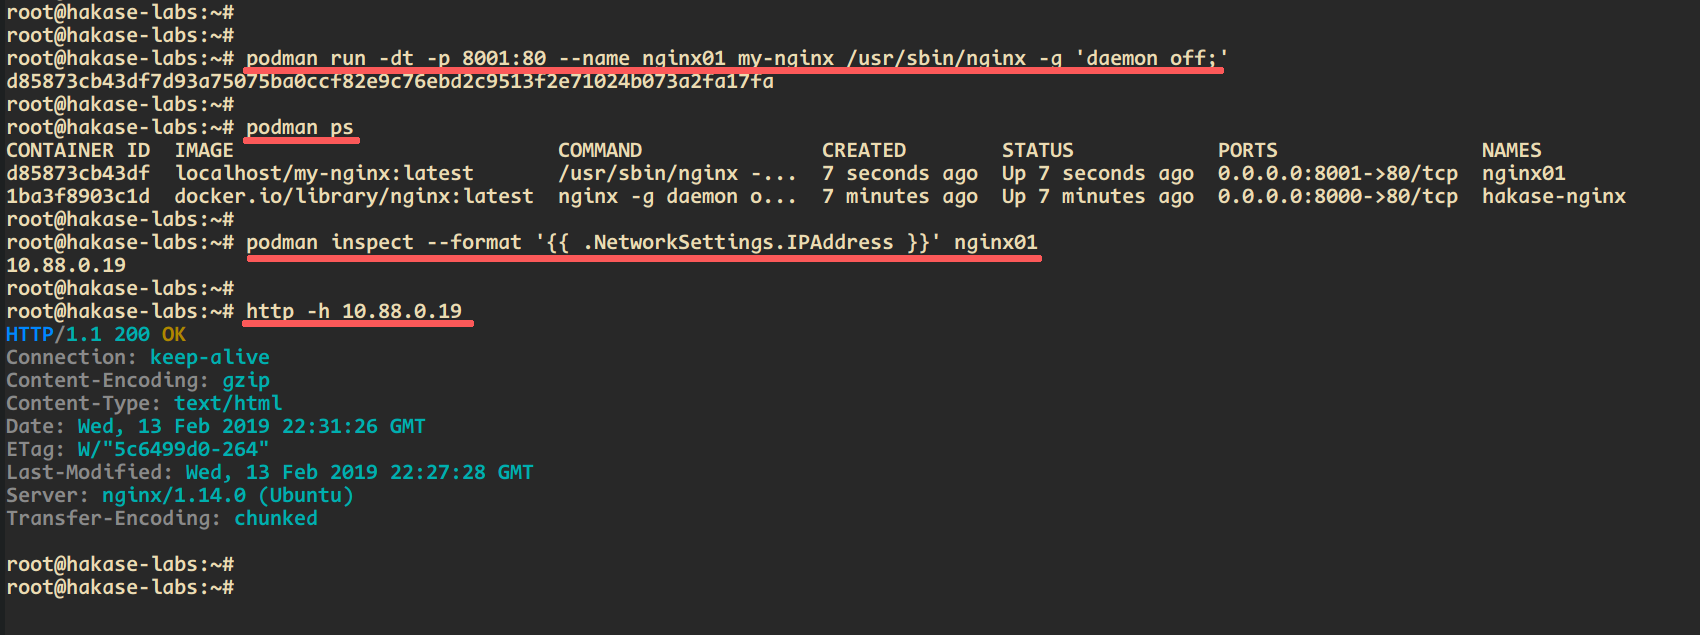
podman run -dt -p 8001:80 --name nginx01 my-nginx /usr/sbin/nginx -g 'daemon off;'
Now check the running container and check its IP address.
podman ps
podman inspect --format '{{ .NetworkSettings.IPAddress }}' nginx01
And you will be shown the ‘nginx01’ container is up and running. After that, access the HTTP port on ‘nginx01’ container.
http -p h 10.88.0.19
as a result, you will get the HTTP header response as below.
6. Create Custom images with Dockerfile
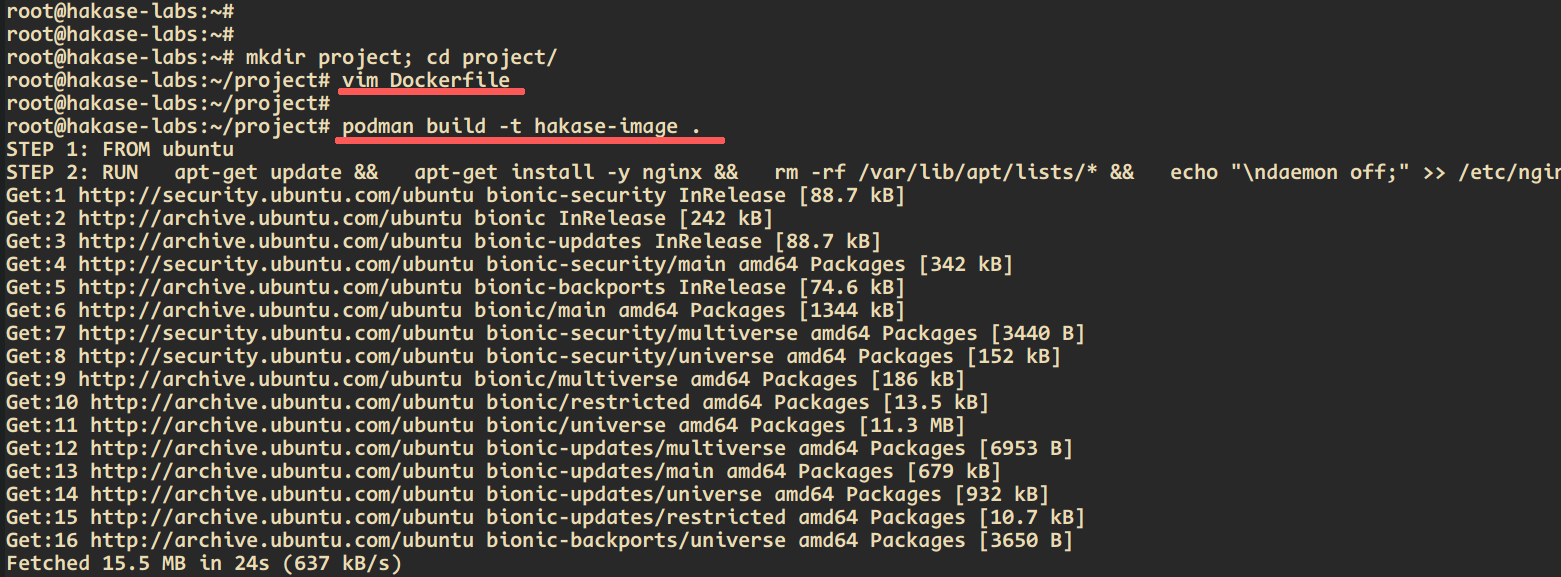
Now we’re going to create a new custom container image using the Dockerfile.
Create a new project directory and create a new ‘Dockerfile’ inside.
mkdir project; cd project/
vim Dockerfile
Paste the following configuration.
FROM ubuntu# Install Nginx
RUN
  apt-get update &&
  apt-get install -y nginx &&
  rm -rf /var/lib/apt/lists/* &&
  echo "ndaemon off;" >> /etc/nginx/nginx.conf &&
chown -R www-data:www-data /var/lib/nginx# Define mountable directories.
VOLUME ["https://www.howtoforge.com/etc/nginx/sites-enabled", "https://www.howtoforge.com/etc/nginx/certs", "https://www.howtoforge.com/etc/nginx/conf.d", "https://www.howtoforge.com/var/log/nginx", "https://www.howtoforge.com/var/www/html"]# Define the working directory.
WORKDIR /etc/nginx# Define default command.
CMD ["nginx"]# Expose ports.
EXPOSE 80
EXPOSE 443
Save and close.
Now run the podman below to build a new custom image using the Dockerfile.
podman build -t hakase-image .
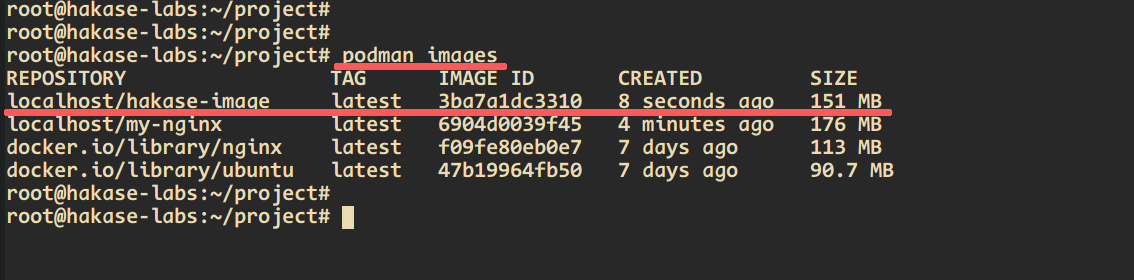
Once it’s complete, check the new image on the machine.
podman images
And you will get the ‘hakase-image’.
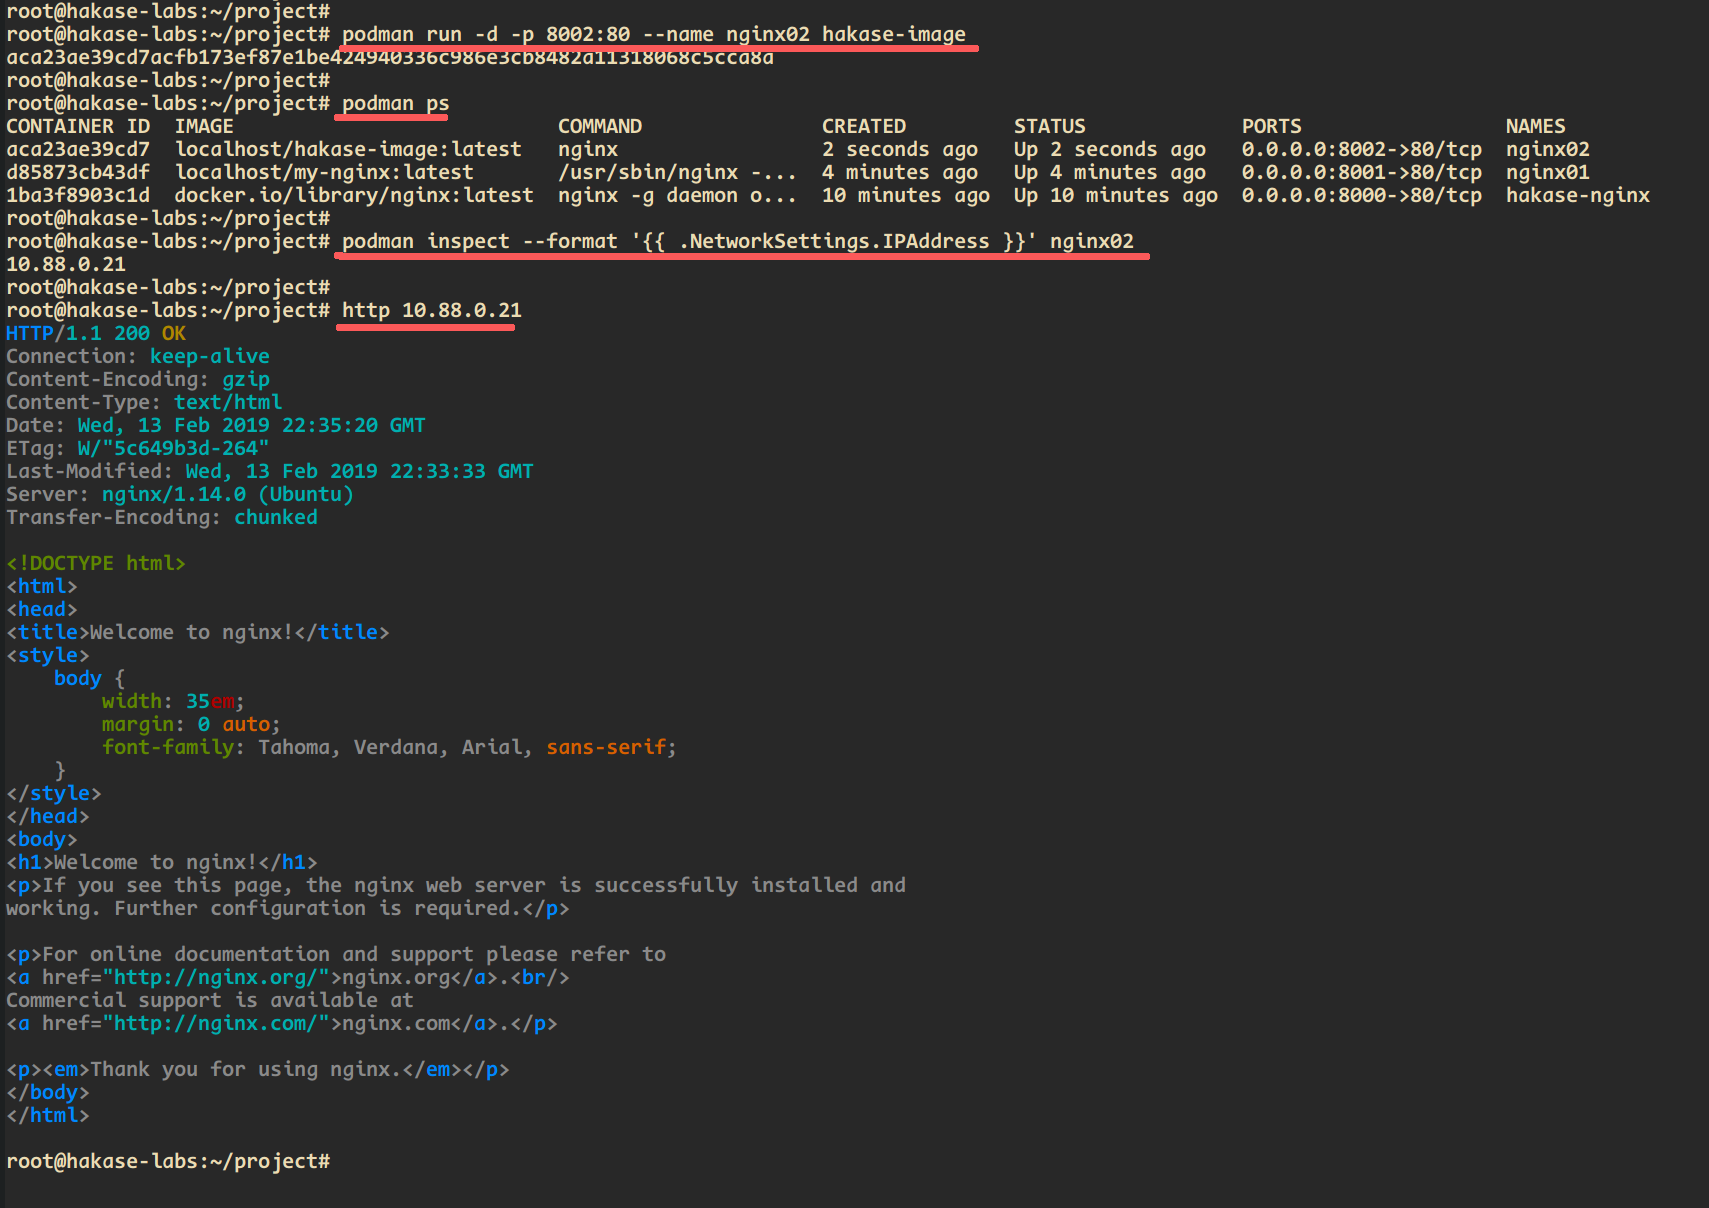
Next, create a new container based on the ‘hakase-image’ by running the following command.
podman run -d -p 8002:80 --name nginx02 hakase-image
After that, check the ‘nginx02’ container and its IP address.
podman ps
podman inspect --format '{{ .NetworkSettings.IPAddress }}' nginx02
Make sure the ‘nginx02’ container is up and running.
Now check the container using httpie tool.
http 10.88.0.21
And you will be shown the default Nginx page and its HTTP header.
Finally, now you can manage containers, images, and volume using Podman. And you can create new custom images for your application using the Dockerfile.


