Azure Virtual Machine (VM) is one of the types of on-demand, scalable computing resources. It gives us the flexibility of virtualization. We do not need to buy and maintain the physical hardware, we just need to take care of the machine itself. We can easily and quickly create a virtual machine with specific configurations as per our needs. The size of the VM that we use is determined by the workload that we want to run. We can connect Virtual machines in an Azure virtual network easily to our organization’s network.

Azure provides many operating systems images that can be used to create Virtual Machines.

The Virtual Machine can have a public IP address assigned to it to access it remotely. The Virtual Machine needs to be created in the Virtual Network in Azure. To create a VM, we need to select a location from the list. 

With Azure Virtual Machine we need to pay for compute capacity, with no long-term commitment or upfront payments.

Pre-requisites

  1. Azure Account (Create if you don’t have one). 

What will we do?

  1. Login to Azure.
  2. Create a Virtual Machine.
  3. Connect to the Virtual Machine
  4. Delete the Virtual Machine 

Login to Azure

Click here to go Azure portal and click on Sign in.

<img alt="Login to Azure" data-ezsrc="https://kirelos.com/wp-content/uploads/2022/01/echo/screenshot_2020-06-04_at_104507_pm.png61eaac74aa027.jpg" ezimgfmt="rs rscb5 src ng ngcb5" height="468" loading="lazy" src="data:image/svg xml,” width=”750″>

Use your credentials to log in to the account.

<img alt="Sign-in" data-ezsrc="https://kirelos.com/wp-content/uploads/2022/01/echo/screenshot_2020-06-04_at_104835_pm.png61eaac7548725.jpg" ezimgfmt="rs rscb5 src ng ngcb5" height="468" loading="lazy" src="data:image/svg xml,” width=”750″>

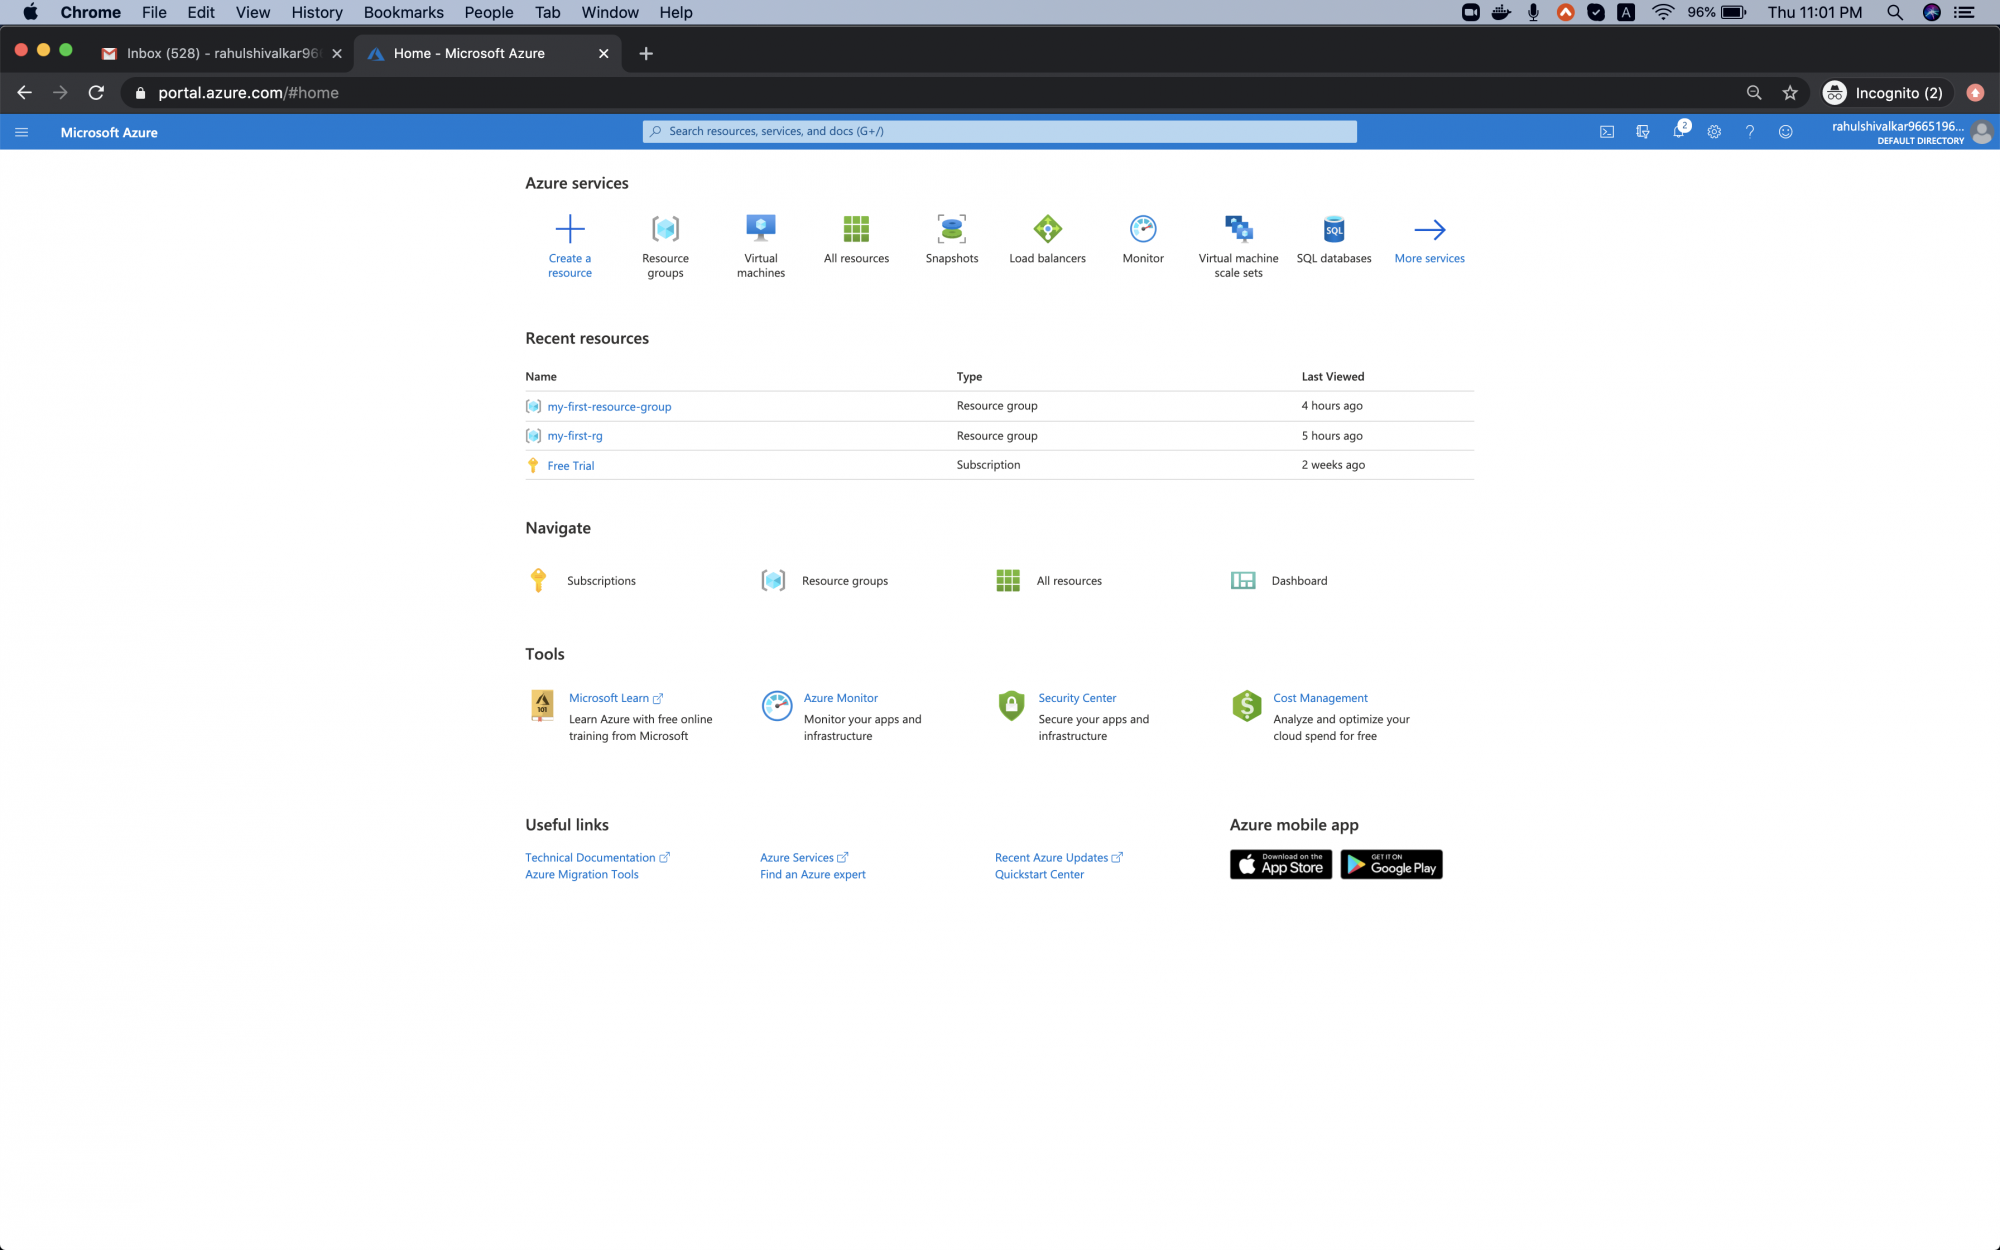
You will see the main page as follows once you successfully log in to your account. Click on 3 lines near “Microsoft Azure” in the upper left-hand corner of the Azure portal to show the portal menu.

<img alt="Microsoft Azure" data-ezsrc="https://kirelos.com/wp-content/uploads/2022/01/echo/screenshot_2020-06-04_at_110109_pm.png61eaac75943c0.jpg" ezimgfmt="rs rscb5 src ng ngcb5" height="468" loading="lazy" src="data:image/svg xml,” width=”750″>

Create a Virtual Machine in Azure Cloud

Click on “All services” in the left panel.

<img alt="All Services" data-ezsrc="https://kirelos.com/wp-content/uploads/2022/01/echo/screenshot_2020-06-04_at_110129_pm.png61eaac75dc021.jpg" ezimgfmt="rs rscb5 src ng ngcb5" height="468" loading="lazy" src="data:image/svg xml,” width=”750″>

You will see a screen with all the services, click on Compute – > Virtual Machine.

<img alt="Compute Services" data-ezsrc="https://kirelos.com/wp-content/uploads/2022/01/echo/screenshot_2020-06-05_at_120645_am.png61eaac763e1dd.jpg" ezimgfmt="rs rscb5 src ng ngcb5" height="468" loading="lazy" src="data:image/svg xml,” width=”750″>

Click on “Add” to create your first Virtual Machine.

<img alt="Add VM" data-ezsrc="https://kirelos.com/wp-content/uploads/2022/01/echo/screenshot_2020-06-05_at_120701_am.png61eaac7693b09.jpg" ezimgfmt="rs rscb5 src ng ngcb5" height="468" loading="lazy" src="data:image/svg xml,” width=”750″>

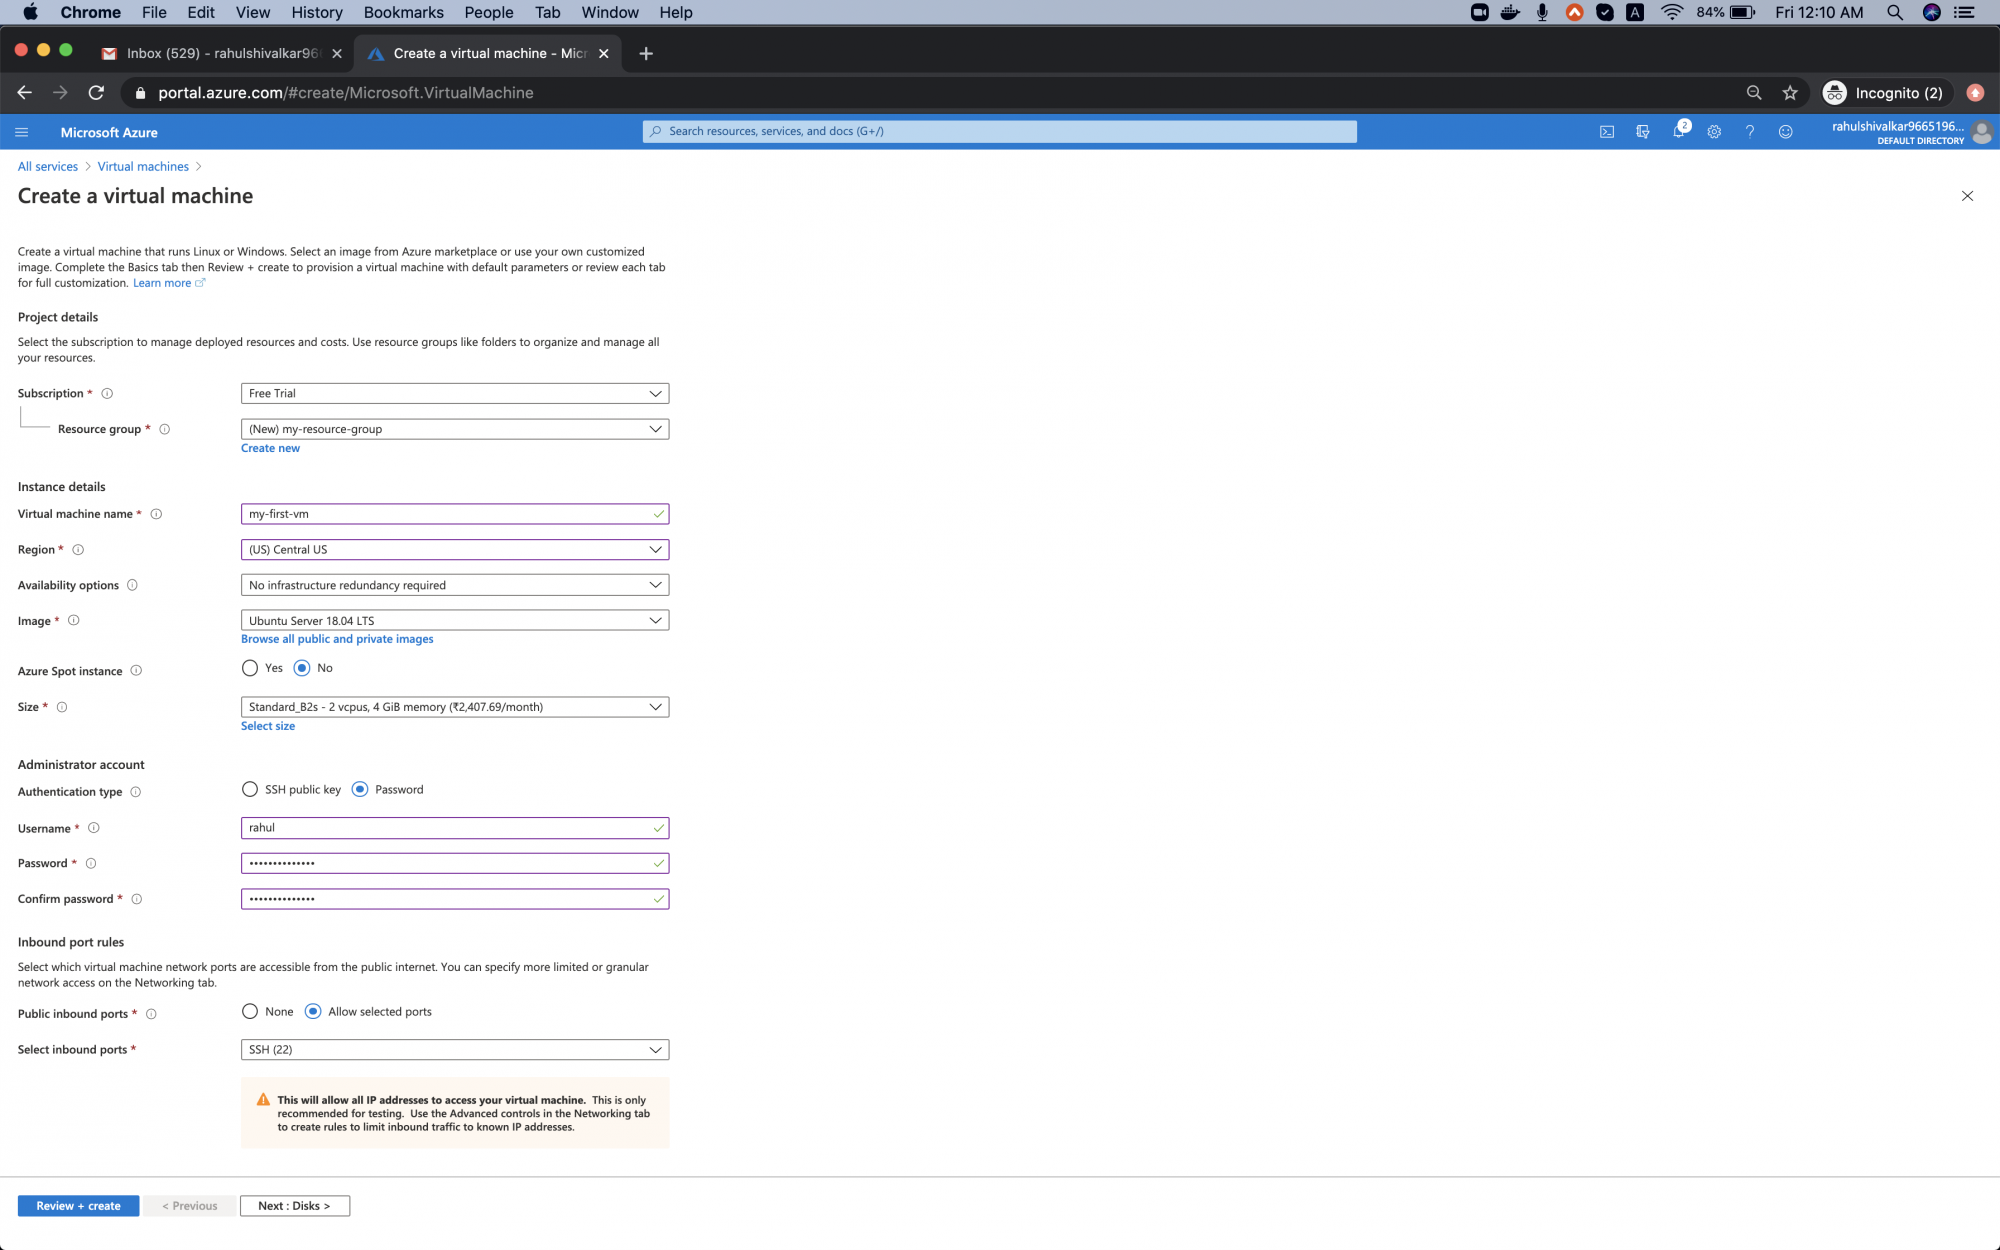
Here, for Resource Group click on create new, enter my-resource-group name and then select OK.

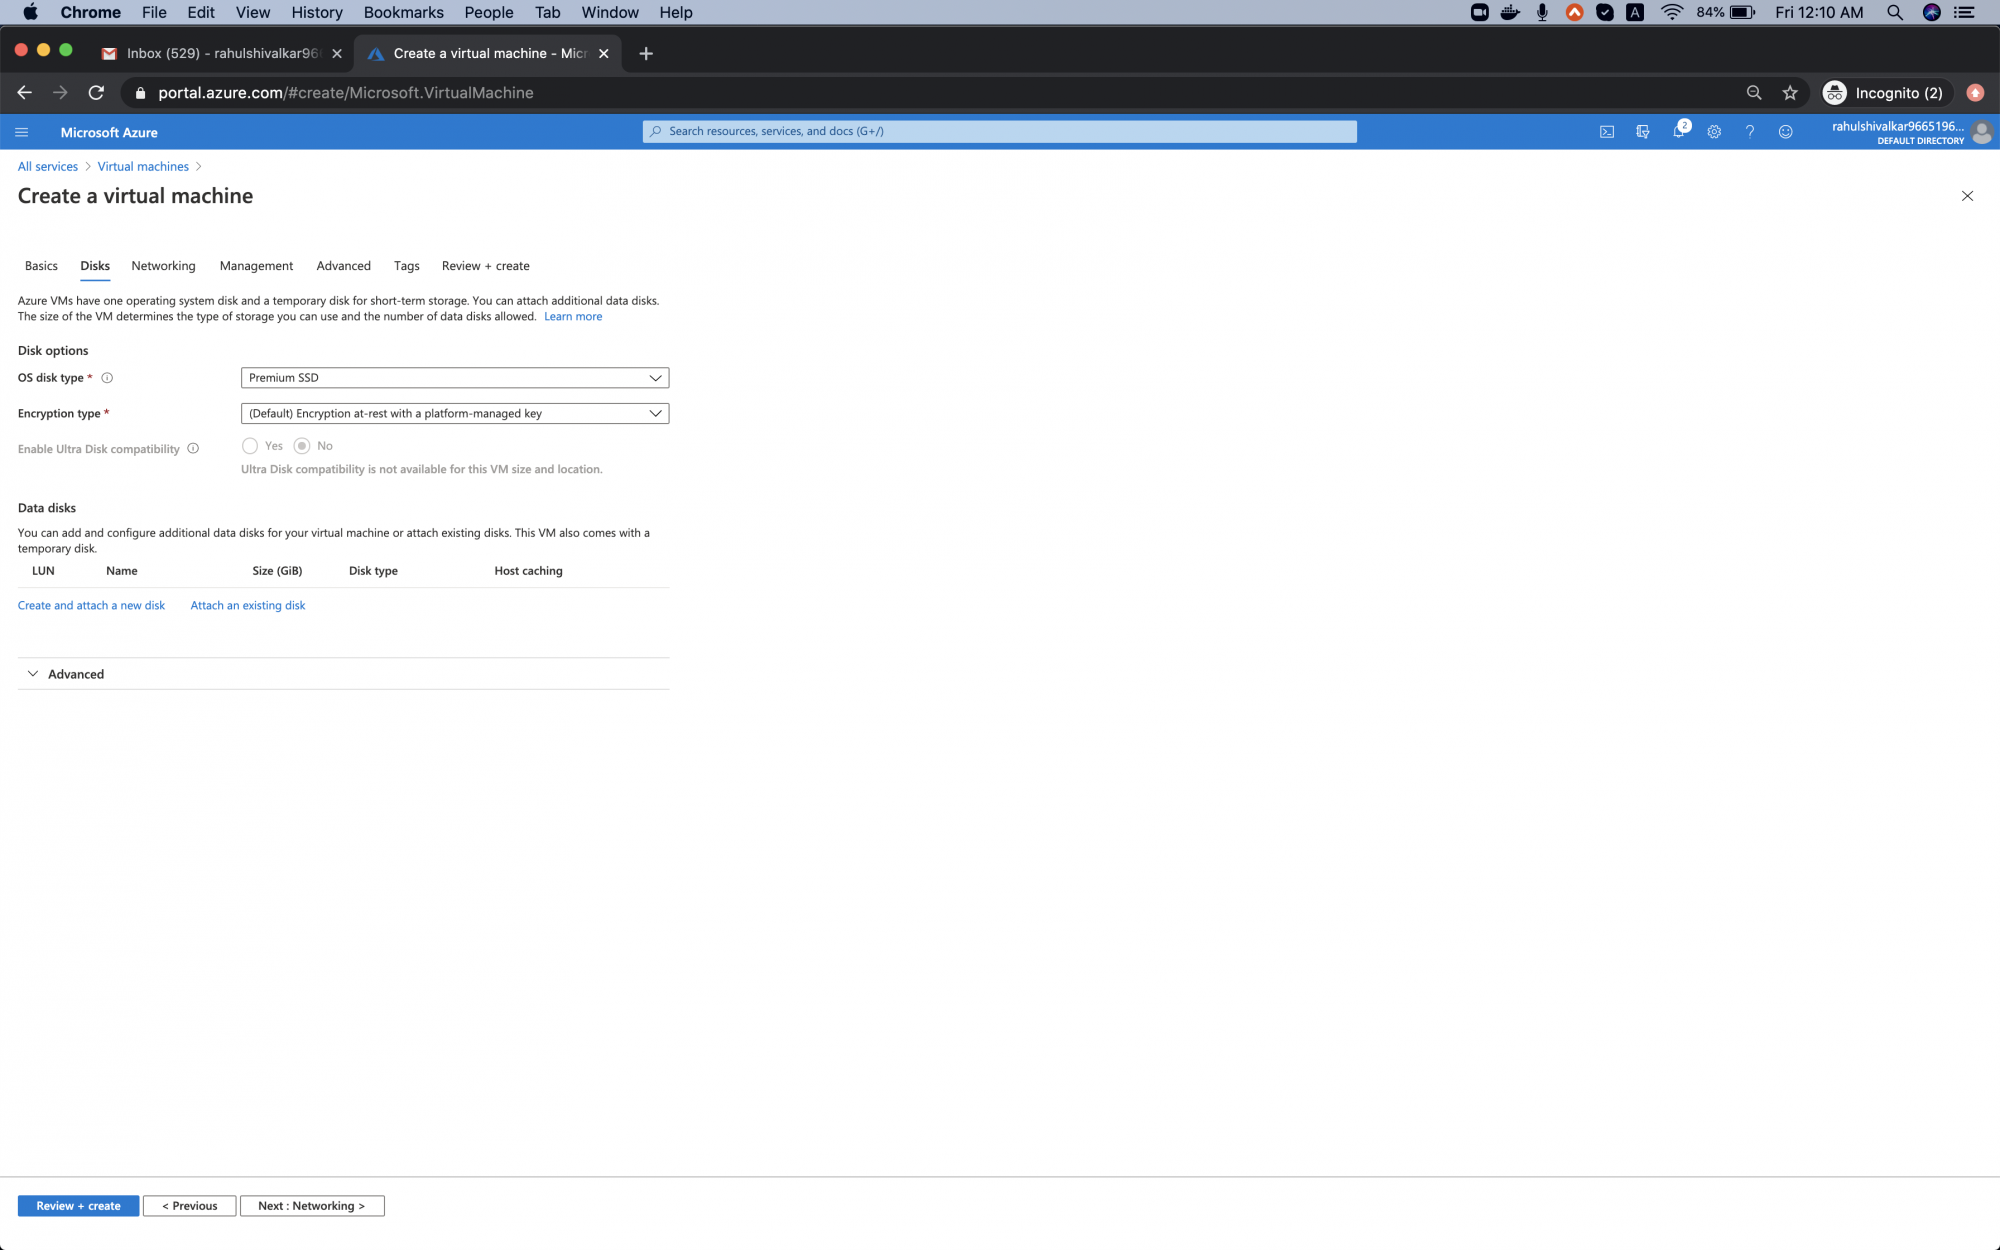
Name the virtual machine as “my-first-vm”, select the region “Central US”, Change the Size as required, add “Username” and “Password” which will be used to login to the Virtual Machine. Click on “Next: Disk”.

<img alt="Resource group" data-ezsrc="https://kirelos.com/wp-content/uploads/2022/01/echo/screenshot_2020-06-05_at_121006_am.png61eaac7719165.jpg" ezimgfmt="rs rscb5 src ng ngcb5" height="468" loading="lazy" src="data:image/svg xml,” width=”750″>

Keep this configuration unchanged and click on “Next: Networking”.

<img alt="Networking" data-ezsrc="https://kirelos.com/wp-content/uploads/2022/01/echo/screenshot_2020-06-05_at_121019_am.png61eaac77aa193.jpg" ezimgfmt="rs rscb5 src ng ngcb5" height="468" loading="lazy" src="data:image/svg xml,” width=”750″>

Here, the Virtual Network will be created by default for this Virtual Machine, if you already have your Virtual Network you can select it.

Keep the other configuration as is and click on “Next: Management”.

<img alt="Management" data-ezsrc="https://kirelos.com/wp-content/uploads/2022/01/echo/screenshot_2020-06-05_at_121033_am.png61eaac7832810.jpg" ezimgfmt="rs rscb5 src ng ngcb5" height="468" loading="lazy" src="data:image/svg xml,” width=”750″>

Proceed with the default configuration, click on “Next: Advanced”.

<img alt="Advanced VM settings" data-ezsrc="https://kirelos.com/wp-content/uploads/2022/01/echo/screenshot_2020-06-05_at_121109_am.png61eaac7893c5d.jpg" ezimgfmt="rs rscb5 src ng ngcb5" height="468" loading="lazy" src="data:image/svg xml,” width=”750″>

Click on “Next: Tags” to proceed with the default configuration.

<img alt="Default configuration" data-ezsrc="https://kirelos.com/wp-content/uploads/2022/01/echo/screenshot_2020-06-05_at_121144_am.png61eaac7930d24.jpg" ezimgfmt="rs rscb5 src ng ngcb5" height="468" loading="lazy" src="data:image/svg xml,” width=”750″>

Add “environment: test” tag here.  You can add more tags of your choice. Click on “Next: Review create”

<img alt="Review settings and create Virtual machine" data-ezsrc="https://kirelos.com/wp-content/uploads/2022/01/echo/screenshot_2020-06-05_at_121156_am.png61eaac79984fd.jpg" ezimgfmt="rs rscb5 src ng ngcb5" height="468" loading="lazy" src="data:image/svg xml,” width=”750″>

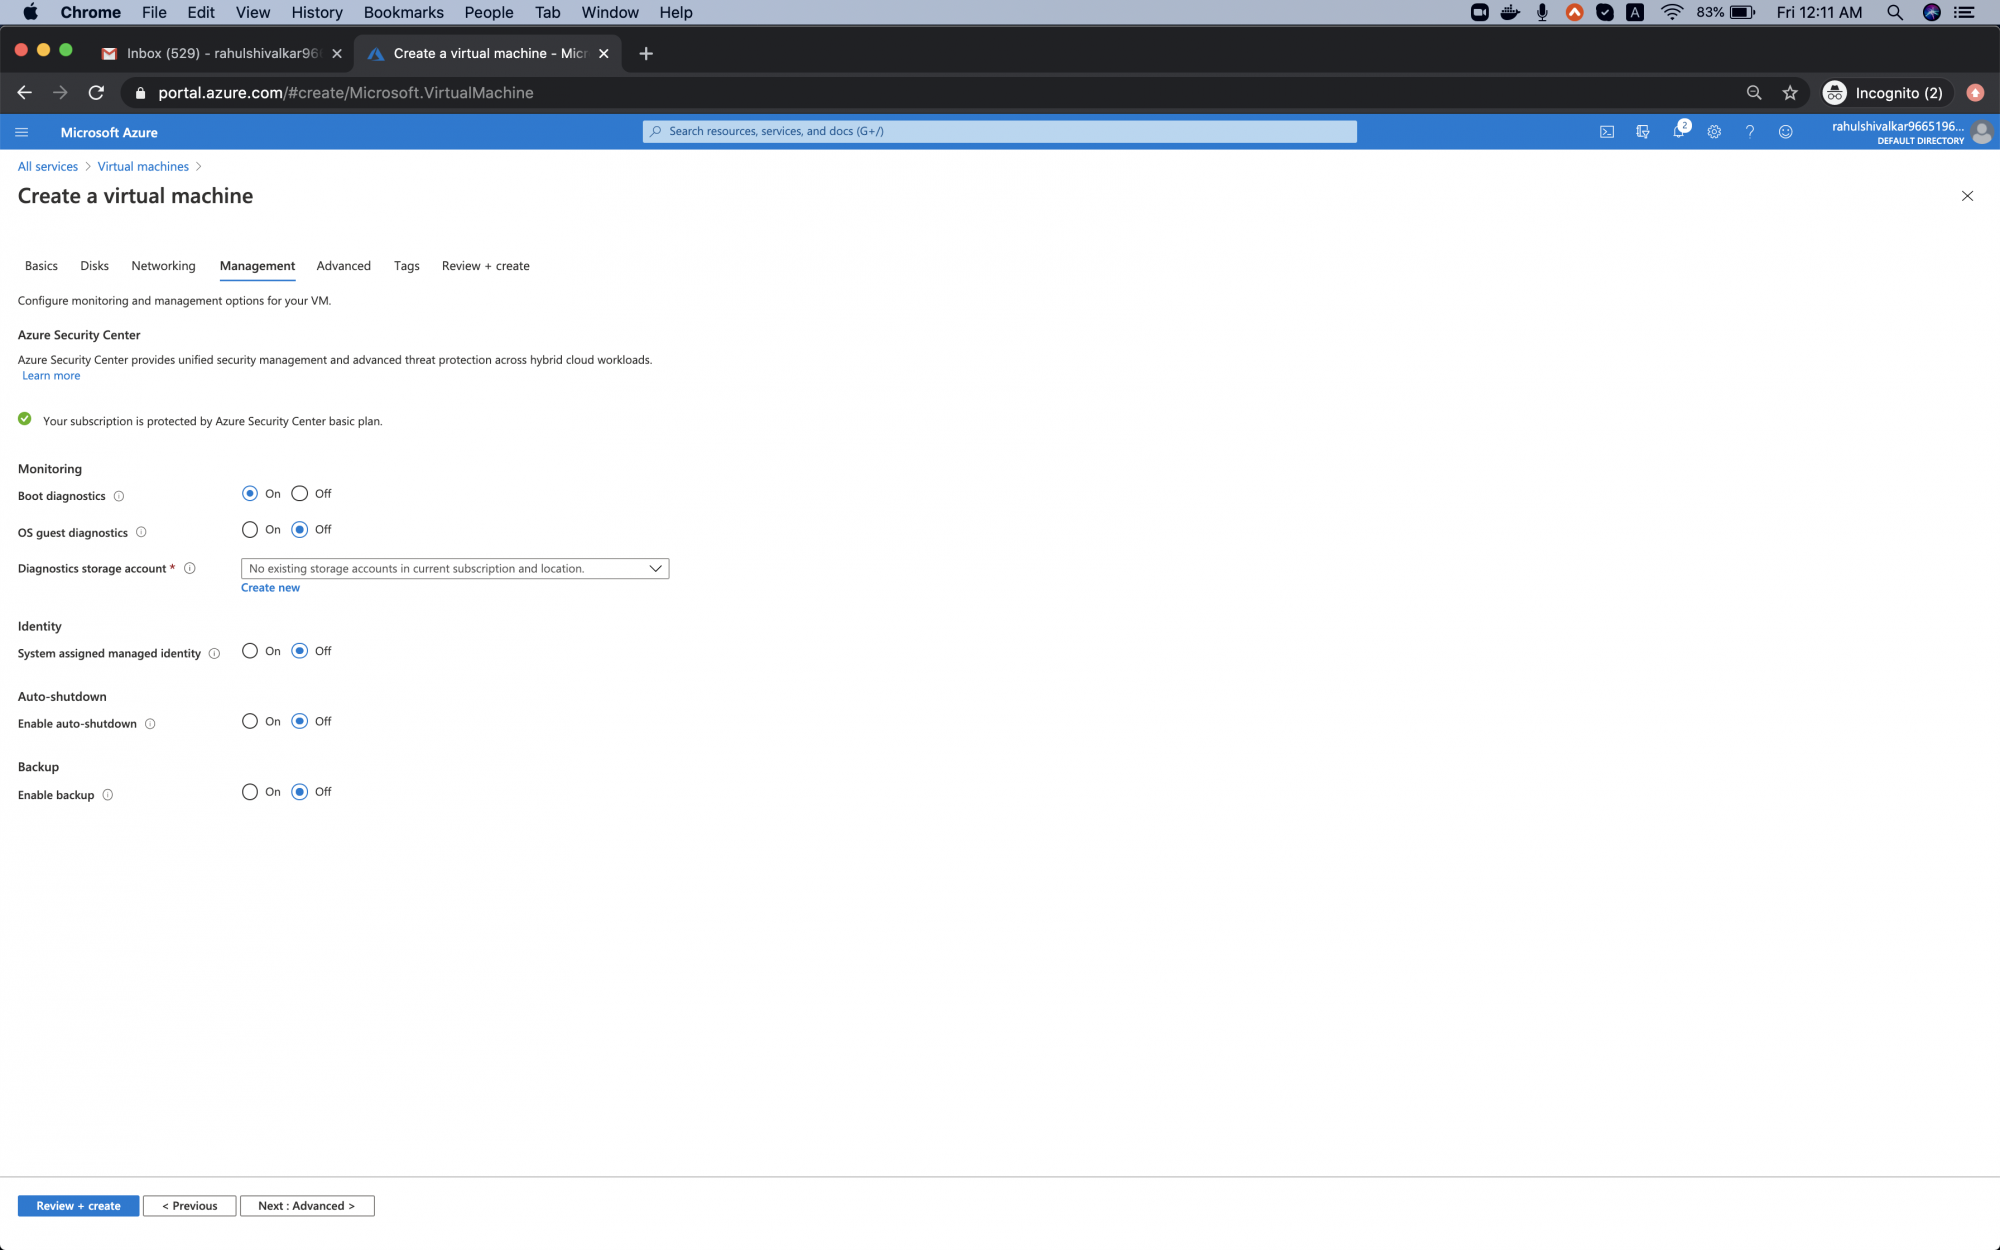
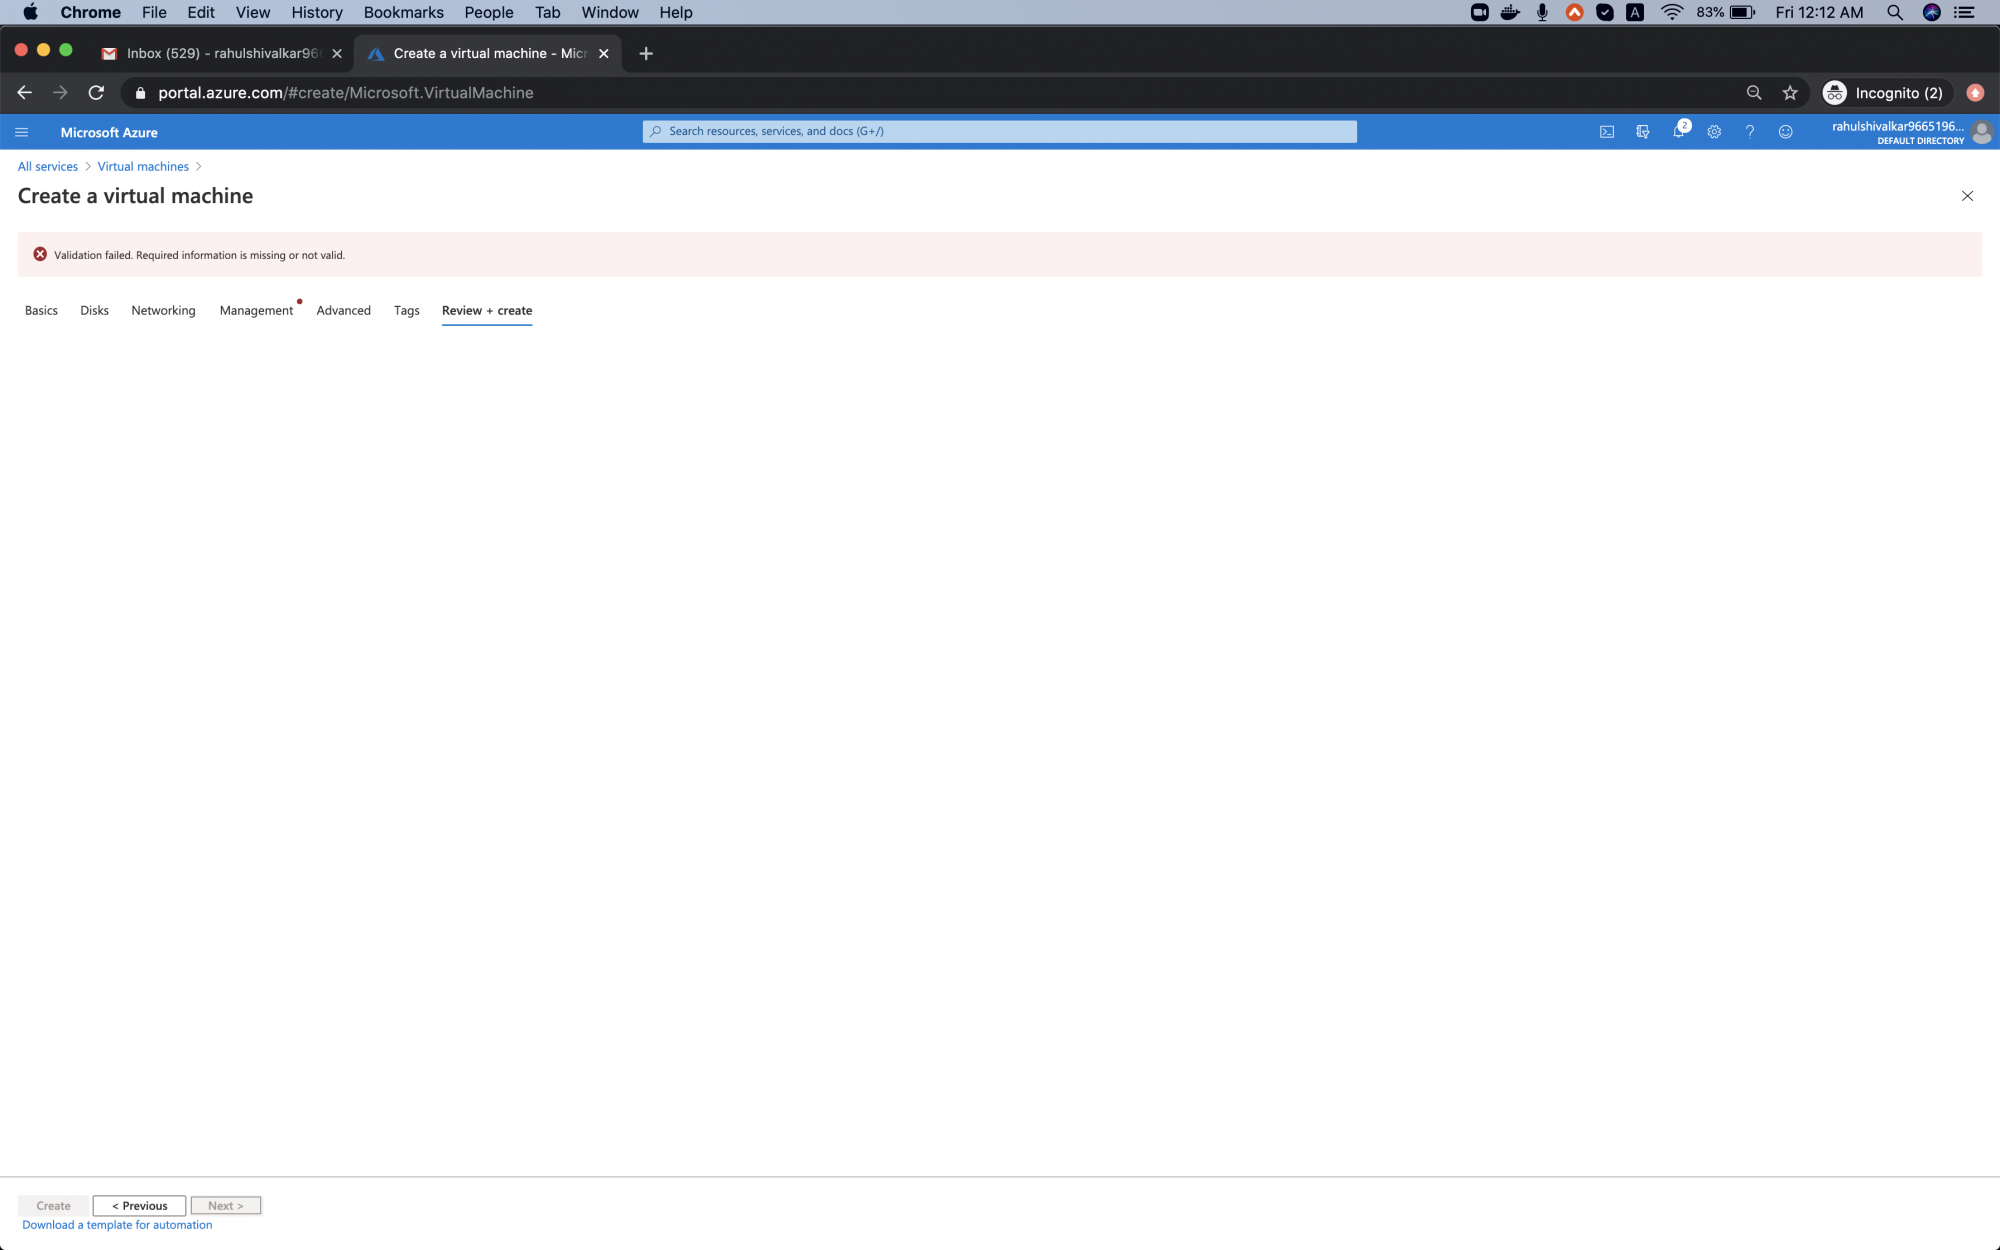
You will see an error as “Validation failed. Required information is missing or not valid.” To fix this error, go to the “Management” tab with a red-colored dot on it.

<img alt="VM Creation error" data-ezsrc="https://kirelos.com/wp-content/uploads/2022/01/echo/screenshot_2020-06-05_at_121222_am.png61eaac7a2691b.jpg" ezimgfmt="rs rscb5 src ng ngcb5" height="468" loading="lazy" src="data:image/svg xml,” width=”750″>

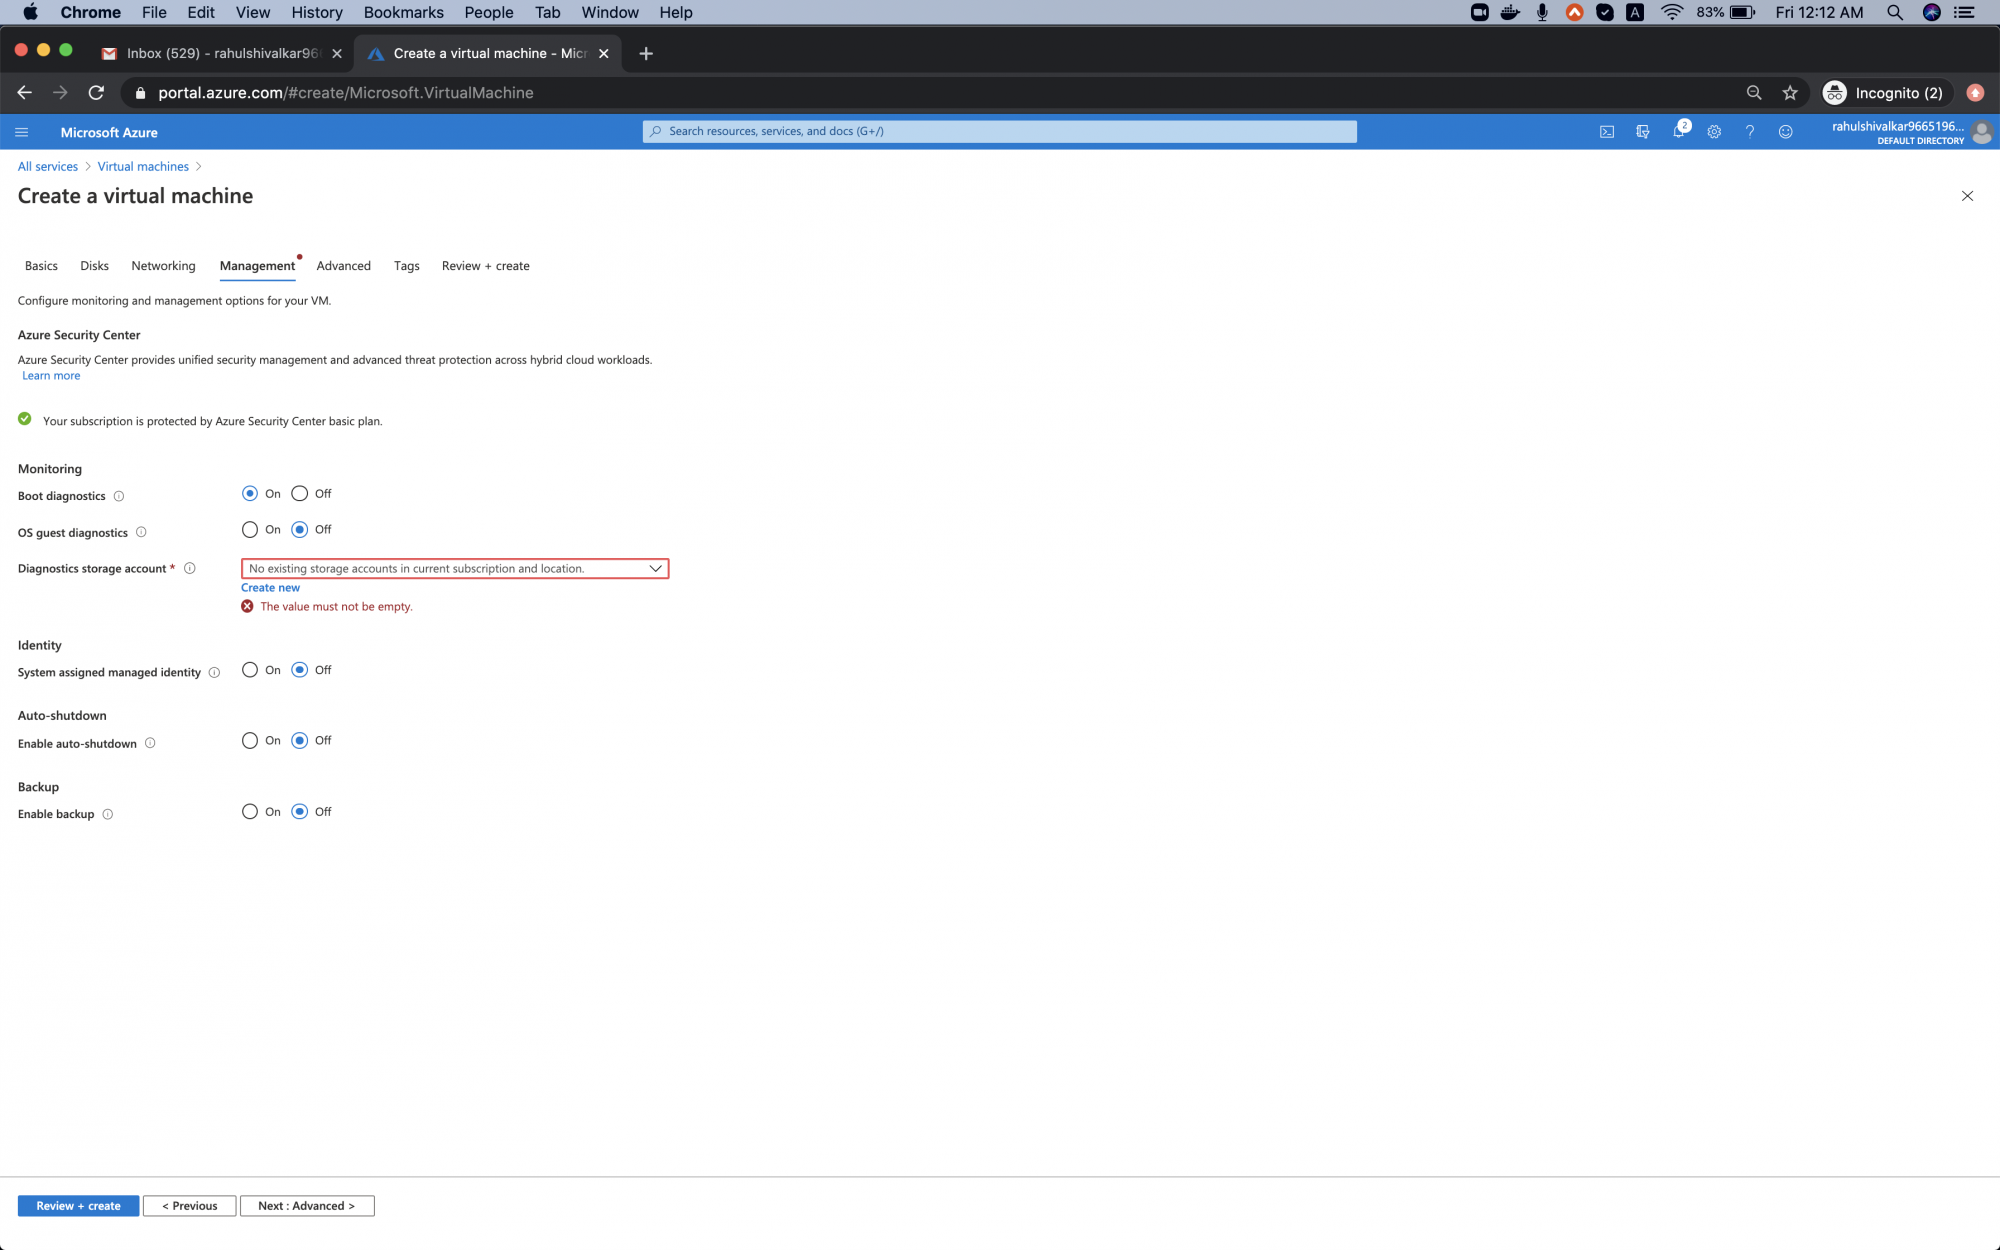
Here the error says that “No existing storage account in current subscription and location”.

The reason for this is:  We have enabled “” for which “Diagnostics storage account” is needed to Metrics are written so you can analyze them with your own tools.

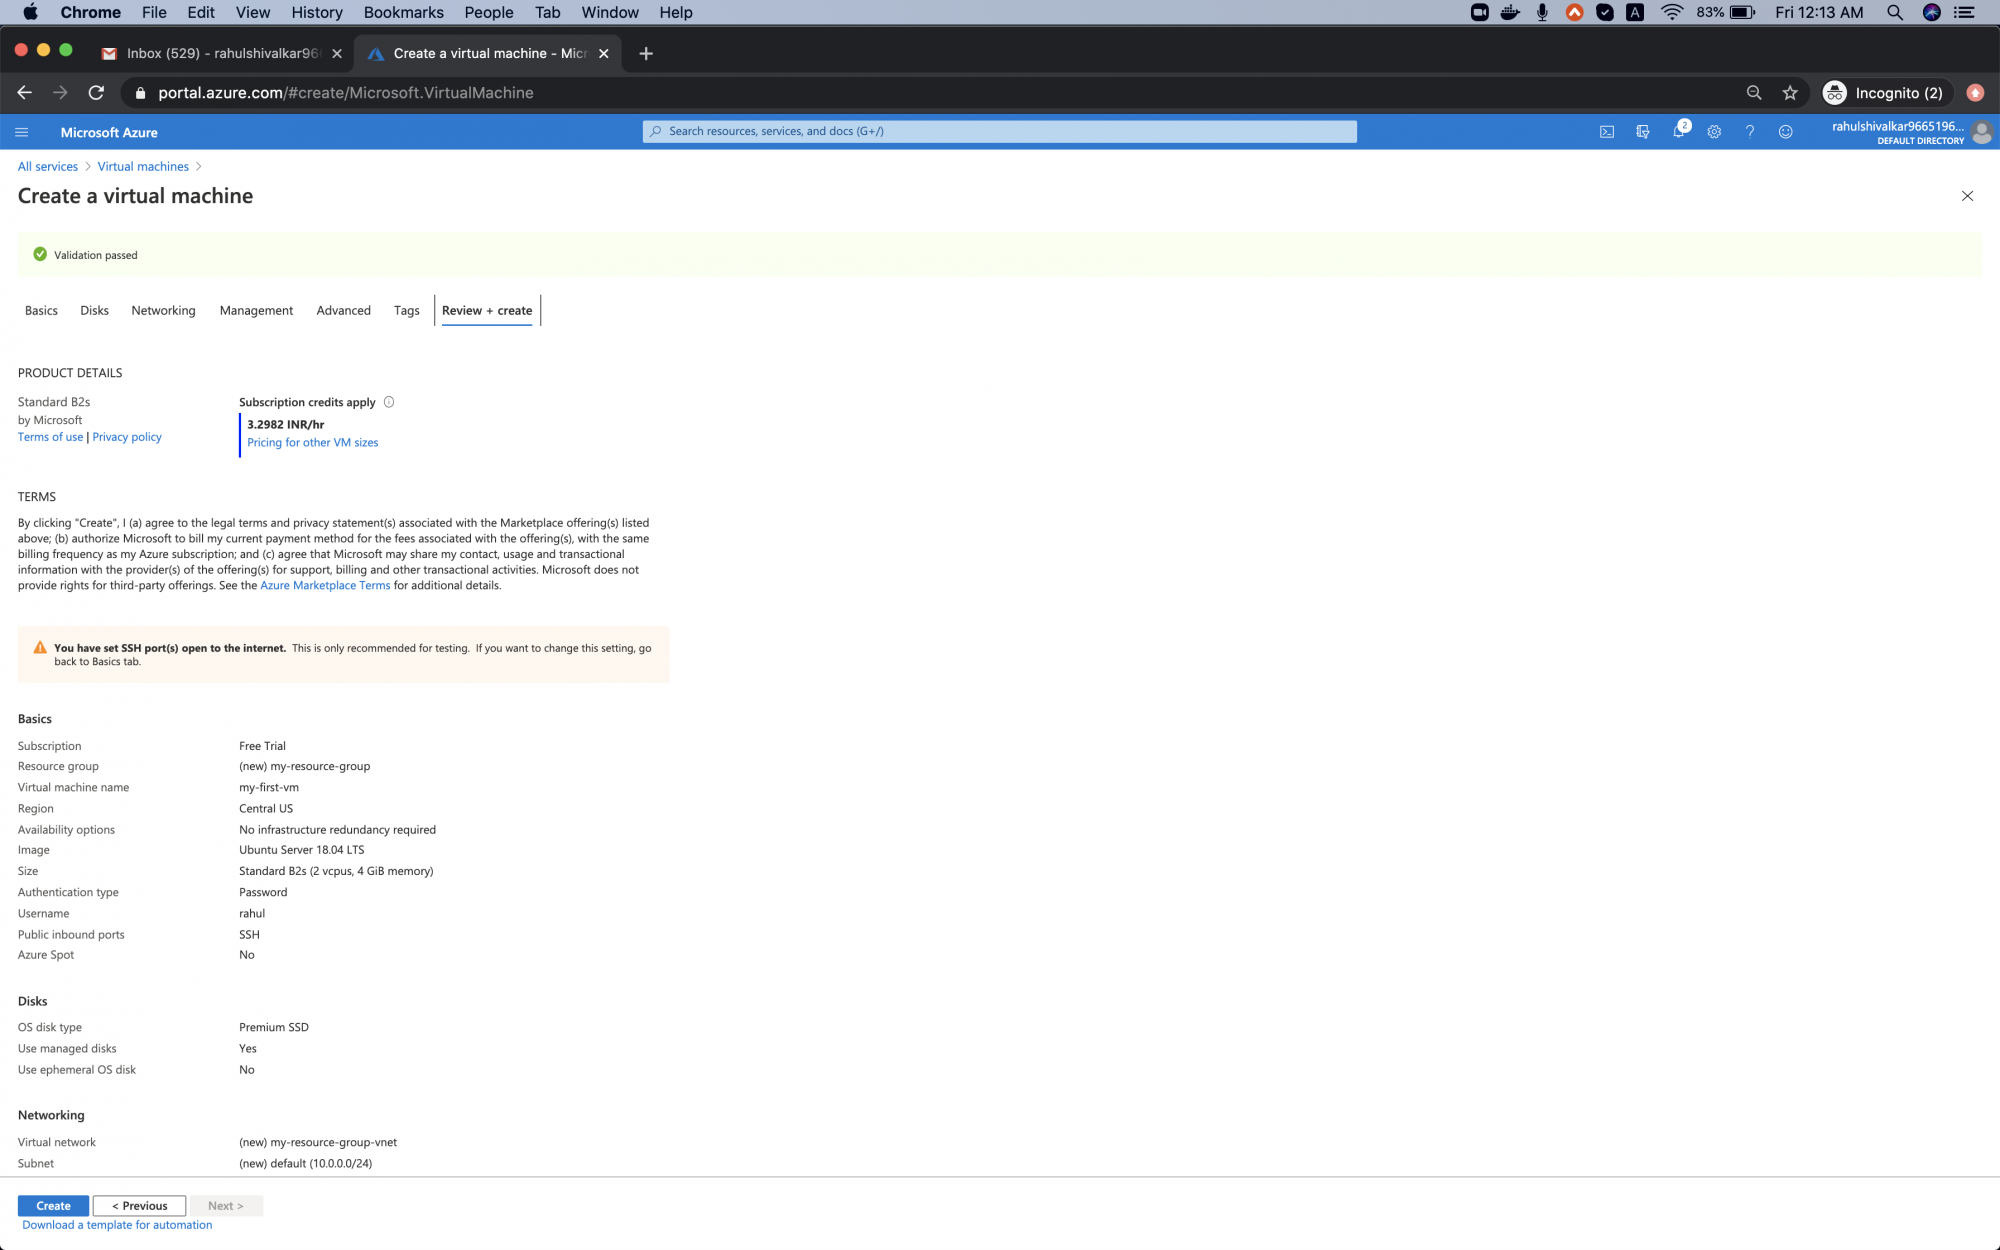
To get rid of this error for now “keep Boot diagnostics as off” and click on the “Review create” tab.

<img alt="Disable Boot diagnostics" data-ezsrc="https://kirelos.com/wp-content/uploads/2022/01/echo/screenshot_2020-06-05_at_121245_am.png61eaac7ab49ef.jpg" ezimgfmt="rs rscb5 src ng ngcb5" height="468" loading="lazy" src="data:image/svg xml,” width=”750″>

Now you can see the message “Validation passed”.

<img alt="Validation passed" data-ezsrc="https://kirelos.com/wp-content/uploads/2022/01/echo/screenshot_2020-06-05_at_121300_am.png61eaac7b222fd.jpg" ezimgfmt="rs rscb5 src ng ngcb5" height="468" loading="lazy" src="data:image/svg xml,” width=”750″>

Wait for some time and once the deployment is complete, click on “Go to resources”.

<img alt="Create Ubuntu VM in Azure" data-ezsrc="https://kirelos.com/wp-content/uploads/2022/01/echo/screenshot_2020-06-05_at_121419_am.png61eaac7ba8df8.jpg" ezimgfmt="rs rscb5 src ng ngcb5" height="468" loading="lazy" src="data:image/svg xml,” width=”750″>

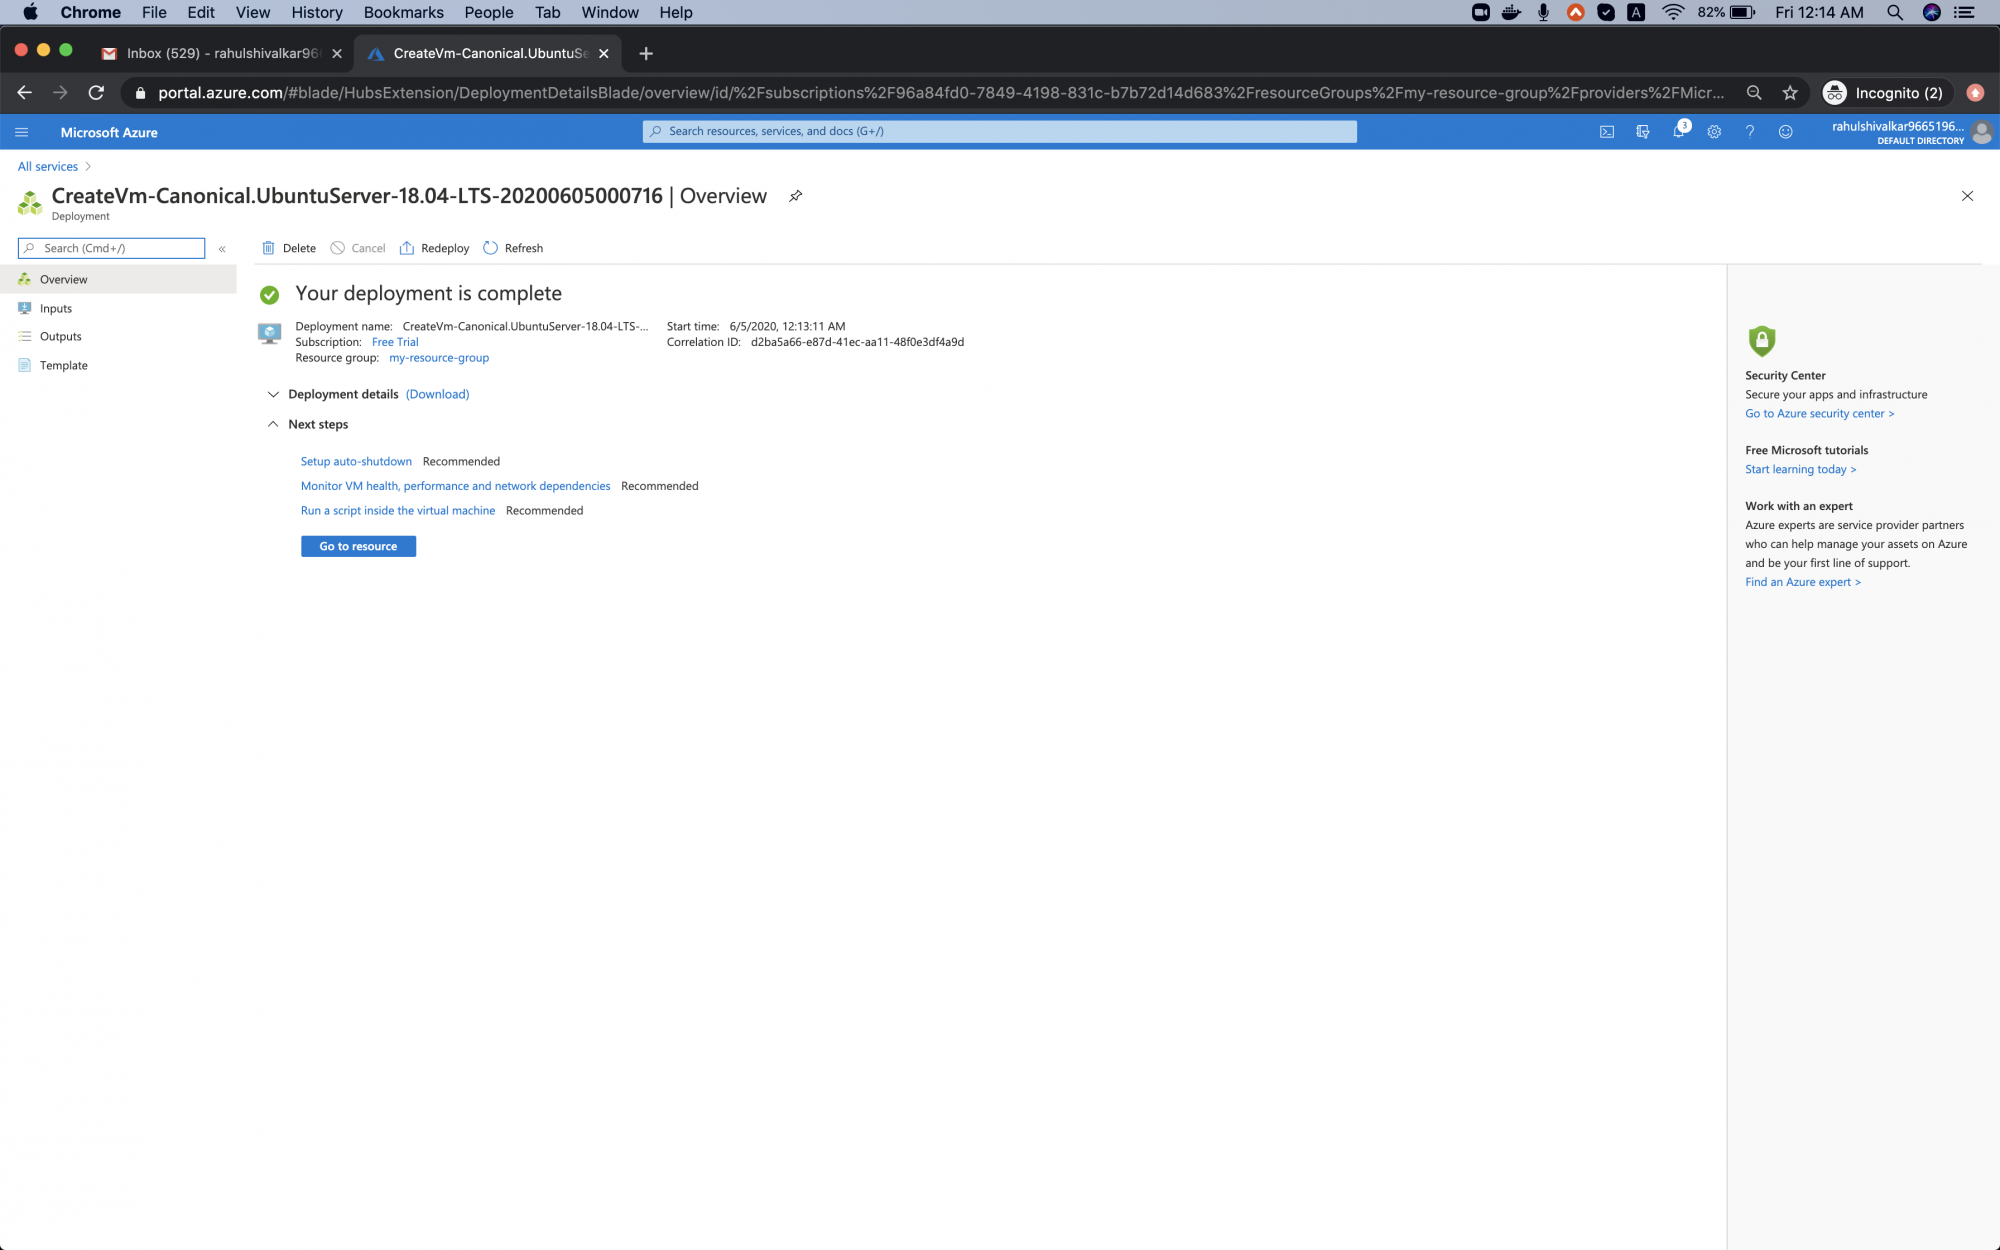
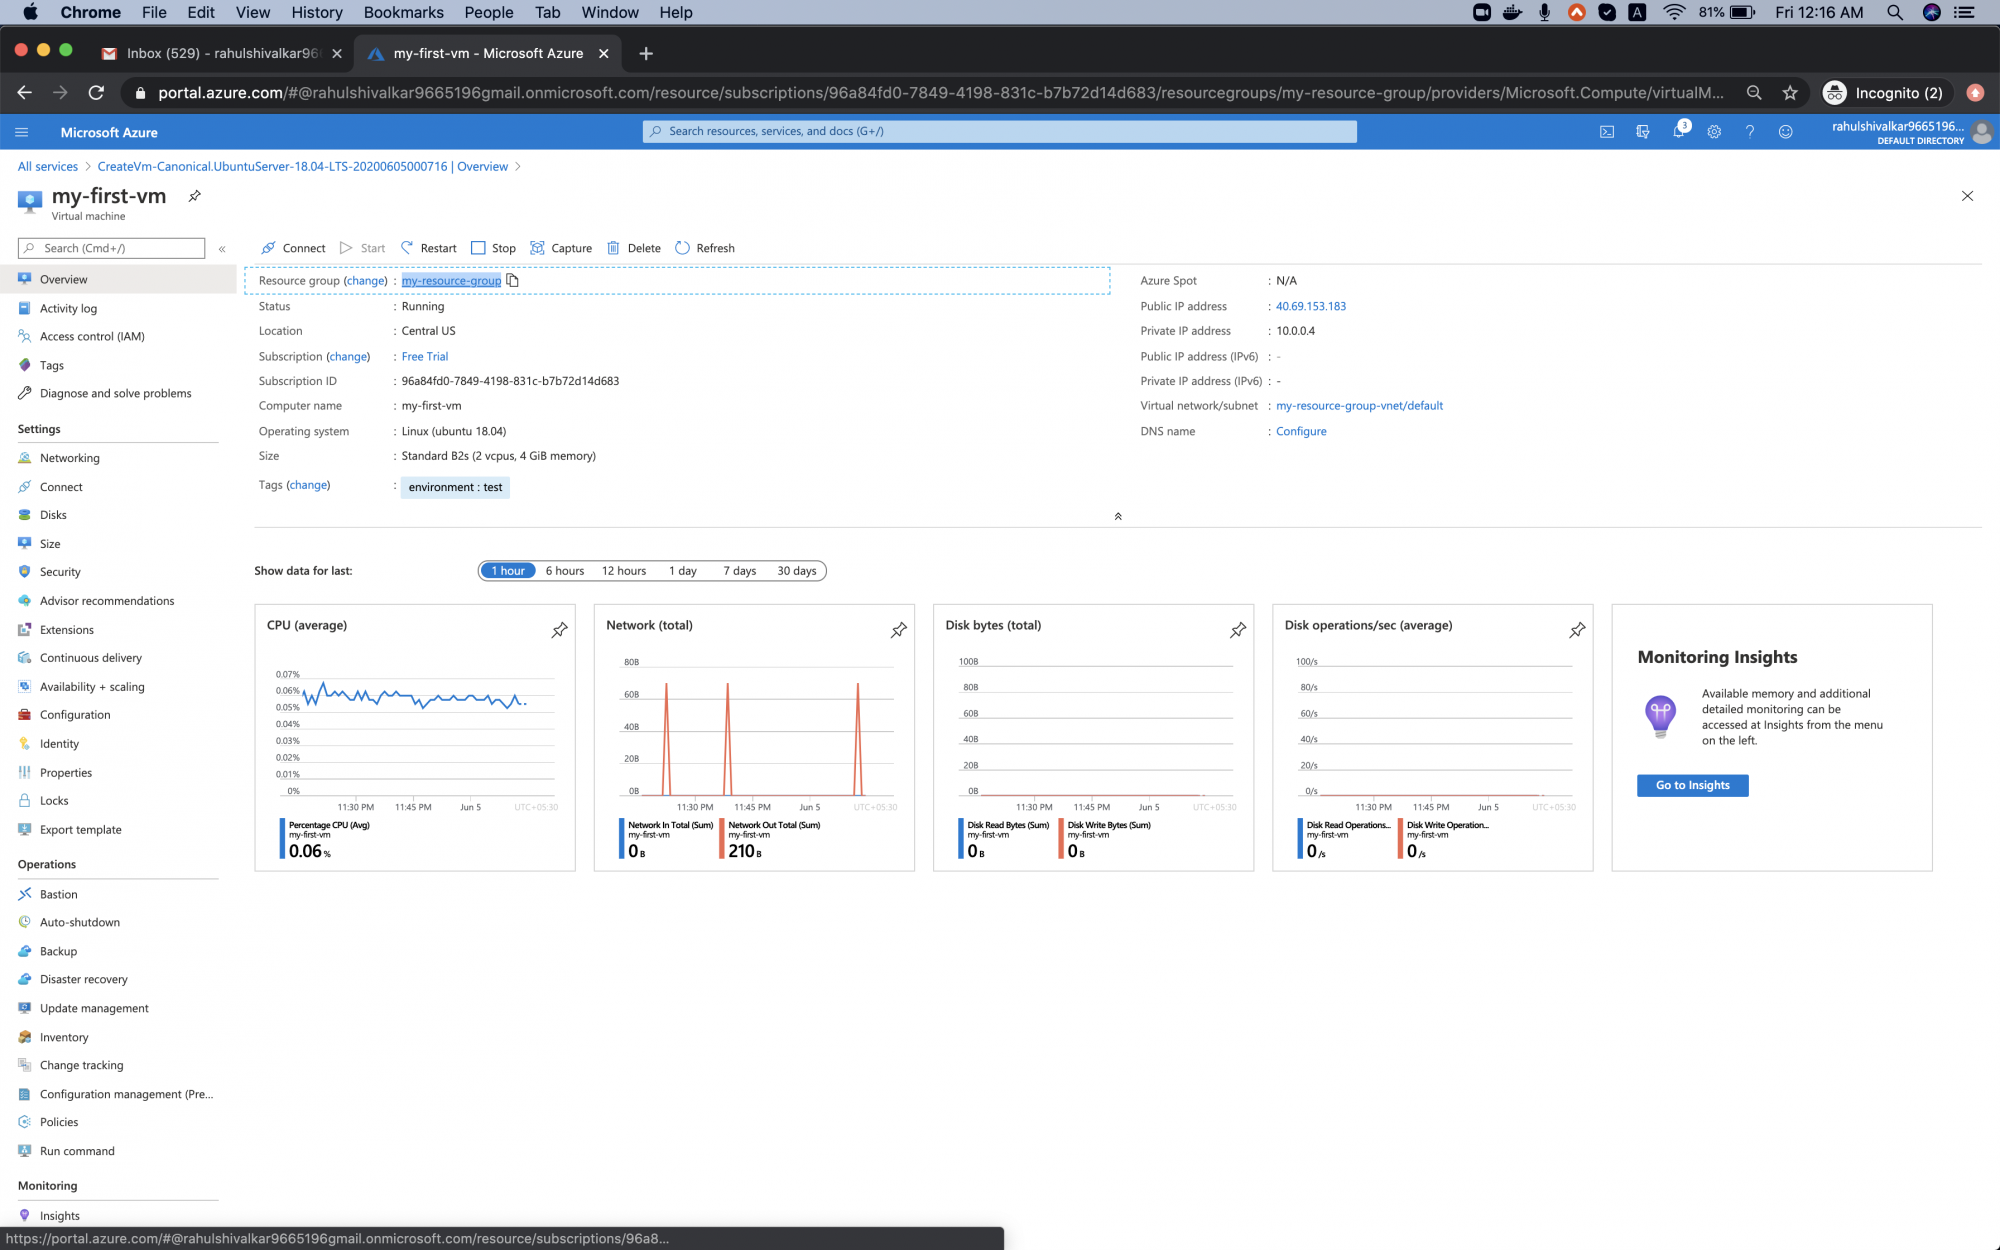
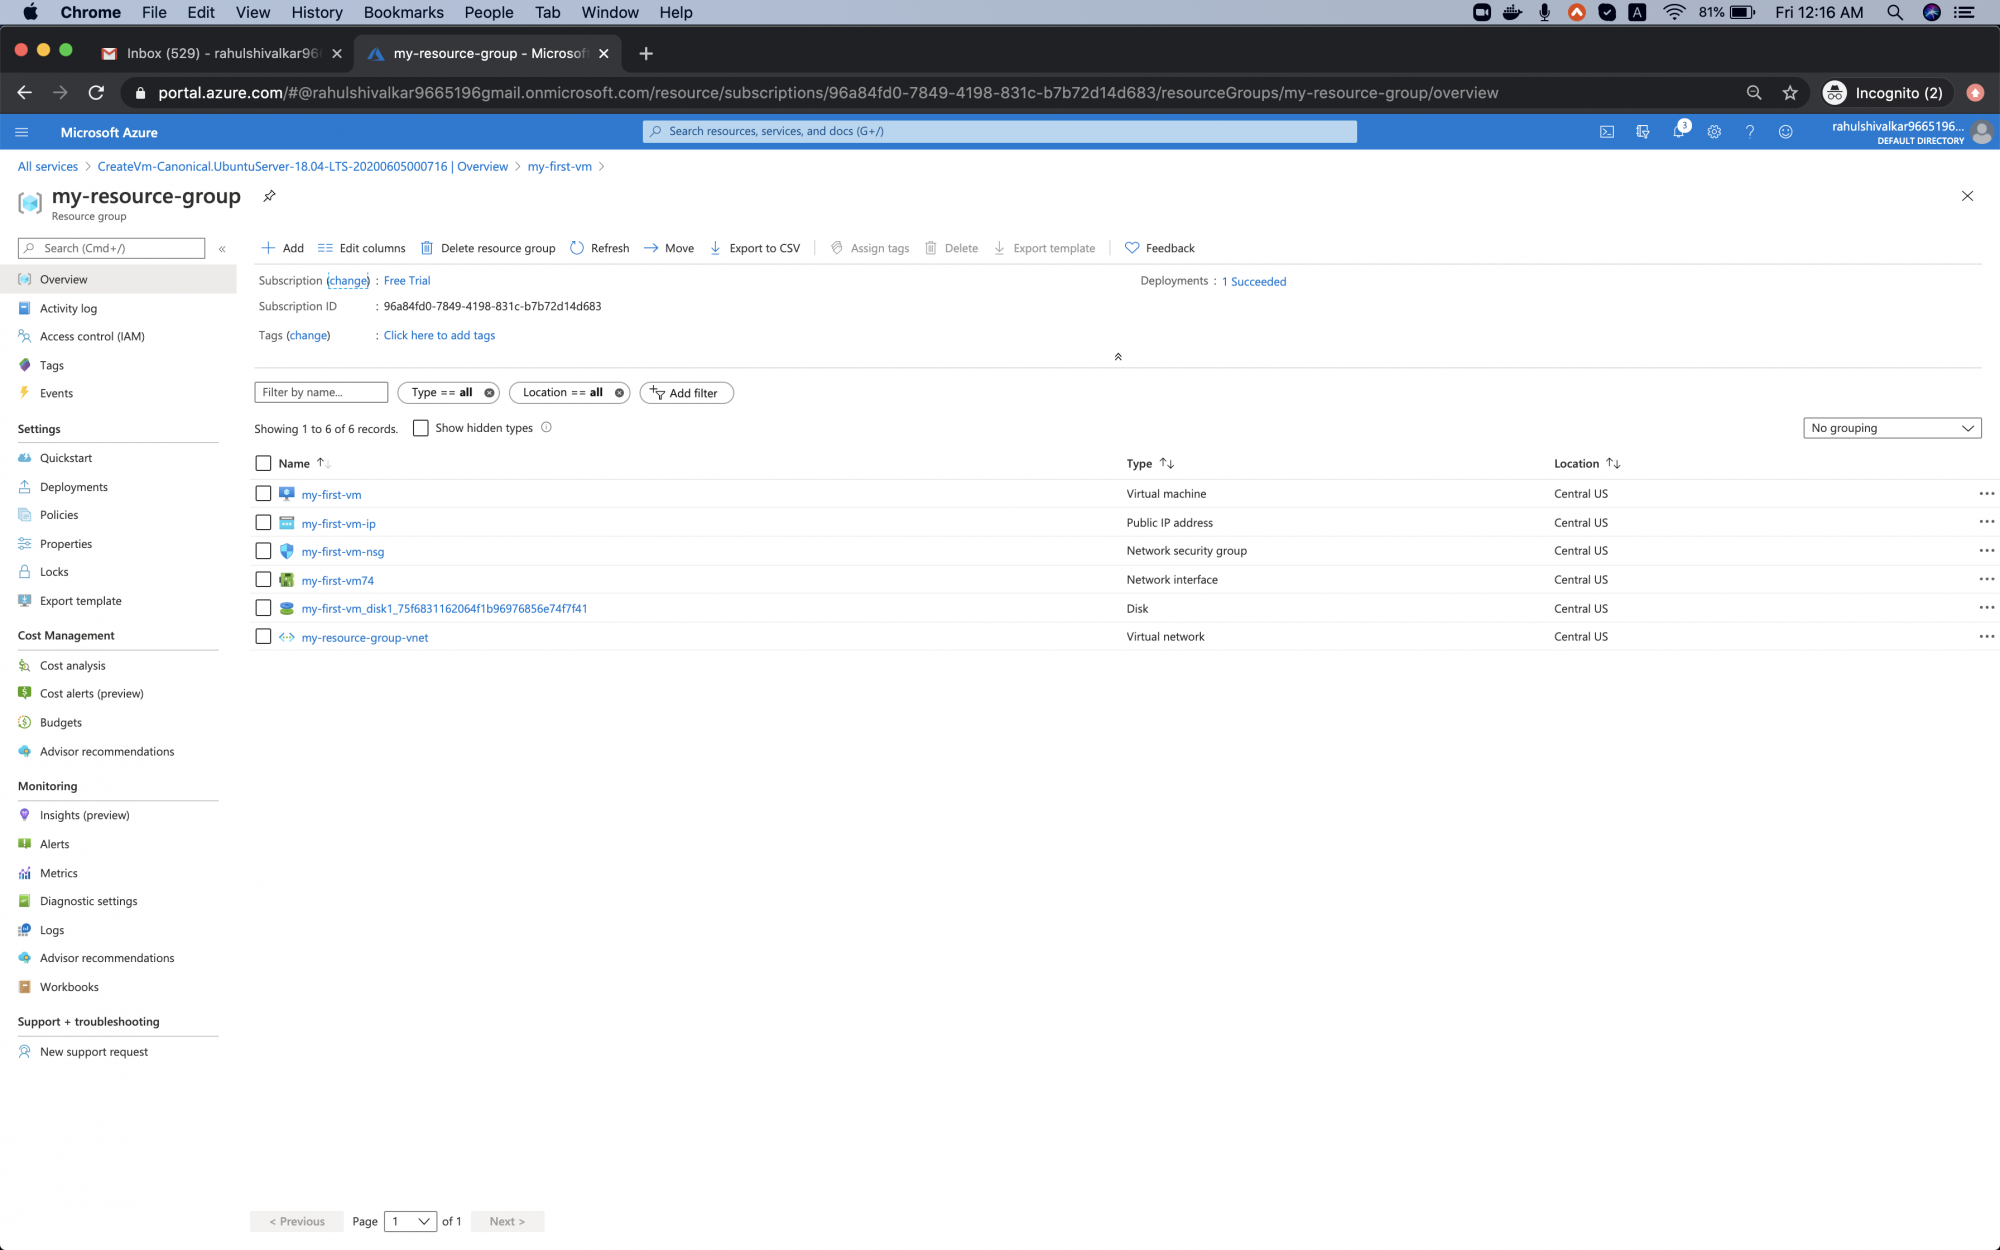
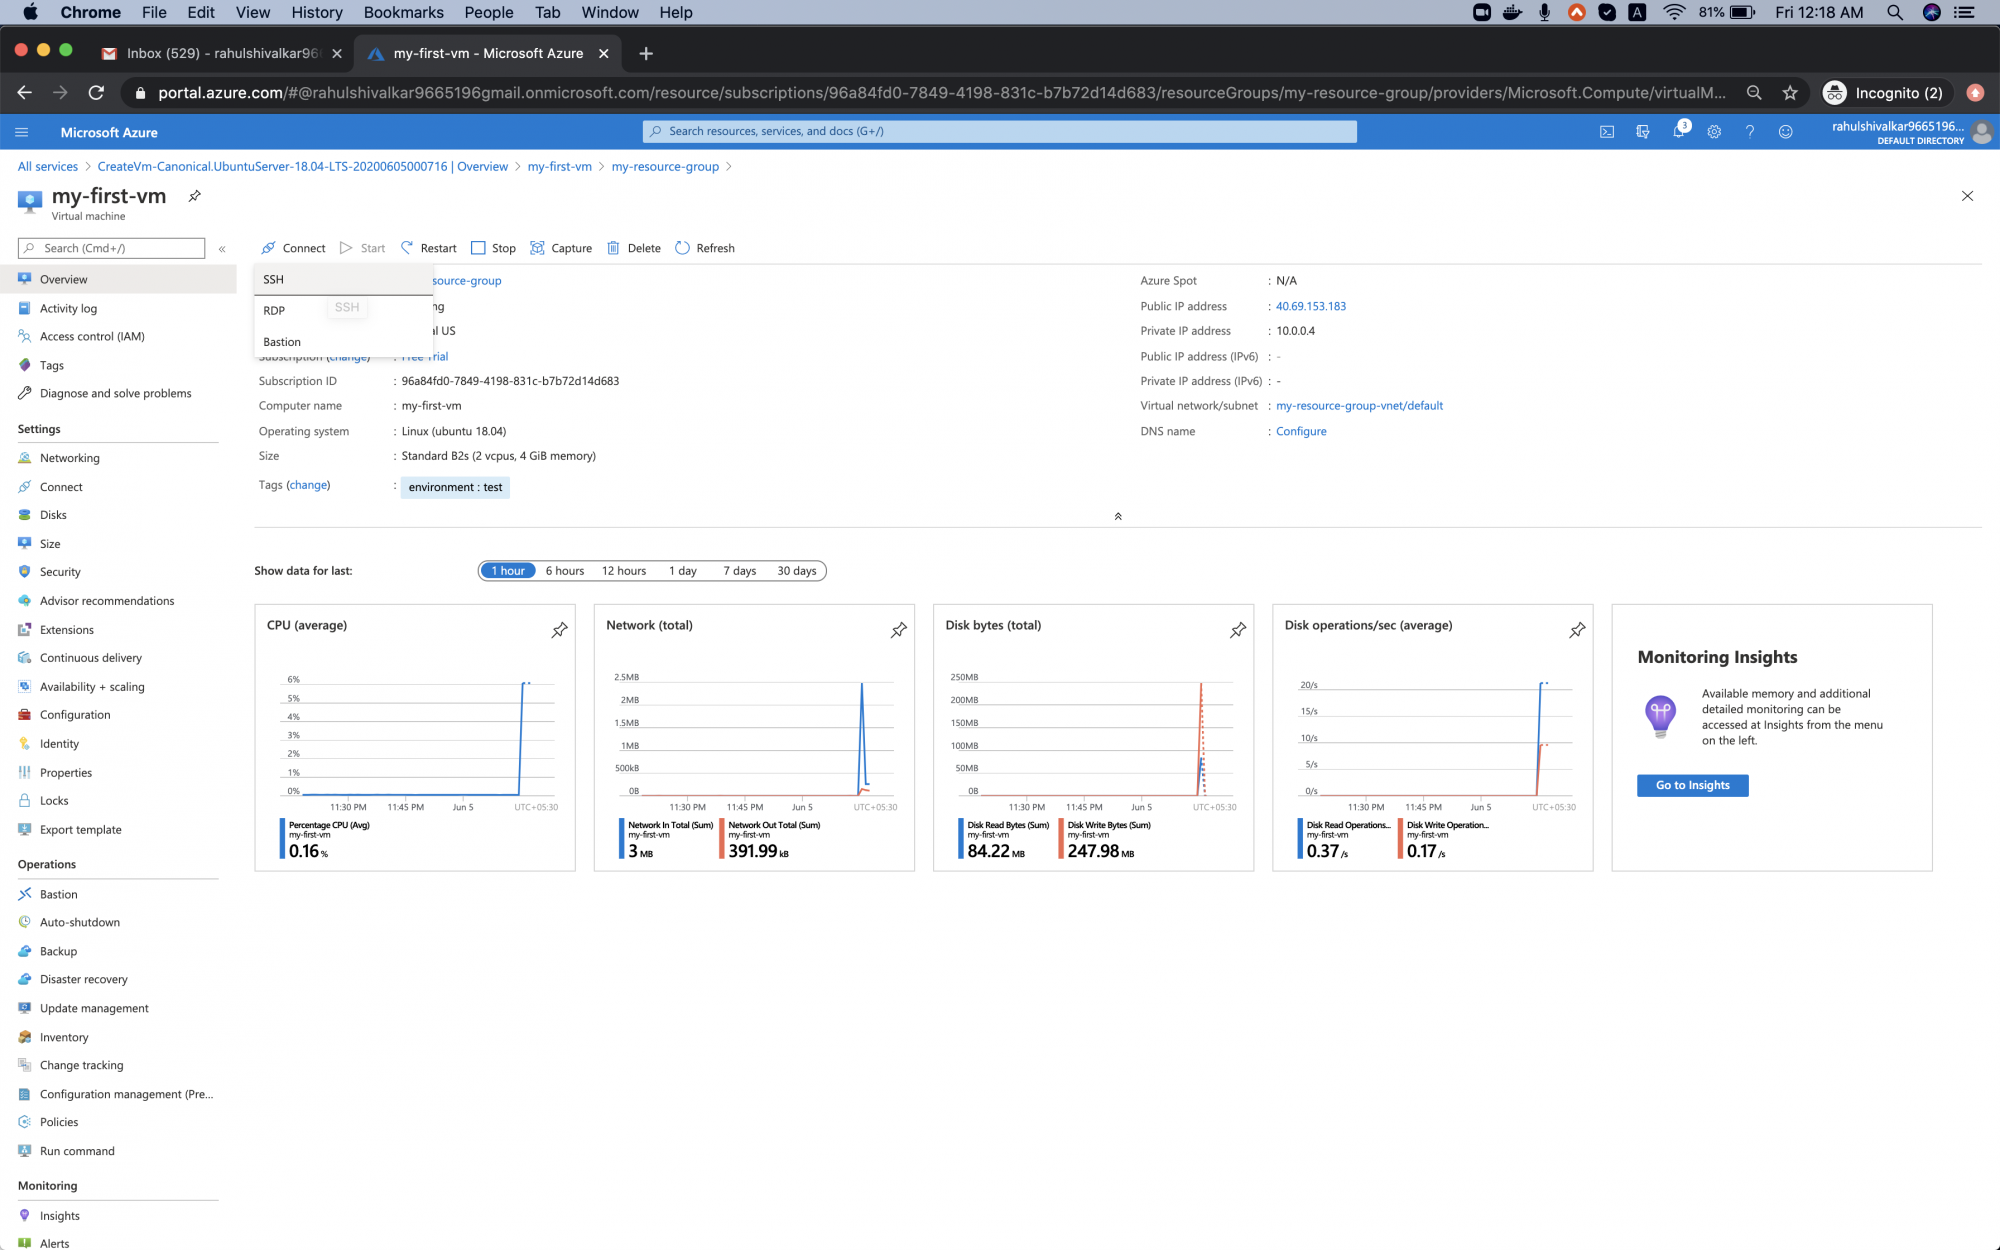
Here, you can see that the Virtual Machine is ready. Click on “Resource group” to see what all resources have been created under the resource group we created as part of the Virtual Machine creation process.

<img alt="VM Dashboard" data-ezsrc="https://kirelos.com/wp-content/uploads/2022/01/echo/screenshot_2020-06-05_at_121617_am.png61eaac7c22c4c.jpg" ezimgfmt="rs rscb5 src ng ngcb5" height="468" loading="lazy" src="data:image/svg xml,” width=”750″>

You can see that there are multiple resources that have been created upon creating the Virtual Machine. All these resources belong to the Virtual Machine we created.

<img alt="VM Resources overview" data-ezsrc="https://kirelos.com/wp-content/uploads/2022/01/echo/screenshot_2020-06-05_at_121631_am.png61eaac7c917f7.jpg" ezimgfmt="rs rscb5 src ng ngcb5" height="468" loading="lazy" src="data:image/svg xml,” width=”750″>

Connect to the Virtual Machine

To connect to the Virtual Machine we created, go back to the “Overview” page of the Virtual Machine.

<img alt="Connect to VM" data-ezsrc="https://kirelos.com/wp-content/uploads/2022/01/echo/screenshot_2020-06-05_at_121758_am.png61eaac7d5a6db.jpg" ezimgfmt="rs rscb5 src ng ngcb5" height="468" loading="lazy" src="data:image/svg xml,” width=”750″>

Click on “Connect” -> “SSH”.

<img alt="Connect by SSH" data-ezsrc="https://kirelos.com/wp-content/uploads/2022/01/echo/screenshot_2020-06-05_at_121817_am.png61eaac7e11adc.jpg" ezimgfmt="rs rscb5 src ng ngcb5" height="468" loading="lazy" src="data:image/svg xml,” width=”750″>

You will see the connection details under “SSH” to connect to the Virtual Machine. Copy the IP from here.

<img alt="VM IP address" data-ezsrc="https://kirelos.com/wp-content/uploads/2022/01/echo/screenshot_2020-06-05_at_121954_am.png61eaac7e73f87.jpg" ezimgfmt="rs rscb5 src ng ngcb5" height="468" loading="lazy" src="data:image/svg xml,” width=”750″>

Go to the terminal on your machine, type the ssh command as. “ssh [email protected]. Enter the password when prompted. 

You will see the output as follows when you successfully connect to the Virtual Machine from the terminal.

<img alt="SSV connect to VM" data-ezsrc="https://kirelos.com/wp-content/uploads/2022/01/echo/screenshot_2020-06-05_at_122221_am.png61eaac7edfcbb.jpg" ezimgfmt="rs rscb5 src ng ngcb5" height="431" loading="lazy" src="data:image/svg xml,” width=”750″>

Delete the Virtual Machine

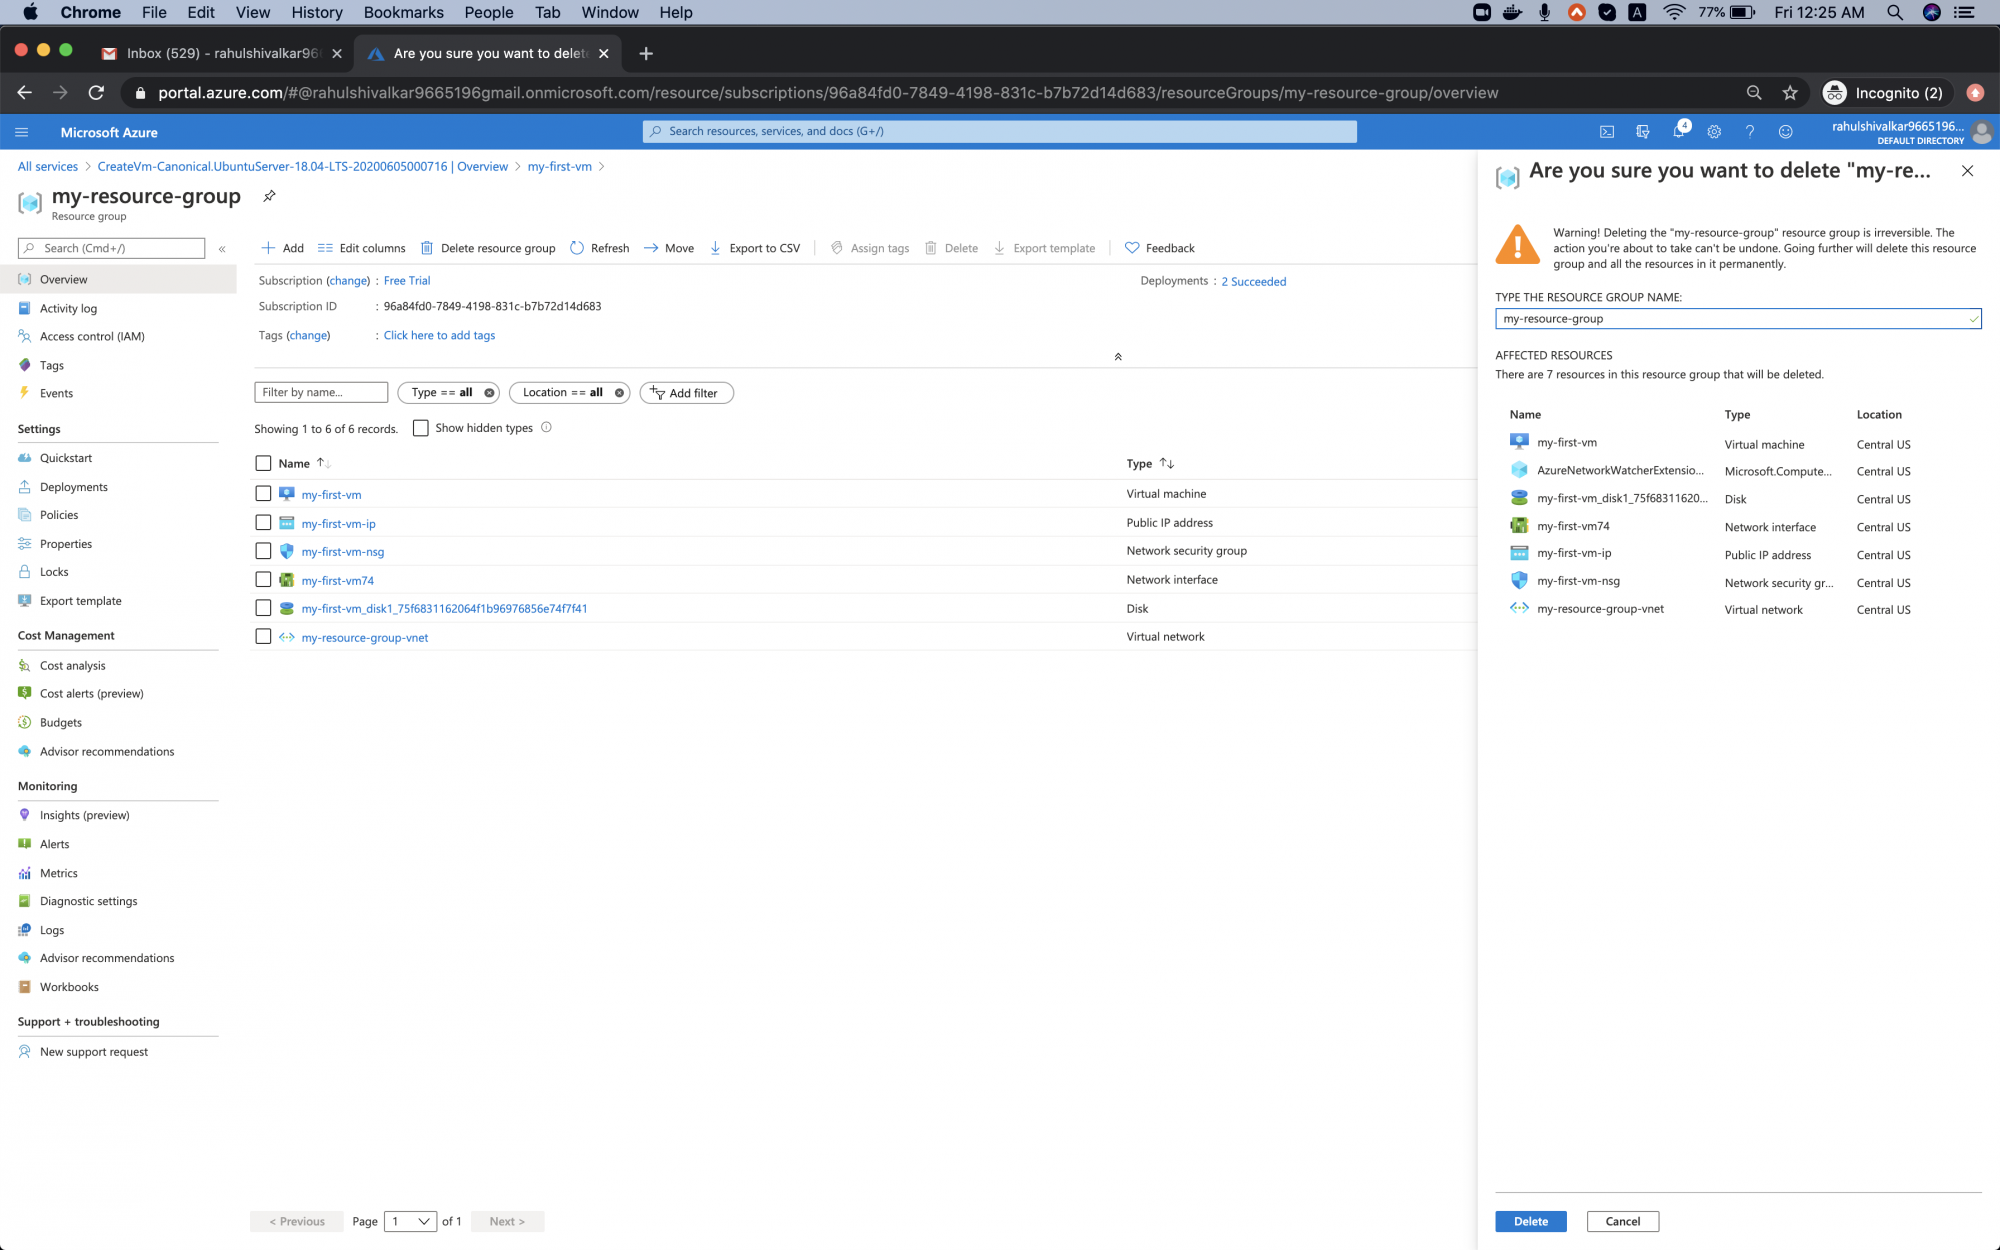
When you no longer need the Virtual Machine, you can delete it by deleting the Resource Group under which we created it.

Type the Resource Group name in the text box and click on “Delete”.

When you delete the Resource Group, all the resources which belong to it will get deleted. 


Since the Resource Group we created does not have any other resources it is safe to delete it, but if there were other resources in it, we should avoid deleting the resources group as it will delete other resources too.

<img alt="Delete VM on Azure" data-ezsrc="https://kirelos.com/wp-content/uploads/2022/01/echo/screenshot_2020-06-05_at_122501_am.png61eaac7f5f0c3.jpg" ezimgfmt="rs rscb5 src ng ngcb5" height="468" loading="lazy" src="data:image/svg xml,” width=”750″>

Conclusion

In this article, we learn to create our very first Virtual Machine on Azure Cloud. We saw how to fix the error we encountered while creating the machine. We also saw the steps to connect and delete the machine when it is no longer needed.