NameCheap is my recommended domain registrar, because the price is low and they give whois privacy protection free for life. This tutorial is going to show you how to create common DNS records in NameCheap. This is primarily for users who need to set up a mail server.
Create DNS Records in NameCheap
To create DNS records, go to your NameCheap account dashboard, click Domain List on the left pane, and click the Manage button on the right.

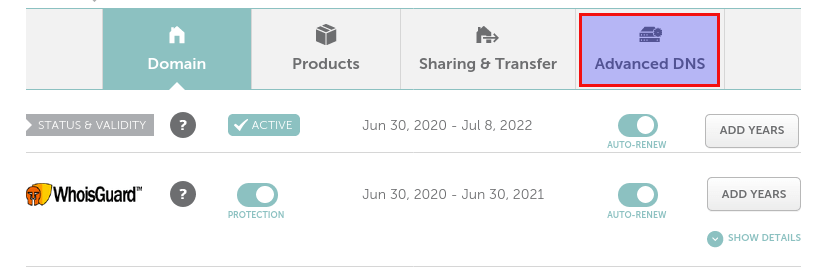
The click Advanced DNS tab to edit DNS records.
MX Record
The MX record specifies which host or hosts handle emails for a particular domain name. For example, the host that handles emails for linuxbabe.com is mail.linuxbabe.com. If someone with a Gmail account sends an email to [email protected], then Gmail server will query the MX record of linuxbabe.com. When it finds out that mail.linuxbabe.com is responsible for accepting email, it then query the A record of mail.linuxbabe.com to get the IP address, thus the email can be delivered.
Scroll down, you will find Mail Settings, choose Custom MX.
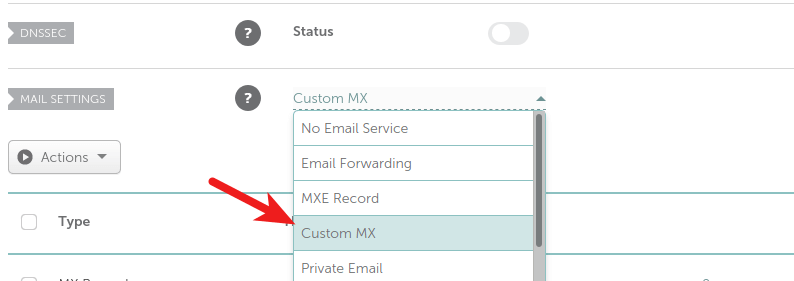
Next, click the add new record button to add a new MX record. Enter @ in the Host field to represent the main domain name, then enter mail.your-domain.com in the Value field. Enter 0 in the priority field. The priority value can be any number between 0 and 65,356. A small number has higher priority than a big number. It’s recommended that you set the value to 0, so this mail server will have the highest priority for receiving emails. Click the check button to save your changes.

A Record
A Record (Address Record) maps a domain name to an IP address. After creating MX record, you also need to create an A record for mail.your-domain.com , so that it can be resolved to an IP address.
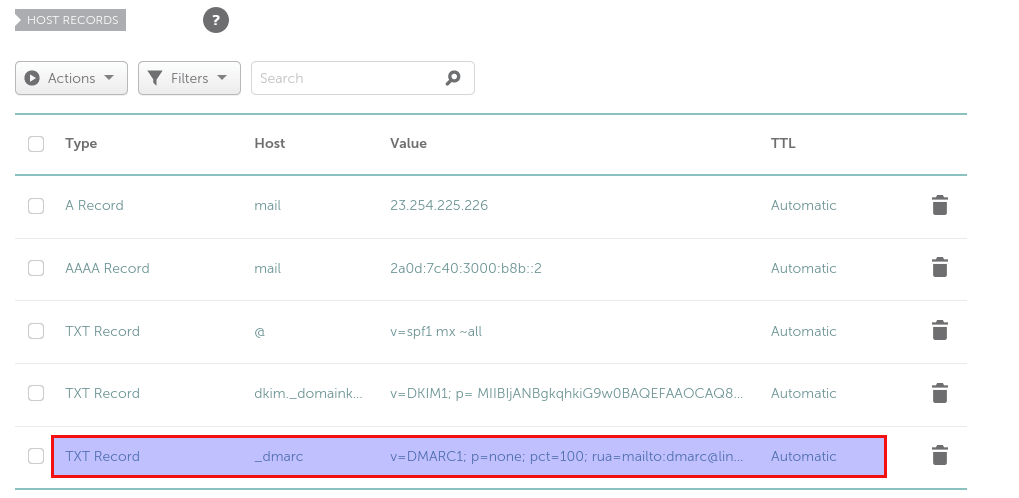
Click the add new record button in the Host Records section. Create an A record. Enter mail in the Host field. Then enter the IP address of your mail server in the Value filed. Click the check button to save your changes.

AAAA Record
AAAA Record maps a domain name to an IPv6 address. If your server uses IPv6 address, be sure to add AAAA record.
Click the add new record button in the Host Records section. Create an AAAA record. Enter mail in the Host field. Then enter the public IPv6 address of your mail server in the Value filed. Click the check button to save your changes.

SPF Record
SPF (Sender Policy Framework) is a type of TXT record. It specifies which hosts or IP address are allowed to send emails on behalf of a domain. You should allow only your own email server or your ISP’s server to send emails for your domain.
In the NameCheap Host Records section, create a new TXT record. Enter @ in the Host field to represent the main domain name. Enter v=spf1 mx ~all in the Value field. Click the check button to save your changes.
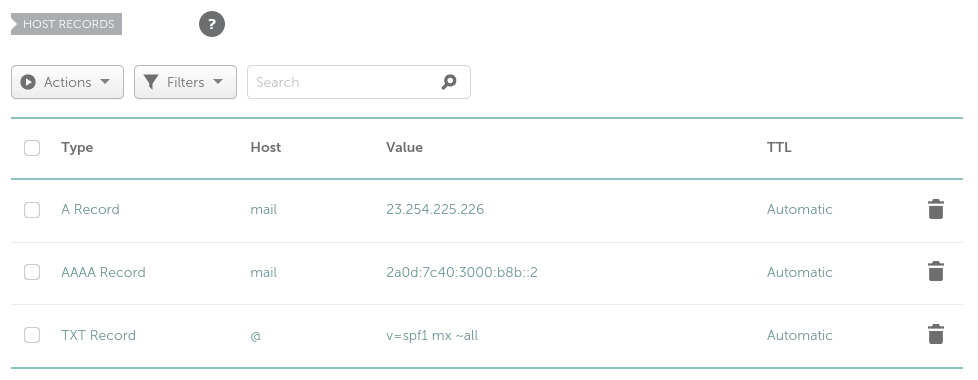
Explanation:
- v=spf1 indicates this is an SPF record and the version is SPF1.
- mx means all hosts listed in the MX records are allowed to send emails for your domain and all other hosts are disallowed.
- ~all indicates that emails from your domain should only come from hosts specified in the SPF record. Emails that are from other hosts will be flagged as forged.
To check if your SPF record is propagated to the public Internet, you can use the dig utility on your Linux machine like below:
dig your-domain.com txt
The txt option tells dig that we only want to query TXT records.
DKIM Record
This is also a type of TXT record. DKIM (DomainKeys Identified Mail) uses a private key to digitally sign emails sent from your domain. Receiving SMTP servers verify the signature by using the public key, which is published in the DNS DKIM record.
The DKIM private/public key pair is produced by software on the mail server. The method to get the DKIM public key can be different depending on the software you use. If you follow my iRedMail or Modoboa tutorial, please read that tutorial to find how to get the DKIM public key.
Once you have the key, go to NameCheap Host Records section, create a new TXT record. Enter dkim._domainkey in the Host field if you follow my iRedMail tutorial. Enter modoboa._domainkey in the Host field if you follow my Modoboa tutorial. Next, copy the DKIM public key to the Value filed. Note that you need to Delete all double quotes and line breaks. You can copy the DKIM public key to a tex editor first, delete the double quotes and line breaks, then copy it to the Value field in NameCheap.
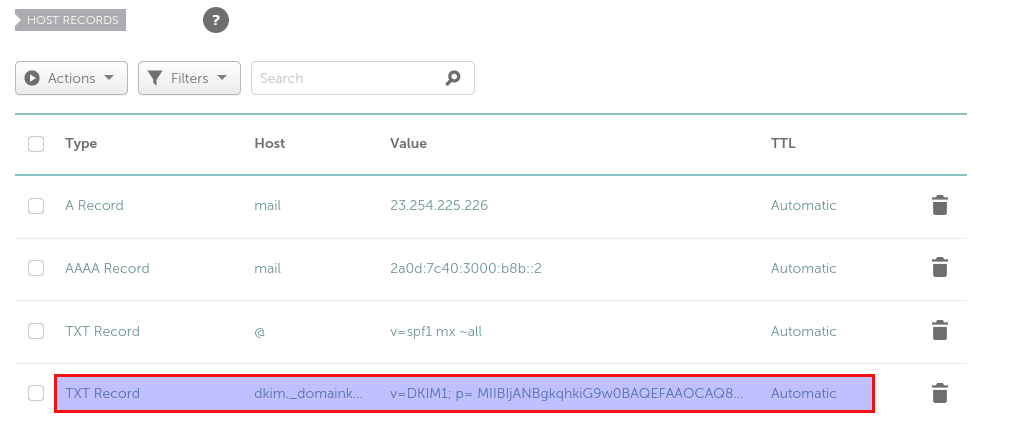
Click the check button to save your changes.
DMARC Record
DMARC stands for Domain-based Message Authentication, Reporting and Conformance. DMARC can help receiving email servers to identify legitimate emails and prevent your domain name from being used by email spoofing.
To create a DMARC record, go to NameCheap Host Records section, create a new TXT record. Enter _dmarc in the Host field. Enter v=DMARC1; p=none; pct=100; rua=mailto:[email protected] in the Value field. (You should create the [email protected] email address.) Click the check button to save your changes.
PTR record
A pointer record, or PTR record, maps an IP address to an FQDN (fully qualified domain name). It’s the counterpart to the A record and is used for reverse DNS lookup, which can help with blocking spammers. Many SMTP servers reject emails if no PTR record is found for the sending server.
To check the PTR record for an IP address, run this command:
dig -x IP-address short
or
host IP-address
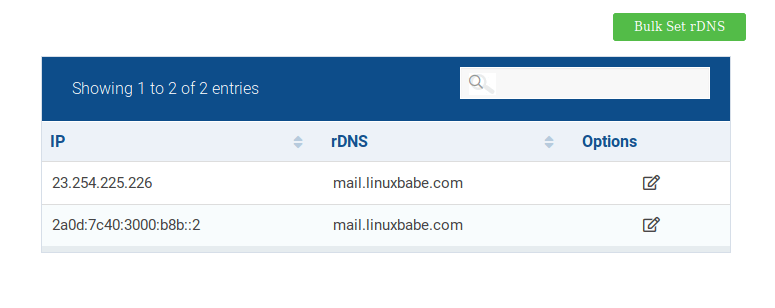
PTR record is not controlled by your domain registrar. Because you get IP address from your hosting provider or ISP, not from your domain registrar, so you must set PTR record for your IP in the control panel of your hosting provider, or ask your ISP. Its value should be your mail server’s hostname: mail.your-domain.com. If your server uses IPv6 address, be sure to add a PTR record for your IPv6 address as well.
To edit the reverse DNS record for your Hostwinds VPS, log into Hostwinds client area, select Domains -> Manage rDNS, Then you can edit the reverse DNS record for both IPv4 and IPv6 address.
Wrapping Up
I hope this article helped you create DNS record in NameCheap. As always, if you found this post useful, then subscribe to our free newsletter to get more tips and tricks. Take care 🙂
Rate this tutorial
[Total: 0 Average: 0]


