
Kubernetes or k8s is an open-source platform for container orchestration that automates deployments, management, and scaling of containerized applications. Kubernetes is a container orchestration created by Google, and now become an open-source project and become standard for modern application deployment and computing platforms.
Kubernetes is the solution for the modern container deployment era. It provides service discovery and load-balancing, storage orchestration, automated rollout and rollback, self-healing service, secret and configuration management. Kubernetes enables cost-effective cloud-native development.
In this tutorial, you will set up the Kubernetes Cluster by:
- Setting up systems, which includes – setup /etc/hosts file, setup SELinux, enabling kernel modules, and disabling SWAP.
- Setting up Firewalld by adding some ports that are required for Kubernetes.
- Installing containerd as the container runtime for Kubernetes.
- Installing Kubernetes packages such as kubelet, kubeadm, and kubectl.
- Installing Flannel network plugin for Kubernetes Pods.
- Initializing one control-plane node and adding two worker nodes.
Prerequisites
To complete this tutorial, you will need the following requirements:
- Three or more Rocky Linux servers.
- A non-root user with root/administrator privileges.
Setting Up Systems
Before you start installing any packages for Kubernetes deployment, you will need to set up all of your systems as required for Kubernetes Deployment. This includes the following configurations:
- Setup correct /etc/hosts file: Each server hostname must be resolved to the correct IP address. This can be done in multiple ways, but the easiest and simple one is by using the /etc/hosts file on all servers.
- Setup Firewalld: For the production environment, it’s always recommended to enable the firewall on both control-plane and worker nodes.
- Setup SELinux: For this example, we will change the default rule of the SELinux to “permissive”.
- Enable kernel Modules: The Kubernetes required some kernel modules on the Linux system to be enabled. The kernel module “overlay” and “br_netfilter” is required to let iptables see bridged traffics.
- Disable SWAP: This is mandatory, you must disable SWAP on all Kubernetes nodes, both control-plane and worker nodes. Otherwise, the kubelet service will be running with issues.
Setup /etc/hosts file
In this first step, you will set up the system hostname and the /etc/hosts file on all of your servers. For this demonstration, we will use the following servers.
Hostname              IP Address        Used as
-------------------------------------------------------
kube-master           192.168.5.10      control-plane
kube-kube-worker1     192.168.5.15      worker node
kube-kube-worker2     192.168.5.16      worker node
Run the following hostnamectl command below to set up the system hostname on each server.
For the control-plane node, run the following command to set up the system hostname to “kube-master“.
sudo hostnamectl set-hostname kube-master
For Kubernetes worker nodes, run the following hostnamectl command.
# setup hostname kube-worker1
sudo hostnamectl set-hostname kube-worker1# setup hostname kube-worker2
sudo hostnamectl set-hostname kube-worker2
Next, modify the /etc/hosts file on all servers using the following command.
sudo nano /etc/hosts
Add the following configuration to the file. Be sure each hostname is pointed to the correct IP address.
192.168.5.10 kube-master
192.168.5.15 kube-worker1
192.168.5.16 kube-worker2
Save and close the file when you are finished.
Lastly, if you run the ping command against each hostname, you will be pointed to the correct IP address as defined on the /etc/hosts file.
ping kube-master -c3
ping kube-worker1 -c3
ping kube-worker2 -c3
Configuring Firewalld Rules
Kubernetes required some ports to be open on all of your systems. On the default RHEL-based system, Firewalld is the default firewall application. You will add some ports to the Firewalld for the Kubernetes deployment.
For the Kubernetes control-plane, you need to open the following ports:
Protocol  Direction Port Range  Purpose Used By
-----------------------------------------------
TCP       Inbound   6443        Kubernetes API server All
TCP       Inbound   2379-2380   etcd server client API  kube-apiserver, etcd
TCP       Inbound   10250       Kubelet API Self, Control plane
TCP       Inbound   10259       kube-scheduler  Self
TCP       Inbound   10257       kube-controller-manager Self
For the Kubernetes worker nodes, you need to open the following ports:
Protocol  Direction Port Range  Purpose Used By
--------------------------------------------------
TCP       Inbound   10250       Kubelet API Self, Control plane
TCP       Inbound   30000-32767 NodePort Services†  All
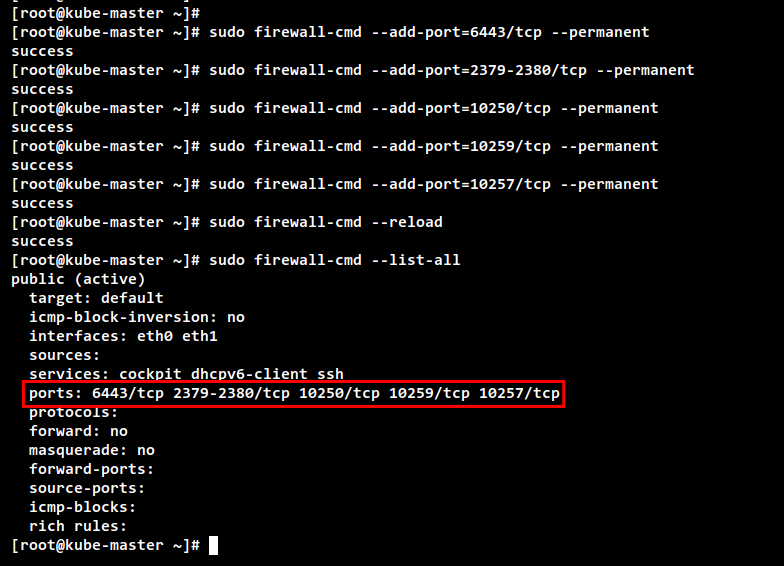
On the control-plane node “kube-master“, run the following firewall-cmd command to open Kubernetes control-plane ports. Then, reload the Firewalld rules and verify the list of available rules.
sudo firewall-cmd --add-port=6443/tcp --permanent
sudo firewall-cmd --add-port=2379-2380/tcp --permanent
sudo firewall-cmd --add-port=10250/tcp --permanent
sudo firewall-cmd --add-port=10259/tcp --permanent
sudo firewall-cmd --add-port=10257/tcp --permanentsudo firewall-cmd --reload
sudo firewall-cmd --list-all
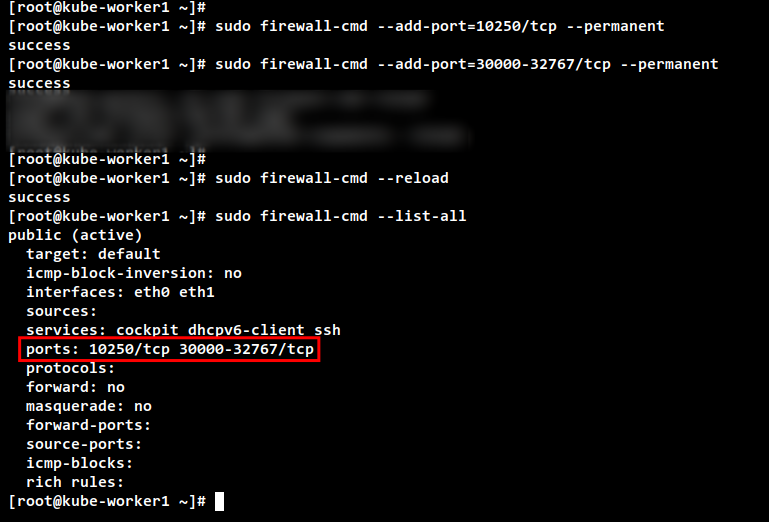
On worker nodes “kube-worker1” and “kube-worker2“, run the following firewall-cmd command to open some Kubernetes worker ports. Then, reload the Firewalld and verify the list of available rules on Firewalld.
sudo firewall-cmd --add-port=10250/tcp --permanent
sudo firewall-cmd --add-port=30000-32767/tcp --permanentsudo firewall-cmd --reload
sudo firewall-cmd --list-all
Setup SELinux and Kernel Modules and Disable SWAP
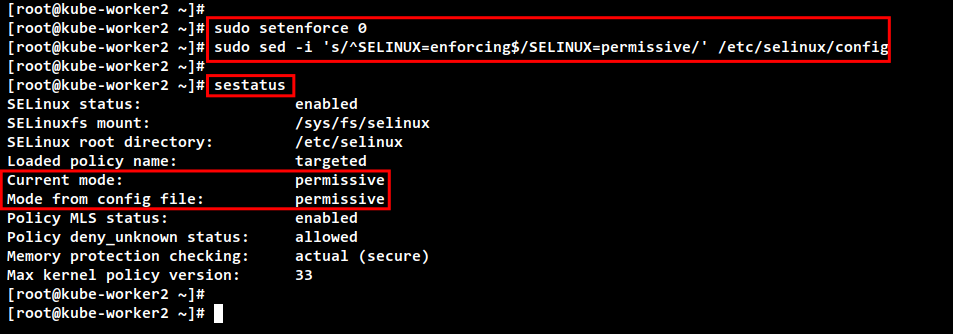
To make the Kubernetes service kubelet works properly, you will need to change the default SELinux to “permissive” or you can disable SELinux completely. In this example, you will change the SELinux policy from “enforcing” to “permissive“, which means you will only get notified from SELinux.
Run the following command to change the default SELinux policy to “permissive”. Then, check and verify the current status of the SELinux policy. You should see the SELinux is still enabled, but with the policy “permissive“.
sudo setenforce 0
sudo sed -i 's/^SELINUX=enforcing$/SELINUX=permissive/' /etc/selinux/configsestatus
Next, the Kubernetes required the kernel modules “overlay” and “br_netfilter” to be enabled on all servers. This will let the iptbales see bridged traffics. Also, you will need to enable the port forwarding and disable SWAP.
Run the following command to enable the kernel modules “overlay” and “br_netfilter“.
sudo modprobe overlay
sudo modprobe br_netfilter
To make it permanent, create the configuration file to “/etc/modules-load.d/k8s.conf“. This will enable Linux systems to enable kernel modules during the system boot.
cat <<EOF | sudo tee /etc/modules-load.d/k8s.conf
overlay
br_netfilter
EOF
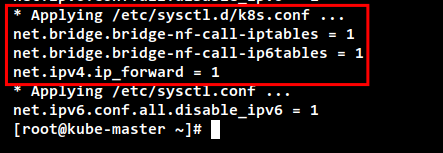
Next, create the systemctl params required using the following command.
cat <<EOF | sudo tee /etc/sysctl.d/k8s.conf
net.bridge.bridge-nf-call-iptables  = 1
net.bridge.bridge-nf-call-ip6tables = 1
net.ipv4.ip_forward                 = 1
EOF
To apply the new sysctl configuration without reboot, use the following command. You should get the list of default sysctl params on your system and be sure you get sysctl params that you just added in the file “k8s.conf“.
sudo sysctl --system
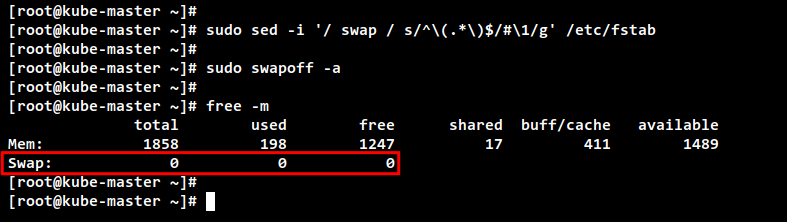
To disable SWAP, you will need to comment on the SWAP configuration on the “/etc/fstab” file. This can be done by using the single command via sed (stream editor) or manually editing the /etc/fstab file.
sudo sed -i '/ swap / s/^(.*)$/#1/g' /etc/fstab
or
sudo nano /etc/fstab
Now turn off the SWAP on the current session using the below command. Then, verify the SWAP is off using the “free –m” command. You should see the SWAP has “0” values, which means it’s now disabled.
sudo swapoff -a
free -m
Installing Container Runtime: Containerd
To set up Kubernetes Cluster, you must install the container runtime on all servers so that Pods can run. Multiple container runtimes can be used for Kubernetes deployments such as containerd, CRI-O, Mirantis Container Runtime, and Docker Engine (via cri-dockerd).
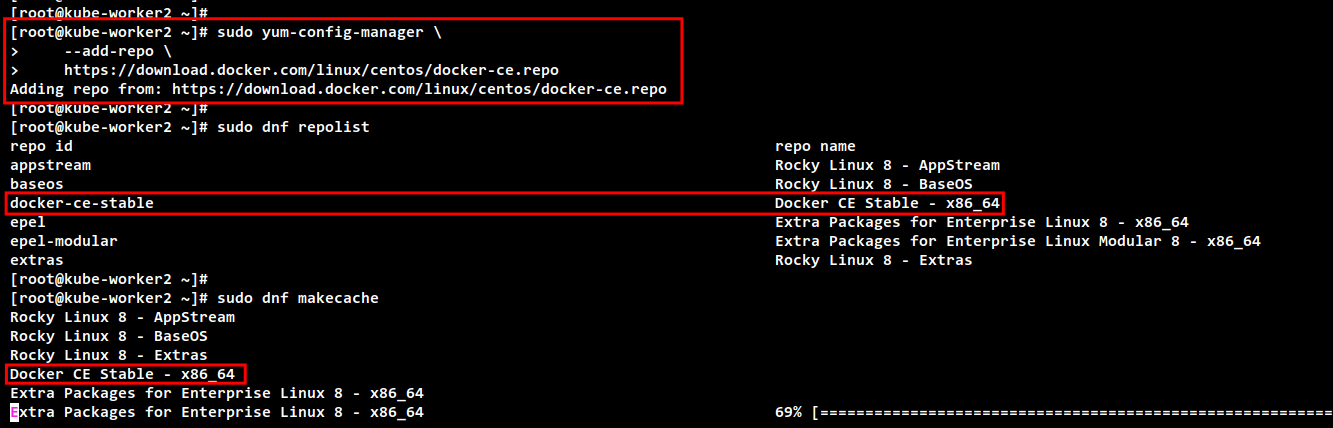
In this example, we will use the “containerd” as the container for our Kubernetes deployment. So, you will install containerd on all of the Kubernetes nodes. And there are multiple ways to install containerd, the easiest way is by using pre-built binary packages provided by the Docker repository.
Before adding the repository, run the DNF command below to install additional tools “dnf-utils”.
sudo dnf install dnf-utils
Now run the following command to add the Docker repository for CentOS-based systems.
sudo yum-config-manager
    --add-repo
    https://download.docker.com/linux/centos/docker-ce.repo
Run the following command to check and verify repositories on your Rocky Linux systems. Then, generate a new metadata cache. You will see the Docker repository is added to Rocky Linux.
sudo dnf repolist
sudo dnf makecache
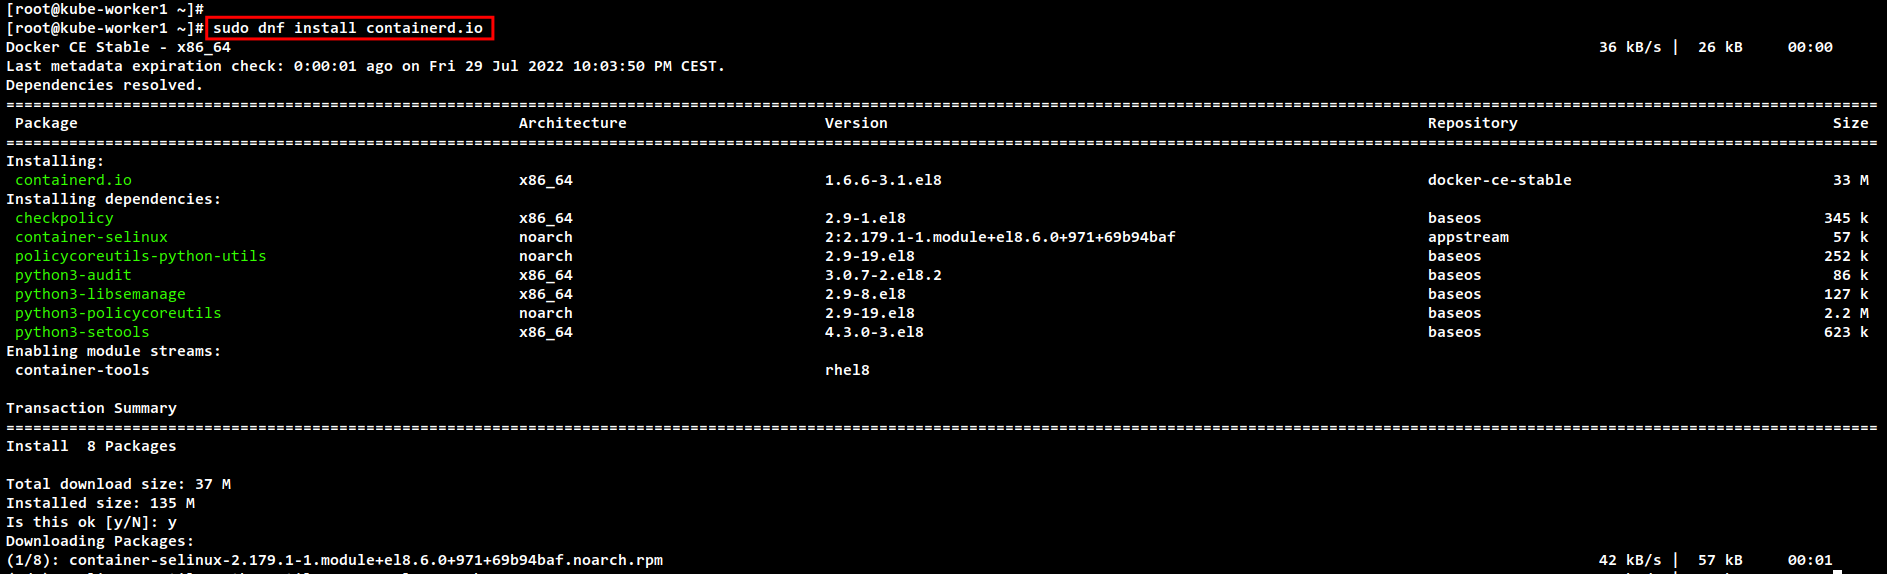
Next, install the containerd package using the DNF command below. Input Y to confirm the installation and press ENTER, and the installation will begin. When asked to import the Docker GPG key, input y to add.
sudo dnf install containerd.io
After installation is finished, run the following command to back up the default containerd configuration and generate a new containerd config file.
sudo mv /etc/containerd/config.toml /etc/containerd/config.toml.orig
sudo containerd config default > /etc/containerd/config.toml
Now modify the containerd config file “/etc/containerd/config.toml” using the following command.
sudo nano /etc/containerd/config.toml
Change the value of cgroup driver “SystemdCgroup = false” to “SystemdCgroup = true“. This will enable the systemd cgroup driver for the containerd container runtime.
[plugins."io.containerd.grpc.v1.cri".containerd.runtimes.runc]
  ...
  [plugins."io.containerd.grpc.v1.cri".containerd.runtimes.runc.options]
    SystemdCgroup = true
When you are finished, save and close the file.
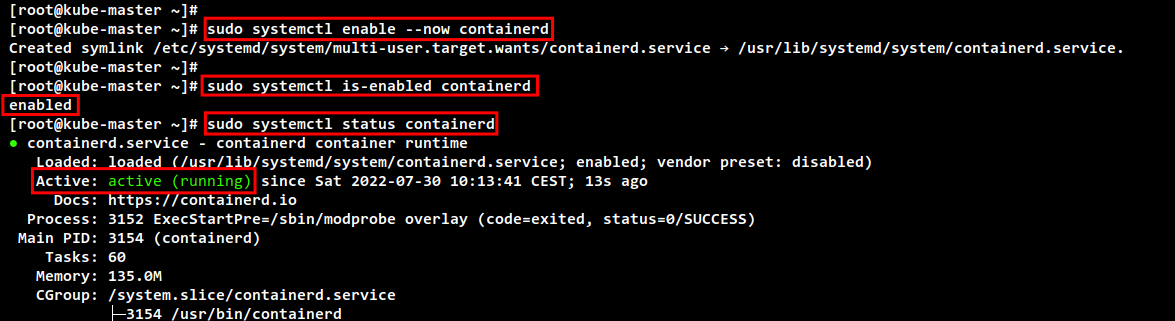
Next, run the following systemctl command to start and enable the containerd service. This will add the containerd service to be run automatically at system boot.
sudo systemctl enable --now containerd
Lastly, check and verify the containerd service using the below command. You should see the containerd is enabled and will be run automatically at system boot. And the current status of containerd service is running.
sudo systemctl is-enabled containerd
sudo systemctl status containerd
Installing Kubernetes Packages
You have installed the containerd container runtime. Now you will install Kubernetes packages on all of your Rocky Linux systems. This includes the kubeadm for bootstrapping the Kubernetes cluster, kubelet the main component of the Kubernetes Cluster, and the kubectl the command-line utility for managing the Kubernetes cluster.
In this example, we will install Kubernetes packages using the repository provided by Kubernetes. So, you will add the Kubernetes repository to all of your Rocky Linux systems.
Run the following command to add the Kubernetes repository for RHEL/CentOS-based operating systems.
cat <<EOF | sudo tee /etc/yum.repos.d/kubernetes.repo
[kubernetes]
name=Kubernetes
baseurl=https://packages.cloud.google.com/yum/repos/kubernetes-el7-$basearch
enabled=1
gpgcheck=1
gpgkey=https://packages.cloud.google.com/yum/doc/yum-key.gpg https://packages.cloud.google.com/yum/doc/rpm-package-key.gpg
exclude=kubelet kubeadm kubectl
EOF
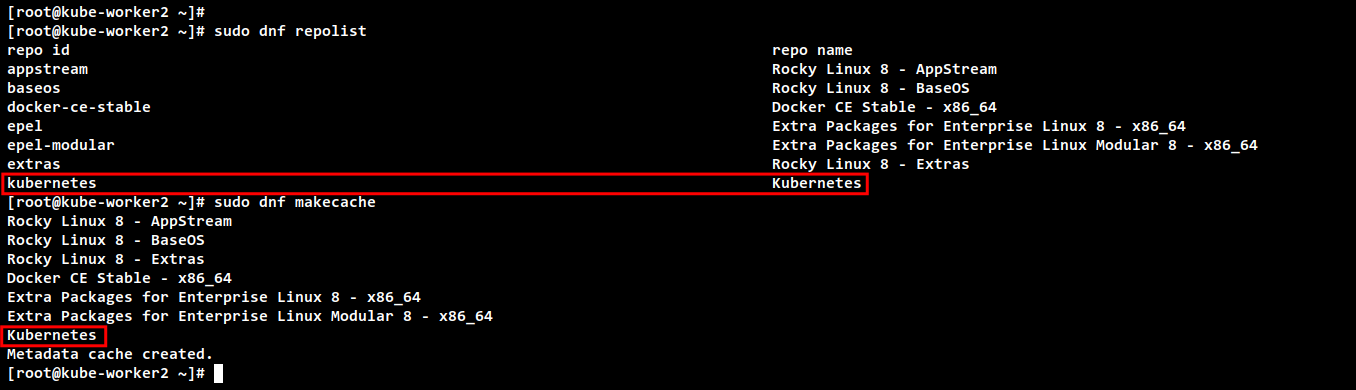
Now check the list of repositories and generate a new metadata cache using the dnf command below. And you should see the Kubernetes repository is added to Rocky Linux systems.
sudo dnf repolist
sudo dnf makecache
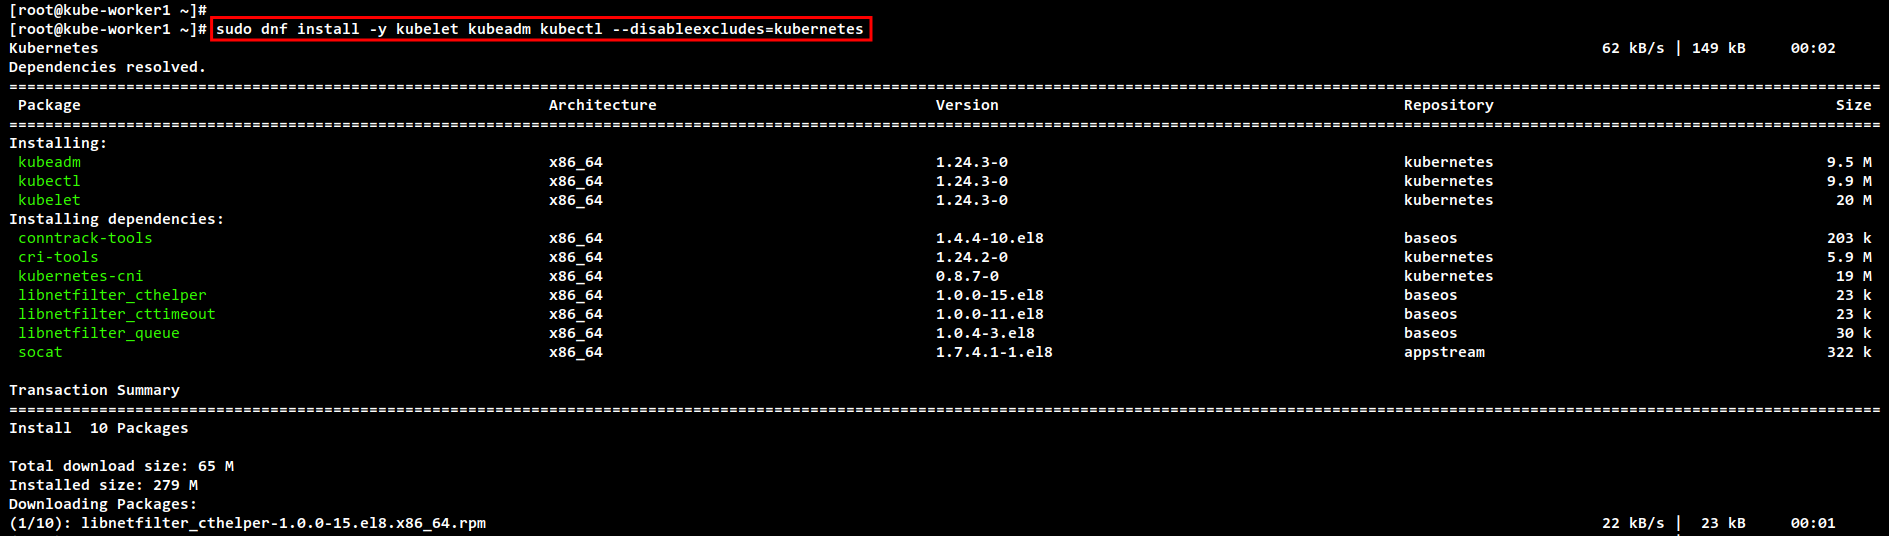
Next, install Kubernetes packages using the following dnf command. Input Y to confirm the installation and press ENTER to continue, and the installation will begin.
sudo dnf install kubelet kubeadm kubectl --disableexcludes=kubernetes
After installation is finished, run the following systemctl command to start and enable the kubelet service. Then, check the kubelet service and make sure it’s enabled and running on all nodes.
This service is the main Kubernetes service that will wait for any events when you initialize the cluster or join the node to the cluster.
sudo systemctl enable --now kubelet
Installing CNI Plugin: Flannel
Kubernetes supports various Container Network Plugins such as AWS VPC for Kubernetes, Azure CNI, Cilium, Calico, Flannel, and many more. In this example, we will use Flannel as the CNI plugin for the Kubernetes deployment. And this required you to install the binary file of Flannel across Kubernetes nodes.
Run the below command to create a new directory “/opt/bin“. Then, download the binary file of Flannel into it.
mkdir -p /opt/bin/
sudo curl -fsSLo /opt/bin/flanneld https://github.com/flannel-io/flannel/releases/download/v0.19.0/flanneld-amd64
Now make the “flanneld” binary file executable by changing the permission of the file using the below command. This “flanneld” binary file will be executed automatically when you set up the Pod network addon.
sudo chmod x /opt/bin/flanneld
Initializing Kubernetes Control Plane
You have finished all dependencies and requirements for deploying Kubernetes Cluster. Now you will start the Kubernetes Cluster by initializing the Control Plane node for the first time. In this example, the Kubernetes Control Plane will be installed on the “kubem-master” server with the IP address “192.168.5.10“.
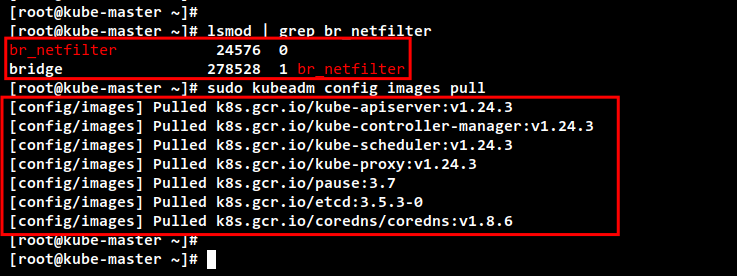
Before initializing the Control Plane node, run the following command to check the “br_netfilter” kernel modules are enabled. If you get an output from the command, it means the “br_netfilter” module is enabled.
lsmod | grep br_netfilter
Next, run the following command to download images that are required for the Kubernetes Cluster. This command will download all container images that are needed for creating Kubernetes Cluster such as coredns, kube-api server, etcd, kube-controller, kube-proxy, and the pause container image.
sudo kubeadm config images pull
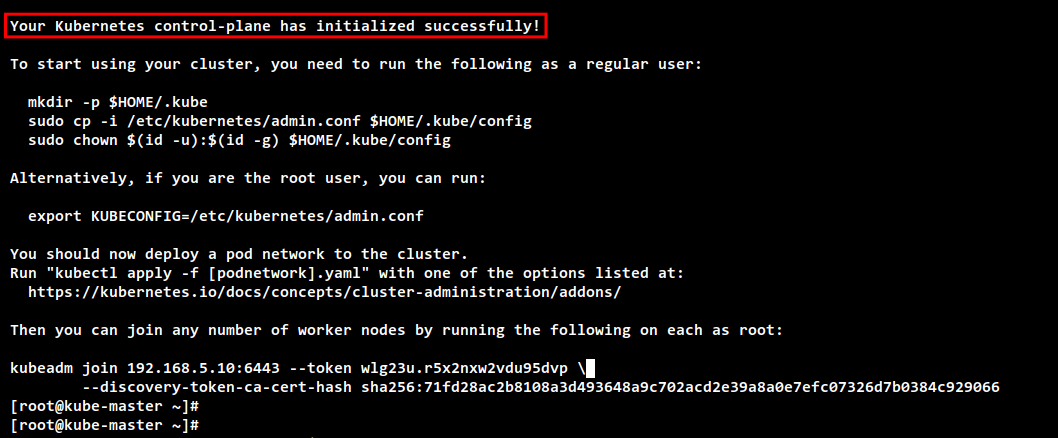
After the download is finished, run the following “kubeadm init” command to initialize the Kubernetes Cluster on the “kube-master” server. This node “kube-master” will automatically be selected as the Kubernetes Control Plane because this is the first time initializing the cluster.
- Also, in this example, we specify the network for Pods to “10.244.0.0/16“, which is the default network range for the Flannel CNI plugin.
- The “–apiserver-advertise-address” determines in which IP address the Kubernetes API server will be running, this example uses the internal IP address “192.168.5.10“.
- For the “–cri-socket” option here, we specify the CRI socket to the container runtime socket that is available on “/run/containerd/containerd.sock“. If you are using different Container Runtime, then you must change the path of the socket file, or you can just remove this option “–cri-socket” because the kubeadm will detect the Container Runtime socket automatically.
sudo kubeadm init --pod-network-cidr=10.244.0.0/16
--apiserver-advertise-address=192.168.5.10
--cri-socket=unix:///run/containerd/containerd.sock
When the initialize is finished, you can see the message such as “Your Kubernetes control-plane has initialized successfully!” with some important output messages for setting up the Kubernetes credentials and deploying the Pod network add-on, the how to add the worker node to your Kubernetes Cluster.
Before you start using the Kubernetes Cluster, you will need to set up the Kubernetes credentials. Run the following command to set up the Kubernetes credentials.
mkdir -p $HOME/.kube
sudo cp -i /etc/kubernetes/admin.conf $HOME/.kube/config
sudo chown $(id -u):$(id -g) $HOME/.kube/config
Now you can use the “kubectl” command to interact with your Kubernetes cluster. Run the following “kubectl” command to check the Kubernetes Cluster information. And you should see the Kubernetes control plane and the coredns running.
kubectl cluster-info
To get full information about your Kubernetes, you can use the option dump – so “kubectl cluster-info dump“.
After the Kubernetes Control Plane is running, run the following command to install the Flannel Pod network plugin. This command will automatically run the “flanneld” binary file and run some flannel pods.
kubectl apply -f https://raw.githubusercontent.com/flannel-io/flannel/master/Documentation/kube-flannel.yml
Check the list of running pods on your Kubernetes using the following command. if your Kubernetes installation is successful, you should see all main pods for Kubernetes which includes Flannel pods are running.
kubectl get pods --all-namespaces
Adding Worker Nodes to Kubernetes
After initializing the Kubernetes Control Plane on the “kube-master” server, you will add worker nodes “kube-worker1” and “kube-worker2” to the Kubernetes Cluster.
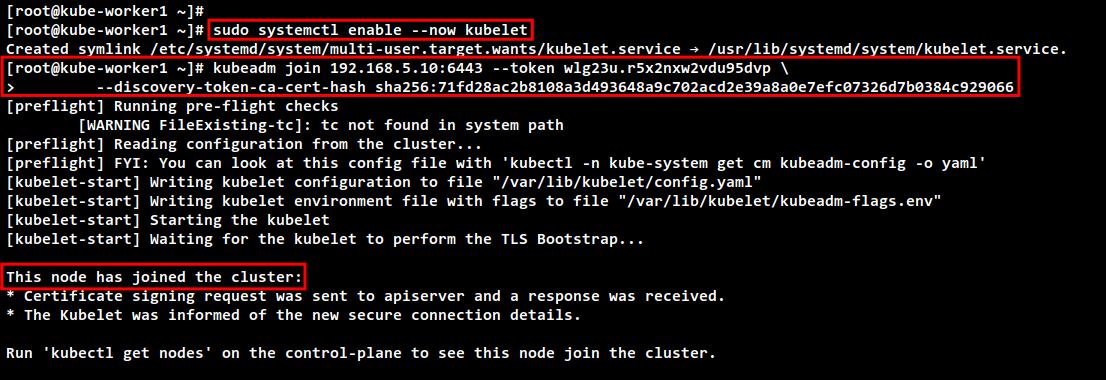
Move to the “kube-worker1” server and run the following “kubeadm join” command below to add the “kube-worker1” to the Kubernetes Cluster. You may have different token and ca-cert-hash, you can see details of this information on the output message when you initialize the Control Plane node.
kubeadm join 192.168.5.10:6443 --token wlg23u.r5x2nxw2vdu95dvp
        --discovery-token-ca-cert-hash sha256:71fd28ac2b8108a3d493648a9c702acd2e39a8a0e7efc07326d7b0384c929066
In the following output, you can see that the “kube-worker1” server is joined by the Kubernetes Cluster.
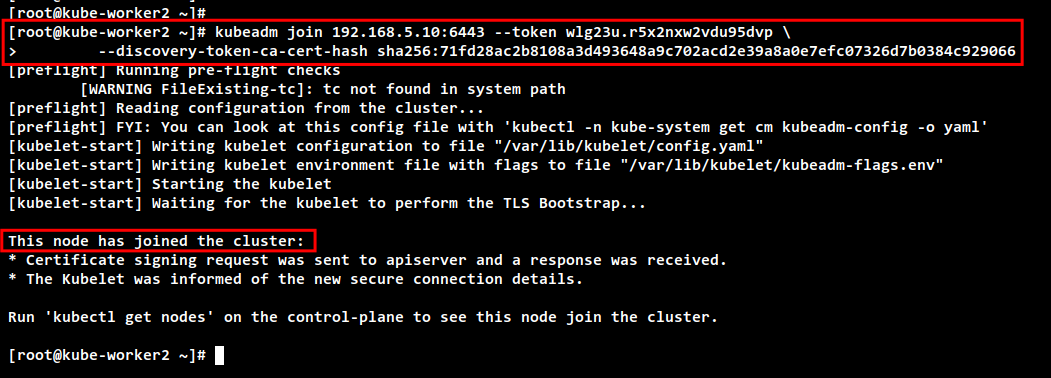
Next, move to the “kube-worker2” server and run the “kubeadm join” command to add the “kube-worker2” to the Kubernetes Cluster.
kubeadm join 192.168.5.10:6443 --token wlg23u.r5x2nxw2vdu95dvp
        --discovery-token-ca-cert-hash sha256:71fd28ac2b8108a3d493648a9c702acd2e39a8a0e7efc07326d7b0384c929066
You will see the same output message when the process is finished.
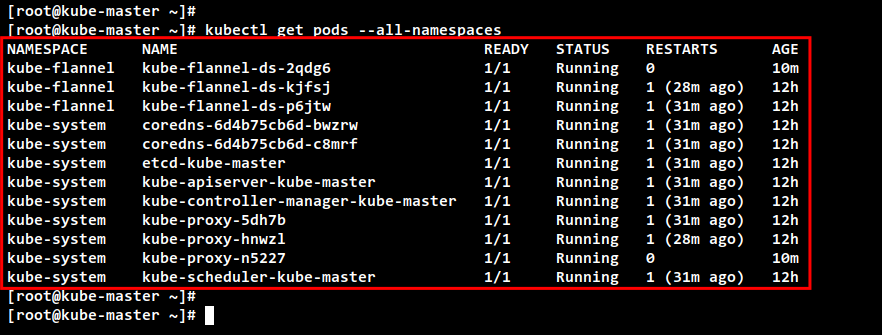
Now back to the Control Plane server ‘kube-master” and run the following command to check all running pods on the Kubernetes Cluster. You should see there are additional pods on every Kubernetes component.
kubectl get pods --all-namespaces
Lastly, check and verify all available nodes on the Kubernetes Cluster using the ‘kubectl” command below. You should see the ‘kube-master” server is running as the Kubernetes Control Plane, and the “kube-worker1” and “kube-worker2” servers are running as the worker node.
kubectl get nodes -o wide
Conclusion
Throughout this tutorial, you have finished the deployment of the Kubernetes Cluster with three Rocky Linux servers. The Kubernetes Cluster is running with one control plane and two worker nodes. It’s running with the containerd as the Container Runtime for your Kubernetes Cluster, and the Flannel network plugin for the networking of Pods on your cluster. You have fully configured Kubernetes Cluster, you can start deploying your applications to the Kubernetes Cluster or try to install the Kubernetes Dashboard to learn more about your Kubernetes environment.


