
Python is an open-source and object-oriented interpreted programming language. Anaconda is a Python, R, Data Science, and machine learning platform and used as a package manager. It comes with 1,500 open source packages with free community support. It is used by more than 15 million users around the globe.
This tutorial will show you how to install and use Anaconda Python Distribution on Debian 11.
Prerequisites
- A server running Debian 11.
- A root password is configured on the server.
Install Anaconda
The simple and easiest way to install Anaconda is to download the latest Anaconda installer bash script. First, go to the Anaconda download page, pick the latest version of the Anaconda installer and run the following command to download it to your system.
wget https://repo.anaconda.com/archive/Anaconda3-2021.05-Linux-x86_64.sh
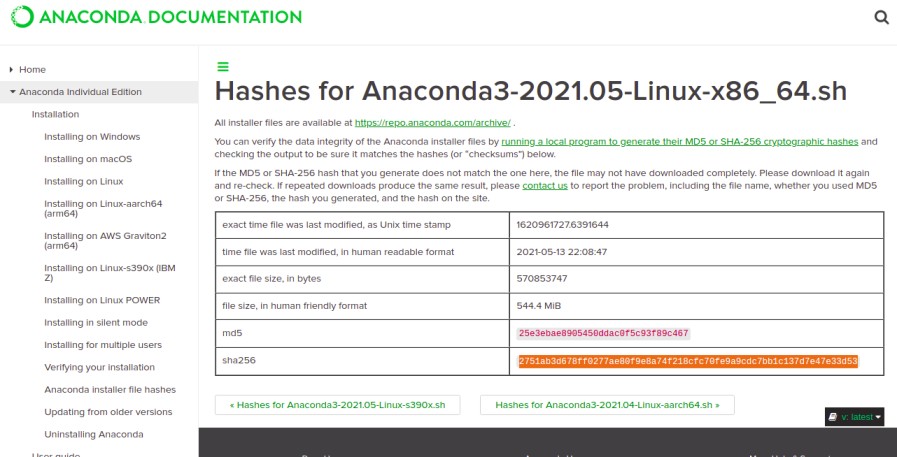
Once the download is completed, verify the data integrity of the installer using the following command:
sha256sum Anaconda3-2021.05-Linux-x86_64.sh
You should get the following output:
2751ab3d678ff0277ae80f9e8a74f218cfc70fe9a9cdc7bb1c137d7e47e33d53 Anaconda3-2021.05-Linux-x86_64.sh
Now, please copy the above output and check it against the hashes available at Anaconda Page.
Once your output matches with the hash displayed on the Anaconda page, you can install it using the following command:
bash Anaconda3-2021.05-Linux-x86_64.sh
You will be asked to review the license as shown below:
Welcome to Anaconda3 2021.05

In order to continue the installation process, please review the license
agreement.
Please, press ENTER to continue
>>>
===================================

Do you accept the license terms? [yes|no]

>>> yes
Type Yes and hit Enter to accept the license. You will be asked to specify the Anaconda location as shown below:
Anaconda3 will now be installed into this location:
/root/anaconda3

  - Press ENTER to confirm the location
  - Press CTRL-C to abort the installation
  - Or specify a different location below

[/root/anaconda3] >>>
Just press Enter to continue with the default location. You will be asked to initialize the Anaconda as shown below:
Preparing transaction: done
Executing transaction: done
installation finished.
Do you wish the installer to initialize Anaconda3
by running conda init? [yes|no]
[no] >>> yes
Type yes and hit Enter. Once the installation has been completed, you should see the following output:
no change     /root/anaconda3/condabin/conda
no change     /root/anaconda3/bin/conda
no change     /root/anaconda3/bin/conda-env
no change     /root/anaconda3/bin/activate
no change     /root/anaconda3/bin/deactivate
no change     /root/anaconda3/etc/profile.d/conda.sh
no change     /root/anaconda3/etc/fish/conf.d/conda.fish
no change     /root/anaconda3/shell/condabin/Conda.psm1
no change     /root/anaconda3/shell/condabin/conda-hook.ps1
no change     /root/anaconda3/lib/python3.8/site-packages/xontrib/conda.xsh
no change     /root/anaconda3/etc/profile.d/conda.csh
modified      /root/.bashrc

==> For changes to take effect, close and re-open your current shell. <==

If you'd prefer that conda's base environment not be activated on startup,
   set the auto_activate_base parameter to false:

conda config --set auto_activate_base false

Thank you for installing Anaconda3!

===========================================================================

Working with Python and Jupyter notebooks is a breeze with PyCharm Pro,
designed to be used with Anaconda. Download now and have the best data
tools at your fingertips.

PyCharm Pro for Anaconda is available at: https://www.anaconda.com/pycharm
Next, activate the Anaconda installation using the following command:
source ~/.bashrc
You should see the following output:
(base) [email protected]:~#
You can verify the Anaconda version using the following command:
(base) [email protected]:~# conda info
You should see the following output:
     active environment : base
    active env location : /root/anaconda3
            shell level : 1
       user config file : /root/.condarc
 populated config files :
          conda version : 4.10.1
    conda-build version : 3.21.4
         python version : 3.8.8.final.0
       virtual packages : __linux=5.10.0=0
                          __glibc=2.31=0
                          __unix=0=0
                          __archspec=1=x86_64
       base environment : /root/anaconda3  (writable)
      conda av data dir : /root/anaconda3/etc/conda
  conda av metadata url : https://repo.anaconda.com/pkgs/main
           channel URLs : https://repo.anaconda.com/pkgs/main/linux-64
                          https://repo.anaconda.com/pkgs/main/noarch
                          https://repo.anaconda.com/pkgs/r/linux-64
                          https://repo.anaconda.com/pkgs/r/noarch
          package cache : /root/anaconda3/pkgs
                          /root/.conda/pkgs
       envs directories : /root/anaconda3/envs
                          /root/.conda/envs
               platform : linux-64
             user-agent : conda/4.10.1 requests/2.25.1 CPython/3.8.8 Linux/5.10.0-8-amd64 debian/11 glibc/2.31
                UID:GID : 0:0
             netrc file : None
           offline mode : False
How to Use Anaconda
Anaconda comes with a conda utility to manage the Python packages.
To list all available packages, run the following command:
(base) [email protected]:~# conda list
You should see the following output:
# packages in environment at /root/anaconda3:
#
# Name                    Version                   Build  Channel
_ipyw_jlab_nb_ext_conf    0.1.0                    py38_0
_libgcc_mutex             0.1                        main
alabaster                 0.7.12             pyhd3eb1b0_0
anaconda                  2021.05                  py38_0
anaconda-client           1.7.2                    py38_0
anaconda-navigator        2.0.3                    py38_0
anaconda-project          0.9.1              pyhd3eb1b0_1
anyio                     2.2.0            py38h06a4308_1
appdirs                   1.4.4                      py_0
argh                      0.26.2                   py38_0
argon2-cffi               20.1.0           py38h27cfd23_1
asn1crypto                1.4.0                      py_0
astroid                   2.5              py38h06a4308_1
astropy                   4.2.1            py38h27cfd23_1
async_generator           1.10               pyhd3eb1b0_0
atomicwrites              1.4.0                      py_0
attrs                     20.3.0             pyhd3eb1b0_0
autopep8                  1.5.6              pyhd3eb1b0_0
babel                     2.9.0              pyhd3eb1b0_0
backcall                  0.2.0              pyhd3eb1b0_0
backports                 1.0                pyhd3eb1b0_2
To update the Anaconda to the latest version, run the following command:
(base) [email protected]:~# conda update conda
You should see the following output:
Collecting package metadata (current_repodata.json): done
Solving environment: done

## Package Plan ##

  environment location: /root/anaconda3

  added / updated specs:
    - conda


The following packages will be downloaded:

    package                    |            build
    ---------------------------|-----------------
    conda-4.10.3               |   py38h06a4308_0         2.9 MB
    xmltodict-0.12.0           |     pyhd3eb1b0_0          13 KB
    ------------------------------------------------------------
                                           Total:         2.9 MB

The following packages will be UPDATED:

  conda                               4.10.1-py38h06a4308_1 --> 4.10.3-py38h06a4308_0

The following packages will be DOWNGRADED:

  xmltodict                                     0.12.0-py_0 --> 0.12.0-pyhd3eb1b0_0


Proceed ([y]/n)? y
How to Create Anaconda Environments
Anaconda allows you to create a virtual environment to keep projects organized by Python versions. You can use different Python versions for each Anaconda environment.
Before creating a Virtual environment, check all available Python versions using the following command:
(base) [email protected]:~# conda search "^python$"
Now, let’s create a new Anaconda environment named myenv using the Python version 3:
(base) [email protected]:~# conda create --name myenv python=3
You should see the following output:
Proceed ([y]/n)? y


Downloading and Extracting Packages
openssl-1.1.1l       | 2.5 MB    | #################################################################################################### | 100%
pip-21.2.4           | 1.8 MB    | #################################################################################################### | 100%
_openmp_mutex-4.5    | 22 KB     | #################################################################################################### | 100%
sqlite-3.36.0        | 990 KB    | #################################################################################################### | 100%
libgcc-ng-9.3.0      | 4.8 MB    | #################################################################################################### | 100%
libstdcxx-ng-9.3.0   | 3.1 MB    | #################################################################################################### | 100%
libgomp-9.3.0        | 311 KB    | #################################################################################################### | 100%
ld_impl_linux-64-2.3 | 586 KB    | #################################################################################################### | 100%
ca-certificates-2021 | 113 KB    | #################################################################################################### | 100%
tzdata-2021a         | 111 KB    | #################################################################################################### | 100%
wheel-0.37.0         | 33 KB     | #################################################################################################### | 100%
setuptools-52.0.0    | 724 KB    | #################################################################################################### | 100%
certifi-2021.5.30    | 139 KB    | #################################################################################################### | 100%
python-3.9.6         | 18.4 MB   | #################################################################################################### | 100%
Preparing transaction: done
Verifying transaction: done
Executing transaction: done
#
# To activate this environment, use
#
#     $ conda activate myenv
#
# To deactivate an active environment, use
#
#     $ conda deactivate
Next, activate your environment using the following command:
(base) [email protected]:~# conda activate myenv
Next, verify which version of Python you are using:
(myenv) [email protected]:~# python --version
You should see the following output:
Python 3.9.6
To deactivate from your environment, run the following command:
(myenv) [email protected]:~# conda deactivate
You should see the following output:
(base) [email protected]:~#
To list all Anaconda environments that you have set up, run the following command:
(base) [email protected]:~# conda info --envs
You should see the following output:
# conda environments:
#
base                  *  /root/anaconda3
myenv                    /root/anaconda3/envs/myenv
To remove myenv environment, run the following command:
(base) [email protected]:~# conda env remove -n myenv
You should see the following output:
Remove all packages in environment /root/anaconda3/envs/myenv:
Uninstall Anaconda
To remove the Anaconda completely from your system, you will need to install the anaconda-clean module to your system. You can install it using the following command:
(base) [email protected]:~# conda install anaconda-clean
Once the installation is complete, you should get the following output:
Collecting package metadata (current_repodata.json): done
Solving environment: done

## Package Plan ##

  environment location: /root/anaconda3

  added / updated specs:
    - anaconda-clean


The following packages will be downloaded:

    package                    |            build
    ---------------------------|-----------------
    anaconda-clean-1.1.0       |   py38h06a4308_1         244 KB
    ------------------------------------------------------------
                                           Total:         244 KB

The following NEW packages will be INSTALLED:

  anaconda-clean     pkgs/main/linux-64::anaconda-clean-1.1.0-py38h06a4308_1


Proceed ([y]/n)? y
Now, uninstall Anaconda from your system using the following command:
(base) [email protected]:~# anaconda-clean
You will be asked to delete Anaconda from your system as shown below:
Delete .conda? (y/n): y
Type y and hit Enter to uninstall the Anaconda.
Next, remove the Anaconda directory using the following command:
rm -rf ~/anaconda3
Next, edit the .bashrc file with the following command:
nano ~/.bashrc
Scroll down and remove the following lines:
# >>> conda initialize >>>
# !! Contents within this block are managed by 'conda init' !!
__conda_setup="$('/root/anaconda3/bin/conda' 'shell.bash' 'hook' 2> /dev/null)"
if [ $? -eq 0 ]; then
    eval "$__conda_setup"
else
    if [ -f "https://www.howtoforge.com/root/anaconda3/etc/profile.d/conda.sh" ]; then
        . "https://www.howtoforge.com/root/anaconda3/etc/profile.d/conda.sh"
    else
        export PATH="https://www.howtoforge.com/root/anaconda3/bin:$PATH"
    fi
fi
unset __conda_setup
# <<< conda initialize <<<
Save and close the file when you are finished.
Conclusion
In the above guide, we walked you through the Anaconda installation process on Debian 11. We also explained setting up environments, updating Anaconda, and deleting Anaconda. Feel free to ask me if you have any questions.


