The old adage “sharing is caring” must be known to almost everyone. NFS was built on the purpose to share and care for the clients. NFS stands for Network File System and NFS gives access to the client to view or update a file shared with him on his local system from a server over a network. It was originally implemented as an experiment but watching the initial success the second version was then released publicly. The best thing about NFS is that it is completely open-source which means anyone in the world can implement NFS protocol.
The server in NFS implements NFS daemon processes so that the files are shared with the clients and clients can access the shared data in their local machine as a local storage file. The server holds the rights and permissions over the shared file and can give full access or half access to the client depending on him/her.
NFS server can be installed on almost all the major operating systems however In this article, we will install and configure an NFS server on Ubuntu 20.04
Installing NFS Server on Ubuntu
01. Before going into the NFS server installation let us first update all our packages by executing the following command in our Ubuntu 20.04 terminal:
sudo apt update
If all the packages are up to date then you don’t have to run the following command of the upgrade, however, if they are not then execute the following command:
sudo apt upgrade
02. Now that our system packages are updated and upgrade let us start installation the nfs-kernel-server package with the following command:
sudo apt install nfs-kernel-server
03. Once you are done with installing the nfs-kernel-server, create an NFS export directory that will be shared with a client, use the following command:
sudo mkdir -p /mnt/nfs_share
It is this nfs_share directory that we will share with the client and the client will be able to view or update this directory in their local system.
04. The next step is to set permissions of the nfs_share directory so that the client machines can access the nfs_share directory:
sudo chown -R nobody:nogroup /mnt/nfs_share/
According to your requirements and needs, you can also give other permissions as well but we will give the read, write and execute permission to all the clients that are inside the directory with the following command:
sudo chmod 777 /mnt/nfs_share/
05. Let us now give access to client systems of nfs_share directory whose permissions are in the /etc/exports directory and to change it first you have to open it in your favorite editor with the following command:
sudo nano /etc/exports
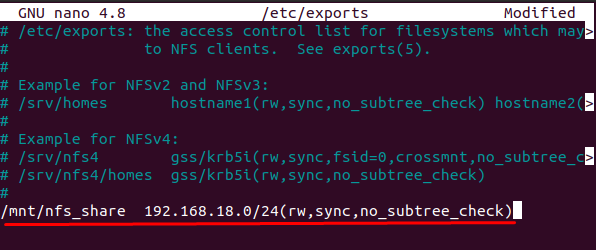
Once opened you will see the following screen:
In /etc/exports you can set permission for a single client or multiple clients as well as an entire subnet depending on your requirements. However, we will access an entire subnet to access our nfs_share directory by adding the following line in the opened file /etc/exports:
/mnt/nfs_share 192.168.18.0/24(rw,sync,no_subtree_check)

Replace the Ip address in the above line with the client’s IP address. We can see in the above line that we have given the 192.168.43.0/24 subnet access to rw (read and write), sync(writing all changes to disk before applying), no_subtree_check( excludes subtree checking).
However, if you want to grant a single client access then insert the following line in the above-opened file which is /etc/exports.
/mnt/nfs_share client_IP_Address_1 (re,sync,no_subtree_check)
Replace the clinet_IP_Adress_1 with the client IP address and then save the file by pressing CTRL S and then to exit press CTRL X.
06. The last step with giving access to a client machine is to export the directory nfs_share which will be achieved with the following command:
sudo exportfs -a
Now we have to restart our nfs-kernel-server for which purpose type or copy the following command on your Ubuntu 20.04 terminal:
sudo systemctl restart nfs-kernel-server
07. We are done with exporting the nfs_share directory and now we have to allow the NFS through the UFW firewall in ubuntu for which execute the following command on your Ubuntu 20.04 terminal:
sudo ufw allow from 192.168.18.0/24 to any port nfs
If the firewall is turned off then use the following command to enable it:
sudo ufw enable
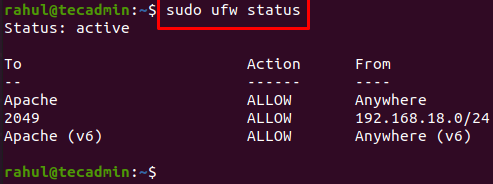
After enabling the ufw firewall, let us check the status of the ufw firewall with the following command:
sudo ufw status

Confiugre NFS client to Mount Share
01. As it is a recommended step we will first update and upgrade our client system packages with the following command:
sudo apt update && sudo apt upgrade
02. Now that we are done with updating and upgrading our system packages let us install nfs_common in our client system with the following command:
sudo apt install nfs-common
03. This Step involves creating a mount point from which we will mount the nfs_share directory from the NFS server with the following command:
sudo mkdir -p /mnt/nfs_clientshare
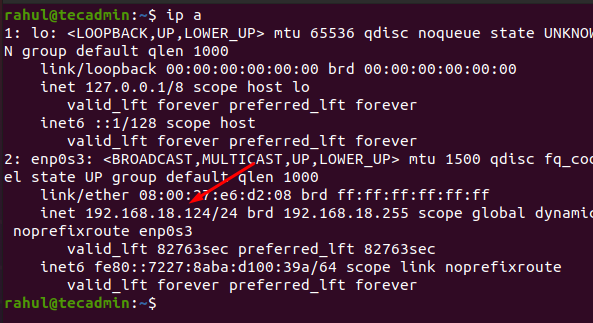
04. This is the last step where we will enable the client to have access to the nfs_share directory but first go to your server system terminal and type the following command so that we can find out the server Ip address:
ip a

Now all you have to do is to execute the following command by replacing your server IP address show above:
sudo mount 192.168.18.124:/mnt/nfs_share /mnt/nfs_clientshare
Verify the NFS Mount
Now that we are done with everything, let us test that if the nfs_share directory has client access or not for which first we have to move to the /mnt/nfs_share/ directory with the following command on our Server Ubuntu Machine:
cd /mnt/nfs_share/
Next, let’s create some files in nfs_share directory by executing the following commands in the Ubuntu Server terminal:
touch test1.txt test2.txt
Now let’s go back to our client system Ubuntu and check whether the files created in the above step in Ubuntu Server are available or not:
ls -l /mnt/nfs_clientshare/
Congratulations! as seen in the above output test1.txt and test2.txt are available in the client ubuntu system.
Conclusion
Now that we have successfully installed and then configured the NFS server on Ubuntu 20.04 we can share our files with another system over a network without any hassle no matter where your client system is in the world.
The above article showed you how to install and configure the NFS server on ubuntu 20.04. We hope that if you follow the steps thoroughly you are set with the NFS Server.


