
Apache Hadoop is an open-source framework used to manage, store and process data for various big data applications running under clustered systems. It is written in Java with some native code in C and shell scripts. It uses a distributed file system (HDFS) and scale up from single servers to thousands of machines.
Apache Hadoop is based on the four main components:
- Hadoop Common : It is the collection of utilities and libraries needed by other Hadoop modules.
- HDFS : Also known as Hadoop Distributed File System distributed across multiple nodes.
- MapReduce : It is a framework used to write applications to process huge amounts of data.
- Hadoop YARN : Also known as Yet Another Resource Negotiator is the resource management layer of Hadoop.
In this tutorial, we will explain how to set up a single-node Hadoop cluster on Ubuntu 20.04.
Prerequisites
- A server running Ubuntu 20.04 with 4 GB RAM.
- A root password is configured on your server.
Update the System Packages
Before starting, it is recommended to update your system packages to the latest version. You can do it with the following command:
apt-get update -y
apt-get upgrade -y
Once your system is updated, restart it to implement the changes.
Install Java
Apache Hadoop is a Java-based application. So you will need to install Java in your system. You can install it with the following command:
apt-get install default-jdk default-jre -yOnce installed, you can verify the installed version of Java with the following command:
java -versionYou should get the following output:
openjdk version "11.0.7" 2020-04-14
OpenJDK Runtime Environment (build 11.0.7 10-post-Ubuntu-3ubuntu1)
OpenJDK 64-Bit Server VM (build 11.0.7 10-post-Ubuntu-3ubuntu1, mixed mode, sharing)
Create Hadoop User and Setup Passwordless SSH
First, create a new user named hadoop with the following command:
adduser hadoopNext, add the hadoop user to the sudo group
usermod -aG sudo hadoop
Next, login with hadoop user and generate an SSH key pair with the following command:
su - hadoop
ssh-keygen -t rsa
You should get the following output:
Generating public/private rsa key pair.
Enter file in which to save the key (/home/hadoop/.ssh/id_rsa):
Created directory '/home/hadoop/.ssh'.
Enter passphrase (empty for no passphrase):
Enter same passphrase again:
Your identification has been saved in /home/hadoop/.ssh/id_rsa
Your public key has been saved in /home/hadoop/.ssh/id_rsa.pub
The key fingerprint is:
SHA256:HG2K6x1aCGuJMqRKJb GKIDRdKCd8LXnGsB7WSxApno [email protected]
The key's randomart image is:
 ---[RSA 3072]----
|..=..            |
| O. .o   .       |
|oo*.o   . o      |
|o .o * o         |
|o E.= o S        |
|=. o * o         |
|*.o.= o o        |
|=  o..   .       |
|o ..  o .        |
 ----[SHA256]-----
Next, add this key to the Authorized ssh keys and give proper permission:
cat ~/.ssh/id_rsa.pub >> ~/.ssh/authorized_keys
chmod 0600 ~/.ssh/authorized_keys
Next, verify the passwordless SSH with the following command:
ssh localhostOnce you are login without password, you can proceed to the next step.
Install Hadoop
First, log in with hadoop user and download the latest version of Hadoop with the following command:
su - hadoop
wget https://downloads.apache.org/hadoop/common/hadoop-3.2.1/hadoop-3.2.1.tar.gz
Once the download is completed, extract the downloaded file with the following command:
tar -xvzf hadoop-3.2.1.tar.gzNext, move the extracted directory to the /usr/local/:
sudo mv hadoop-3.2.1 /usr/local/hadoopNext, create a directory to store log with the following command:
sudo mkdir /usr/local/hadoop/logsNext, change the ownership of the hadoop directory to hadoop:
sudo chown -R hadoop:hadoop /usr/local/hadoopNext, you will need to configure the Hadoop environment variables. You can do it by editing ~/.bashrc file:
nano ~/.bashrcAdd the following lines:
export HADOOP_HOME=/usr/local/hadoop
export HADOOP_INSTALL=$HADOOP_HOME
export HADOOP_MAPRED_HOME=$HADOOP_HOME
export HADOOP_COMMON_HOME=$HADOOP_HOME
export HADOOP_HDFS_HOME=$HADOOP_HOME
export YARN_HOME=$HADOOP_HOME
export HADOOP_COMMON_LIB_NATIVE_DIR=$HADOOP_HOME/lib/native
export PATH=$PATH:$HADOOP_HOME/sbin:$HADOOP_HOME/bin
export HADOOP_OPTS="-Djava.library.path=$HADOOP_HOME/lib/native"
Save and close the file when you are finished. Then, activate the environment variables with the following command:
source ~/.bashrcConfigure Hadoop
In this section, we will learn how to setup Hadoop on a single node.
Configure Java Environment Variables
Next, you will need to define Java environment variables in hadoop-env.sh to configure YARN, HDFS, MapReduce, and Hadoop-related project settings.Advertisement
First, locate the correct Java path using the following command:
which javacYou should see the following output:
/usr/bin/javac
Next, find the OpenJDK directory with the following command:
readlink -f /usr/bin/javacYou should see the following output:
/usr/lib/jvm/java-11-openjdk-amd64/bin/javac
Next, edit the hadoop-env.sh file and define the Java path:
sudo nano $HADOOP_HOME/etc/hadoop/hadoop-env.shAdd the following lines:
export JAVA_HOME=/usr/lib/jvm/java-11-openjdk-amd64
export HADOOP_CLASSPATH =" $HADOOP_HOME/lib/*.jar"
Next, you will also need to download the Javax activation file. You can download it with the following command:
cd /usr/local/hadoop/lib
sudo wget https://jcenter.bintray.com/javax/activation/javax.activation-api/1.2.0/javax.activation-api-1.2.0.jar
You can now verify the Hadoop version using the following command:
hadoop versionYou should get the following output:
Hadoop 3.2.1
Source code repository https://gitbox.apache.org/repos/asf/hadoop.git -r b3cbbb467e22ea829b3808f4b7b01d07e0bf3842
Compiled by rohithsharmaks on 2019-09-10T15:56Z
Compiled with protoc 2.5.0
From source with checksum 776eaf9eee9c0ffc370bcbc1888737
This command was run using /usr/local/hadoop/share/hadoop/common/hadoop-common-3.2.1.jar
Configure core-site.xml File
Next, you will need to specify the URL for your NameNode. You can do it by editing core-site.xml file:Advertisement
sudo nano $HADOOP_HOME/etc/hadoop/core-site.xmlAdd the following lines:
      fs.default.name
      hdfs://0.0.0.0:9000
      The default file system URI
Save and close the file when you are finished:
Configure hdfs-site.xml File
Next, you will need to define the location for storing node metadata, fsimage file, and edit log file. You can do it by editing hdfs-site.xml file. First, create a directory for storing node metadata:
sudo mkdir -p /home/hadoop/hdfs/{namenode,datanode}
sudo chown -R hadoop:hadoop /home/hadoop/hdfs
Next, edit the hdfs-site.xml file and define the location of the directory:
sudo nano $HADOOP_HOME/etc/hadoop/hdfs-site.xmlAdd the following lines:
      dfs.replication
      1


      dfs.name.dir
      file:///home/hadoop/hdfs/namenode


      dfs.data.dir
      file:///home/hadoop/hdfs/datanode
Save and close the file.
Configure mapred-site.xml File
Next, you will need to define MapReduce values. You can define it by editing mapred-site.xml file:
sudo nano $HADOOP_HOME/etc/hadoop/mapred-site.xmlAdd the following lines:
      mapreduce.framework.name
      yarn
Save and close the file.
Configure yarn-site.xml File
Next, you will need to edit the yarn-site.xml file and define YARN related settings:
sudo nano $HADOOP_HOME/etc/hadoop/yarn-site.xmlAdd the following lines:
      yarn.nodemanager.aux-services
      mapreduce_shuffle
Save and close the file when you are finished.
Format HDFS NameNode
Next, you will need to validate the Hadoop configuration and format the HDFS NameNode.
First, log in with Hadoop user and format the HDFS NameNode with the following command:
su - hadoop
hdfs namenode -format
You should get the following output:
2020-06-07 11:35:57,691 INFO util.GSet: VM type       = 64-bit
2020-06-07 11:35:57,692 INFO util.GSet: 0.25% max memory 1.9 GB = 5.0 MB
2020-06-07 11:35:57,692 INFO util.GSet: capacity      = 2^19 = 524288 entries
2020-06-07 11:35:57,706 INFO metrics.TopMetrics: NNTop conf: dfs.namenode.top.window.num.buckets = 10
2020-06-07 11:35:57,706 INFO metrics.TopMetrics: NNTop conf: dfs.namenode.top.num.users = 10
2020-06-07 11:35:57,706 INFO metrics.TopMetrics: NNTop conf: dfs.namenode.top.windows.minutes = 1,5,25
2020-06-07 11:35:57,710 INFO namenode.FSNamesystem: Retry cache on namenode is enabled
2020-06-07 11:35:57,710 INFO namenode.FSNamesystem: Retry cache will use 0.03 of total heap and retry cache entry expiry time is 600000 millis
2020-06-07 11:35:57,712 INFO util.GSet: Computing capacity for map NameNodeRetryCache
2020-06-07 11:35:57,712 INFO util.GSet: VM type       = 64-bit
2020-06-07 11:35:57,712 INFO util.GSet: 0.029999999329447746% max memory 1.9 GB = 611.9 KB
2020-06-07 11:35:57,712 INFO util.GSet: capacity      = 2^16 = 65536 entries
2020-06-07 11:35:57,743 INFO namenode.FSImage: Allocated new BlockPoolId: BP-1242120599-69.87.216.36-1591529757733
2020-06-07 11:35:57,763 INFO common.Storage: Storage directory /home/hadoop/hdfs/namenode has been successfully formatted.
2020-06-07 11:35:57,817 INFO namenode.FSImageFormatProtobuf: Saving image file /home/hadoop/hdfs/namenode/current/fsimage.ckpt_0000000000000000000 using no compression
2020-06-07 11:35:57,972 INFO namenode.FSImageFormatProtobuf: Image file /home/hadoop/hdfs/namenode/current/fsimage.ckpt_0000000000000000000 of size 398 bytes saved in 0 seconds .
2020-06-07 11:35:57,987 INFO namenode.NNStorageRetentionManager: Going to retain 1 images with txid >= 0
2020-06-07 11:35:58,000 INFO namenode.FSImage: FSImageSaver clean checkpoint: txid=0 when meet shutdown.
2020-06-07 11:35:58,003 INFO namenode.NameNode: SHUTDOWN_MSG:
/************************************************************
SHUTDOWN_MSG: Shutting down NameNode at ubuntu2004/69.87.216.36
************************************************************/
Start the Hadoop Cluster
First, start the NameNode and DataNode with the following command:
start-dfs.shYou should get the following output:
Starting namenodes on [0.0.0.0]
Starting datanodes
Starting secondary namenodes [ubuntu2004]
Next, start the YARN resource and nodemanagers by running the following command:
start-yarn.shYou should get the following output:
Starting resourcemanager
Starting nodemanagers
You can now verify them with the following command:
jpsYou should get the following output:
5047 NameNode
5850 Jps
5326 SecondaryNameNode
5151 DataNode
Access Hadoop Web Interface
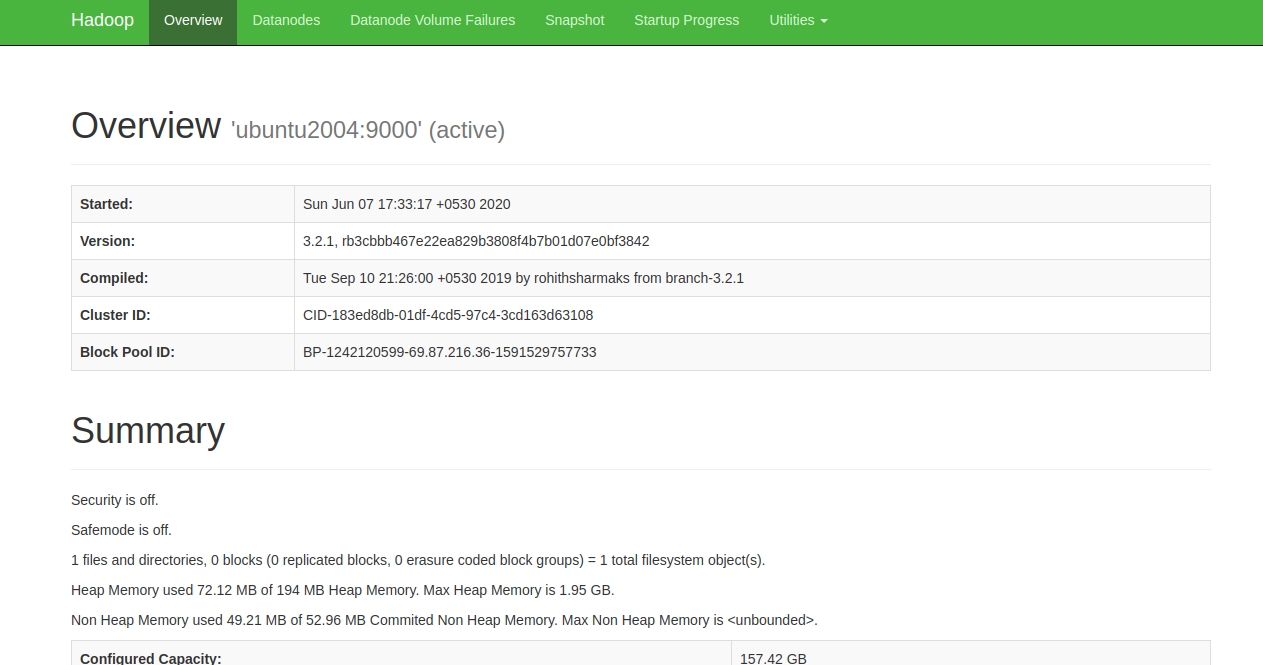
You can now access the Hadoop NameNode using the URL http://your-server-ip:9870. You should see the following screen:
You can also access the individual DataNodes using the URL http://your-server-ip:9864. You should see the following screen:
To access the YARN Resource Manager, use the URL http://your-server-ip:8088. You should see the following screen:
Conclusion
Congratulations! you have successfully installed Hadoop on a single node. You can now start exploring basic HDFS commands and design a fully distributed Hadoop cluster. Feel free to ask me if you have any questions.


