
Matrix is an open standard for decentralized and end-to-end encrypted communication. It is a collection of servers and services that communicate with each other using a standardized API that synchronizes in real time. It uses homeservers to store account information and chat history. If one home server goes down, other servers can continue communication without issues due to the nature of decentralization. You can use a Matrix home server hosted by someone else or host your own to maintain control over your data.
In this tutorial, you will learn how to install and create a chat server using Synapse, a home server implementation of Matrix. Element is a Matrix web client built using Matrix React SDK. This will allow you to offer Matrix chat on the web. You can also use the server with any other Matrix client. We will also install the Coturn server to enable Voice and Video calling. The Coturn service is optional if you are not interested in using it.
Prerequisites
-
A server running Debian 12.
-
A non-sudo user with root privileges.
-
The uncomplicated Firewall(UFW) is enabled and running.
-
Fully Qualified Domain Names(FQDN) for Matrix, Element, and Coturn pointing to your server. We will be using
matrix.example.com,element.example.com, andcoturn.example.comrespectively for the three services. -
Ensure that everything is updated.
$ sudo dnf update
-
Few packages that your system needs.
$ sudo dnf install wget curl nano unzip yum-utils policycoreutils-python-utils -y
Some of these packages may already be installed on your system.
Step 1 – Configure Firewall
Before installing any packages, the first step is configuring the firewall to open ports for HTTP, HTTPS, and Synapse. Rocky Linux uses Firewalld Firewall. Check the firewall’s status.
$ sudo firewall-cmd --state
running
The firewall works with different zones, and the public zone is the default one that we will use. List all the services and ports active on the firewall.
$ sudo firewall-cmd --zone=public --list-all
It should show the following output.
public
  target: default
  icmp-block-inversion: no
  interfaces: enp1s0
  sources:
  services: cockpit dhcpv6-client ssh
  ports:
  protocols:
  forward: yes
  masquerade: no
  forward-ports:
  source-ports:
  icmp-blocks:
  rich rules:
Open the HTTP, HTTPS, and Synapse ports in the firewall.
$ sudo firewall-cmd --zone=public --add-port=8448/tcp
$ sudo firewall-cmd --zone=public --add-service=http
$ sudo firewall-cmd --zone=public --add-service=https
Recheck the status of the firewall.
$ sudo firewall-cmd --zone=public --list-all
You should see a similar output.
public
  target: default
  icmp-block-inversion: no
  interfaces: enp1s0
  sources:
  services: cockpit dhcpv6-client http https ssh
  ports: 8448/tcp
  protocols:
  forward: yes
  masquerade: no
  forward-ports:
  source-ports:
  icmp-blocks:
  rich rules:
Make all the changes permanent and reload the firewall to enable the changes.
$ sudo firewall-cmd --runtime-to-permanent
$ sudo firewall-cmd --reload
Step 2 – Install and Configure PostgreSQL
Rocky Linux 9 ships with PostgreSQL 13 by default. We will be using PostgreSQL 16 from its official repository.
Install the PostgreSQL RPM repository.
$ sudo dnf install -y https://download.postgresql.org/pub/repos/yum/reporpms/EL-9-x86_64/pgdg-redhat-repo-latest.noarch.rpm
Disable the built-in PostgreSQL module.
$ sudo dnf -qy module disable postgresql
Now, you can install PostgreSQL using the following command.
$ sudo dnf install -y postgresql16-server postgresql16-contrib postgresql16-devel
sudo dnf install postgresql16-devel
export PATH=$PATH:/usr/pgsql-16/bin
The postgresql-contrib package contains some extra utilities.
Verify the version.
$ psql --version
psql (PostgreSQL) 16.1
Initialize the PostgreSQL database.
$ sudo /usr/pgsql-16/bin/postgresql-16-setup initdb
Initializing database ... OK
Enable the PostgreSQL service.
$ sudo systemctl enable postgresql-16
Start the PostgreSQL service.
$ sudo systemctl start postgresql-16
Check the status of the PostgreSQL service.
$ sudo systemctl status postgresql-16
? postgresql-16.service - PostgreSQL 16 database server
     Loaded: loaded (/usr/lib/systemd/system/postgresql-16.service; enabled; preset: disabled)
     Active: active (running) since Tue 2024-01-30 11:55:26 UTC; 10s ago
       Docs: https://www.postgresql.org/docs/16/static/
    Process: 9610 ExecStartPre=/usr/pgsql-16/bin/postgresql-16-check-db-dir ${PGDATA} (code=exited, status=0/SUCCESS)
   Main PID: 9615 (postgres)
      Tasks: 7 (limit: 12225)
     Memory: 17.4M
        CPU: 98ms
     CGroup: /system.slice/postgresql-16.service
             ??9615 /usr/pgsql-16/bin/postgres -D /var/lib/pgsql/16/data/
             ??9616 "postgres: logger "
             ??9617 "postgres: checkpointer "
             ??9618 "postgres: background writer "
             ??9620 "postgres: walwriter "
             ??9621 "postgres: autovacuum launcher "
             ??9622 "postgres: logical replication launcher "

Jan 30 11:55:26 matrix.example.com systemd[1]: Starting PostgreSQL 16 database server...
Jan 30 11:55:26 matrix.example.com postgres[9615]: 2024-01-30 11:55:26.482 UTC [9615] LOG:  redirecting log output to logging collector process
Jan 30 11:55:26 matrix.example.com postgres[9615]: 2024-01-30 11:55:26.482 UTC [9615] HINT:  Future log output will appear in directory "log".
Jan 30 11:55:26 matrix.example.com systemd[1]: Started PostgreSQL 16 database server.
You can see that the service is enabled and running by default.
Log in to the postgres system account.
$ sudo -su postgres
Create a new database user and a database for PostgreSQL. You will be prompted for a password when creating the user.
$ createuser --pwprompt synapse
$ createdb --encoding=UTF8 --locale=C --template=template0 --owner=synapse synapsedb
Exit the postgres account.
$ exit
Step 3 – Install Matrix Synapse
Matrix Synapse doesn’t have a pre-built package for CentOS-based distributions like Rocky Linux. Therefore, we will install it as a Python module from PyPI.
The first step is to install the prerequisites required for Synapse to work. We also need the EPEL repository which includes the python3-virtualenv package.
$ sudo dnf install epel-release
$ sudo dnf install --enablerepo=crb libtiff-devel libjpeg-devel libzip-devel
                 freetype-devel libwebp-devel libxml2-devel libxslt-devel
                 libpq-devel  python3-virtualenv libffi-devel openssl-devel
                 python3-devel libicu-devel
$ sudo dnf groupinstall "Development Tools"
$ sudo dnf install postgresql16-devel
Create a directory for Synapse.
$ mkdir -p ~/synapse
Create a Python virtual environment in the said directory.
$ virtualenv -p python3 ~/synapse/env
Activate the virtual environment.
$ source ~/synapse/env/bin/activate
Ensure that you have the latest version of pip and setuptools.
(env) $ pip install --upgrade pip
(env) $ pip install --upgrade setuptools
Install Matrix Synapse.
(env) $ pip install "matrix-synapse[postgres]"
This will download Synapse from PyPI and install it, along with the Python libraries it uses into a virtual environment under the ~/synapse/env folder. It will also install the PostgreSQL Python library required for Synapse to connect with the PostgreSQL server. The above command is a combination of the pip install matrix-synapse and pip install psycopg2 commands.
The next step is to generate a configuration file with some basic settings. Switch to the Synapse directory.
(env) $ cd ~/synapse
Run the following command to generate the configuration file.
(env) $ python -m synapse.app.homeserver
    --server-name matrix.example.com
    --config-path homeserver.yaml
    --generate-config
    --report-stats=[yes|no]
The value of the --server-name variable forms a part of your Matrix ID. Enter your Matrix domain name as its value. This will act as your homeserver address.
You can choose whether or not you wish to send anonymized statistics about your homeserver back to Matrix via the --report-stats variable. Choose yes or no as per your choice.
You will get the following output.
Generating config file homeserver.yaml
Generating log config file /home/navjot/synapse/matrix.example.com.log.config which will log to /home/navjot/synapse/homeserver.log
Generating signing key file /home/navjot/synapse/matrix.example.com.signing.key
A config file has been generated in 'homeserver.yaml' for server name 'matrix.example.com'. Please review this file and customise it to your needs.
You can change these settings later in the file ~/synapse/homeserver.yaml or /home//synapse/homeserver.yaml file. The keys generated by the above command will allow your homeserver to identify itself to other homeserver.
It is time to run the Matrix server. Make sure you are inside the Synapse directory and the virtual environment is active.
Start the homeserver.
(env) $ synctl start
You should see a similar output.
This server is configured to use 'matrix.org' as its trusted key server via the
'trusted_key_servers' config option. 'matrix.org' is a good choice for a key
server since it is long-lived, stable and trusted. However, some admins may
wish to use another server for this purpose.

To suppress this warning and continue using 'matrix.org', admins should set
'suppress_key_server_warning' to 'true' in homeserver.yaml.
--------------------------------------------------------------------------------
started synapse.app.homeserver(homeserver.yaml)
To stop the server, run the following command.
(env) $ synctl stop
Deactivate the virtual environment.
(env) $ deactivate
Step 4 – Install Nginx
For the production environment, it is recommended to run the Synapse server using an Nginx proxy.
Rocky Linux 9 ships with an older version of Nginx. You need to use the official Nginx repository to install the latest version.
Create and open the file /etc/yum.repos.d/nginx.repo for editing.
$ sudo nano /etc/yum.repos.d/nginx.repo
Paste the following code in it.
[nginx-stable]
name=nginx stable repo
baseurl=http://nginx.org/packages/centos/$releasever/$basearch/
gpgcheck=1
enabled=1
gpgkey=https://nginx.org/keys/nginx_signing.key
module_hotfixes=true

[nginx-mainline]
name=nginx mainline repo
baseurl=http://nginx.org/packages/mainline/centos/$releasever/$basearch/
gpgcheck=1
enabled=0
gpgkey=https://nginx.org/keys/nginx_signing.key
module_hotfixes=true
Once you are finished, save the file by pressing Ctrl X and entering Y when prompted.
We will be installing the Nginx mainline so enable the package for it.
$ sudo dnf config-manager --enable nginx-mainline
Install Nginx.
$ sudo dnf install nginx -y
Verify the installation.
$ nginx -v
nginx version: nginx/1.25.3
Enable and start the Nginx server service.
$ sudo systemctl enable nginx --now
Check the status of the service.
$ sudo systemctl status nginx
? nginx.service - nginx - high performance web server
     Loaded: loaded (/usr/lib/systemd/system/nginx.service; enabled; preset: disabled)
     Active: active (running) since Tue 2024-01-30 12:50:34 UTC; 4s ago
       Docs: http://nginx.org/en/docs/
    Process: 10810 ExecStart=/usr/sbin/nginx -c /etc/nginx/nginx.conf (code=exited, status=0/SUCCESS)
   Main PID: 10811 (nginx)
      Tasks: 3 (limit: 12225)
     Memory: 3.1M
        CPU: 24ms
     CGroup: /system.slice/nginx.service
             ??10811 "nginx: master process /usr/sbin/nginx -c /etc/nginx/nginx.conf"
             ??10812 "nginx: worker process"
             ??10813 "nginx: worker process"
Step 5 – Install SSL
We need to install Certbot to generate the SSL certificate. We will use the Snapd package installer for that. Since Rocky Linux doesn’t ship with it, install the Snapd installer. It requires the EPEL (Extra Packages for Enterprise Linux) repository to work. But since we already installed it in step 3, we can directly move ahead.
Install Snapd package.
$ sudo dnf install snapd -y
Enable and Start the Snap service.
$ sudo systemctl enable snapd --now
Install the Snap core package, and ensure that your version of Snapd is up to date.
$ sudo snap install core
$ sudo snap refresh core
Create necessary links for Snapd to work.
$ sudo ln -s /var/lib/snapd/snap /snap
$ echo 'export PATH=$PATH:/var/lib/snapd/snap/bin' | sudo tee -a /etc/profile.d/snapd.sh
Install Certbot.
$ sudo snap install --classic certbot
Use the following command to ensure that the Certbot command can be run by creating a symbolic link to the /usr/bin directory.
$ sudo ln -s /snap/bin/certbot /usr/bin/certbot
Check the Certbot version.
$ certbot --version
certbot 2.8.0
Run the following command to generate an SSL Certificate.
$ sudo certbot certonly --nginx --agree-tos --no-eff-email --staple-ocsp --preferred-challenges http -m [email protected] -d matrix.example.com
The above command will download a certificate to the /etc/letsencrypt/live/matrix.example.com directory on your server.
Generate a Diffie-Hellman group certificate.
$ sudo openssl dhparam -dsaparam -out /etc/ssl/certs/dhparam.pem 4096
Check the Certbot renewal scheduler service.
$ systemctl list-timers
You will find snap.certbot.renew.service as one of the services scheduled to run.
NEXT                        LEFT         LAST                        PASSED      UNIT                         ACTIVATES                   ----------------------------------------------------------------------------------------------------------------------------------
Tue 2024-01-30 14:37:50 UTC 29min left   Tue 2024-01-30 13:05:13 UTC 1h 3min ago dnf-makecache.timer          dnf-makecache.service
Tue 2024-01-30 15:13:00 UTC 1h 4min left -                           -           snap.certbot.renew.timer     snap.certbot.renew.service
Wed 2024-01-31 00:00:00 UTC 9h left      Tue 2024-01-30 06:35:44 UTC 7h ago      logrotate.timer              logrotate.service
Do a dry run of the process to check whether the SSL renewal is working fine.
$ sudo certbot renew --dry-run
If you see no errors, you are all set. Your certificate will renew automatically.
Step 6 – Configure SELinux
SELinux prevents you from running a system service where the binary is in a user’s home directory. For this reason, if we create a service file for Synapse, it will be blocked by SELinux. To get around the issue, we need to run the following command to allow the Python binary to be run as a system service.
$ sudo chcon -R -t bin_t /home/username/synapse/env/bin/python
Apply the policy to allow connections to be made to outside hosts.
$ sudo setsebool -P httpd_can_network_connect 1
Apply the policy to allow Nginx to give access to PostgreSQL.
$ sudo setsebool -P httpd_can_network_connect_db 1
Step 7 – Create Matrix Systemd Service
The Synapse service status doesn’t get saved across a reboot which means if you restart the server, you will need to start the server manually. To get around this issue, we need to create the Systemd file for it.
Before proceeding with that, make sure the Synapse service is stopped.
$ cd ~/synapse
$ source env/bin/activate
(env) $ synctl stop
(env) $ deactivate
Create and open the matrix-synapse.service file in the /etc/systemd/system/ directory for editing.
$ sudo nano /etc/systemd/system/matrix-synapse.service
Paste the following code in it. Replace the username variable with your Linux system user under which you installed Synapse.
# This assumes that Synapse has been installed by a user named username.
# This assumes that Synapse has been installed in a virtualenv in
# the user's home directory: `/home/username/synapse/env`.

[Unit]
Description=Synapse Matrix homeserver
After=postgresql-16.service

[Service]
Type=notify
NotifyAccess=main
ExecReload=/bin/kill -HUP $MAINPID
Restart=on-abort

WorkingDirectory=/home/username/synapse
ExecStart=/home/username/synapse/env/bin/python -m synapse.app.homeserver --config-path=/home/username/synapse/homeserver.yaml
SyslogIdentifier=matrix-synapse

# adjust the cache factor if necessary
# Environment=SYNAPSE_CACHE_FACTOR=2.0

[Install]
WantedBy=multi-user.target
Once finished, save the file by pressing Ctrl X and entering Y when prompted.
Reload the service daemon.
$ sudo systemctl daemon-reload
Enable the Matrix Synapse service.
$ sudo systemctl enable matrix-synapse
Start the Matrix Synapse service.
$ sudo systemctl start matrix-synapse
Check the service status.
$ sudo systemctl status matrix-synapse
You should see the following output.
? matrix-synapse.service - Synapse Matrix homeserver
     Loaded: loaded (/etc/systemd/system/matrix-synapse.service; enabled; preset: disabled)
     Active: active (running) since Tue 2024-01-30 14:20:20 UTC; 5s ago
   Main PID: 14687 (python)
      Tasks: 8 (limit: 12225)
     Memory: 77.6M
        CPU: 3.527s
     CGroup: /system.slice/matrix-synapse.service
             ??14687 /home/navjot/synapse/env/bin/python -m synapse.app.homeserver --config-path=/home/navjot/synapse/homeserver.yaml

Jan 30 14:20:16 matrix.example.com systemd[1]: Starting Synapse Matrix homeserver...
Jan 30 14:20:19 matrix.example.com matrix-synapse[14687]: This server is configured to use 'matrix.org' as its trusted key server via the
Jan 30 14:20:19 matrix.example.com matrix-synapse[14687]: 'trusted_key_servers' config option. 'matrix.org' is a good choice for a key
Jan 30 14:20:19 matrix.example.com matrix-synapse[14687]: server since it is long-lived, stable and trusted. However, some admins may
Jan 30 14:20:19 matrix.example.com matrix-synapse[14687]: wish to use another server for this purpose.
Jan 30 14:20:19 matrix.example.com matrix-synapse[14687]: To suppress this warning and continue using 'matrix.org', admins should set
Jan 30 14:20:19 matrix.example.com matrix-synapse[14687]: 'suppress_key_server_warning' to 'true' in homeserver.yaml.
Jan 30 14:20:19 matrix.example.com matrix-synapse[14687]: --------------------------------------------------------------------------------
Jan 30 14:20:20 matrix.example.com systemd[1]: Started Synapse Matrix homeserver.
Step 8 – Configure Matrix Synapse
Before proceeding ahead, create a secret registration key first. The key should be secured because it will allow anyone to register a new user, even if registration is disabled.
$ echo "registration_shared_secret: '$(cat /dev/urandom | tr -cd '[:alnum:]' | fold -w 256 | head -n 1)'"
registration_shared_secret: '1y75ja0RUxvbWcS6SdZhakenukUwHHEjOXWC9Mu3FpO0QenOnpKRsc6NBZSxuzPcHYsOEuIQziwVjSZcP87dlWK4ZkIGYniurMqNsCYL4xg5xXs4bJDuTJH2CUXab4U9liv399lmkIZFaMpJCLxV9lVWB9mKHILYsjeLgGY5wAARv1SiK07bFsQOwKJGFqIvsUXmxymx5QCNDzTHw8R4ShqZ7elnnZrbdYk4r2f7qogERNHvQaRV7IEYUIOtMhVP'
Copy the output from the above line and save it.
You can configure the Matrix server via the file /home/username/synapse/homeserver.yaml. Open it for editing.
$ nano ~/synapse/homeserver.yaml
Paste the output of the registration key command at the bottom of the file.
By default, Synapse is configured to use the SQLite database. We need to edit it to add PostgreSQL credentials.
Find the following section in the file and comment it out as shown.
#database:
#  name: sqlite3
#  args:
#    database: /home/navjot/synapse/homeserver.db
Add the following section below it. Replace the your-password field with the PostgreSQL user password you created in step 3. Replace localhost with the IP address of your server, if you are hosting the database elsewhere.
database:
  name: psycopg2
  args:
    user: synapse
    password: 'your-password'
    database: synapsedb
    host: localhost
    cp_min: 5
    cp_max: 10
By default, Synapse enables presence indicators that show if a person is online. It can cause high CPU usage, therefore you can disable it. Paste the following line at the bottom.
presence:
  enabled: false
Once finished, save the file by pressing Ctrl X and entering Y when prompted.
Create a new matrix user. You will be asked for your username and password. Since this is the first user we are creating, type yes when asked whether to make the user an administrator. You will need to activate the virtual environment to create the user.
$ cd ~/synapse
$ source env/bin/activate
(env) $ register_new_matrix_user -c homeserver.yaml http://localhost:8008
New user localpart [navjot]: navjot
Password:
Confirm password:
Make admin [no]: yes
Sending registration request...
Success!
(env) $ deactivate
You can see that we used port 8008 in the above command. That is because it is the default port that Matrix Synapse listens on.
By default, registration of new users is disabled which means you need to register every user manually like above. If you want to open public registrations, you can do so by editing the homeserver.yaml file.
Open it for editing again.
$ nano ~/synapse/homeserver.yaml
Paste the following line at the bottom.
enable_registration: true
By default, Synapse does not allow registrations without email verification. To enable email verification, paste the following lines.
registrations_require_3pid:
  - email

email:
  smtp_host: mail.example.com
  smtp_port: 587

  # If mail server has no authentication, skip these 2 lines
  smtp_user: '[email protected]'
  smtp_pass: 'password'

  # Optional, require encryption with STARTTLS
  require_transport_security: true

  app_name: 'HowtoForge Example Chat'  # defines value for %(app)s in notif_from and email subject
  notif_from: "%(app)s <[email protected]>"
To disable email verification, paste the following line instead.
enable_registration_without_verification: true
Once finished, save the file by pressing Ctrl X and entering Y when prompted.
Restart Synapse to apply the configuration.
$ sudo systemctl restart matrix-synapse
Step 9 – Configure Nginx
Open the file /etc/nginx/nginx.conf for editing.
$ sudo nano /etc/nginx/nginx.conf
Add the following line before the line include /etc/nginx/conf.d/*.conf;.
server_names_hash_bucket_size 64;
Save the file by pressing Ctrl X and entering Y when prompted.
Create and open the file /etc/nginx/conf.d/synapse.conf for editing.
$ sudo nano /etc/nginx/conf.d/synapse.conf
Paste the following code in it.
# enforce HTTPS
server {
    # Client port
    listen 80;
    listen [::]:80;
    server_name matrix.example.com;
    return 301 https://$host$request_uri;
}

server {
    server_name matrix.example.com;

    # Client port
    listen 443 ssl;
    listen [::]:443 ssl;
    http2 on;

    # Federation port
    listen 8448 ssl default_server;
    listen [::]:8448 ssl default_server;

    access_log  /var/log/nginx/synapse.access.log;
    error_log   /var/log/nginx/synapse.error.log;

    # TLS configuration
    ssl_certificate /etc/letsencrypt/live/matrix.example.com/fullchain.pem;
    ssl_certificate_key /etc/letsencrypt/live/matrix.example.com/privkey.pem;
    ssl_trusted_certificate /etc/letsencrypt/live/matrix.example.com/chain.pem;
    ssl_session_timeout 1d;
    ssl_session_cache shared:MozSSL:10m;
    ssl_session_tickets off;
    ssl_prefer_server_ciphers on;
    ssl_stapling on;
    ssl_stapling_verify on;
    ssl_dhparam /etc/ssl/certs/dhparam.pem;
    resolver 1.1.1.1 1.0.0.1 [2606:4700:4700::1111] [2606:4700:4700::1001] 8.8.8.8 8.8.4.4 [2001:4860:4860::8888] [2001:4860:4860::8844] valid=60s;
    resolver_timeout 2s;

    ssl_protocols TLSv1.2 TLSv1.3;
    ssl_ciphers ECDHE-ECDSA-AES128-GCM-SHA256:ECDHE-RSA-AES128-GCM-SHA256:ECDHE-ECDSA-AES256-GCM-SHA384:ECDHE-RSA-AES256-GCM-SHA384:ECDHE-ECDSA-CHACHA20-POLY1305:ECDHE-RSA-CHACHA20-POLY1305:DHE-RSA-AES128-GCM-SHA256:DHE-RSA-AES256-GCM-SHA384;

    tcp_nopush on;
    gzip on;

    location ~ ^(/_matrix|/_synapse/client) {
            proxy_pass http://localhost:8008;
            proxy_http_version 1.1;

            proxy_set_header X-Forwarded-For $remote_addr;
            proxy_set_header X-Forwarded-Proto $scheme;
            proxy_set_header Host $host;

            # Nginx by default only allows file uploads up to 1M in size
            # Increase client_max_body_size to match max_upload_size defined in homeserver.yaml
            client_max_body_size 50M;
    }
}
Save the file by pressing Ctrl X and entering Y when prompted once finished. The above configuration works on the assumption that the IP address of the domains example.com and matrix.example.com are pointing to the same server. If they are not, then use the following configuration file for the example.com server.
server {
    server_name example.com;

    listen 443 ssl http2;
    listen [::]:443 ssl http2;

    # TLS configuration
    ssl_certificate /etc/letsencrypt/live/matrix.example.com/fullchain.pem;
    ssl_certificate_key /etc/letsencrypt/live/matrix.example.com/privkey.pem;
    ssl_trusted_certificate /etc/letsencrypt/live/matrix.example.com/chain.pem;
    ssl_session_timeout 1d;
    ssl_session_cache shared:MozSSL:10m;
    ssl_session_tickets off;
    ssl_prefer_server_ciphers on;
    ssl_stapling on;
    ssl_stapling_verify on;
    ssl_dhparam /etc/ssl/certs/dhparam.pem;
    resolver 1.1.1.1 1.0.0.1 [2606:4700:4700::1111] [2606:4700:4700::1001] 8.8.8.8 8.8.4.4 [2001:4860:4860::8888] [2001:4860:4860::8844] valid=60s;
    resolver_timeout 2s;

    ssl_protocols TLSv1.2 TLSv1.3;
    ssl_ciphers ECDHE-ECDSA-AES128-GCM-SHA256:ECDHE-RSA-AES128-GCM-SHA256:ECDHE-ECDSA-AES256-GCM-SHA384:ECDHE-RSA-AES256-GCM-SHA384:ECDHE-ECDSA-CHACHA20-POLY1305:ECDHE-RSA-CHACHA20-POLY1305:DHE-RSA-AES128-GCM-SHA256:DHE-RSA-AES256-GCM-SHA384;

    # Redirect
    location ~ ^(/_matrix|/_synapse/client) {
            return 301 "https://matrix.example.com$request_uri";
    }

    # Client homeserver autodiscovery
    location /.well-known/matrix/client {
        default_type application/json;
        add_header Access-Control-Allow-Origin *;

        return 200 '{ "m.homeserver": { "base_url": "https://matrix.example.com" } }';
    }

    # Domain delegation
    location /.well-known/matrix/server {
        default_type application/json;
        add_header Access-Control-Allow-Origin *;

        return 200 '{ "m.server": "matrix.example.com" }';
    }
}
Verify the Nginx configuration file syntax.
$ sudo nginx -t
nginx: the configuration file /etc/nginx/nginx.conf syntax is ok
nginx: configuration file /etc/nginx/nginx.conf test is successful
Restart the Nginx service.
$ sudo systemctl restart nginx
Step 10 – Install Coturn
You will need to install a Traversal Using Relays around the NAT (TURN) server to enable voice and video calling. For this purpose, we will install the Coturn package. If you don’t need this functionality, you can skip this step.
Install Coturn.
$ sudo dnf install coturn
Open the TURN and UDP ports.
$ sudo firewall-cmd --zone=public --add-port=3478/{tcp,udp}
$ sudo firewall-cmd --zone=public --add-port=5349/{tcp,udp}
$ sudo firewall-cmd --zone=public --add-port=49152-65535/udp
$ sudo firewall-cmd --runtime-to-permanent
$ sudo firewall-cmd --reload
Generate an SSL certificate for Turn (coturn.example.com).
$ sudo certbot certonly --nginx --agree-tos --no-eff-email --staple-ocsp --preferred-challenges http -m [email protected] -d coturn.example.com
Generate an authentication secret for Coturn.
$ echo "static-auth-secret=$(cat /dev/urandom | tr -cd '[:alnum:]' | fold -w 256 | head -n 1)"
static-auth-secret=u3ksgJ9X876sFMO00A8KabXwZvzVwCmV30wWvZ7DzGiepRwNRYSCTYzf2E8olNzdDHu7oO3XpT3l5bv5mVdhXEQ3pnoTWBquSVPFFBJtyD6y9gBxiMaD2TYTD2WohQLE9s7OKJVpkDeKTnZQnkmjrFadE3M9DRxPL1W5Lgdg6XLLKABgb5XGkutRgkJOV0JRH4sBYsot63fWq9mcGTm6nAMdIycvDVDOs7vhoeqRzcTbMF0wsfAHVJNhXpGGFDyZ
Open the configuration file for editing.
$ sudo nano /etc/coturn/turnserver.conf
We will go through the file and enable the settings that we need. First, enable the authentication method by uncommenting the use-auth-secret line.
# Be aware that use-auth-secret overrides some parts of lt-cred-mech.
# The use-auth-secret feature depends internally on lt-cred-mech, so if you set
# this option then it automatically enables lt-cred-mech internally
# as if you had enabled both.
#
# Note that you can use only one auth mechanism at the same time! This is because,
# both mechanisms conduct username and password validation in different ways.
#
# Use either lt-cred-mech or use-auth-secret in the conf
# to avoid any confusion.
#
use-auth-secret
Next, we will configure the static-auth-secret variable with the value we created above. We will also need this secret to configure Synapse later on.
# 'Static' authentication secret value (a string) for TURN REST API only.
# If not set, then the turn server
# will try to use the 'dynamic' value in the turn_secret table
# in the user database (if present). The database-stored  value can be changed on-the-fly
# by a separate program, so this is why that mode is considered 'dynamic'.
#
static-auth-secret=u3ksgJ9X876sFMO00A8KabXwZvzVwCmV30wWvZ7DzGiepRwNRYSCTYzf2E8olNzdDHu7oO3XpT3l5bv5mVdhXEQ3pnoTWBquSVPFFBJtyD6y9gBxiMaD2TYTD2WohQLE9s7OKJVpkDeKTnZQnkmjrFadE3M9DRxPL1W5Lgdg6XLLKABgb5XGkutRgkJOV0JRH4sBYsot63fWq9mcGTm6nAMdIycvDVDOs7vhoeqRzcTbMF0wsfAHVJNhXpGGFDyZ
The next value we need to change is the realm. It refers to the domain we picked for Coturn.
# The default realm to be used for the users when no explicit
# origin/realm relationship is found in the database, or if the TURN
# server is not using any database (just the commands-line settings
# and the userdb file). Must be used with long-term credentials
# mechanism or with TURN REST API.
#
# Note: If the default realm is not specified, then realm falls back to the host domain name.
#       If the domain name string is empty, or set to '(None)', then it is initialized as an empty string.
#
realm=coturn.example.com
Next, define the number of sessions and sessions per user. Choose a value that works for your server.
# Per-user allocation quota.
# default value is 0 (no quota, unlimited number of sessions per user).
# This option can also be set through the database, for a particular realm.
#
user-quota=12

# Total allocation quota.
# default value is 0 (no quota).
# This option can also be set through the database, for a particular realm.
#
total-quota=1200
Next, we need to disable TCP since VOIP is UDP.
# Uncomment if no TCP relay endpoints are allowed.
# By default TCP relay endpoints are enabled (like in RFC 6062).
#
no-tcp-relay
We also need to configure the location of the certificates we created for Coturn.
# Certificate file.
# Use an absolute path or path relative to the
# configuration file.
# Use PEM file format.
#
cert=/etc/letsencrypt/live/coturn.example.com/fullchain.pem

# Private key file.
# Use an absolute path or path relative to the
# configuration file.
# Use PEM file format.
#
pkey=/etc/letsencrypt/live/coturn.example.com/privkey.pem
Next, we need to disable traffic to private IP ranges and disallow peers on multicast addresses to improve security.
# Flag that can be used to disallow peers on well-known broadcast addresses (224.0.0.0 and above, and FFXX:*).
# This is an extra security measure.
#
no-multicast-peers

...............

# Option to allow or ban specific ip addresses or ranges of ip addresses.
# If an ip address is specified as both allowed and denied, then the ip address is
# considered to be allowed. This is useful when you wish to ban a range of ip
# addresses, except for a few specific ips within that range.
#
# This can be used when you do not want users of the turn server to be able to access
# machines reachable by the turn server, but would otherwise be unreachable from the
# internet (e.g. when the turn server is sitting behind a NAT)
#
# Examples:
# denied-peer-ip=83.166.64.0-83.166.95.255
# allowed-peer-ip=83.166.68.45
denied-peer-ip=0.0.0.0-0.255.255.255
denied-peer-ip=10.0.0.0-10.255.255.255
denied-peer-ip=100.64.0.0-100.127.255.255
denied-peer-ip=127.0.0.0-127.255.255.255
denied-peer-ip=169.254.0.0-169.254.255.255
denied-peer-ip=172.16.0.0-172.31.255.255
denied-peer-ip=192.0.0.0-192.0.0.255
denied-peer-ip=192.0.2.0-192.0.2.255
denied-peer-ip=192.88.99.0-192.88.99.255
denied-peer-ip=192.168.0.0-192.168.255.255
denied-peer-ip=198.18.0.0-198.19.255.255
denied-peer-ip=198.51.100.0-198.51.100.255
denied-peer-ip=203.0.113.0-203.0.113.255
denied-peer-ip=240.0.0.0-255.255.255.255
denied-peer-ip=::1
denied-peer-ip=64:ff9b::-64:ff9b::ffff:ffff
denied-peer-ip=::ffff:0.0.0.0-::ffff:255.255.255.255
denied-peer-ip=100::-100::ffff:ffff:ffff:ffff
denied-peer-ip=2001::-2001:1ff:ffff:ffff:ffff:ffff:ffff:ffff
denied-peer-ip=2002::-2002:ffff:ffff:ffff:ffff:ffff:ffff:ffff
denied-peer-ip=fc00::-fdff:ffff:ffff:ffff:ffff:ffff:ffff:ffff
denied-peer-ip=fe80::-febf:ffff:ffff:ffff:ffff:ffff:ffff:ffff
Once finished, save the file by pressing Ctrl X and entering Y when prompted.
Restart Coturn to apply the configuration.
$ sudo systemctl restart coturn
Open the Synapse configuration (homeserver.yaml) file for adding Coturn settings.
$ nano ~/synapse/homeserver.yaml
Paste the following lines in it. Replace turn_shared_secret value with the value of static-auth-secret from the etccoturnturnserver.conf file.
turn_uris: [ "turn:coturn.example.com?transport=udp", "turn:coturn.example.com?transport=tcp" ]
turn_shared_secret: 'static-auth-secret'
turn_user_lifetime: 86400000
turn_allow_guests: True

# vim:ft=yaml
Save the file by pressing Ctrl X and entering Y when prompted.
Restart Synapse to apply the changes.
$ sudo systemctl restart matrix-synapse
Step 11 – Access Matrix
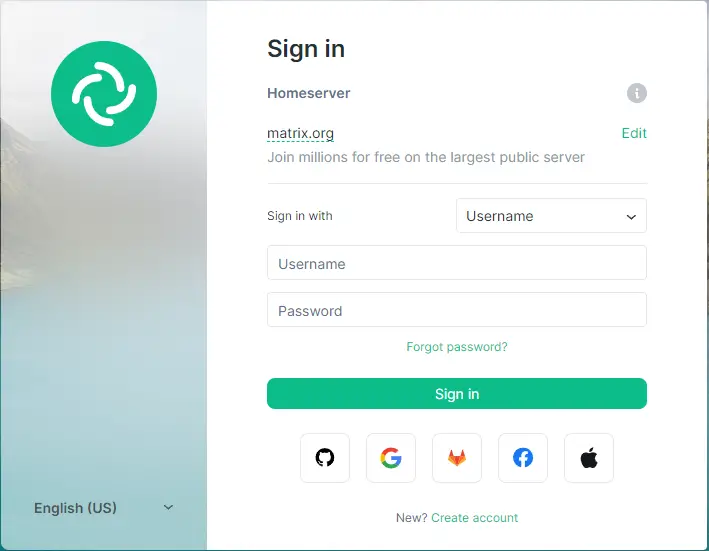
You can access Matrix Chat using Element’s web client at https://app.element.io. Click the Sign in button to proceed.
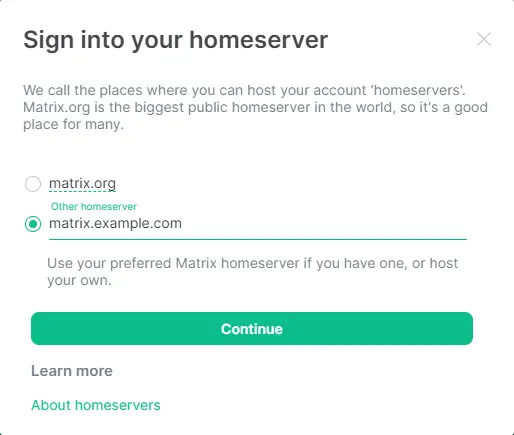
Click the Edit link under Homeserver. Enter matrix.example.com as your homeserver.
If the client detects your homeserver correctly, the boundary and the text will become green colored else it will be shown in red. Click Continue to proceed.
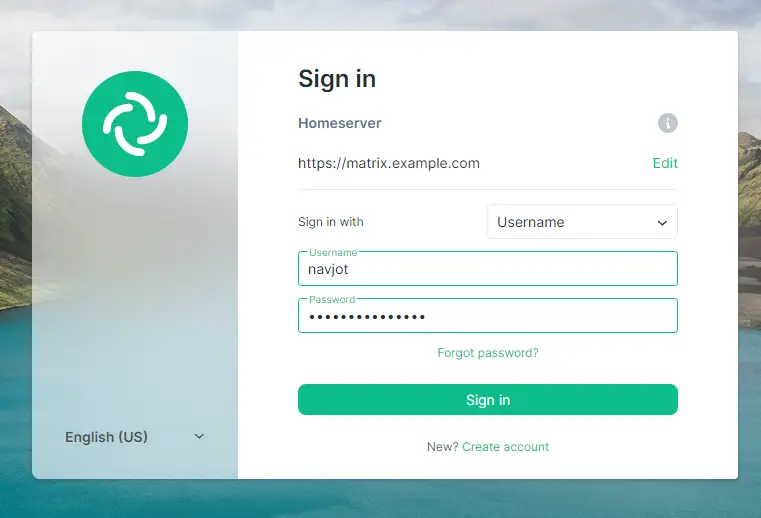
Enter the username and password you created in step 8 while configuring Synapse. Click the Sign in button to log in. You will be asked to create a secure and encrypted backup.
Select the Enter a Security Phrase option to create a security phrase that will be required every time you log in. Click Continue to proceed.
Enter a security phrase and click the Continue button to proceed. You will be asked to confirm it again on the next screen.
Enter the phrase again and click Continue to proceed.
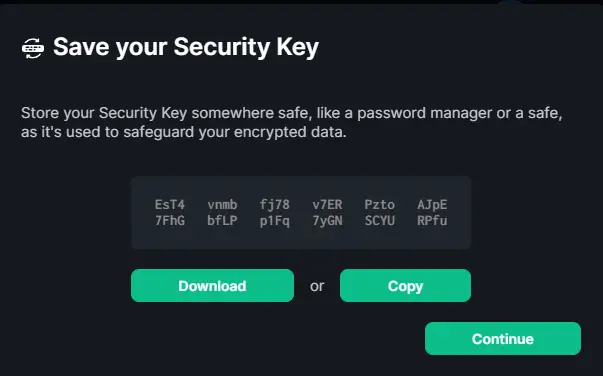
You will be given a set of security keys that you can use if you forget your security phrase. Click the Download button to save them.
Click the Continue button to proceed.
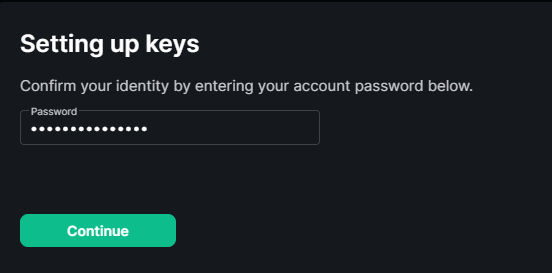
You will be asked for your account password. Enter the password and click the Continue button to finish setting up the encrypted backup.
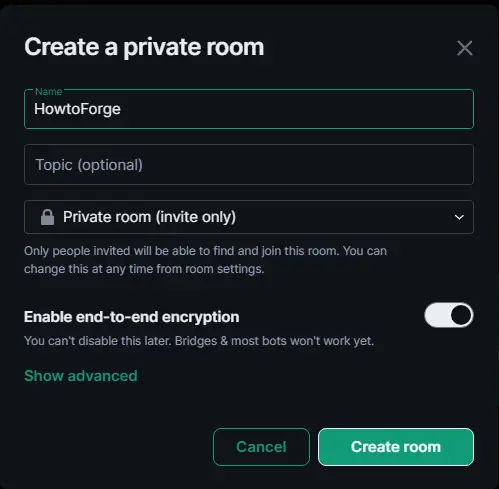
We created a group chat room named HowtoForge using the Create a Group Chat button on the homepage. You will get the following popup when you click the button.
You can restrict members to the domain by expanding the advanced menu and selecting the option. Finish creating the room by clicking the Create room button.
Step 12 – Install Element
Create a directory for Element.
$ sudo mkdir -p /var/www/html/element
Create a new file for grabbing the latest Element release.
$ sudo nano /var/www/html/element/update.sh
Add the following lines to it.
#!/bin/sh
set -e

install_location="https://www.howtoforge.com/var/www/html/element"
latest="$(curl -I https://github.com/element-hq/element-web/releases/latest | awk -F '/' '/^location/ {print  substr($NF, 1, length($NF)-1)}')"

cd "$install_location"

[ ! -d "archive" ] && mkdir -p "archive"
[ -d "archive/element-${latest}" ] && rm -r "archive/element-${latest}"
[ -f "archive/element-${latest}.tar.gz" ] && rm "archive/element-${latest}.tar.gz"

wget "https://github.com/element-hq/element-web/releases/download/${latest}/element-${latest}.tar.gz" -P "archive"
tar xf "archive/element-${latest}.tar.gz" -C "archive"

[ -L "${install_location}/current" ] && rm "${install_location}/current"
ln -sf "${install_location}/archive/element-${latest}" "${install_location}/current"
ln -sf "${install_location}/config.json" "${install_location}/current/config.json"
Save the file by pressing Ctrl X and entering Y when prompted.
Make the file executable.
$ sudo chmod x /var/www/html/element/update.sh
Run the script to download Element.
$ sudo /var/www/html/element/update.sh
Step 13 – Configure Element
Copy the same element configuration file.
$ sudo cp /var/www/html/element/current/config.sample.json /var/www/html/element/config.json
Open the configuration file for editing.
$ sudo nano /var/www/html/element/config.json
Find the following lines.
"m.homeserver": {
    "base_url": "https://matrix-client.matrix.org",
    "server_name": "matrix.org"
},
Change the default Matrix homeserver address to your homeserver and remove the server_name variable.
"m.homeserver": {
    "base_url": "https://matrix.example.com",
    "server_name": "example.com"
},
If you want to use your name instead of Element in the website title, change the brand name.
"brand": "HowtoForge Example Chat",
Set the disable_guests variable as true to disallow Guests from using Element.
"disable_guests": true,
Save the file by pressing Ctrl X and entering Y when prompted.
Generate an SSL certificate for the Element client.
$ sudo certbot certonly --nginx --agree-tos --no-eff-email --staple-ocsp --preferred-challenges http -m [email protected] -d element.example.com
Create and open the file /etc/nginx/conf.d/element.conf for editing.
$ sudo nano /etc/nginx/conf.d/element.conf
Paste the following lines in it.
server {
    listen 80;
    listen [::]:80;
    server_name element.example.com;
    return 301 https://$host$request_uri;
}

server {
    listen 443 ssl;
    listen [::]:443 ssl;
    http2 on;

    server_name element.example.com;

    root /var/www/html/element/current;
    index index.html;

    access_log  /var/log/nginx/element.access.log;
    error_log   /var/log/nginx/element.error.log;

    add_header Referrer-Policy "strict-origin" always;
    add_header X-Content-Type-Options "nosniff" always;
    add_header X-Frame-Options "SAMEORIGIN" always;

    # TLS configuration
    ssl_certificate /etc/letsencrypt/live/element.example.com/fullchain.pem;
    ssl_certificate_key /etc/letsencrypt/live/element.example.com/privkey.pem;
    ssl_trusted_certificate /etc/letsencrypt/live/element.example.com/chain.pem;
    ssl_session_timeout 1d;
    ssl_session_cache shared:MozSSL:10m;
    ssl_session_tickets off;
    ssl_prefer_server_ciphers on;
    ssl_stapling on;
    ssl_stapling_verify on;
    ssl_dhparam /etc/ssl/certs/dhparam.pem;
    resolver 1.1.1.1 1.0.0.1 [2606:4700:4700::1111] [2606:4700:4700::1001] 8.8.8.8 8.8.4.4 [2001:4860:4860::8888] [2001:4860:4860::8844] valid=60s;
    resolver_timeout 2s;

    ssl_protocols TLSv1.2 TLSv1.3;
    ssl_ciphers ECDHE-ECDSA-AES128-GCM-SHA256:ECDHE-RSA-AES128-GCM-SHA256:ECDHE-ECDSA-AES256-GCM-SHA384:ECDHE-RSA-AES256-GCM-SHA384:ECDHE-ECDSA-CHACHA20-POLY1305:ECDHE-RSA-CHACHA20-POLY1305:DHE-RSA-AES128-GCM-SHA256:DHE-RSA-AES256-GCM-SHA384;
}
Save the file by pressing Ctrl X and entering Y when prompted.
Verify the Nginx configuration file syntax.
$ sudo nginx -t
nginx: the configuration file /etc/nginx/nginx.conf syntax is ok
nginx: configuration file /etc/nginx/nginx.conf test is successful
Restart the Nginx service.
$ sudo systemctl restart nginx
We need to configure SELinux settings before accessing Element. Run the following commands to permit Element to run.
$ sudo semanage fcontext -a -t httpd_sys_rw_content_t "https://www.howtoforge.com/var/www/html/element(/.*)?"
$ sudo restorecon -Rv /var/www/html/element/
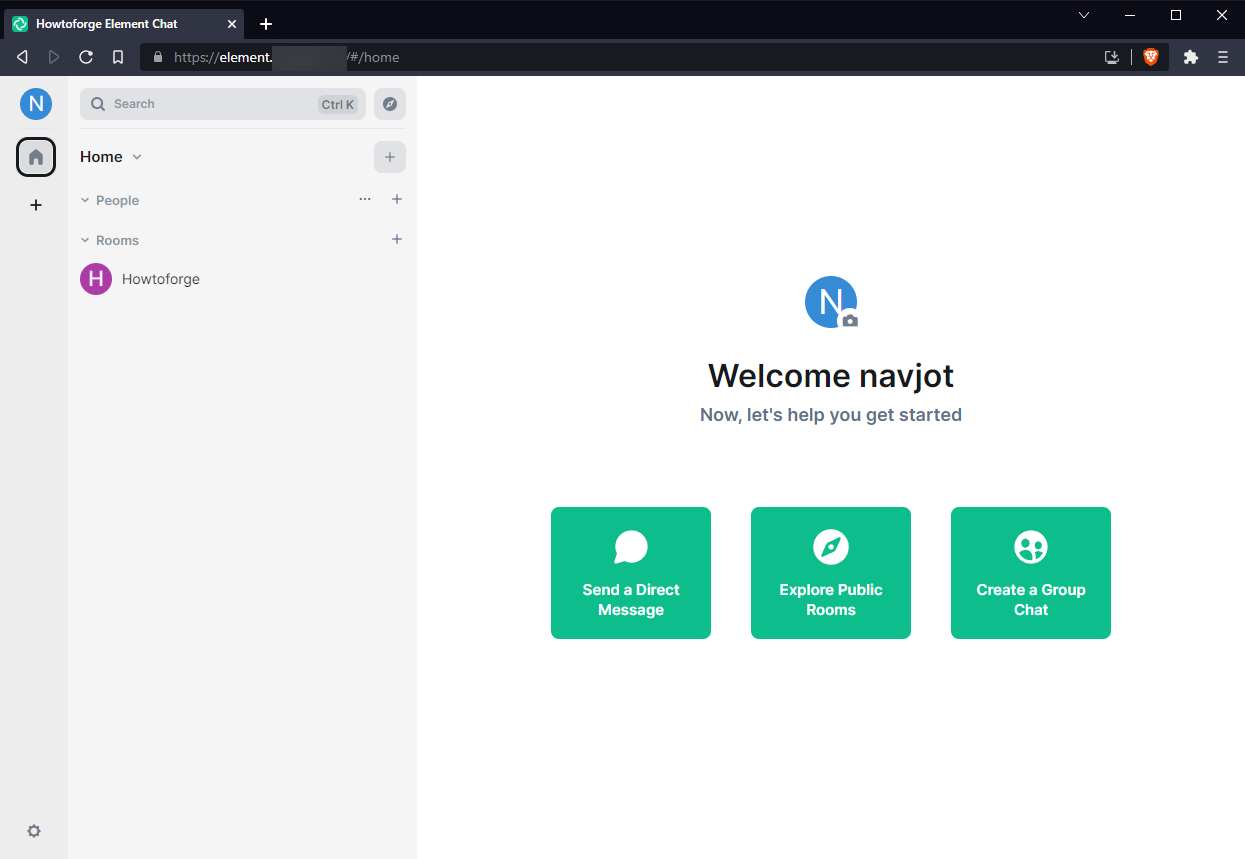
You can access the Element client via the URL https://element.example.com in your browser. Log in, and you will be taken to the app dashboard. You will be asked to verify the app with the https://app.element.io first, make sure you are logged in at the original Element app and you will be asked to match the emoji characters. Once you are verified, you will get the following dashboard.
Conclusion
This concludes our tutorial on installing the Matrix Synapse Chat server along with Coturn and Element web client using Nginx as a proxy server on a Debian 12 machine. If you have any questions, post them in the comments below.

")
