
A reverse proxy is a web server that can sit in front of another web server or a web service. It can encrypt outgoing traffic, act as a load balancer, redirect traffic, and offer protection. Nginx web server can be used as a proxy server in front of traditional servers, but sometimes setting it up can be tedious and cause issues if not done properly.
Nginx Proxy Manager is an application that makes setting up Nginx as a proxy server easier by providing a graphical user interface (GUI) with features like in-built SSL support using Let’s Encrypt, support for multiple hosts, HTTP authentication, access lists, and user management.
This tutorial will teach you how to install the Nginx proxy manager on a Linux server using Docker. We will cover all popular Linux distributions in a single tutorial.
Prerequisites
- A Linux server running Ubuntu/Debian/CentOS/Alma Linux/Rocky Linux with a minimum of 1 GB of RAM.
- A non-root user with sudo privileges.
- A fully qualified domain name (FQDN) like
npm.example.compointing to the server.
Step 1 – Configure Firewall
Cent OS/Rocky Linux/Alma Linux
You should have the Firewalld firewall installed. Check the firewall’s status.
$ sudo firewall-cmd --state
running
Open ports 80, 81 and 443.
$ sudo firewall-cmd --permanent --add-service=http
$ sudo firewall-cmd --permanent --add-service=https
$ sudo firewall-cmd --permanent --add-port=81/tcp
Reload the firewall to enable the changes.
$ sudo firewall-cmd --reload
Ubuntu/Debian
Ubuntu and Debian systems use ufw (Uncomplicated Firewall) by default.
Check if the firewall is running.
$ sudo ufw status
If it is running, then open ports 80, 81 and 443.
$ sudo ufw allow 80
$ sudo ufw allow 81
$ sudo ufw allow 443
Open the SSH port if the firewall isn’t running.
$ sudo ufw allow "OpenSSH"
Enable the firewall if it is not running.
$ sudo ufw enable
If it is running, reload it to apply the changes.
$ sudo ufw reload
Step 2 – Install Docker
Cent OS/Rocky Linux/Alma Linux
Run the following command to install Docker.
$ sudo yum install -y yum-utils
$ sudo yum-config-manager
    --add-repo
    https://download.docker.com/linux/centos/docker-ce.repo
$ sudo yum install docker-ce docker-ce-cli containerd.io
Ubuntu
$ sudo apt install ca-certificates curl gnupg lsb-release
$ curl -fsSL https://download.docker.com/linux/ubuntu/gpg | sudo gpg --dearmor -o /usr/share/keyrings/docker-archive-keyring.gpg
$ echo "deb [arch=$(dpkg --print-architecture) signed-by=/usr/share/keyrings/docker-archive-keyring.gpg] https://download.docker.com/linux/ubuntu
  $(lsb_release -cs) stable" | sudo tee /etc/apt/sources.list.d/docker.list > /dev/null
$ sudo apt update
$ sudo apt install docker-ce docker-ce-cli containerd.io
Debian
$ sudo apt install ca-certificates curl gnupg lsb-release
$ curl -fsSL https://download.docker.com/linux/debian/gpg | sudo gpg --dearmor -o /usr/share/keyrings/docker-archive-keyring.gpg
$ echo "deb [arch=$(dpkg --print-architecture) signed-by=/usr/share/keyrings/docker-archive-keyring.gpg] https://download.docker.com/linux/debian
  $(lsb_release -cs) stable" | sudo tee /etc/apt/sources.list.d/docker.list > /dev/null
$ sudo apt update
$ sudo apt install docker-ce docker-ce-cli containerd.io
Enable and Start the Docker service.
$ sudo systemctl start docker --now
Add your username to the Docker group.
$ sudo usermod -aG docker $USER
Log out of the system and log back in to apply the change.
Step 3 – Install Docker Compose
Download and install Docker compose binary.
$ sudo curl -L "https://github.com/docker/compose/releases/download/1.29.2/docker-compose-$(uname -s)-$(uname -m)" -o /usr/local/bin/docker-compose
Apply executable permission to the binary.
$ sudo chmod x /usr/local/bin/docker-compose
Step 4 – Create Docker Compose File
Create a directory for the Nginx proxy manager.
$ mkdir ~/nginx-proxy
Switch to the directory.
$ cd ~/nginx-proxy
Create directories for user data and SSL certificates.
$ mkdir {data,letsencrypt}
Create and open the docker-compose.yml file for editing.
$ nano docker-compose.yml
Paste the following code in it.
version: "3"
services:
  npm-app:
    image: 'jc21/nginx-proxy-manager:latest'
    container_name: npm-app
    restart: unless-stopped
    ports:
      - '80:80' # Public HTTP Port
      - '443:443' # Public HTTPS Port
      - '81:81' # Admin Web Port
      # Add any other Stream port you want to expose
      # - '21:21' # FTP
    environment:
      DB_MYSQL_HOST: "npm-db"
      DB_MYSQL_PORT: 3306
      DB_MYSQL_USER: "npm"
      DB_MYSQL_PASSWORD: "npm"
      DB_MYSQL_NAME: "npm"
      # Uncomment the line below if IPv6 is not enabled on your host
      # DISABLE_IPV6: 'true'
    volumes:
      - ./data:/data
      - ./letsencrypt:/etc/letsencrypt
    depends_on:
      - npm-db
    networks:
      - npm-nw
      - npm-internal

  npm-db:
    image: 'mariadb:latest'
    container_name: npm-db
    restart: unless-stopped
    environment:
      MYSQL_ROOT_PASSWORD: 'npm'
      MYSQL_DATABASE: 'npm'
      MYSQL_USER: 'npm'
      MYSQL_PASSWORD: 'npm'
    volumes:
      - ./data/mysql:/var/lib/mysql
    networks:
      - npm-internal

networks:
  npm-internal:
  npm-nw:
    external: true
Save the file by pressing Ctrl X and entering Y when prompted.
Let us go through the file. The first part of the file is where we import Nginx proxy manager’s image and set some environment variables in the form of database credentials. We also expose ports 80, 81 and 443 to the server for access. You can expose more ports, such as 21, for FTP access. You can disable IPV6 support by uncommenting the line DISABLE_IPV6: 'true'. We have mapped several directories from our host to the Docker for data and SQL storage.Advertisement
We are using two networks here. One is the internal network npm-internal to connect the proxy manager and the database. This one is optional since it is automatically created. But here, we are doing it manually by giving it a name of our choice.
We have added an external network to the proxy manager container called npm-nw. This network is essential because you can use it to connect the proxy manager to any other docker containers you install. Using a network will allow you to connect any container directly without the need to expose its ports to the server.
Step 5 – Run Nginx Proxy Manager
Before launching the Docker container, we need to create the external network npm-nw. Internal networks are automatically created. Run the following command to create the external network.
$ docker network create npm-nw
Launch the Docker Container using the following command.
$ docker-compose up -d
Check the status of the containers.
$ docker ps
CONTAINER ID   IMAGE                             COMMAND                  CREATED              STATUS              PORTS                                                                                  NAMES
c91ca0ddca97   jc21/nginx-proxy-manager:latest   "https://www.howtoforge.com/init"                  About a minute ago   Up About a minute   0.0.0.0:80-81->80-81/tcp, :::80-81->80-81/tcp, 0.0.0.0:443->443/tcp, :::443->443/tcp   npm-app
1738d71b95da   mariadb:latest                    "docker-entrypoint.s…"   About a minute ago   Up About a minute   3306/tcp                                                                               npm-db
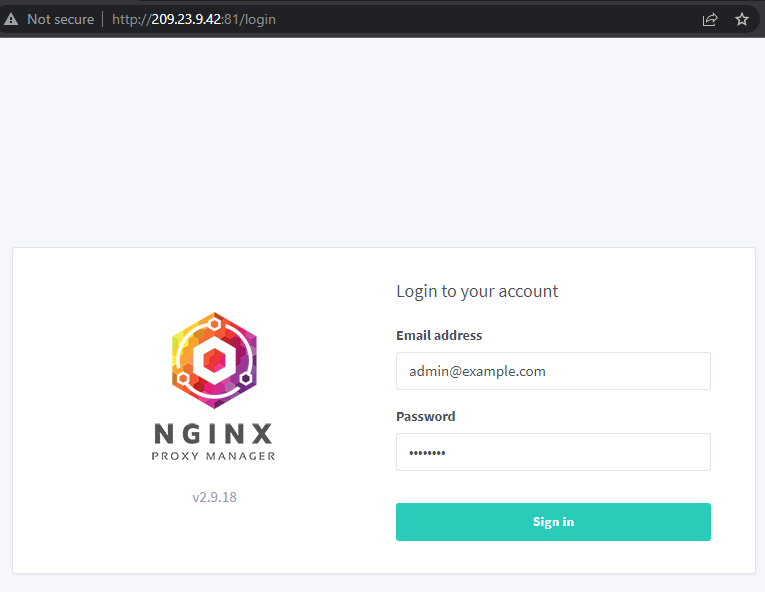
Step 6 – Access Nginx Proxy Manager
You can now access your Nginx proxy manager via the URL http://yourserverIP:81. You should get the following login screen.
Enter the following default credentials to sign in.
Email address: [email protected] Password: changeme
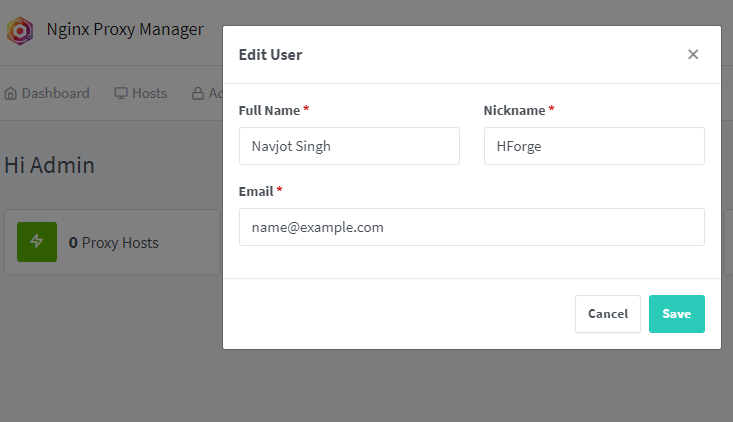
Next, you will be immediately asked to set a name and an email address.
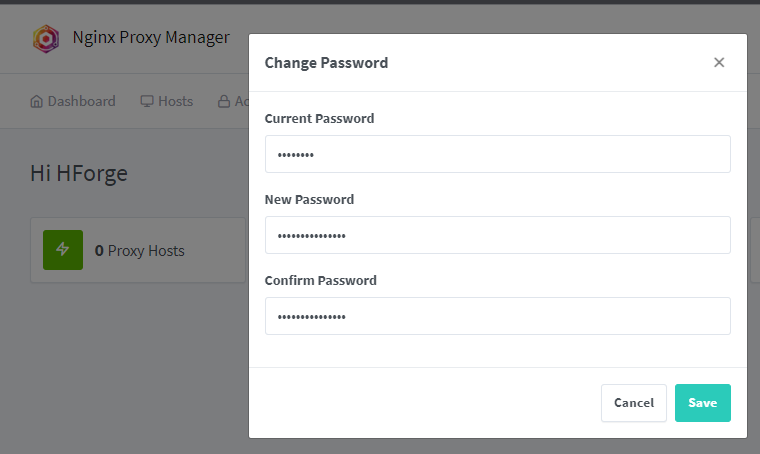
Click the Save button, and you will be asked to set a new password.
Click the Save button again, and you can now start using the application.
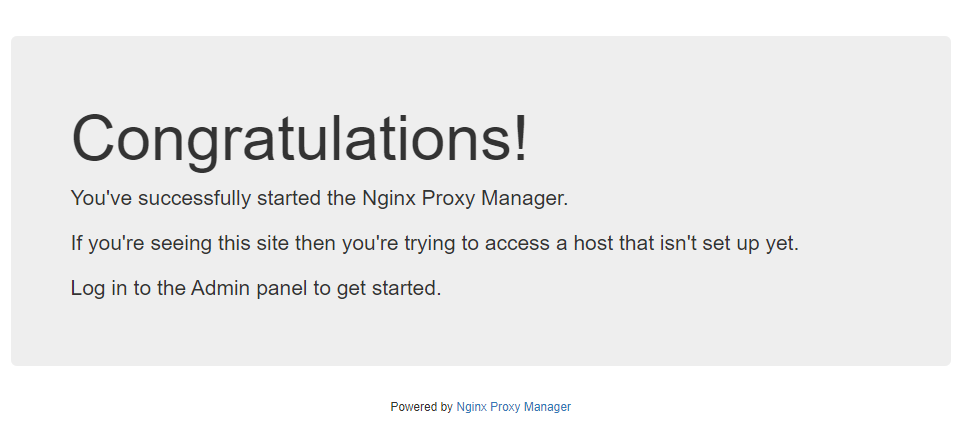
If you open the URL http://yourserverIP in your browser, you will be taken to a default page that the proxy manager has set.
Step 7 – Setting up Domain Name and SSL for Nginx Proxy Manager
Let us set a domain name for accessing Nginx Proxy Manager. This step is optional but is useful if you want to put the application behind SSL.
Click on Hosts >> Proxy Hosts from the dashboard menu to open the Proxy Hosts page. From there, click on the Add Proxy Host button to proceed.
Add the FQDN name (npm.example.com) and click on it. Enter your Server’s IP address and 81 as the Forward Port.
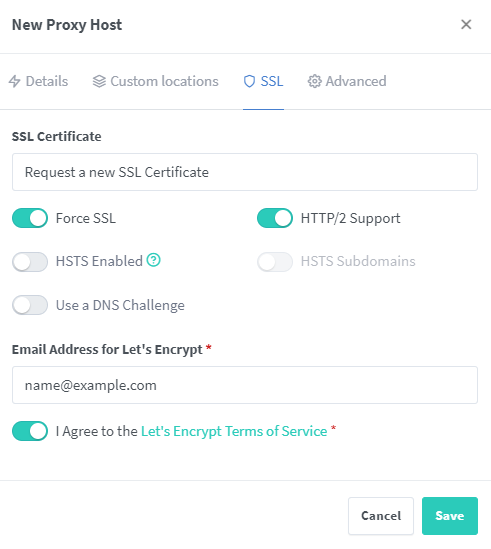
Switch to the SSL tab.
Select Request a new SSL Certificate from the dropdown menu. Select the options Force SSL and HTTP/2 support. If you want to enable HSTS, you can enable that as well. If you have your domain configured via Cloudflare, don’t enable the option Force SSL otherwise, you will be stuck in a redirection loop.
Enter your email address, agree to the Let’s Encrypt Terms of Service (TOS) and click the Save button to finish.
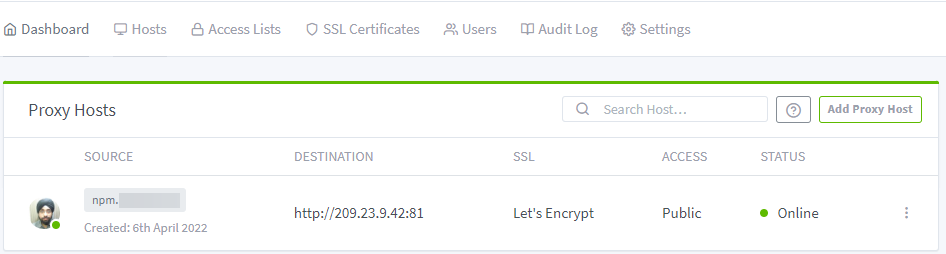
Your domain should be live and working. Try opening https://npm.example.com in your browser, and you should get Nginx Proxy Manager’s login screen.
You can similarly do it for the default landing page and assign it to a domain name like https://example.com. Just change the port from 81 to 81 while setting up the proxy host.
Step 8 – Use Nginx Proxy Manager with another Docker web application
Now that we have installed the proxy manager, it is time to put it to some use. The first thing we will do is to use it to host another Docker web application. For this, we will be installing the Ghost blog. If you want to learn more, check our tutorial on installing Ghost using Docker on a Ubuntu server.
Create another directory for your Ghost blog.
$ mkdir ~/ghost
Switch to the Ghost directory.
$ cd ~/ghost
Create two directories for the content and the database.
$ mkdir {content,mysql}
Even if you are using the same MySQL image, you should keep the data and their containers separate from the Proxy manager’s. This will help isolate any issues you might run into and allow you to move stuff around in case you need to.
Create and open the Docker compose file for editing.
$ nano docker-compose.yml
Paste the following code. Replace example.com with your actual domain name for your Ghost blog. Enter SMTP details if you want to receive emails. You can remove them if you don’t need them.
version: '3.3'
services:

  ghost-app:
    image: ghost:latest
    container_name: ghost-app
    restart: always
    depends_on:
      - ghost-db
    environment:
      url: https://ghost.example.com
      database__client: mysql
      database__connection__host: ghost-db
      database__connection__user: ghost
      database__connection__password: ghostdbpass
      database__connection__database: ghostdb
      mail__transport: SMTP
      mail__options__host: {Your Mail Service host}
      mail__options__port: {Your Mail Service port}
      mail__options__secureConnection: {true/false}
      mail__options__service: {Your Mail Service}
      mail__options__auth__user: {Your User Name}
      mail__options__auth__pass: {Your Password}
    volumes:
      - /home//ghost/content:/var/lib/ghost/content
    networks:
      - npm-nw
      - ghost-network

  ghost-db:
    image: mariadb:latest
    container_name: ghost-db
    restart: always
    environment:
      MYSQL_ROOT_PASSWORD: your_mysql_root_password
      MYSQL_USER: ghost
      MYSQL_PASSWORD: ghostdbpass
      MYSQL_DATABASE: ghostdb
    volumes:
      - /home//ghost/mysql:/var/lib/mysql
    networks:
      - ghost-network

networks:
  ghost-network:
  npm-nw:
    external: true
Save the file by pressing Ctrl X and entering Y when prompted.
As you can see, we have connected the Ghost container with the Nginx proxy manager using the external network npm-nw. This way, we are not exposing the Ghost’s ports to the system. We have also used an internal network ghost-network to connect our Ghost app and the corresponding database container.
Start the container.
$ docker-compose up -d
Configure Ghost in Nginx Proxy Manager
Now, we need to set the reverse proxy for our Ghost install. Open Nginx Proxy manager in your browser, go to Dashboard >> Hosts >> Proxy Host, and add a new Proxy Host.
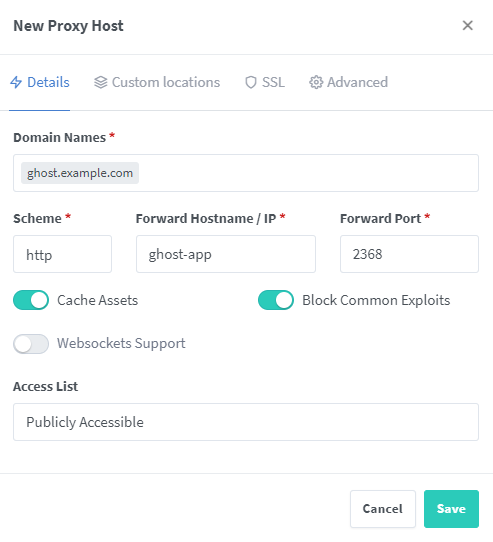
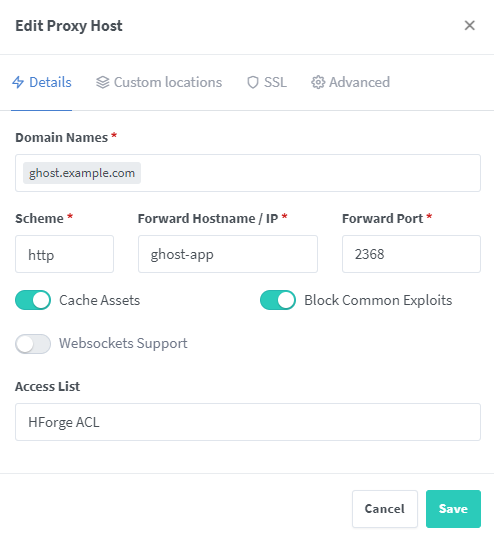
Add the domain name you chose for your Ghost blog. For the Hostname/IP value, enter the name of your container. In this case, it would be ghost-app. We cannot add the IP address here because we have not exposed Ghost’s port to the server, and the Nginx proxy won’t be able to reach Ghost via the IP. Hence, we use the container name, which NPM can access using Docker’s network npm-nw, which we created. Use 2368 as the port, the default port used by the Ghost Blog. Check the other options as shown in the screenshot above.
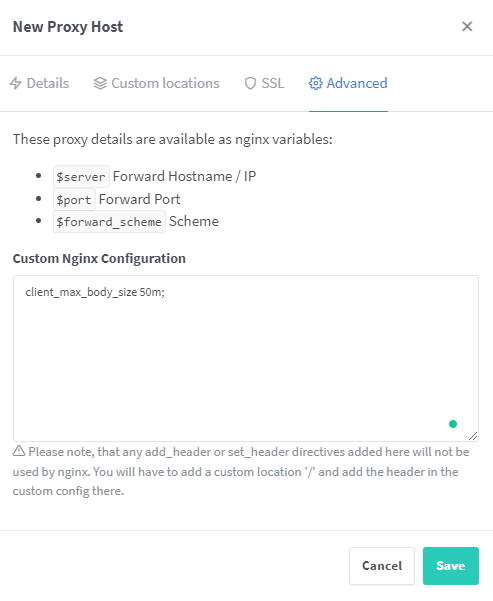
Next, switch to the SSL tab and create a new SSL certificate following step 6. Since you will be uploading content to your Ghost blog, setting a maximum upload size for your uploads would be good.
Fortunately, NPM allows you to add custom configurations. Switch to the Advanced tab and enter client_max_body_size 50m; in the box.
Click the Save button to finish adding the proxy host. You should be able to access your Ghost blog via the URL https://ghost.exampl.com
Step 9 – Use Nginx Proxy Manager as a redirect service
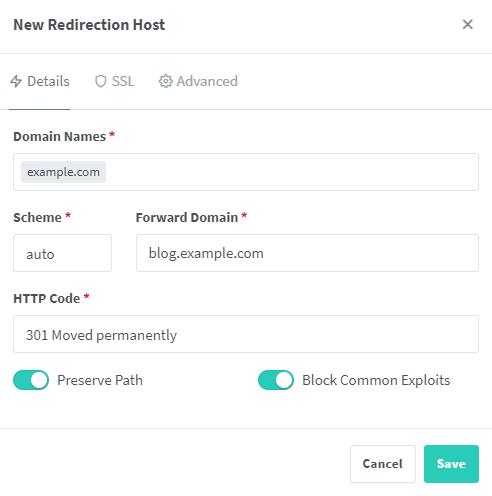
Let’s see how you can use NPM to redirect one domain to another easily. To do so, visit Dashboard >> Hosts >> Redirection Hosts. From there, click on the Add Redirection Host button to get started.
Enter the domain name you want to forward. And enter the forwarding domain. The forwarding domain should already be configured. Leave the scheme as auto. Depending upon your requirement, you can choose http or https. Select the correct HTTP Code and check Preserve Path and Block Common Exploits options. If you are using an auto or https scheme, ensure you have selected or created an SSL certificate using NPM. Click Save to finish adding your redirection host.
Your domain example.com should start redirecting to blog.example.com.
Other uses of Nginx Proxy Manager
There are other two ways in which you can use Nginx Proxy Manager. You can use it as a 404 host, which means you can use a domain as a landing page to show the search engines that the domain pages don’t exist. The step includes just entering a domain and setup SSL for it. You can also use this as an opportunity to track the logs for the domain name and view the referrer traffic.
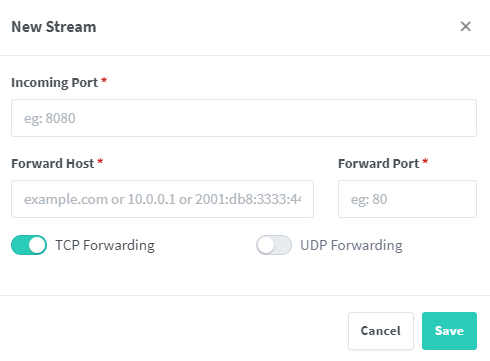
The other feature is to use NPM as a stream host. You can use this feature to forward TCP/UDP ports to another computer on the network. This is useful if you are hosting game servers. The only thing it requires is for you to enter the incoming port, forwarding domain or IP address, the forwarding port, and select the type of port.
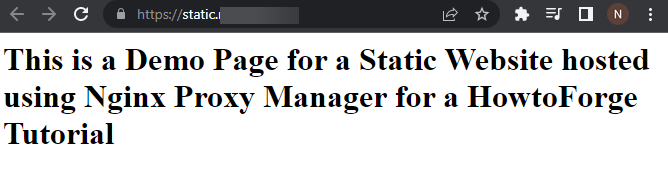
Use Nginx Proxy Manager to host a static website
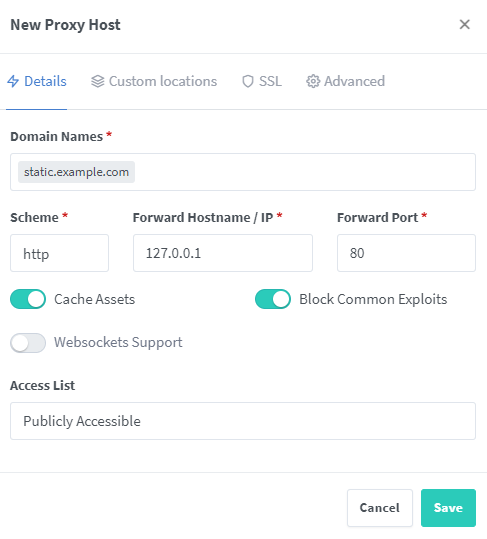
Nginx Proxy Manager can host simple static or dynamic websites as well. To do so, add a new proxy host and choose 127.0.0.1 as the Forward domain and 80 as the port.
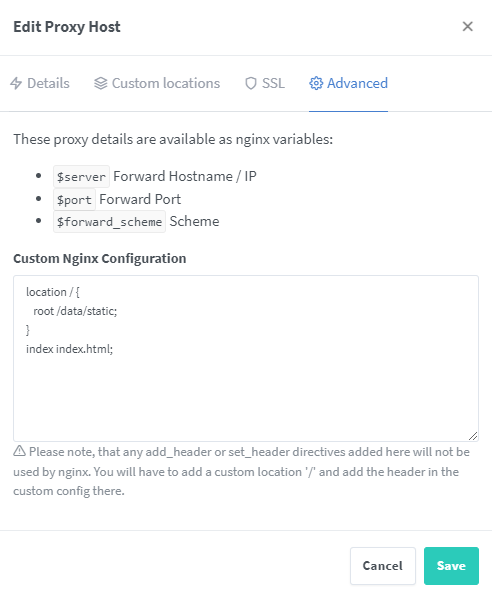
Under the Advanced tab, enter the configuration specifying the root directory. Make sure the root directory for the site is mounted in the initial Docker compose configuration. Here we are using the /data/static directory to host our static website.
Click Save to finish, and your site should be accessible. You can similarly host any type of site using the proxy manager.
Step 10 – Miscellaneous Features
Use Nginx Proxy Manager’s Access Control Feature
You can use NPM’s Access Lists feature to enable HTTP authentication or block IP ranges. Open NPM and visit the Dashboard >> Access Lists page.
Click the Add Access List button to get started.
You can name your Access List(ACL) configuration. The Satisfy Any tab, if checked, will allow access if the client fulfills any one of the conditions specified. If a client passes the HTTP authentication but may fail the IP-based access, it will be allowed. But if the Satisfy Any option is unchecked, the client will need to fulfill all the conditions.
The Pass Auth to Host feature will forward the authentication feature to the host server.
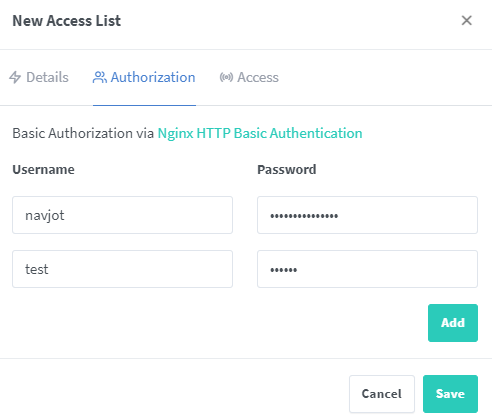
Next, switch to the Authorization tab. Here you can create a username and password for the HTTP authentication method. To add more than one user, click the Add button. You can only add up to 5 users. And there is a bug with the Add button so use the button first and then fill in the details. If you fill in the detail and click the button later to add another user, it clears the previous user data.
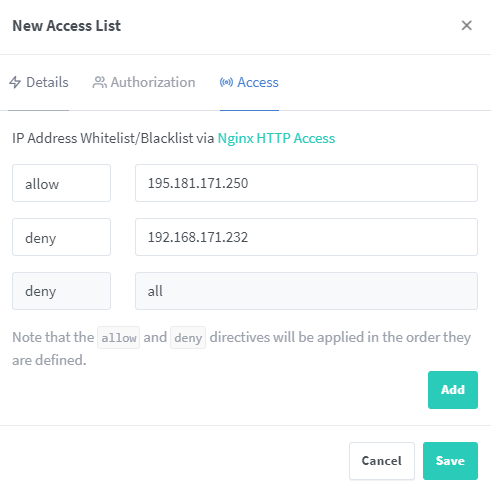
Switch to the Access tab. Here you can set which IP addresses are to be given or denied access.
Click Save to finish.
To use this Access list, you need to select it when adding your proxy host. Like in the example for Ghost Blog below, we have selected our access List.
Enable Support for more domain names
As the number of hosts and domains grows, your Nginx may run out of hash space or can run into memory problems. We can add a custom configuration that will apply to all the hosts to solve this issue.
To do this, create the directory custom inside ~/nginx-proxy/data/nginx.
$ sudo mkdir ~/nginx-proxy/data/nginx/custom
Create and open the file http.conf inside this directory.
$ sudo nano ~/nginx-proxy/data/nginx/custom/http.conf
Paste the following lines in it.
proxy_headers_hash_max_size 1024;
proxy_headers_hash_bucket_size 128;
Save the file by pressing Ctrl X and entering Y when prompted.
Nginx should automatically accept these values. If it doesn’t happen, you can restart the NPM container using the following command.
$ docker restart npm-app
Redirect Default Landing Page
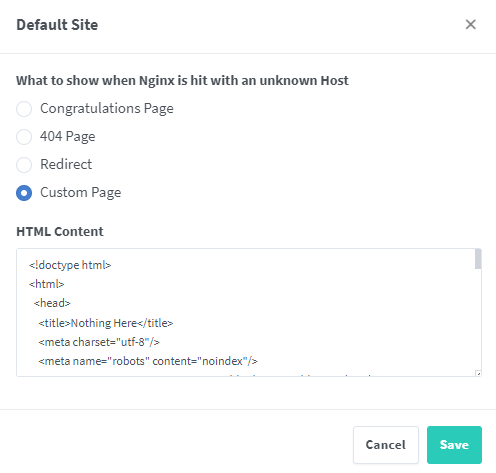
In step 6, you see the default page when you type the URL http://. If you want to change that, it is possible to do that. To do that, visit the Settings Page. Click the three dots on the right-hand side and click the Edit button.
You can set the landing page to act as a 404 page, redirect page, or add custom HTML to it by using the option Custom Page. If you select Redirect, you will need to specify the target URL.
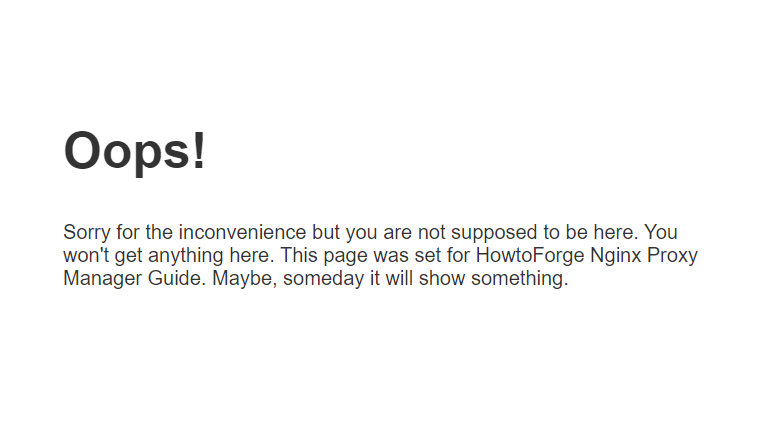
This is the custom HTML we used for our purpose.
    Nothing Here


      body {
          text-align: center;
          padding: 20px;
          font: 20px Helvetica, sans-serif;
          color: #333;
        }
      @media (min-width: 768px){
          body{ padding-top: 150px;
        }
      }
      h1 {
          font-size: 50px;
        }
      article {
          display: block;
          text-align: left;
          max-width: 650px;
          margin: 0 auto;
        }


        Oops!

            Sorry for the inconvenience but you are not supposed to be here. You won't get anything here. This page was set for HowtoForge Nginx Proxy Manager Guide.  Maybe, someday it will show something.
Click Save to finish. Your landing page should be changed to something like the below.
Step 11 – Update Nginx Proxy Manager
To update NPM, first, stop the containers.
$ cd ~/nginx-proxy
$ docker-compose down --remove-orphans
Pull the latest images.
$ docker-compose pull
Start the containers again.
$ docker-compose up -d
Conclusion
This concludes our tutorial where you installed Nginx Proxy Manager and learned how to use it to add a proxy host for another docker container, use it as a redirection service, and control access using it. If you have any questions, post them in the comments below.


