
pgAdmin is a free and open-source graphical administration tool for PostgreSQL, one of the most advanced open-source databases. pgAdmin is a feature-rich PostgreSQL administration tool with a simple interface and easy to use. It supports PostgreSQL 9.6 and above, and it can be run on multiple operating systems, including Windows, macOS, and Linux.
Unlike other graphical database administration tools, the pgAdmin can be run on 3 different modes:
- Desktop mode – can be installed as a user application on your laptop and computer. This method is recommended ways if you want to install pgAdmin on your laptop or computer.
- Server mode – this type of deployment can be applied on the server. It’s like phpMyAdmin on MySQL.
- Container mode – can be run as a docker container.
In this guide, you will learn how to install pgAdmin on a Rocky Linux 8 server. You will learn how to set up pgAdmin with Apache web server, and learn the basic usage of pgAdmin for managing PostgreSQL database and user.
Prerequisites
- An Rocky Linux server. Ensure all packages are updated to the latest version.
- A root user or a user with root privileges. This user will be used for installing new packages and editing system configurations.
- PostgreSQL database server – or you can install it using the following guide.
Installing PostgreSQL on Rocky Linux
If you have got PostgreSQL installed on your system you can skip this first step. Otherwise, you can use the following step for installing PostgreSQL on Rocky Linux. And if you want in flavor, t use the PostgreSQL from the official PostgreSQL repository (not from Rocky Linux repository), you may look for this guide.
For this step, you will be installing PostgreSQL from the official Rocky Linux repository and enable the authentication on PostgreSQL.
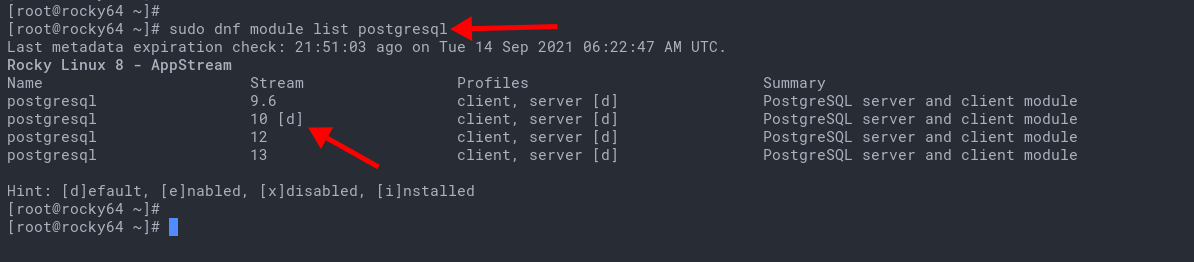
1. By default, the Rocky Linux repository provides multiple versions of PostgreSQL packages, the PostgreSQL 10, 12, and 13.
Execute the following command to check the PostgreSQL repository on Rocky Linux.
sudo dnf module list postgresql
You will see multiple versions of PostgreSQL modules as below.
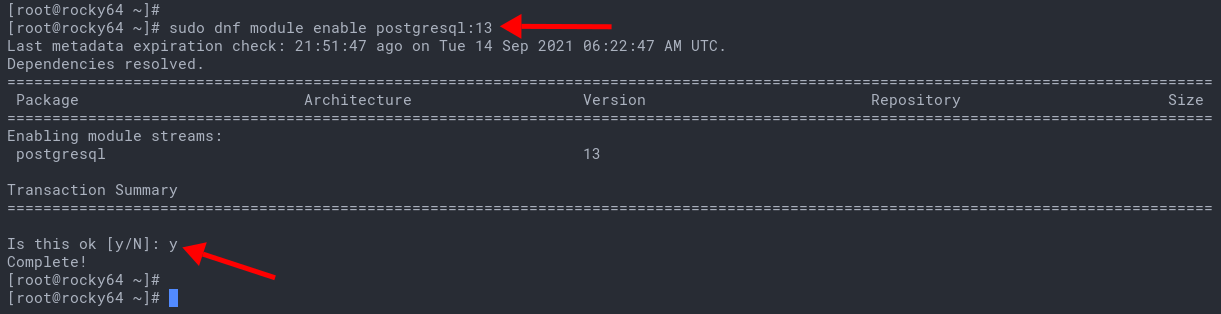
Enable the PostgreSQL 13 repository using the following command.
sudo dnf module enable postgresql:13
Type ‘y‘ and press ‘Enter‘ to enable the repository module.
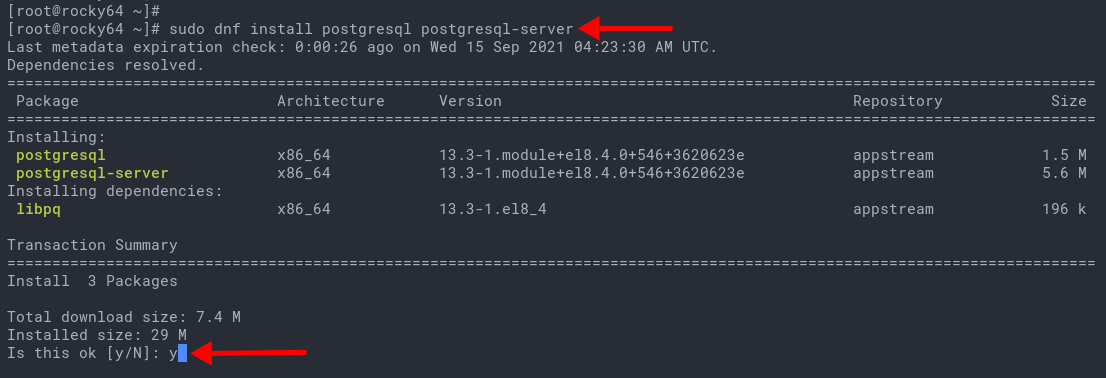
2. Now execute the following command to install PostgreSQL server packages.
sudo dnf install postgresql postgresql-server
Type ‘y‘ and press ‘Enter‘ to continue the installation.
3. If the PostgreSQL installation is complete, initialize the PostgreSQL data using the command below.
sudo postgresql-setup --initdb
Next, change the working directory to ‘/var/lib/pgsql/data‘ and edit the confgiration ‘postgresql.conf‘ using nano.
cd /var/lib/pgsql/data/
nano postgresql.conf
Uncomment the option ‘password_encryption’ and change the value to ‘scram-sha-256‘ as below.
password_encryption = scram-sha-256
Press the ‘Ctrl x’, type ‘y‘, then pres ‘Enter‘ to save the configuration and exit.
Now edit the configiration ‘pg_hba.conf‘ using nano.
nano pg_hba.conf
Change all local connection methods to ‘scram-sha-256‘ as below.
# TYPE  DATABASE        USER            ADDRESS                 METHOD# "local" is for Unix domain socket connections only
local   all             all                                     peer
# IPv4 local connections:
host    all             all             127.0.0.1/32            scram-sha-256
# IPv6 local connections:
host    all             all             ::1/128                 scram-sha-256
Save the configuration by pressing the ‘Ctrl x’, type ‘y‘, the press ‘Enter‘.
4. Now execute the following command to enable the PostgreSQL service.
sudo systemctl enable postgresql
sudo systemctl is-enabled postgresql
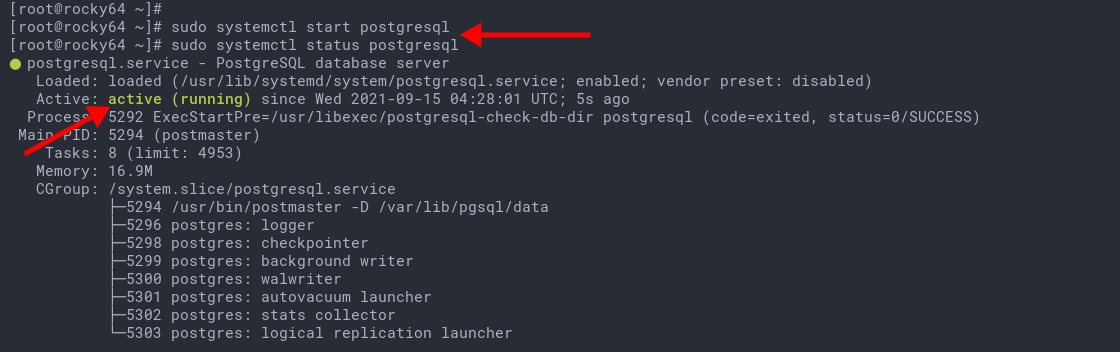
After that, start the PostgreSQL service and check the service status by executing the command below.
sudo systemctl start postgresql
sudo systemctl status postgresql
And you will see similar output as below.
As can be seen, the PostgreSQL service is enabled, it will automatically run at the system startup. And it’s currently ‘active (running)‘ .
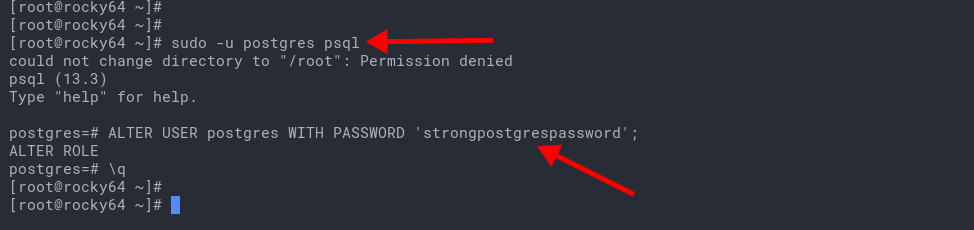
5. Next, log in to the PostgreSQL shell using the following command.
sudo -u postgres psql
Execute the following PostgreSQL query to create a new password for the default database user ‘postgres‘. Also, be sure to change the ‘strongpostgrespassword‘ with your strong password.
ALTER USER postgres WITH PASSWORD 'strongpostgrespassword';
Now type ‘exit‘ to log out from the PostgreSQL shell.
Installing pgAdmin4 on Rocky Linux
The pgAdmin provides a repository for its installation for different Linux, including Debian and RHEL based operating systems. For this step, you will be installing and configuring the pgAdmin4 on the Rocky Linux system.
1. First, execute the following command to add the repository and gpg key of the pgAdmin4.
rpm --import https://www.pgadmin.org/static/packages_pgadmin_org.pub
sudo rpm -i https://ftp.postgresql.org/pub/pgadmin/pgadmin4/yum/pgadmin4-redhat-repo-2-1.noarch.rpm
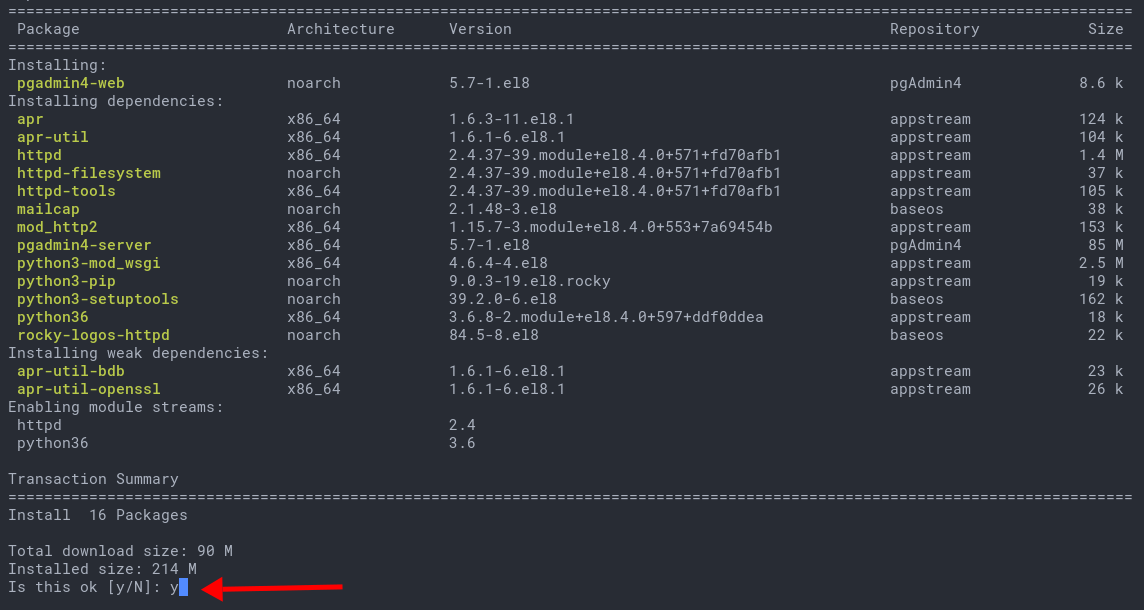
2. Now install the ‘pgAdmin4-web’ package using the dnf command below.Advertisement
sudo dnf install pgadmin4-web
Type ‘y‘ and press ‘Enter‘ to confirm and add the GPG key of pgAdmin4.
Now type ‘y‘ and press ‘Enter‘ again to continue the installation.
The command will automatically install additional packages including the Apache/httpd.
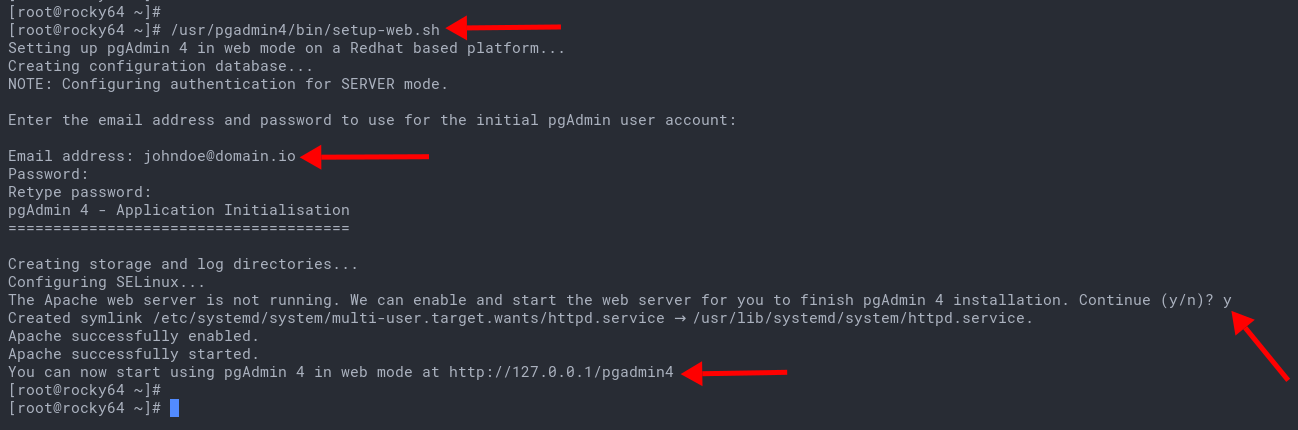
3. If all installation is completed, execute the pgAdmin4 setup script below to create a new admin user and set up the Apache/httpd configuration for pgAdmin4.
/usr/pgadmin4/bin/setup-web.sh
Type your email address and password to create a new admin account for pgAdmin4.
After that, type ‘y‘ and press ‘Enter‘ to generate and enable the Apache/httpd configuration for pgAdmin.
The pgAdmin4 configuration is complete, and it’s available at the URL path ‘http://server-ip/pgadmin4‘.
Verify the pgAdmin Installation
To verify the pgAdmin4 installation, you will be accessing the pgAdmin URL path installation and log in to the pgAdmin with your user email and password.
1. open your web browser, type your server IP address with URL path ‘/pgadmin4’ as below.
http://192.168.1.10/pgadmin4
And you will get the pgAdmin4 login page.
2. Type your login user and email, then click the ‘Login‘ button.
And you will get the pgAdmin4 dashboard as below.
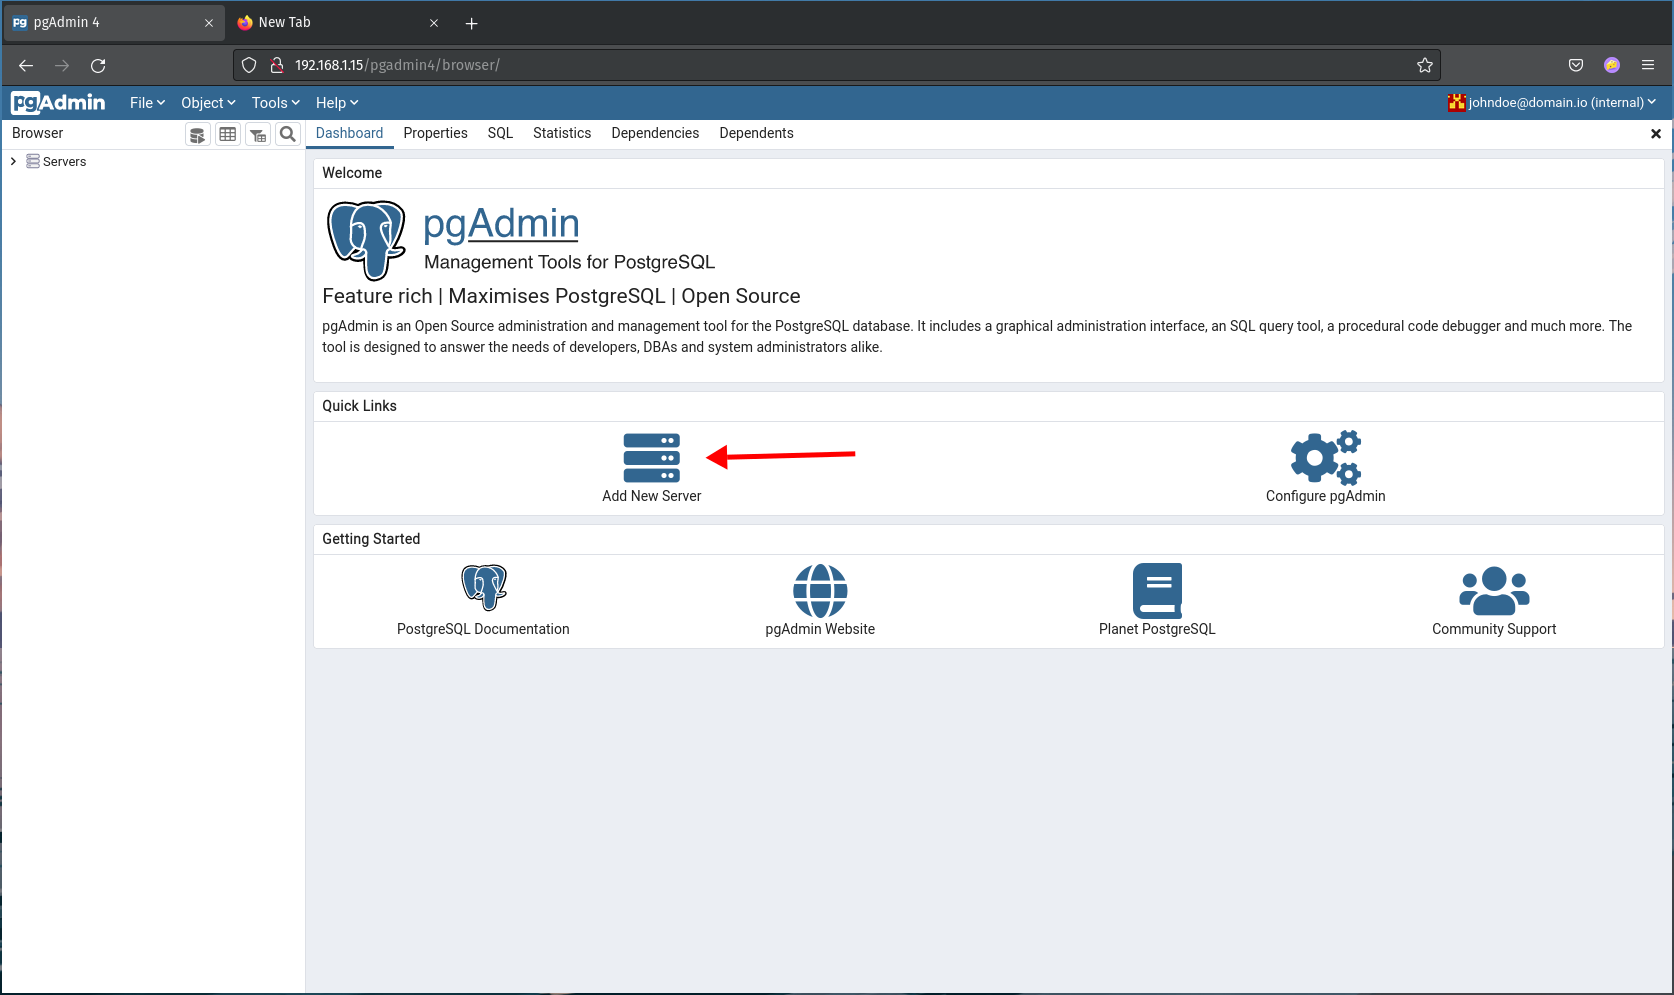
Connect to PostgreSQL Server with pgAdmin4
At this stage, you will be connecting the PostgreSQL through the pgAdmin4 application.
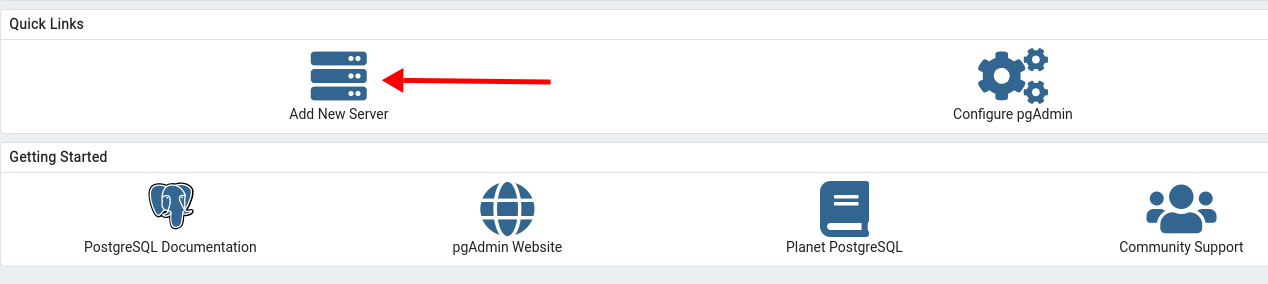
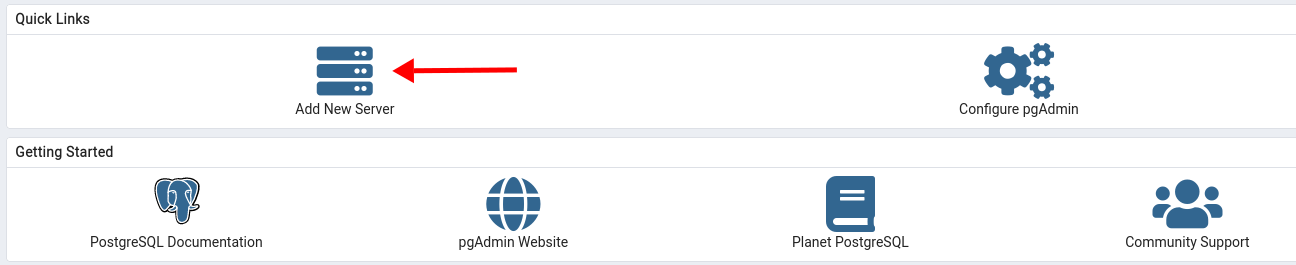
1. At the pgAdmin dashboard, click the icon ‘Add New Server‘.
2. You will get a small window pop-up.
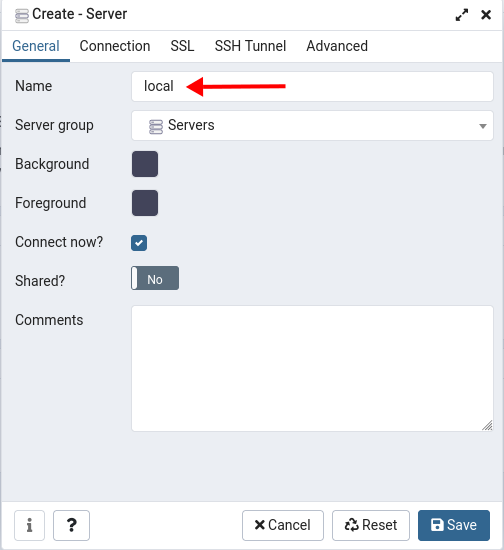
At the tab ‘General‘, type a new ‘Name‘ of your connection.
For this guide, we will give a new connection name as ‘local‘.
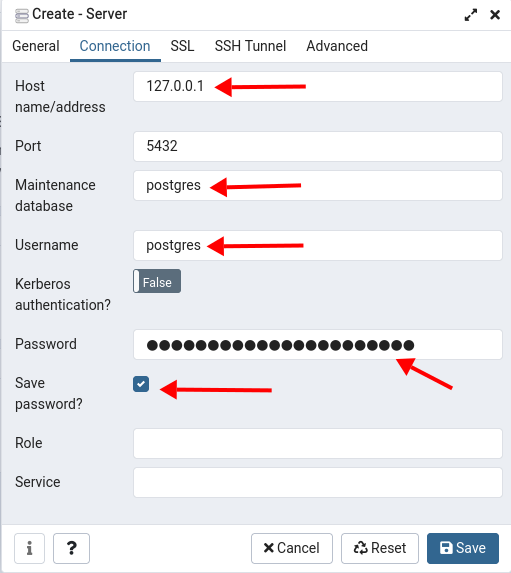
3. Move to the tab ‘Connection‘ and type your details PostgreSQL host, database, user, and password.
For this example, we will use the local PostgreSQL server with user ‘postgres‘ to manage a default database ‘postgres‘.
After that, click the ‘Save‘ button to save a new connection.
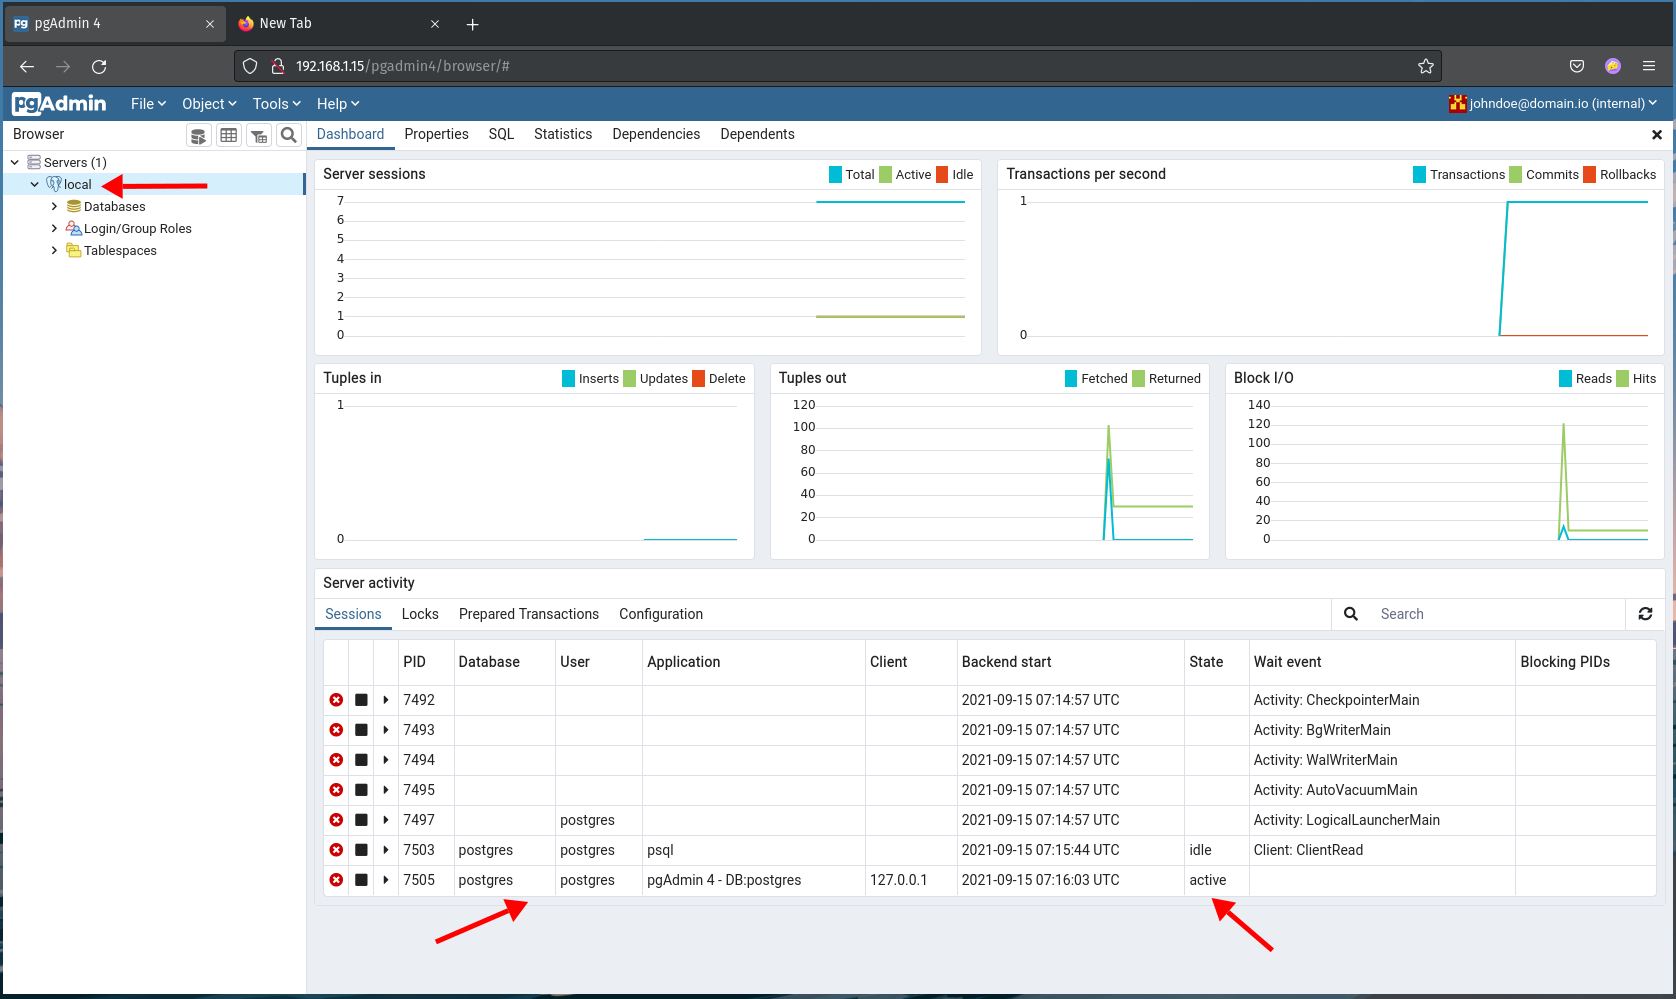
4. If your connection is successful, you will see a similar page as below. Otherwise, you will see an error.
As you can see at the bottom of the screenshot, the user ‘postgres‘ is connected to the database ‘postgres’ with the application ‘pgAdmin4‘, and the state of the connection is ‘active‘.
Basic Usage pgAdmin4: Creating New User
For this stage, you will be creating a new PostgreSQL using the pgAdmin4 tool.
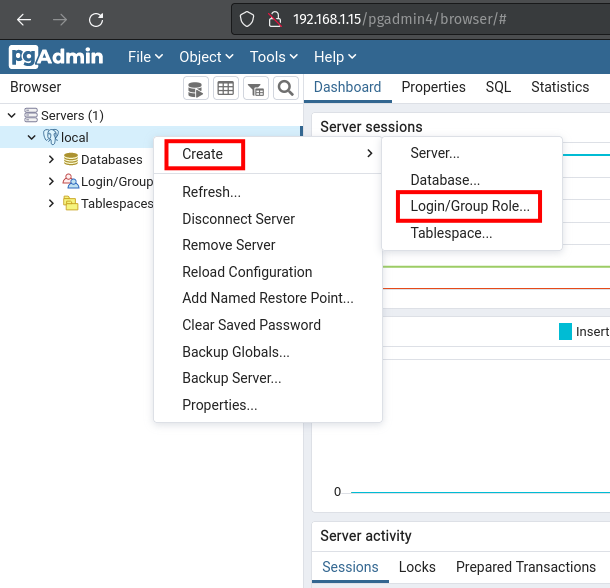
1. Right click on the connection name menu “local => Create => Login/Group Role..”.
2. At the tab ‘General‘, type the new user that you want to create. For this example, you will be creating a new user ‘bob‘.
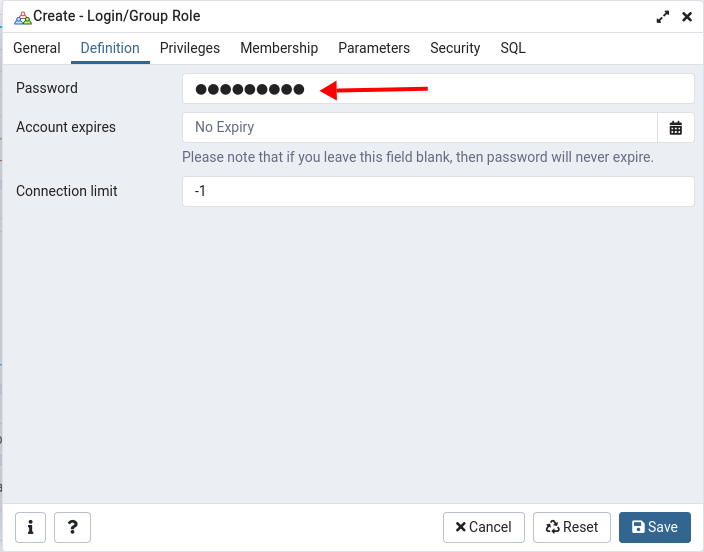
3. Move to the tab ‘Definition‘ and type the password for your user.
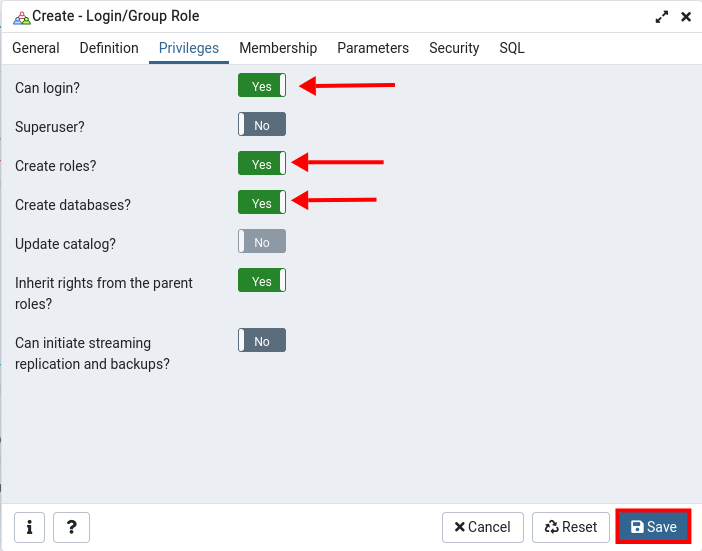
4. Move to the tab ‘Privileges‘ and turn on some privileges as you need.
Now click the ‘Save‘ button.
5. To verify your new user, click the menu ‘Login/Group Roles’ at left, choose your new user ‘bob‘ that you just created.
Click the tab ‘Properties‘ on the page and you will get details of the user as on the top screenshot.
Basic Usage pgAdmin4: Creating New Database
After creating a PostgreSQL user through the pgAdmin4 dashboard, you will be creating a new database through the pgAdmin4 dashboard.
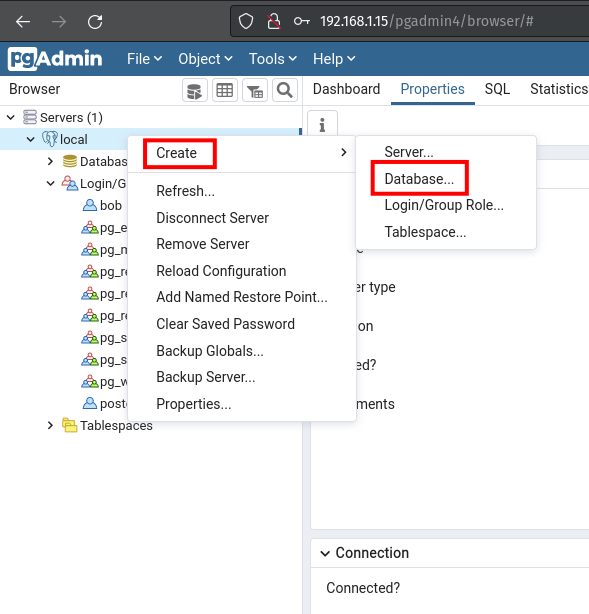
1. Right click on the connection name menu “local => Create => Database..“.
2. At the tab ‘General‘, type your new database name and choose the user owner of it. For this example, you will be creating a new database ‘bobdb‘, and make the user ‘bob‘ as the owner.
Now click the ‘Save‘ button.
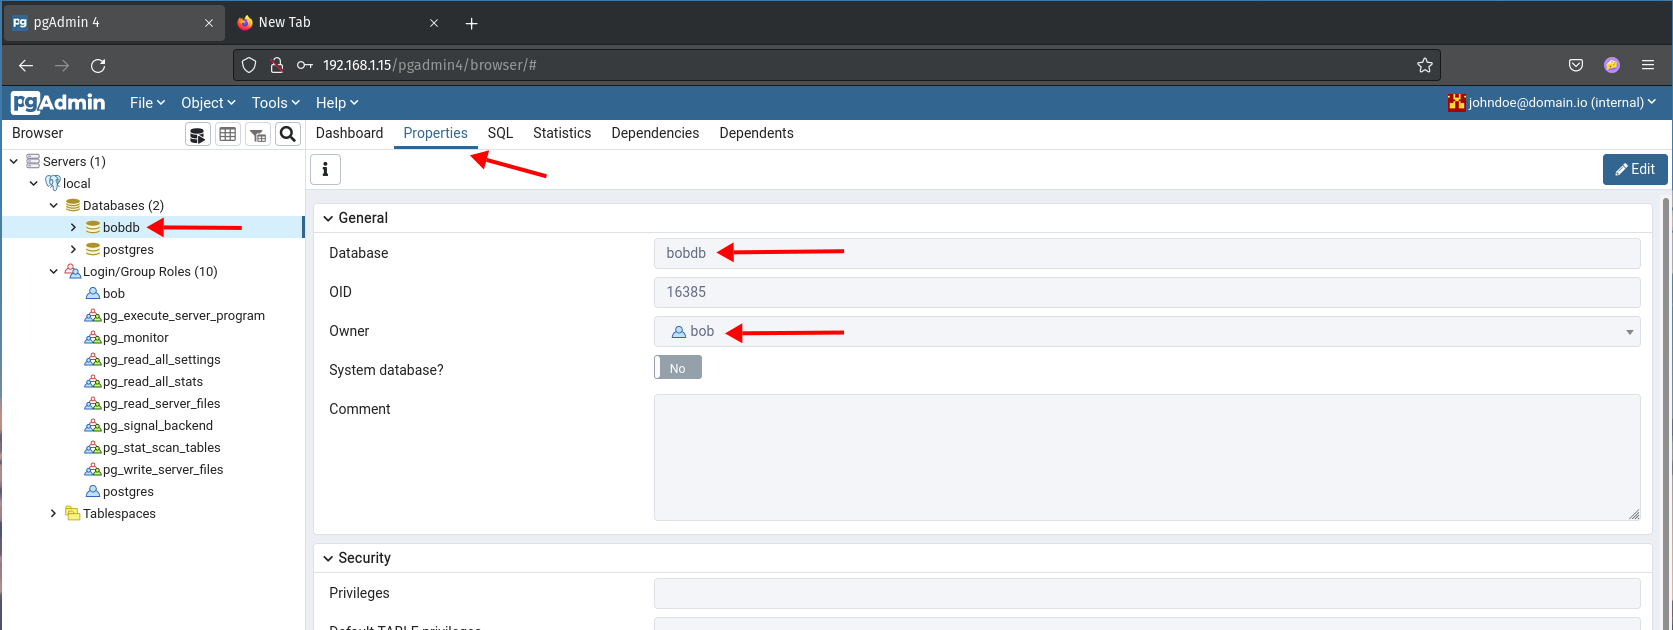
3. To verify your new database, click the menu ‘Databases‘ at the left, then click the database ‘bobdb‘ that you just created.
Click the tab ‘Properties‘ on the page and you will get details of the database ‘bobdb‘ as on the top screenshot.
Verify PostgreSQL User Connection with pgAdmin4
At this stage, you will add a new connection pgAdmin with the user ‘bob‘ and database ‘bobdb‘
1. Back to the pgAdmin4 dashboard and click the icon ‘Add New Server’.
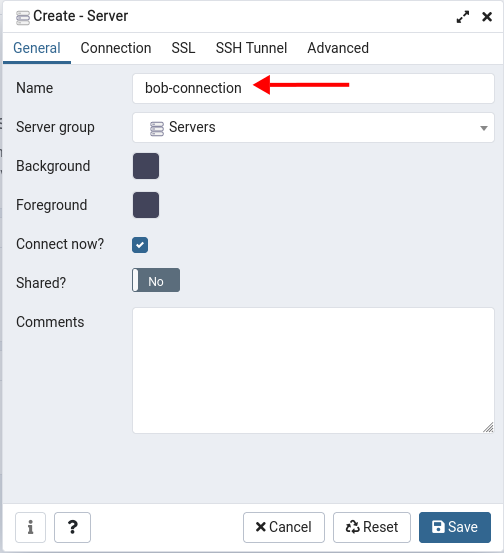
2. At the tab ‘General‘, type the new connection name as ‘bob-connection‘ as below.
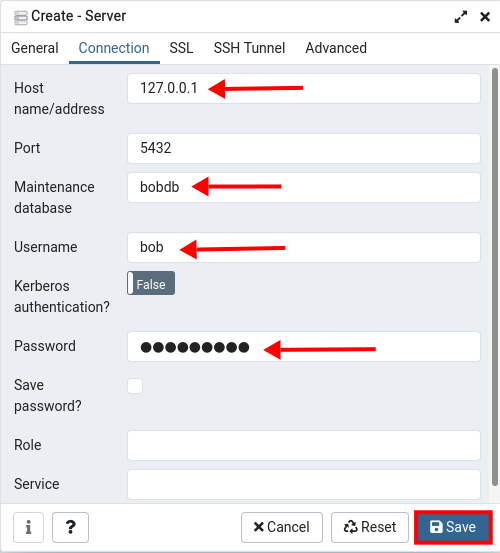
3. Move to the tab ‘Connection‘ and type details of the new connection. The host is ‘127.0.0.1‘ with the user ‘bob‘, and will manage the database ‘bobdb‘, and don’t forget to type the password for the user ‘bob‘.
Now click the ‘Save‘ button.
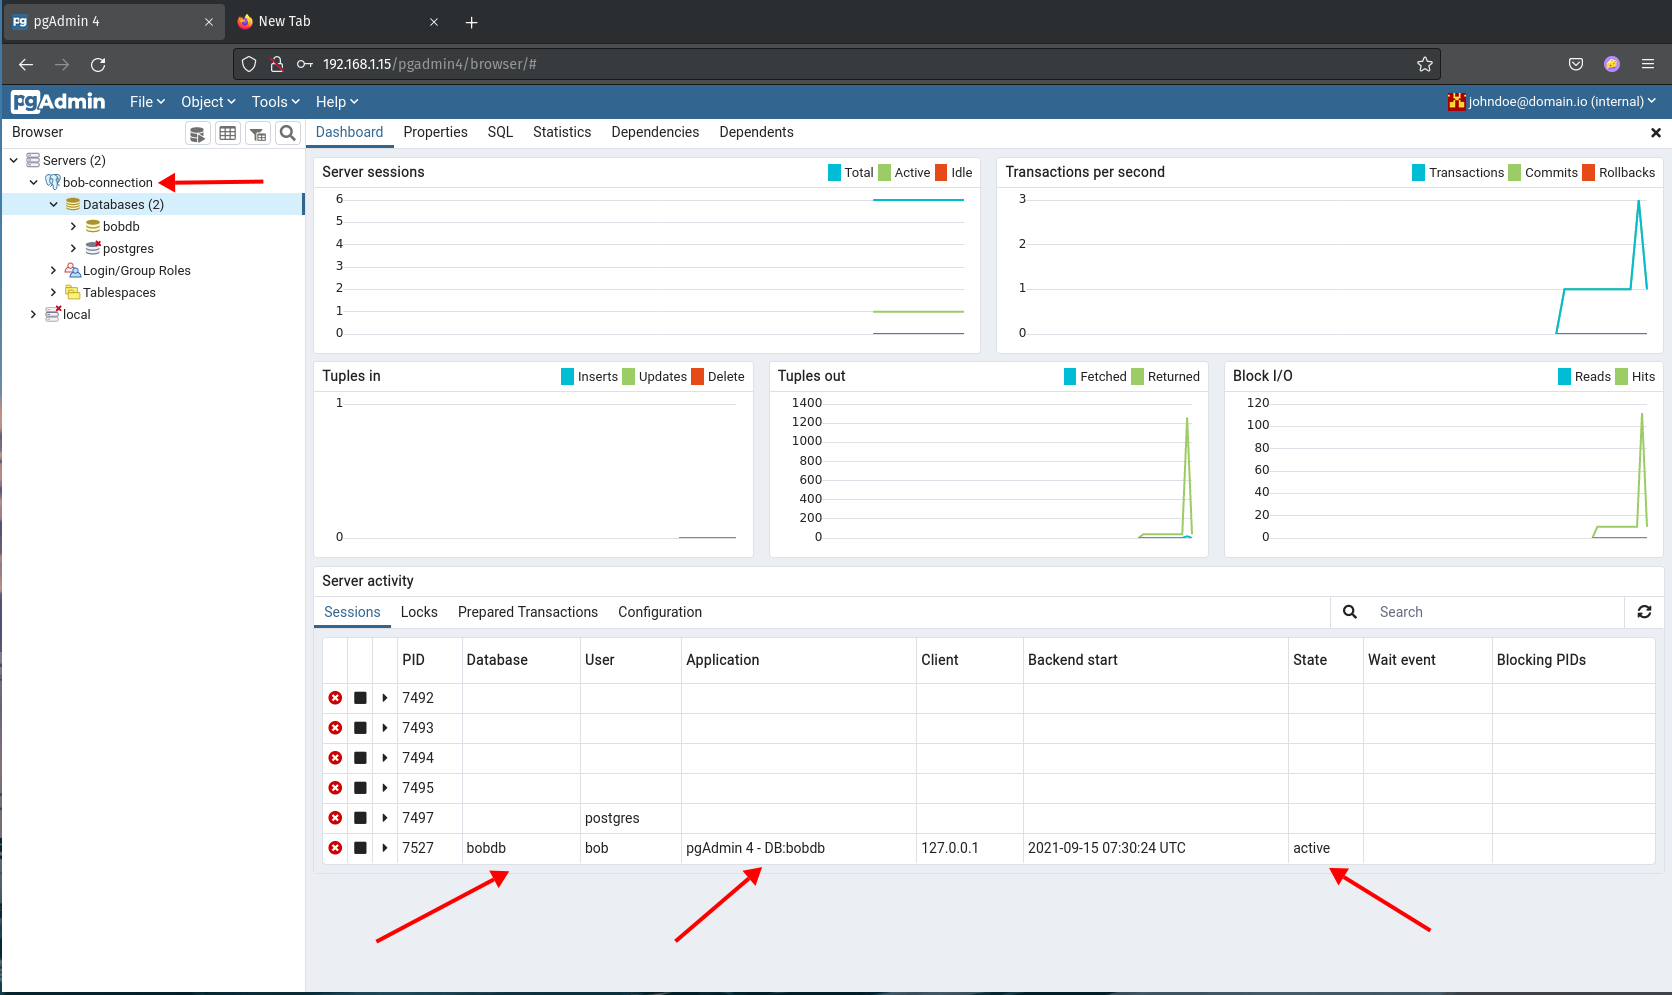
4. If your database credentials are correct, you will see a similar page as below.
As you can see at the bottom of the screenshot, the user ‘bob‘ is connected to the database ‘bobdb‘ with the application ‘pgAdmin4‘, and the state of the connection is ‘active‘.
Conclusion
Congratulations! Now you’ve successfully installed the pgAdmin4 administration tool for PostgreSQL on the Rocky Linux. Also, you’ve learned how to create a new PostgreSQL connection on the pgAdmin4. And the basic usage of pgAdmin4 for creating a new database and user. For the next stage, you can use add your PostgreSQL server connection and managing your database through the pgAdmin4 dashboard.


