
Apache Maven is a build tool used to manage project builds. Maven understands the structure of a project and can automate many processes, reducing your time to release.
Maven provides a uniform process for creating projects by supporting best practices throughout the entire software development lifecycle; not only is it easy to use but it also facilitates great communication between all members of your team or even teams during development.
Additionally, Maven has pluggable support for almost any version control system or packaging type out there, which makes it even easier for developers because they do not have to learn any new systems. As a developer, you will be able to spend more time on what you want to do and less time on the mechanics of doing it.
You can use Maven to build and manage projects of any size, and it is especially useful in larger software development teams where the strict guidelines that Maven provides offer increased productivity by programming conventions and more control over build consistency.
Maven’s standard directory layout also makes it helpful to learn the system only once and then transfer that knowledge across multiple projects. By following standard conventions, you can easily locate project information such as source code, configuration files, reports in a predictable location for each type of artifact.
Prerequisites
In order to install Apache Maven on Linux, you need to have:
- A server running Debian 11
- Root access to this server
- Updating the Server
Before you install anything, it is important to ensure that your local package index is up-to-date. Run the command below to make sure you have the latest version of all packages on your server.
sudo apt-get update && sudo apt-get -y upgrade
Installing Java
In order to install Apache Maven on Linux, Java must be installed. Without java, you cannot install Maven. Maven itself is written in Java, so it needs a java compiler to be present on the server.
Debian 11 supports both Java 11 and Java 17, but some old Apache Maven plugins might not be compatible with Java 17. Therefore, this guide will show you how to install Java 11.
Before you install anything, it is important to ensure that there are no conflicts caused by multiple java versions. First, determine what version of java your server is running with the following command
java -version
If you get an output like the one below, you are good to go.
Run the command below to install java 11.
sudo apt install -y openjdk-11-jdk -y
Once Java is installed, check its version with the following command
java -version
You will get an output like the one below. You can see that java version 11 is installed.
Installing Apache Maven on Debian 11
Now that you have updated the server and installed java 11, you will install Apache Maven. In this step, we will download and install Maven.
Run the command below to grab Maven from its official website.
curl -O https://archive.apache.org/dist/maven/maven-3/3.8.2/binaries/apache-maven-3.8.2-bin.tar.gz
Once the download is complete, extract the downloaded file and move the extracted files with the command below.
sudo tar -zxvf apache-maven-3.8.2-bin.tar.gz
sudo mv apache-maven-3.8.2 /opt/maven
Once completed, you will have new files under /opt/maven directory, which contains all of Maven’s executables and scripts to run Maven.
You can view where the installation script has been moved using the command below.
ls /opt/maven
As shown in the output above, you should have a file named “bin” under /opt/maven, which contains all of Maven’s executables and scripts to run Maven.
In order to execute any maven command, you need to add the /opt/maven/bin directory to your PATH environment variable. To do this in the bash shell, run the command below to create a new file and set its properties so that it can be executed as a script.
sudo nano /etc/profile.d/maven.sh
Once created, copy and paste the following code into the file.
export JAVA_HOME=/usr/lib/jvm/java-1.11.0-openjdk-amd64
export M2_HOME=/opt/maven
export PATH=${M2_HOME}/bin:${PATH}
Save and close the file when you are finished entering the content by using the keystrokes Ctrl O and then confirm it with the keystroke Enter, and CTRL X.
Now to make sure your updated paths take effect, run the following command, which tells your bash shell to read and append the changes you made in the /etc/profile.d/maven.sh file.
source /etc/profile.d/maven.sh
You can see if Maven is installed on your server running the mvn command with the -version option.
mvn -version
You should get an output like the one below.
You can now remove the apache-maven-3.8.2 file you downloaded earlier to save space with the command below.
sudo rm apache-maven-3.8.2-bin.tar.gz
You can now run any Maven command from the terminal. For example, if you want to create a new maven project from a template, you can do so by typing the following command.
mvn archetype:generate -DgroupId={project-packaging} -DartifactId={project-name} -DarchetypeArtifactId={maven-template} -DinteractiveMode=fa
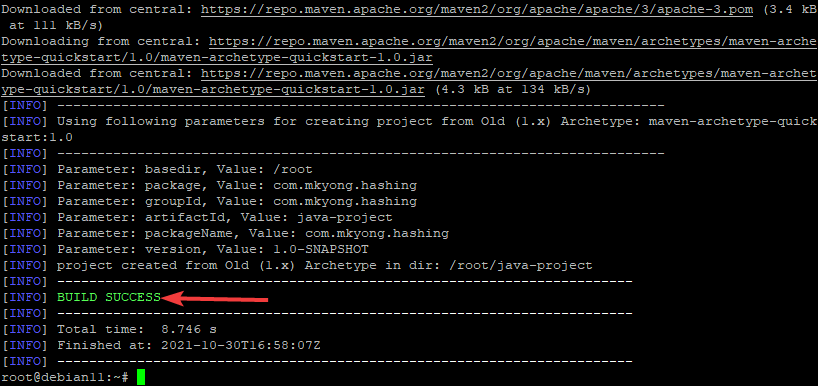
mvn archetype:generate -DgroupId=com.mkyong.hashing -DartifactId=java-project -DarchetypeArtifactId=maven-archetype-quickstart -DinteractiveMode=false
This command tells Maven to create a directory with the groupId, artifactId and package name I just provided. These values will also be used as the project’s version numbers.
You will get an output like the one below, which means Maven has successfully created a new project in the java-project directory from the maven-archetype-quickstart template.
Conclusion
In this tutorial, you have learned how to update your Debian 11 server and how to install Java 11. You have also installed Apache Maven and created a new project using the maven-archetype-quickstart template. We hope you found this tutorial helpful. Happy coding!


