This tutorial will show you how to Install and configure Ceph Storage Cluster on CentOS 8 Linux servers. Ceph is an open source, massively scalable, simplified storage solution that implements distributed object storage cluster, and provides interfaces for an object, block, and file-level storage. Our installation of Ceph 15 (Octopus) Storage Cluster on CentOS 8 will use Ansible as automation method for deployment.
Ceph Cluster Components
The basic components of a Ceph storage cluster
- Monitors: A Ceph Monitor (
ceph-mon) maintains maps of the cluster state, including the monitor map, manager map, the OSD map, and the CRUSH map - Ceph OSDs: A Ceph OSD (object storage daemon,
ceph-osd) stores data, handles data replication, recovery, rebalancing, and provides some monitoring information to Ceph Monitors and Managers by checking other Ceph OSD Daemons for a heartbeat. At least 3 Ceph OSDs are normally required for redundancy and high availability. - MDSs: A Ceph Metadata Server (MDS,
ceph-mds) stores metadata on behalf of the Ceph Filesystem (i.e., Ceph Block Devices and Ceph Object Storage do not use MDS). Ceph Metadata Servers allow POSIX file system users to execute basic commands (like,ls, findetc.) without placing an enormous burden on the Ceph Storage Cluster. - Ceph Managers: A Ceph Manager daemon (
ceph-mgr) is responsible for keeping track of runtime metrics and the current state of the Ceph cluster, including storage utilization, current performance metrics, and system load.
Our Ceph Storage Cluster installation on CentOS 8 is based on below system design.
| SERVER NAME | CEPH COMPONENT | Server Specs |
| cephadmin | ceph-ansible | 2gb ram, 1vcpus |
| cephmon01 | Ceph Monitor | 8gb ram, 4vpcus |
| cephmon01 | Ceph MON, MGR,MDS | 8gb ram, 4vpcus |
| cephmon01 | Ceph MON, MGR,MDS | 8gb ram, 4vpcus |
| cephosd01 | Ceph OSD | 16gb ram, 8vpcus |
| cephosd02 | Ceph OSD | 16gb ram, 8vpcus |
| cephosd03 | Ceph OSD | 16gb ram, 8vpcus |
The cephadmin node will be used for deployment of Ceph Storage Cluster on CentOS 8.
Step 1: Prepare all Nodes – ceph-ansible, OSD, MON, MGR, MDS
We need to prepare all the nodes by following below few steps.
- Set Correct hostname on each server
- Set correct time and configure chrony NTP service
- Add hostname with IP addresses to DNS server or update /etc/hosts on all servers
Example of /etc/hosts contents on each host.
sudo tee -a /etc/hosts<<EOF
192.168.10.10  cephadmin
192.168.10.11  cephmon01
192.168.10.12  cephmon02
192.168.10.13  cephmon03
192.168.10.14  cephosd01
192.168.10.15  cephosd02
192.168.10.16  cephosd03
EOF
Once you’ve done above tasks, install basic packages:
sudo dnf update
sudo dnf install vim bash-completion tmux
Reboot each server after upgrade.
sudo dnf -y update && sudo rebootStep 2: Prepare Ceph Admin Node
Login to the admin node:
$ ssh [email protected]Add EPEL repository:
sudo dnf -y install https://dl.fedoraproject.org/pub/epel/epel-release-latest-8.noarch.rpm
sudo dnf config-manager --set-enabled PowerTools
Install Git:
sudo yum install git vim bash-completionClone Ceph Ansible repository:
git clone https://github.com/ceph/ceph-ansible.gitChoose ceph-ansible branch you wish to use. The command Syntax is:
git checkout $branchI’ll switch to stable-5.0 which supports Ceph octopus version.
cd ceph-ansible
git checkout stable-5.0
Install Python pip.
sudo yum install python3-pipUse pip and the provided requirements.txt to install Ansible and other needed Python libraries:
sudo pip3 install -r requirements.txtEnsure /usr/local/bin path is added to PATH.
$ echo "PATH=$PATH:/usr/local/bin" >>~/.bashrc
$ source ~/.bashrc
Confirm Ansible version installed.
$ ansible --version
ansible 2.9.7
  config file = /root/ceph-ansible/ansible.cfg
  configured module search path = ['/root/ceph-ansible/library']
  ansible python module location = /usr/local/lib/python3.6/site-packages/ansible
  executable location = /usr/local/bin/ansible
  python version = 3.6.8 (default, Nov 21 2019, 19:31:34) [GCC 8.3.1 20190507 (Red Hat 8.3.1-4)]
Copy SSH Public Key to all nodes
Set SSH key-pair on your Ceph Admin Node and copy the public key to all storage Nodes.
$ ssh-keygen

-- Copy pubkey, example:
for host in cephmon01 cephmon02 cephmon03 cephosd01 cephosd02 cephosd03; do
 ssh-copy-id [email protected]$host
done
Create ssh configuration file on the Admin node for all storage nodes.
# This is my ssh config file
$ vi ~/.ssh/config
Host cephadmin
    Hostname 192.168.10.10
    User root
Host cephmon01
    Hostname 192.168.10.11
    User root
Host cephmon02
    Hostname 192.168.10.12
    User root
Host cephmon03
    Hostname 192.168.10.13
    User root
Host cephosd01
    Hostname 192.168.10.14
    User root
Host cephosd02
    Hostname 192.168.10.15
    User root
Host cephosd03
    Hostname 192.168.10.16
User root- Replace Hostname values with the IP addresses of the nodes and User value with the remote user you’re installing as.
When not using root for SSH
For normal user installations, enable the remote user on all storage the nodes to perform passwordless sudo.
echo -e 'Defaults:user !requirettynusername ALL = (root) NOPASSWD:ALL' | sudo tee /etc/sudoers.d/ceph
sudo chmod 440 /etc/sudoers.d/ceph
Where username is to be replaced with the name of user configured in ~/.ssh/config file.
Configure Ansible Inventory and Playbook
Create Ceph Cluster group variables file on the admin Node
cd ceph-ansible
cp group_vars/all.yml.sample  group_vars/all.yml
vim group_vars/all.yml
Edit the file to configure your ceph cluster
ceph_release_num: 15
cluster: ceph

# Inventory host group variables
mon_group_name: mons
osd_group_name: osds
rgw_group_name: rgws
mds_group_name: mdss
nfs_group_name: nfss
rbdmirror_group_name: rbdmirrors
client_group_name: clients
iscsi_gw_group_name: iscsigws
mgr_group_name: mgrs
rgwloadbalancer_group_name: rgwloadbalancers
grafana_server_group_name: grafana-server

# Firewalld / NTP
configure_firewall: True
ntp_service_enabled: true
ntp_daemon_type: chronyd

# Ceph packages
ceph_origin: repository
ceph_repository: community
ceph_repository_type: cdn
ceph_stable_release: octopus

# Interface options
monitor_interface: eth0
radosgw_interface: eth0

# DASHBOARD
dashboard_enabled: True
dashboard_protocol: http
dashboard_admin_user: admin
dashboard_admin_password: [email protected]

grafana_admin_user: admin
grafana_admin_password: [email protected]
If you have separate networks for Cluster and Public network, define them accordingly.
public_network: "192.168.3.0/24"
cluster_network: "192.168.4.0/24"
Configure other parameters as you see fit.
Set OSD Devices.
I have three OSD nodes and each have one raw block devices – /dev/sdb
$ lsblk
NAME    MAJ:MIN RM  SIZE RO TYPE MOUNTPOINT
sda       8:0    0 76.3G  0 disk
├─sda1    8:1    0 76.2G  0 part /
├─sda14   8:14   0    1M  0 part
└─sda15   8:15   0   64M  0 part /boot/efi
sdb       8:16   0   50G  0 disk
sr0      11:0    1 1024M  0 rom
List your OSD raw block devices to be used.
$ cp group_vars/osds.yml.sample group_vars/osds.yml
$ vim group_vars/osds.yml
copy_admin_key: true
devices:
  - /dev/sdb
Create a new ceph nodes ansible inventory:
vim hostsProperly set your inventory file. Below is my inventory. Modify inventory groups the way you want services installed in your cluster nodes.
# Ceph admin user for SSH and Sudo
[all:vars]
ansible_ssh_user=root
ansible_become=true
ansible_become_method=sudo
ansible_become_user=root

# Ceph Monitor Nodes
[mons]
cephmon01
cephmon02
cephmon03

# MDS Nodes
[mdss]
cephmon01
cephmon02
cephmon03

# RGW
[rgws]
cephmon01
cephmon02
cephmon03

# Manager Daemon Nodes
[mgrs]
cephmon01
cephmon02
cephmon03

# set OSD (Object Storage Daemon) Node
[osds]
cephosd01
cephosd02
cephosd03

# Grafana server
[grafana-server]
cephosd01
Step 3: Deploy Ceph 15 (Octopus) Cluster on CentOS 8
Create Playbook file by copying a sample playbook at the root of the ceph-ansible project called site.yml.sample.
cp site.yml.sample site.yml Run Playbook.
ansible-playbook -i hosts site.yml If installation was successful, a health check should return OK.
...
TASK [show ceph status for cluster ceph] ***************************************************************************************************************
Sunday 10 May 2020  20:12:33  0200 (0:00:00.721)       0:09:00.180 ************
ok: [cephmon01 -> cephmon01] =>
  msg:
  - '  cluster:'
  - '    id:     b64fac77-df30-4def-8e3c-1935ef9f0ef3'
  - '    health: HEALTH_OK'
  - ' '
  - '  services:'
  - '    mon: 3 daemons, quorum ceph-mon-02,ceph-mon-03,ceph-mon-01 (age 6m)'
  - '    mgr: ceph-mon-03(active, since 38s), standbys: ceph-mon-02, ceph-mon-01'
  - '    mds: cephfs:1 {0=ceph-mon-02=up:active} 2 up:standby'
  - '    osd: 3 osds: 3 up (since 4m), 3 in (since 4m)'
  - '    rgw: 3 daemons active (ceph-mon-01.rgw0, ceph-mon-02.rgw0, ceph-mon-03.rgw0)'
  - ' '
  - '  task status:'
  - '    scrub status:'
  - '        mds.ceph-mon-02: idle'
  - ' '
  - '  data:'
  - '    pools:   7 pools, 132 pgs'
  - '    objects: 215 objects, 9.9 KiB'
  - '    usage:   3.0 GiB used, 147 GiB / 150 GiB avail'
  - '    pgs:     0.758% pgs not active'
  - '             131 active clean'
  - '             1   peering'
  - ' '
  - '  io:'
  - '    client:   3.5 KiB/s rd, 402 B/s wr, 3 op/s rd, 0 op/s wr'
  - ' '
....
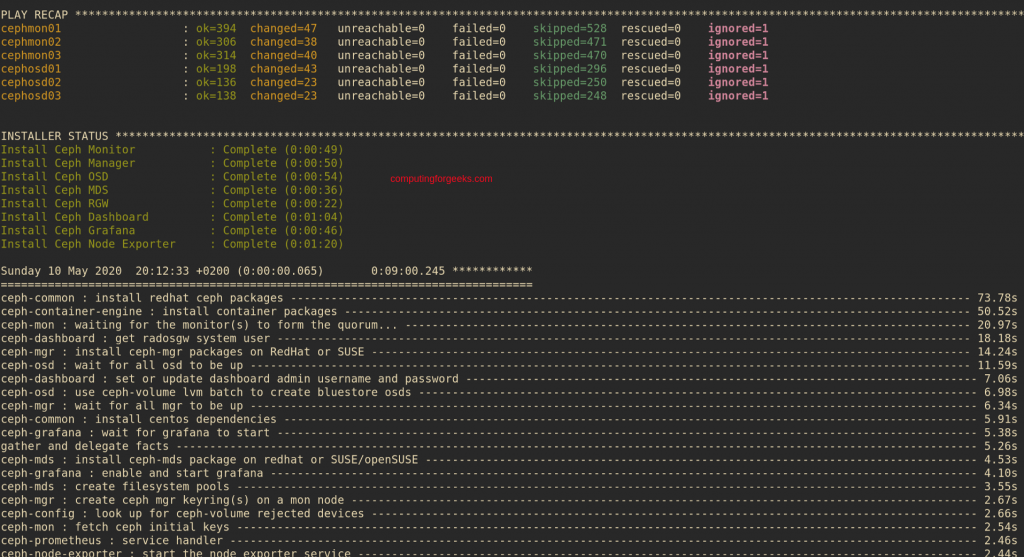
This is a screenshot of my installation output once it has been completed.

Step 4: Validate Ceph Cluster Installation on CentOS 8
Login to one of the cluster nodes and do some validations to confirm installation of Ceph Storage Cluster on CentOS 8 was successful.
$ ssh [email protected]
# ceph -s
  cluster:
    id:     b64fac77-df30-4def-8e3c-1935ef9f0ef3
    health: HEALTH_OK

  services:
    mon: 3 daemons, quorum ceph-mon-02,ceph-mon-03,ceph-mon-01 (age 22m)
    mgr: ceph-mon-03(active, since 16m), standbys: ceph-mon-02, ceph-mon-01
    mds: cephfs:1 {0=ceph-mon-02=up:active} 2 up:standby
    osd: 3 osds: 3 up (since 20m), 3 in (since 20m)
    rgw: 3 daemons active (ceph-mon-01.rgw0, ceph-mon-02.rgw0, ceph-mon-03.rgw0)

  task status:
    scrub status:
        mds.ceph-mon-02: idle

  data:
    pools:   7 pools, 121 pgs
    objects: 215 objects, 11 KiB
    usage:   3.1 GiB used, 147 GiB / 150 GiB avail
    pgs:     121 active clean
You can access Ceph Dashboard on the active MGR node.
Login with credentials configured in group_vars/all.yml file. For me these are:
dashboard_admin_user: admin
dashboard_admin_password: [email protected]
You can then create more users with varying access level at the cluster.
Grafana Dashboard can be accessed on the Node you set for grafana-server group name. The service should be listening on port 3000 by default.
Use Access credentials configured to access admin console.
grafana_admin_user: admin
grafana_admin_password: [email protected]
Day-2 Operations
ceph-ansible provides a set of playbook in infrastructure-playbooks directory in order to perform some basic day-2 operations.
Reference:
Here are some more useful guides on Ceph:
Create a Pool in Ceph Storage Cluster
How To Configure AWS S3 CLI for Ceph Object Gateway Storage


