
Docker Swarm is a container orchestration built on Docker Engine. It allows you to create and deploy a cluster of Docker nodes with multiple servers. Docker Swarm simplifies the deployment of your containerized application in a service. Docker Swarm provides a simple and straightforward way to manage and orchestrate containers.
Docker Swarm provides a high level of availability for applications. In Docker Swarm, you can run a single application or service on multiple nodes called “worker nodes.” There is also a node called “Swarm Manager” that provides centralized management and orchestration of Docker Swarm.
This tutorial shows you how to set up Docker Swarm on Debian 11 servers. You will install Docker, set up the UFW (Uncomplicated Firewall), initialize the “Swarm Manager” and add “Nodes”. You’ll also learn the basic use of Docker Swarm for deploying applications.
Prerequisites
To complete this tutorial, you will need multiple Debian 11 servers and a non-root user with sudo/root administrator privileges.
In this demonstration, we will use three Debian 11 servers with the following details:
Hostname    IP Address        Used as
-------------------------------------
manager     192.168.5.100     Swarm Manager
node1       192.168.5.120     Node
node2       192.168.5.121     Node
With all of these requirements in place, you are ready to start.
Installing Docker
The default Debian repository provides a package for Docker. But, to ensure that you are installing the latest version of Docker, you will install Docker via the official Docker repository.
Also, you must install Docker on all of your Debian servers.
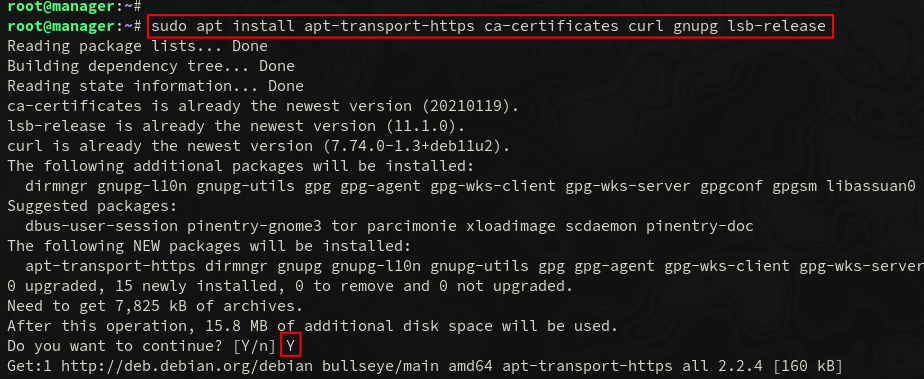
Before adding the repository, run the following apt command to install some basic packages. When prompted to confirm the installation, input Y and press ENTER.
sudo apt install apt-transport-https ca-certificates curl gnupg lsb-release -y
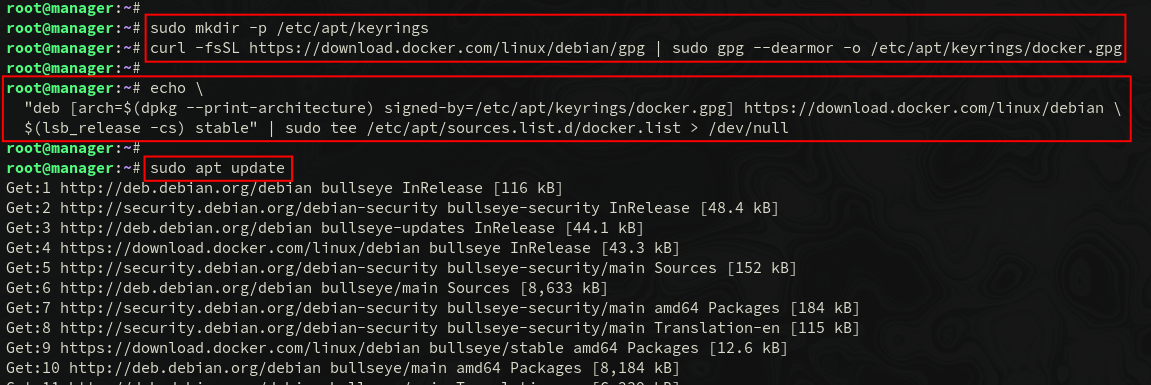
After installing basic packages, add the GPG key for the Docker repository using the following command. With this command, you will create a new directory “/etc/apt/keyrings” and store the GPG key of the Docker repository in it.
sudo mkdir -p /etc/apt/keyrings
curl -fsSL https://download.docker.com/linux/debian/gpg | sudo gpg --dearmor -o /etc/apt/keyrings/docker.gpg
Next, add the Docker repository for the Debian Linux system using the command below.
echo
  "deb [arch=$(dpkg --print-architecture) signed-by=/etc/apt/keyrings/docker.gpg] https://download.docker.com/linux/debian
  $(lsb_release -cs) stable" | sudo tee /etc/apt/sources.list.d/docker.list > /dev/null
Now, update and refresh your package index via the apt command below.
sudo apt update
You will see the new Docker repository being updated.
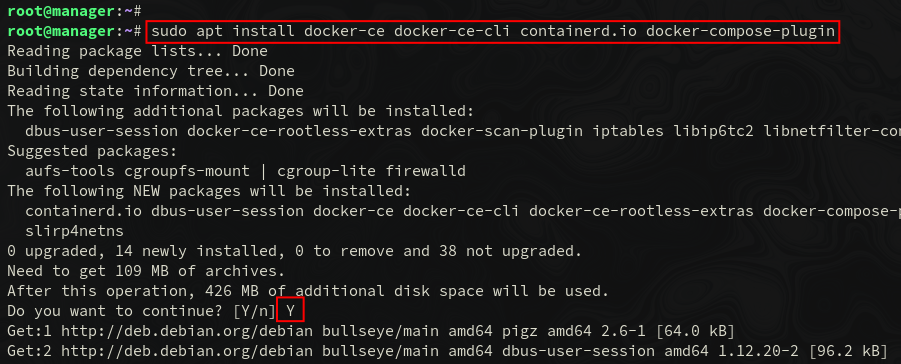
Next, install Docker packages using the following apt command. You will be asked to confirm the installation, input Y to confirm, and press ENTER to proceed.
sudo apt install docker-ce docker-ce-cli containerd.io docker-compose-plugin
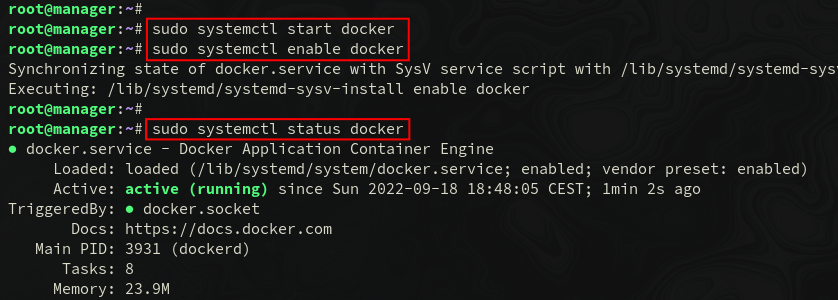
After installing Docker, run the following command to start and enable the ‘docker‘ service. This allows ‘docker’ to run automatically at system boot.
sudo systemctl start docker
sudo systemctl enable docker
Lastly, verify the ‘docker‘ service via the systemctl command below.
sudo systemctl status docker
If the ‘docker‘ service is running, you should see the output like the following screenshot:
Additionally, if you plan to use a non-root user for your deployment, you must add your user to the ‘docker‘ and allow the user to run Docker containers.
sudo usermod -aG docker user
Setting up Firewall
If you are deploying Docker Swarm for production, you must set up the firewall between all nodes. In this example, you will use UFW as the default firewall for your Debian servers.
Below are some ports that you must open for the Docker Swarm to work properly:
- TCP port 2377 for cluster management communications – this is used if you have multiple Swarm Manager.
- TCP and UDP port 7946 for communication among nodes – for all nodes on the Swarm environment.
- UDP port 4789 for overlay network traffic
Install UFW to your Debian systems using the following apt command.
sudo apt install ufw -y
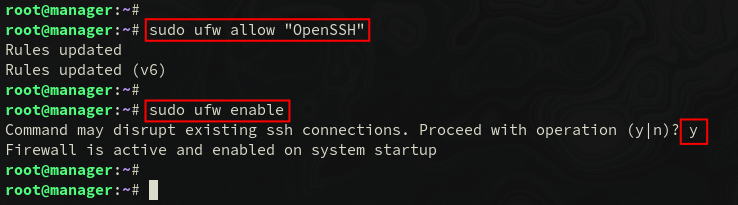
After UFW is installed, run the following ‘ufw‘ command to add the “OpenSSH” application profile. Then, start and enable UFW.
During the process, you will be asked to confirm whether to run and enable the UFW firewall. Input y to confirm and press ENTER to proceed.
sudo ufw allow "OpenSSH"
sudo ufw enable
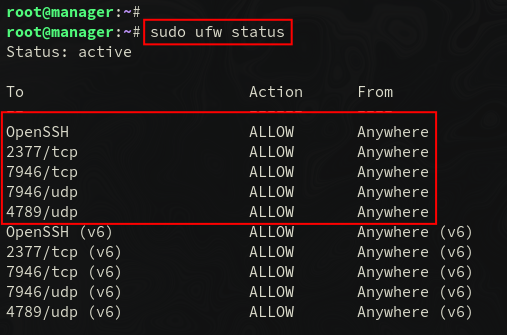
Now run the following ufw command to open some ports for Docker Swarm.
sudo ufw allow 2377/tcp
sudo ufw allow 7946/tcp
sudo ufw allow 7946/udp
sudo ufw allow 4789/udp
Lastly, verify the list of enabled UFW rules on your server via the following ufw command. Be sure all ports for Docker Swarm is enabled and available on UFW.
sudo ufw status
At this point, you have Docker installed and the UFW configured. Let’s initialize Swarm Manager next.
Initializing Swarm Manager
Swarm Manager is the center of the Docker Swarm deployment. It manages the swarm state itself and has no limit on the number of the manager nodes. Deploying multiple Swarm Manager will create a fault-tolerance environment.
The Swarm Manager is cluster management that is integrated with docker Engine. it provides a declarative service model, service scaling, desired state of services, load balancing, and rolling updates.
In this example, you will initialize one node as the Swarm Manager.
To initialize the Swarm Manager, run the following docker command. In this example, the Swarm manager will be running on the IP address 192.168.5.30. And the network for containers on the Docker Swarm environment will be 10.20.0.0/16.
docker swarm init --advertise-addr 192.168.5.30 --default-addr-pool 10.20.0.0/16
When Swarm Manager is initialized, you will see the following output. Also, you can see the details token for joining Nodes to the Swarm manager.
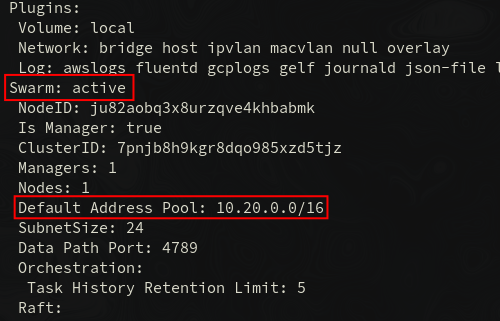
Now, run the following docker command to verify the Swarm mode is enabled.
docker info
In the following screenshot, you can see the Swarm mode is “active” with the pool of IP address “10.20.0.0/16“. Also, the current node that is available on the Docker Swarm is “1“.
You can verify the list of nodes on the Docker Swarm via the docker command below. You should see there is only one node on the current Docker Swarm, which is the Swarm Manager.
docker node ls
Adding Worker Nodes to Swarm
Worker nodes is where containers are executed and running. On the worker node, the Docker Engine must be installed on each server, and also the worker node can be promoted as the Swarm Manager.
To add a worker node, you can use the “docker swarm join” command followed by the token that is generated when you initialize the Swarm Manager.
Add both ‘node1‘ and ‘node2‘ servers to the Docker Swarm via the “docker swarm join” command below. You can replace the token with your generated token during the Swarm Manager initialization.
docker swarm join
--token SWMTKN-1-5tui5dveqw6n2b0m6suut0w7nf9w0wb5jyvfhmykb4jdehps1j-ag99f7750mmnim6ao5yp0x3s2
192.168.5.30:2377
When the node is added, you will get the output message such as “This node joined a swarm as a worker“.
Below is the output that you will see on both ‘node1‘ and ‘node2‘ servers.
Also, if you lost the swarm token for joining the worker node, you can show using the following command.
docker swarm join-token worker
Lastly, back to the “manager” server and verify the list of nodes on your Docker Swarm environment via the “docker” command below.
docker node ls
In the following screenshot, you can see that both “node1” and “node2” is added to the Docker Swarm with the status “Ready” and the docker engine “20.10.18“.
The Docker Swarm deployment is complete, you can now deploy your containerized application to the Swarm.
Managing Services on Docker Swarm
Service is a term of application deployment on Docker Swarm. It’s the image for your microservices, it could be an HTTP server, a database server, or other applications that will be running on your Docker Swarm.
To set up a service in Docker Swarm, you must specify the image that you will be using, the port that will be exposed, and also the number of replicas.
After you have deployed Docker Swarm, you will now learn the basic deployment of your services to Docker Swarm.
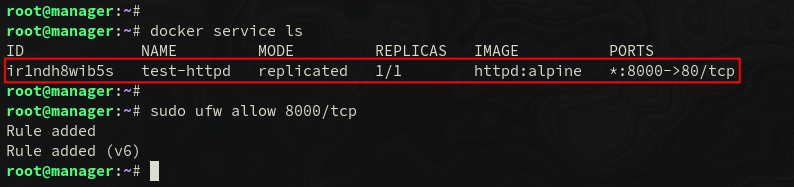
Create a new service “test-httpd” via the command “docker service create” as below.
In this example, you will create a new service “test-httpd” with the 1 replica and expose port “8000” on the Swarm node. The image that you will be using is “httpd:alpine”.
docker service create --replicas 1 --name test-httpd -p 8000:80 httpd:alpine
Once the “test-httpd” service is running, verify using the following command. You should see the service “test-httpd” is running with 1 replica and expose the TCP port 8000.
docker service ls
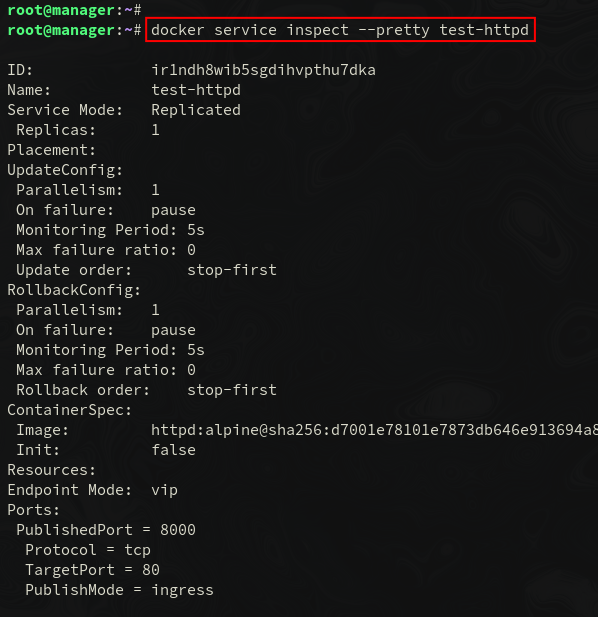
Now, run the following command to check the details service “test-httpd”.
docker service inspect test-httpd
docker service inspect --pretty test-httpd
Below you can see the detailed service of “test-httpd”, this includes the number of replicas, external ports, the base image that you are using, etc.
You can also check the running container on the “test-httpd” service via the “docker service ps” command as below.
docker service ps test-httpd
You can see the “test-httpd.1” container is running on the “manager” server.
Now open the port “8000” on all servers via the ufw command below.
sudo ufw allow 8000/tcp
Then, verify the “test-httpd” service using the curl command as below. The “192.168.5.30” is the Swarm Manager IP address and the “test-httpd” service is running on port 8000.
curl 192.168.5.30:8000
curl -I 192.168.5.30:8000
You will see the default index.html page of the “test-httpd” service.
Scaling Services on Docker Swarm
Now you will learn how to scale your services on Docker Swarm.
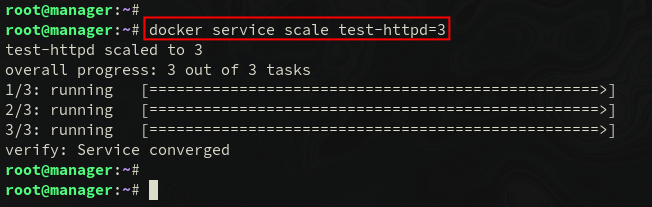
Run the following command to scale the “test-httpd” service to 3 replicas.
docker service scale test-httpd=3
Now verify the running container on the “test-httpd” service using the command below. You should see three different containers on the “test-http” service, which is running on server manager, node1, and node2.
docker service ps test-httpd
Lastly, run the following docker command to verify the running container on the node1 and node2 servers. You should see the container with the name “test-httpd.random name” is running on both servers. Also, you can see that the container is accessible via TCP port 8000.
Checking container on node1.
docker ps
curl node1:8000
Checking container on node2.
docker ps
curl node2:8000
Deleting Services on Docker Swarm
Now is the time to clean up your environment by deleting services that you have deployed to Docker Swarm.
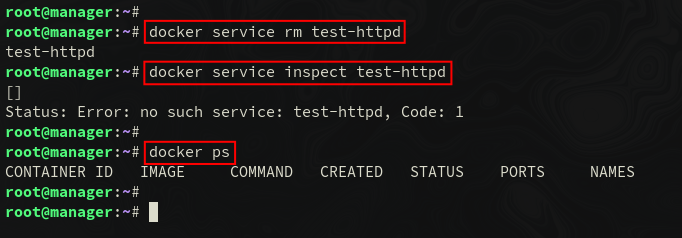
Run the following command to remove and delete the service “test-httpd” from the Docker Swarm.
docker service rm test-httpd
Then, verify the “test-httpd” service via the “docker service inspect” command below. You should see the service is deleted.
docker service inspect test-httpd
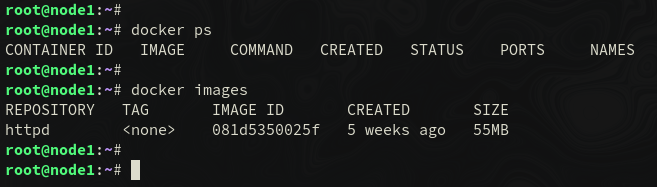
Additionally, you can also verify via the docker command below to check the list of running containers and images on your Swarm.
You should see the container is removed and the httpd:alpine image is available on all of the servers.
docker ps
docker images
Conclusion
In this tutorial, you have deployed the Docker Swarm with three Debian 11 servers. You have also learned the basic installation of Docker Engine on Linux server and the basic configuration of UFW firewall on Debian system. And finally, you have also learned the basic application deployment to Docker Swarm via the “docker service” command.
From here, you can now deploy your containerized applications with all of the dependencies to the Docker Swarm. You can also add more Swarm Manager to set up the high availability of your Docker Swarm environment.


