
Gitea is an open-source code-hosting solution based on the Git platform. It is written in the Go language. It includes a repository file editor, issue tracking, pull requests, user management, notifications, built-in wiki, LFS Support, Git hooks, and much more.
It is a lightweight application. Therefore, it can be installed on low-powered systems. If you are looking for a self-hosted Git platform with a smaller memory platform, you should check out Gitea.
This article will cover how to install and configure Gitea on Fedora 34 and how to set up your first Git repository. Gitea can be installed from source, binary, a docker package, or a package. For our tutorial, we will install it from binary.
Prerequisites
- A server running Fedora 34.
- A non-root sudo user.
- SELinux Disabled.
-
Make sure everything is updated.
$ sudo dnf update
Step 1 – Configure Firewall
The first step is to configure the firewall. Fedora server comes with the Firewalld firewall.
Check if the firewall is running.
$ sudo firewall-cmd --state
You should get the following output.
running
Check the current allowed services/ports.
$ sudo firewall-cmd --permanent --list-services
It should show the following output.
dhcpv6-client mdns ssh
Allow HTTP and HTTPS ports.
$ sudo firewall-cmd --permanent --add-service=http
$ sudo firewall-cmd --permanent --add-service=https
Recheck the status of the firewall.
$ sudo firewall-cmd --permanent --list-services
You should see a similar output.
dhcpv6-client http https mdns ssh
Reload the Firewall.
$ sudo systemctl reload firewalld
Step 2 – Install Git
The first step is to install Git.
$ sudo dnf install git
Verify the installation by checking the Git version.
$ git --version
git version 2.31.1
Configure Git
Git can be configured with the git config command. Set your name and email address for working with Git.
$ git config --global user.name "Your Name"
$ git config --global user.email "[email protected]"
You can check the configuration by using the following command.
$ git config --list
user.name=Your Name
[email protected]
Step 3 – Install and Configure PostgreSQL
Gitea supports SQLite, MySQL/Mariadb, MSSQL, and PostgreSQL. For our tutorial, we will use PostgreSQL.
Install and initialize PostgreSQL.
$ sudo dnf module enable postgresql:13
$ sudo dnf install postgresql-server postgresql-contrib
$ sudo postgresql-setup --initdb --unit postgresql
$ sudo systemctl enable --now postgresql
PostgreSQL uses md5 encryption scheme for password authentication by default which is not secure. You need to switch to SCRAM-SHA-256 scheme. And if you are going to connect to a remote PostgreSQL database, you need to configure it to listen to your IP address. Both these can be changed by editing the /var/lib/pgsql/data/postgresql.conf file. Open it for editing.
$ sudo nano /var/lib/pgsql/data/postgresql.conf
Edit the following variables in the following way.
listen_addresses = 'localhost, 201.0.110.0'
password_encryption = scram-sha-256
Save the file by pressing Ctrl X and entering Y when prompted.
Restart PostgreSQL.
$ sudo systemctl restart postgresql
Log in to the PostgreSQL shell.
$ sudo -u postgres psql
Create a new SQL user and database for Gitea. Choose a strong password for your database user.
postgres-# CREATE ROLE gitea WITH LOGIN PASSWORD 'yourpassword';
postgres-# CREATE DATABASE giteadb WITH OWNER gitea TEMPLATE template0 ENCODING UTF8 LC_COLLATE 'en_US.UTF-8' LC_CTYPE 'en_US.UTF-8';
Replace the username, database name, and password as appropriate.
Exit the shell by typing q.
Allow the database user to access the database created above by adding the following authentication rule to /var/lib/pgsql/data/pg_hba.conf.
If the database is local, then add this line.
local giteadb gitea scram-sha-256
For a remote database, use the following code instead.
host giteadb gitea 192.0.2.10/32 scram-sha-256
You will also need to edit the following lines by adding replacing ident with scram-sha-256.
# IPv4 local connections:
host    all             all             127.0.0.1/32            ident
# IPv6 local connections:
host    all             all             ::1/128                 ident
They should look like the following.
# IPv4 local connections:
host    all             all             127.0.0.1/32            scram-sha-256
# IPv6 local connections:
host    all             all             ::1/128                 scram-sha-256
Save the file by pressing Ctrl X and entering Y when prompted.
Restart PostgreSQL.
$ sudo systemctl restart postgresql
You will also need to add the following rule in the firewall if you want to enable remote connections.
$ sudo firewall-cmd --permanent--add-service=postgresql
$ sudo firewall-cmd --reload
Step 4 – Create a Git user
Create a new system user to run the Gitea application.Advertisement
$ sudo useradd
   --system
   --shell /bin/bash
   --comment 'Git Version Control'
   --create-home
   --home /home/git
   git
This command creates a new user and group named git and sets the home directory to /home/git.
Step 5 – Install Gitea
Open the Gitea Downloads page and check the version number of the latest binary available. At the time of writing this tutorial, the latest version is 1.14.3. If there is a newer version, change it in the VERSION variable in the command below.
Use the wget utility to grab the latest Gitea binary.
$ GITEAVERSION=1.14.3
$ wget -O gitea https://dl.gitea.io/gitea/${GITEAVERSION}/gitea-${GITEAVERSION}-linux-amd64
Move the downloaded binary to the /usr/local/bin directory.
$ sudo mv gitea /usr/local/bin
Make the binary executable.
$ sudo chmod x /usr/local/bin/gitea
Run the following commands to create directories and set required permissions for Gitea to work properly.
$ sudo mkdir -p /var/lib/gitea/{custom,data,log}
$ sudo chown -R git:git /var/lib/gitea/
$ sudo chmod -R 750 /var/lib/gitea/
$ sudo mkdir /etc/gitea
$ sudo chown root:git /etc/gitea
$ sudo chmod 770 /etc/gitea
The permission for /etc/gitea directory is set to 770 for the installation wizard to create the configuration file. Once the installation is complete, we will set more restrictive permission.
Create a Systemd service file
We will run Gitea as a systemd service. For that, create a new systemd entry file for Gitea.
$ sudo nano /etc/systemd/system/gitea.service
Paste the following code in it.
[Unit]
Description=Gitea
After=syslog.target
After=network.target
After=postgresql.service

[Service]
RestartSec=2s
Type=simple
User=git
Group=git
WorkingDirectory=/var/lib/gitea/
ExecStart=/usr/local/bin/gitea web -c /etc/gitea/app.ini
Restart=always
Environment=USER=git HOME=/home/git GITEA_WORK_DIR=/var/lib/gitea

[Install]
WantedBy=multi-user.target
Save the file by pressing Ctrl X and entering Y when prompted.
For reference, you can take a look at the sample systemd file available from the Gitea repository.
Reload the systemd daemon to enable the file we just created.
$ sudo systemctl daemon-reload
Enable and start the Gitea service.
$ sudo systemctl enable --now gitea
Verify that Gitea is running.
$ sudo systemctl status gitea
  gitea.service - Gitea
     Loaded: loaded (/etc/systemd/system/gitea.service; enabled; vendor preset: disabled)
     Active: active (running) since Tue 2021-07-04 20:33:38 EDT; 1 day 8h ago
   Main PID: 46404 (gitea)
      Tasks: 7 (limit: 2328)
     Memory: 115.5M
        CPU: 9min 12.061s
     CGroup: /system.slice/gitea.service
             ---46404 /usr/local/bin/gitea web -c /etc/gitea/app.ini
...
Step 6 – Configure Gitea
Gitea, by default, listens on port 3000. You can use either a different port or stick to the default port. Therefore, we need to open port 3000 as well.
$ sudo firewall-cmd --permanent --add-port=3000/tcp
$ sudo firewall-cmd --reload
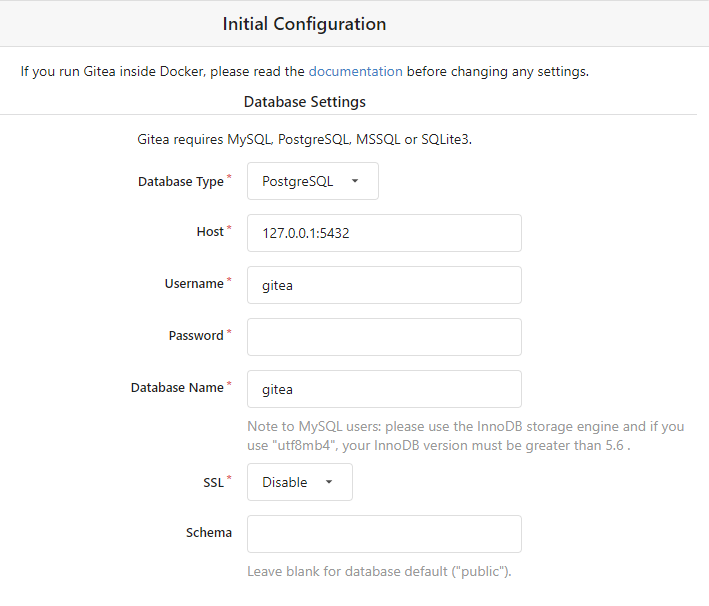
Open your browser and type https://YOURIPADDRESS:3000 and you will be greeted with the Gitea installer. Use the following values to configure.
Database Settings
- Database Type: Choose PostgreSQL from the dropdown
- Host: 127.0.0.1:5432
- Username: gitea
- Password: yourpassword
- Database Name: gitea
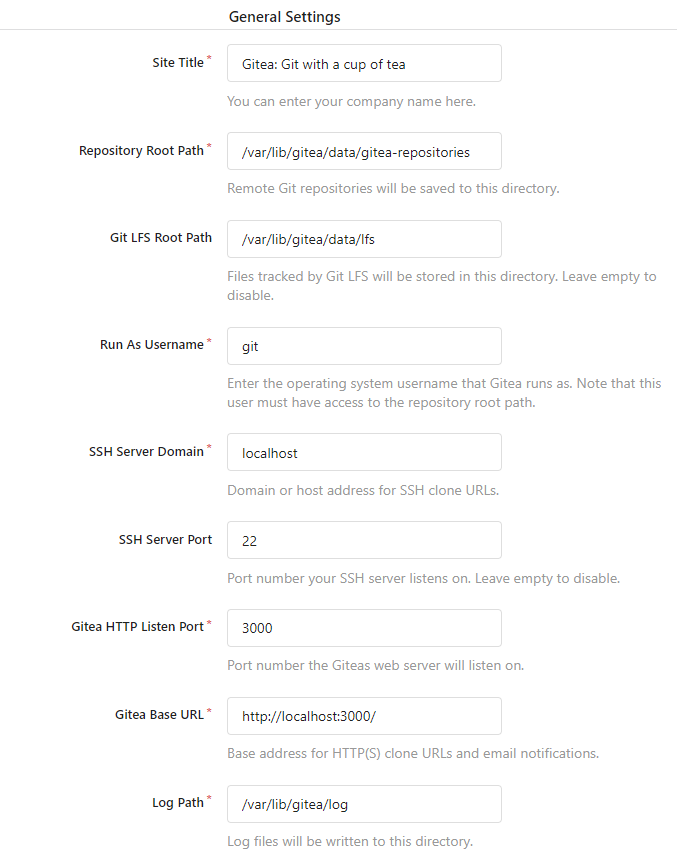
General Settings
- Site Title: Enter your organization name
- Repository Root Path: Leave the default path
- Git LFS Root Path: Leave the default path
- Run as Username: git
- SSH Server Domain: Enter your IP address
- HTTP Listen Port: 3000 (You can change the port here, but you will need to access it via the firewall.)
- Gitea Base URL: http://YOURIPADDRESS:3000
- Log Path: Leave the default
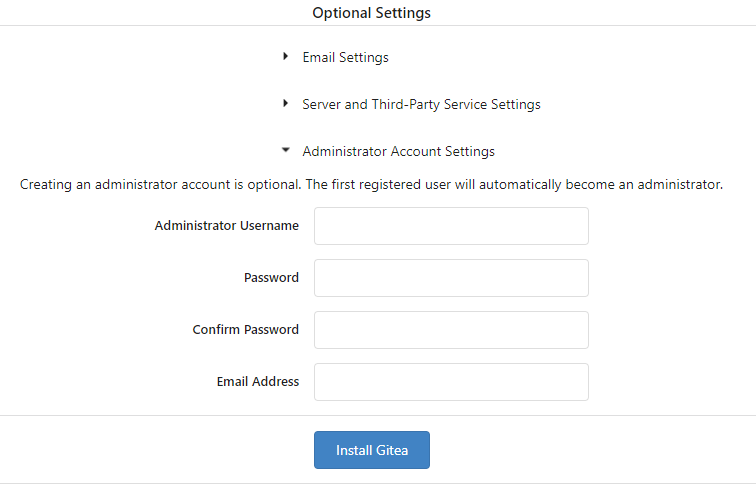
You can configure Email and Server settings at this point, or you can change them later. You should, however, fill in the administrator account settings.
To start the installation, click the Install Gitea* button. Once completed, you will be automatically logged in and redirected to the account dashboard.
The installation will create the Gitea configuration file. Change its permission to read-only.
$ sudo chmod 750 /etc/gitea
$ sudo chmod 640 /etc/gitea/app.ini
That’s it. Gitea is now installed on your server.
Step 7 – Install SSL using Let’s Encrypt
To install an SSL certificate using Let’s Encrypt, we need to download the Certbot tool using the Snapd package installer included in Ubuntu 20.04.
Run the following commands to install Certbot.
$ sudo dnf install certbot
Generate the SSL certificate.
$ sudo certbot certonly --standalone --preferred-challenges http -d example.com
The above command will download a certificate to the /etc/letsencrypt/live/example.com directory on your server.
Create a challenge webroot directory for Let’s Encrypt auto-renewal.
$ sudo mkdir -p /var/lib/letsencrypt
Create a Cron Job to renew the SSL. It will run every day to check the certificate and renew if needed. For that, first, create the file /etc/cron.daily/certbot-renew and open it for editing.
$ sudo nano /etc/cron.daily/certbot-renew
Paste the following code.
#!/bin/sh
certbot renew --cert-name example.com --webroot -w /var/lib/letsencrypt/ --post-hook "systemctl reload nginx"
Save the file by pressing Ctrl X and entering Y when prompted.
Change the permissions on the task file to make it executable.
$ sudo chmod x /etc/cron.daily/certbot-renew
Step 8 – Install and configure Nginx
The next step is to install the Nginx server.
$ sudo dnf install nginx
Create the Nginx configuration file for Gitea.
$ sudo nano /etc/nginx/conf.d/gitea.conf
Paste the following code in it.
server {
        listen 80;

        location ~ /.well-known/acme-challenge {
                root /var/lib/letsencrypt/;
        }

        server_name yourdomain.com;
        return 301 https://$server_name$request_uri;
}
server {
        listen 443 ssl http2;
        server_name your_domain;

        client_max_body_size 50m;

        ssl_session_timeout 1d;
        ssl_session_cache shared:MozSSL:10m;  # about 40000 sessions
        ssl_session_tickets off;
        ssl_protocols TLSv1.2 TLSv1.3;
        ssl_ciphers "ECDHE-ECDSA-AES256-GCM-SHA384:ECDHE-RSA-AES256-GCM-SHA384:ECDHE-ECDSA-CHACHA20-POLY1305:ECDHE-RSA-CHACHA20- POLY1305:ECDHE-ECDSA-AES128-GCM-SHA256:ECDHE-RSA-AES128-GCM-SHA256:ECDHE-ECDSA-AES256-SHA384:ECDHE-RSA-AES256-SHA384:!aNULL:!eNULL:!EXPORT:!DES:!MD5:!PSK:!RC4";
        ssl_prefer_server_ciphers off;
        ssl_ecdh_curve X25519:prime256v1:secp384r1:secp521r1;
        ssl_stapling on;
        ssl_stapling_verify on;

        ssl_certificate /etc/letsencrypt/live/yourdomain.com/fullchain.pem;
        ssl_certificate_key /etc/letsencrypt/live/yourdomain.com/privkey.pem;
        ssl_trusted_certificate /etc/letsencrypt/live/yourdomain.com/chain.pem;

        proxy_read_timeout 720s;
        proxy_connect_timeout 720s;
        proxy_send_timeout 720s;

        proxy_set_header X-Forwarded-Host $host;
        proxy_set_header X-Forwarded-For $proxy_add_x_forwarded_for;
        proxy_set_header X-Forwarded-Proto $scheme;
        proxy_set_header X-Real-IP $remote_addr;

        location / {
                proxy_redirect off;
                proxy_pass http://127.0.0.1:3000;
     	}
        access_log /var/log/nginx/gitea.access.log;
        error_log /var/log/nginx/gitea.error.log;
}
Save the file by pressing Ctrl X and entering Y when prompted.
Verify if the configuration file is working properly.
$ sudo nginx -t
Restart the Nginx server.
$ sudo systemctl restart nginx
Next, change the Gitea domain and root URL. To do that, open the configuration file /etc/gitea/app.ini.
$ sudo nano /etc/gitea/app.ini
Change the following values.
[server]
SSH_DOMAIN       = git.example.com
DOMAIN           = git.example.com
ROOT_URL         = https://git.example.com/
Save the file by pressing Ctrl X and entering Y when prompted.
Restart the Gitea service.
$ sudo systemctl restart gitea
Step 9 – Setting up Email Notifications
If you want to receive email notifications, you can enable them either via Sendmail or via a 3rd party Email transaction service such as Amazon SES, Postmark, Mailgun, or Sendgrid.
To enable the notifications, open the configuration file /etc/gitea/app.ini.
$ sudo nano /etc/gitea/app.ini
Edit the following section in the file and add the following code.
[mailer]
ENABLED = true
FROM           = [email protected]
MAILER_TYPE    = smtp
HOST           = mail.mydomain.com:587
IS_TLS_ENABLED = true
USER           = [email protected]
PASSWD         = `password`
Save the file by pressing Ctrl X and entering Y when prompted.
Restart the Gitea service.
$ sudo systemctl restart gitea
Step 10 – Updating Gitea
Upgrading Gitea involves downloading and replacing the Gitea binary.
First, stop the Gitea service.
$ sudo systemctl stop gitea
Download and install Gitea binary.
$ GITEAVERSION=LATESTVERSION
$ wget -O gitea https://dl.gitea.io/gitea/${GITEAVERSION}/gitea-${GITEAVERSION}-linux-amd64
$ sudo mv gitea /usr/local/bin
$ sudo chmod  x /usr/local/bin/gitea
Restart the Gitea service.
$ sudo systemctl start gitea
Step 11 – How to use SSH
To use SSH, we need to add our own SSH key to Gitea. If you don’t have one, you can create one using the following command on your local system.
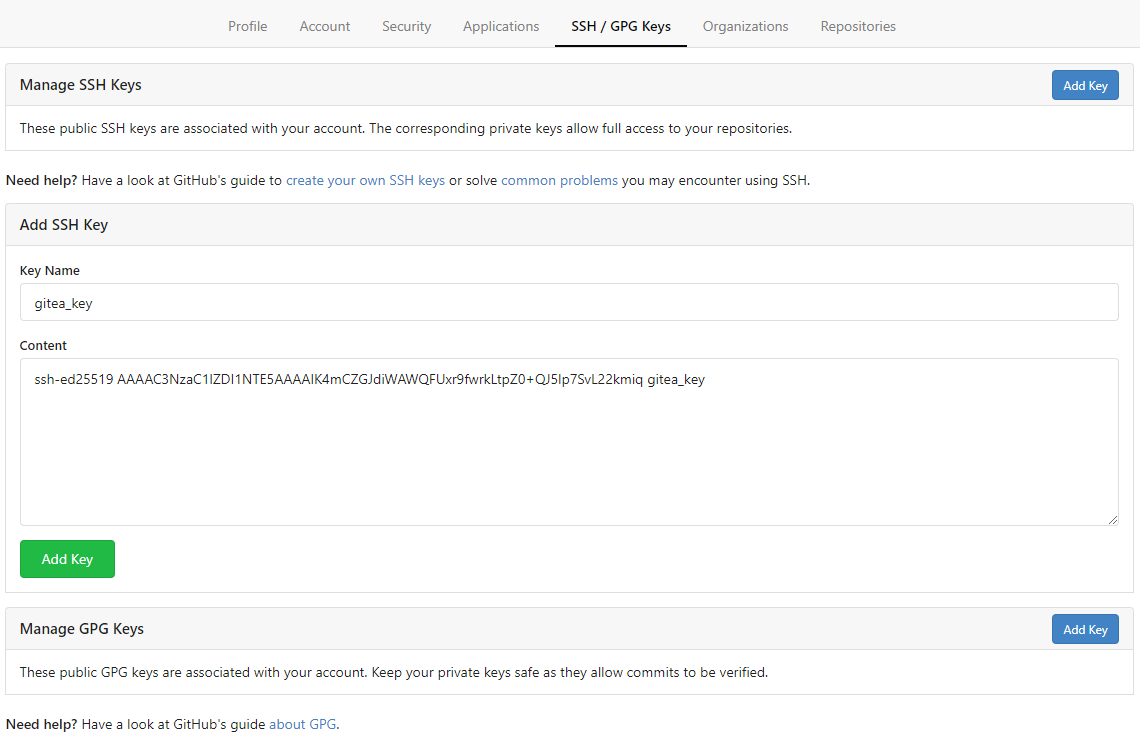
$ ssh-keygen -N "yourpassphrase" -t ed25519 -C "gitea_key"
This will create a key named id_ed25519 in the ~/.ssh directory. To add this key, copy the contents of the file ~/.ssh/id_ed25519.pub to your clipboard. Then add this key to your Gitea settings page under the tab SSH/GPG Keys. Click the Add Key button and give the key a name and paste it in the box.
If you have a list of allowed users in the sshd configuration file, you need to add git to it.
Open the SSHD configuration file.
$ sudo nano /etc/ssh/sshd_config
Look for a line that should look like the following.
AllowUsers myuser myotheruser git
Save the file by pressing Ctrl X and entering Y when prompted.
Restart the SSHD service.
$ sudo systemctl restart ssh
You need to add the passphrase for the key we created to ssh-agent tool on your local system so that you don’t get asked for it repeatedly. Run the following commands to do it.
$ eval $(ssh-agent)
Agent pid 46436
$ ssh-add ~/.ssh/id_ed25519
You can clone your repository to test the SSH connection.
$ git clone ssh://[email protected]/username/repo.git
Cloning into 'repo'...
The authenticity of host 'example.com (201.110.80.160)' can't be established.
ECDSA key fingerprint is SHA256:Kx9l19zpGhHfbb2wHtmWeC7/WWv8e5/T3Tcws2qwVEw.
Are you sure you want to continue connecting (yes/no/[fingerprint])? yes
Warning: Permanently added 'example.com,201.110.80.160' (ECDSA) to the list of known hosts.
remote: Enumerating objects: 5, done.
remote: Counting objects: 100% (5/5), done.
remote: Compressing objects: 100% (4/4), done.
remote: Total 5 (delta 0), reused 0 (delta 0)
Receiving objects: 100% (5/5), 4.77 KiB | 977.00 KiB/s, done.
Conclusion
This concludes the tutorial about installing and configuring the Gitea code hosting service on Fedora 34. If you have any questions, post them in the comments below.


