
Today’s guide will walk you through the installation of JFrog Artifactory on CentOS 8 Linux server. JFrog Artifactory is an advanced repository management system fit for cloud-native deployment pipelines. With JFrog you have the flexibility of using your favorite orchestration tools to manage your application deployments using different configuration packages and application artifacts managed in Artifactory, such as Docker and Helm.
Features of JFrog Artifactory:
- Basic Artifact Management
- On Demand Jar Signing and Web Start Application
- Repository Replication
- Custom repository layout for non-Maven module management
- Universal support for all major package formats
- Powerful SSO integration for NTLM, Kerberos, etc.
- Cloud Storage – S3, Google Cloud Storage, Microsoft Azure Cloud Storage
- High Availability Setup support
- Integration with Other JFrog Products – JFrog Xray, JFrog Mission Control, JFrog Pipelines, JFrog Bintray and JFrog CLI
- Integration with all leading CI-servers
- Promotion, demotion and cleanup of build artifacts
- Powerful REST API for Release Automation
- Basic Security – LDAP Authentication, Role-based authorization with teams and permissions
- Advanced Storage Solutions – Filestore Sharding
We will be installing the JFrog’s Artifactory open source edition. You can as well go with the pro edition if you have the budget. We will run JFrog Artifactory on CentOS 8 in containers using Podman.
Step 1: Update System
Ensure your CentOS 8 system is updated.
sudo dnf updateStep 2: Install Podman on CentOS 8
Install Podman and container tools on CentOS 8 Linux machine.
sudo dnf -y install podman buildahConfirm installation of Podman:
$ podman version
Version:            1.6.4
RemoteAPI Version:  1
Go Version:         go1.13.4
OS/Arch:            linux/amd64

$ podman info
host:
  BuildahVersion: 1.12.0-dev
  CgroupVersion: v1
  Conmon:
    package: conmon-2.0.6-1.module_el8.1.0 298 41f9343a.x86_64
    path: /usr/bin/conmon
    version: 'conmon version 2.0.6, commit: 2721f230f94894671f141762bd0d1af2fb263239'
  Distribution:
    distribution: '"centos"'
    version: "8"
  MemFree: 114774016
  MemTotal: 4031569920
  OCIRuntime:
    name: runc
    package: runc-1.0.0-64.rc9.module_el8.1.0 298 41f9343a.x86_64
    path: /usr/bin/runc
    version: 'runc version spec: 1.0.1-dev'
  SwapFree: 0
  SwapTotal: 0
  arch: amd64
  cpus: 2
  eventlogger: journald
  hostname: centos.computingforgeeks.com
  kernel: 4.18.0-147.8.1.el8_1.x86_64
  os: linux
  rootless: false
  uptime: 23m 53.29s
registries:
  blocked: null
  insecure: null
  search:
  - registry.access.redhat.com
  - registry.fedoraproject.org
  - registry.centos.org
  - docker.io
store:
  ConfigFile: /etc/containers/storage.conf
  ContainerStore:
    number: 1
  GraphDriverName: overlay
  GraphOptions: {}
  GraphRoot: /var/lib/containers/storage
  GraphStatus:
    Backing Filesystem: extfs
    Native Overlay Diff: "true"
    Supports d_type: "true"
    Using metacopy: "false"
  ImageStore:
    number: 1
  RunRoot: /var/run/containers/storage
  VolumePath: /var/lib/containers/storage/volumes
Step 2: Download JFrog Artifactory image
Download the JFrog Artifactory container image:
$ podman pull docker.bintray.io/jfrog/artifactory-oss:latestConfirm image is available locally:
$ podman images
REPOSITORY                                TAG      IMAGE ID       CREATED       SIZE
docker.bintray.io/jfrog/artifactory-oss   latest   3ed8110393b1   4 weeks ago   805 MB
For the commercial edition, use:
$ podman pull docker.bintray.io/jfrog/artifactory-cpp-ceStep 3: Run JFrog Artifactory on CentOS 8
Create a working directory for JFrog container. This is where JFrog Artifactory will store its data.
sudo mkdir -p  /jfrog/artifactory
sudo chown -R 1030 /jfrog
Use the podman command line tool to start an instance of JFrog Artifactory on CentOS 8:
podman run --name jfrog-artifactory
  -d -p 8081:8081 -p 8082:8082
  -v /jfrog/artifactory:/var/opt/jfrog/artifactory
  docker.bintray.io/jfrog/artifactory-oss:latest
Check container status:
$ podman ps
CONTAINER ID  IMAGE                                           COMMAND  CREATED         STATUS             PORTS                             NAMES
ac0e102f254a  docker.bintray.io/jfrog/artifactory-oss:latest           11 minutes ago  Up 11 minutes ago  0.0.0.0:8081-8082->8081-8082/tcp  artifactory
Configure firewalld to allow access to JFrog Artifactory main application port.
sudo firewall-cmd --add-port=8081/tcp --permanent
sudo firewall-cmd --add-port=8082/tcp --permanent
sudo firewall-cmd --reload
Step 3: Manage JFrog Artifactory on CentOS 8 with Systemd
As you’ve seen, we’re managing the container with the podman command line. Let’s introduce systemd to the mix to ensure the service can be started automatically at system boot.
sudo tee /etc/systemd/system/artifactory.service<<EOF
[Unit]
Description=Setup Systemd script for Artifactory Container
After=network.target

[Service]
Restart=always
ExecStartPre=-/usr/bin/podman kill artifactory
ExecStartPre=-/usr/bin/podman rm artifactory
ExecStart=/usr/bin/podman run --name artifactory -p 8081:8081 -p 8082:8082
  -v /jfrog/artifactory:/var/opt/jfrog/artifactory
  docker.bintray.io/jfrog/artifactory-oss:latest
ExecStop=-/usr/bin/podman kill artifactory
ExecStop=-/usr/bin/podman rm artifactory

[Install]
WantedBy=multi-user.target
EOF
Reload systemd:
sudo systemctl daemon-reloadThen start Artifactory container with systemd:
sudo systemctl start artifactoryEnable it to start at system boot.
$ sudo systemctl enable artifactory
Created symlink /etc/systemd/system/multi-user.target.wants/artifactory.service → /etc/systemd/system/artifactory.service.
Status can be checked with:
$ systemctl status artifactory
● artifactory.service - Setup Systemd script for Artifactory Container
   Loaded: loaded (/etc/systemd/system/artifactory.service; enabled; vendor preset: disabled)
   Active: active (running) since Fri 2020-05-29 13:29:56 CEST; 31s ago
 Main PID: 21183 (podman)
    Tasks: 10 (limit: 24408)
   Memory: 33.7M
   CGroup: /system.slice/artifactory.service
           └─21183 /usr/bin/podman run --name artifactory -p 8081:8081 -p 8082:8082 -v /jfrog/artifactory:/var/opt/jfrog/artifactory docker.bintray.io/>

May 29 13:30:24 centos.computingforgeeks.com podman[21183]: 2020-05-29T11:30:24.363Z [jfac ] [INFO ] [d032e08be45c6acc] [CertificateFileHandlerBase:331>
May 29 13:30:24 centos.computingforgeeks.com podman[21183]: 2020-05-29T11:30:24.372Z [jfac ] [INFO ] [d032e08be45c6acc] [CertificateFileHandlerBase:125>
May 29 13:30:24 centos.computingforgeeks.com podman[21183]: 2020-05-29T11:30:24.372Z [jfac ] [INFO ] [d032e08be45c6acc] [CertificateFileHandlerBase:108>
May 29 13:30:24 centos.computingforgeeks.com podman[21183]: 2020-05-29T11:30:24.551Z [jfac ] [INFO ] [d032e08be45c6acc] [CertificateFileHandlerBase:331>
May 29 13:30:24 centos.computingforgeeks.com podman[21183]: 2020-05-29T11:30:24.551Z [jfac ] [INFO ] [d032e08be45c6acc] [CertificateFileHandlerBase:125>
May 29 13:30:24 centos.computingforgeeks.com podman[21183]: 2020-05-29T11:30:24.775Z [jfac ] [INFO ] [d032e08be45c6acc] [b.AccessServerBootstrapImpl:42>
May 29 13:30:26 centos.computingforgeeks.com podman[21183]: 2020-05-29T11:30:26.780Z [jfrt ] [INFO ] [35b2e6e932c70fb6] [ritiesStorageServiceFactory:25>
May 29 13:30:27 centos.computingforgeeks.com podman[21183]: 2020-05-29T11:30:27.093Z [jfac ] [INFO ] [d032e08be45c6acc] [o.j.a.s.r.s.GrpcServerImpl:65 >
May 29 13:30:27 centos.computingforgeeks.com podman[21183]: 2020-05-29T11:30:27.655Z [jfac ] [INFO ] [d032e08be45c6acc] [o.j.a.s.r.s.GrpcServerImpl:84 >
May 29 13:30:27 centos.computingforgeeks.com podman[21183]: 2020-05-29T11:30:27.731Z [jfac ] [INFO ] [d032e08be45c6acc] [o.j.a.s.s.JoinKeyAccess:166
Step 5: Access Artifactory Web Interface
Confirm that the service is listening and bound.
#  ss -tunelp | egrep '8081|8082'
tcp   LISTEN  0       128                   0.0.0.0:8081          0.0.0.0:*      users:(("conmon",pid=11018,fd=5)) ino:75048 sk:4
tcp   LISTEN  0       128                   0.0.0.0:8082          0.0.0.0:*      users:(("conmon",pid=11018,fd=6)) ino:75049 sk:5
Artifactory can be accessed using the following URL:
http://SERVERIP_OR_DOMAIN:8081/artifactory
-- OR --
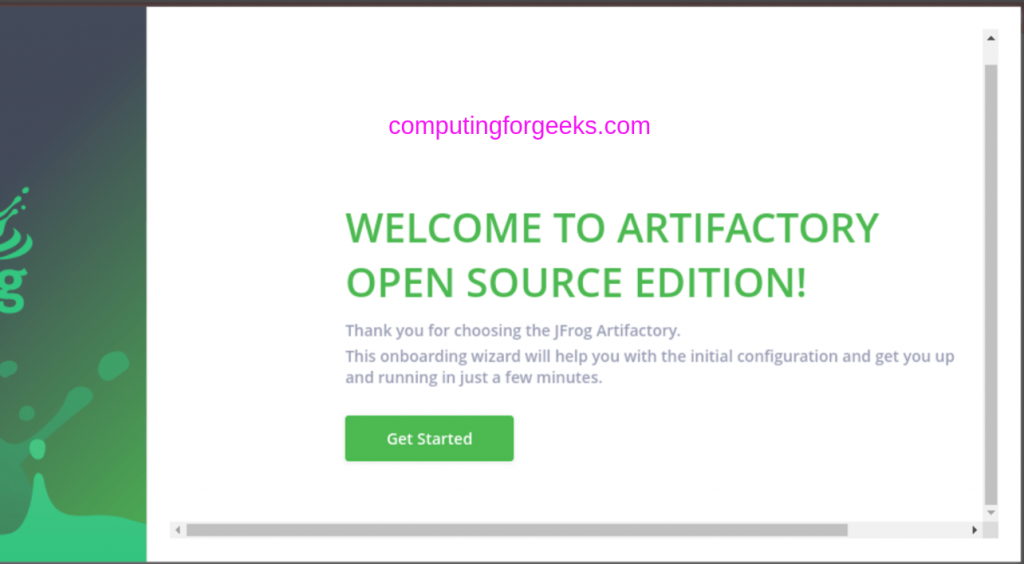
http://SERVERIP_OR_DOMAIN:8082/uiYou should see Artifactory welcome page.
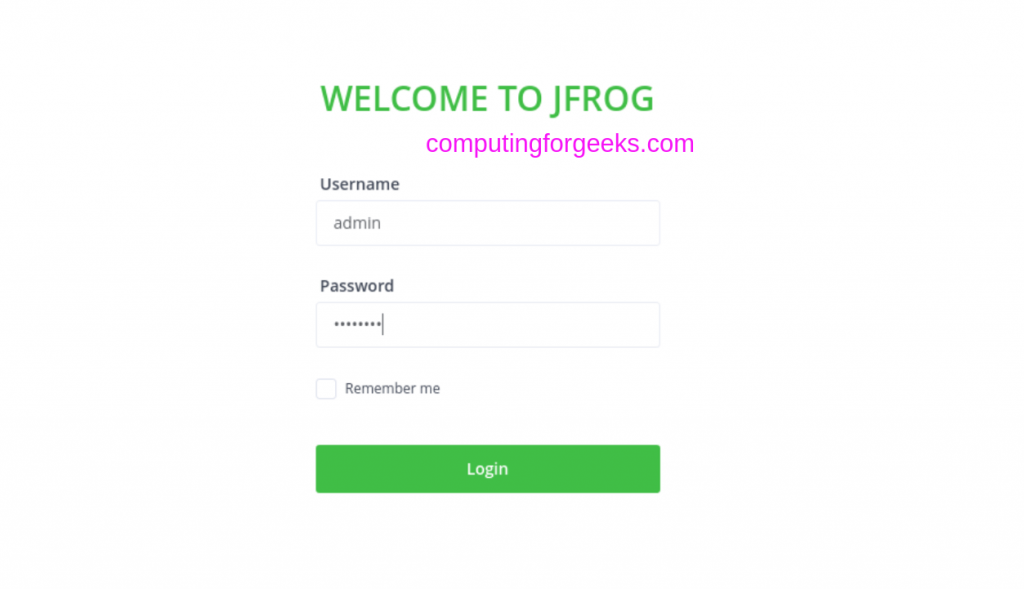
The default logins are:
Username: admin
Password: password
Click the “Get Started” button.
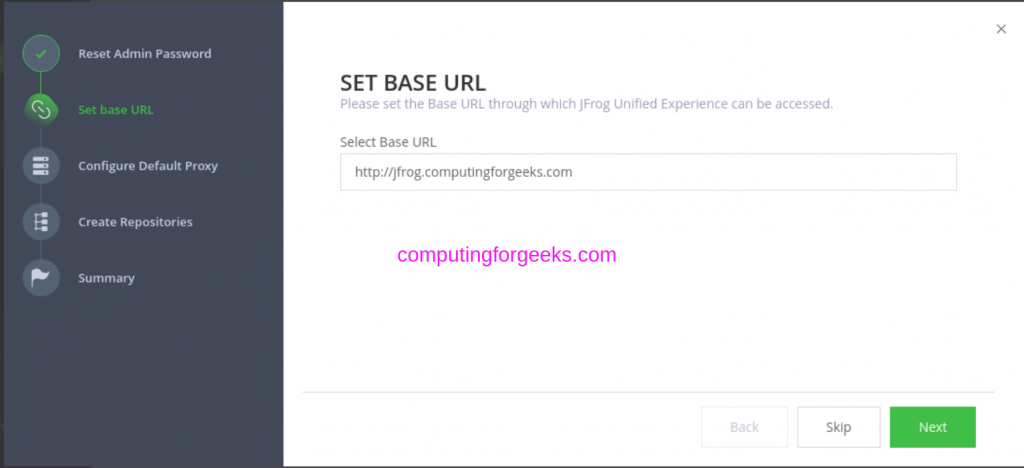
Reset admin password by setting a new one.
Provide base URL for your JFrog.
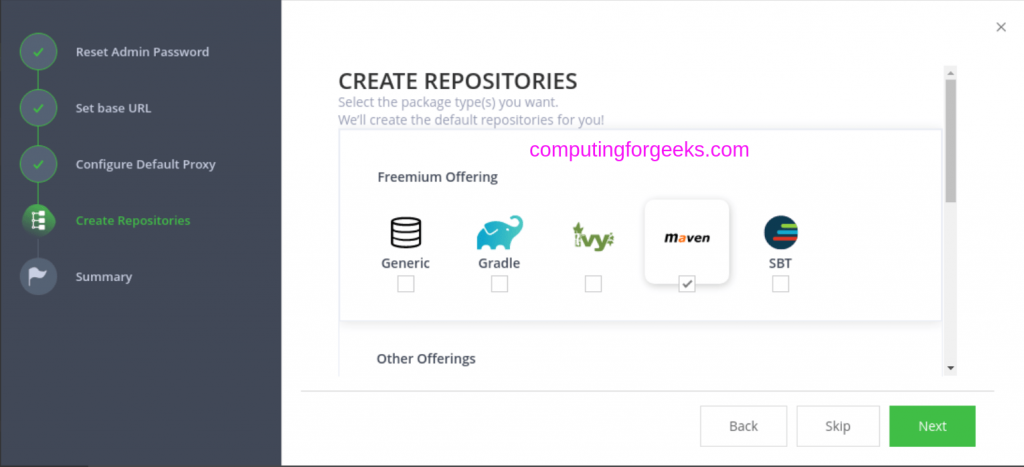
Select the repositories to be created during installation.
You now have JFrog Artifactory installed on CentOS 8 Linux machine.
Reference:
Similar guides:


