SFTPGo is a free, open source, fully featured and highly configurable SFTP server with optional HTTP/S, FTP/S and WebDAV support.
Several storage backends are supported: local filesystem, encrypted local filesystem, S3 (compatible) Object Storage, Google Cloud Storage, Azure Blob Storage, other SFTP servers.
All supported features are described in detail on the GitHub project page.
SFTPGo is available for many Operating Systems including Linux, Windows, macOS, FreeBSD.
In this tutorial, you will learn how to install SFTPGo on Ubuntu 22.04 and we’ll explore the main new features introduced in v2.3.0.
Prerequisites
- An Ubuntu server 22.04.
- A non-root user with sudo privileges.
Setup UFW Firewall
For security reasons, it is recommended to install and configure the UFW firewall in your system. First, install the UFW firewall with the following command:
sudo apt install ufw -y
SFTPGo uses the following TCP ports with the default configuration:
- 2022 for the SFTP service.
- 8080 for the web admin user interfaces.
We also need to allow the OpenSSH port for server administration.
Allow all required ports using the following commands:
sudo ufw allow OpenSSH
sudo ufw allow 2022/tcp
sudo ufw allow 8080/tcp
Next, enable the UFW firewall to start after the system reboot:
sudo ufw enable
Check the status:
sudo ufw status
You will get the following output:
Status: activeTo Action From
-- ------ ----
OpenSSH ALLOW Anywhere
2022/tcp ALLOW Anywhere
8080/tcp ALLOW Anywhere
OpenSSH (v6) ALLOW Anywhere (v6)
2022/tcp (v6) ALLOW Anywhere (v6)
8080/tcp (v6) ALLOW Anywhere (v6)
Installing SFTPGo on Ubuntu 22.04
You can install SFTPGo from its PPA.
Start by adding the PPA:
sudo add-apt-repository ppa:sftpgo/sftpgo
sudo apt update
Next install SFTPGo:
sudo apt install sftpgo
After installation SFTPGo should already be running with default configuration and configured to start automatically at boot, check its status using the following command:
systemctl status sftpgo
Complete SFTPGo Installation
Now, open your web browser and access the SFTPGo installation wizard using the URL: “http:///”.
You will be redirected to the following page:
Provide your admin username and password and click on the “Create Admin” button.
The newly created admin will be automatically logged in, so you can create your SFTPGo users.
For more details about creating users you can take a look at the Getting Started Guide.
New features in v2.3.0
Let’s explore the main new features introduced in v2.3.0 in the next sections.
Groups
Using groups simplifies the administration of multiple SFTPGo users: you can assign settings once to a group, instead of multiple times to each individual user.
SFTPGo supports two types of groups:
- primary groups
- secondary groups
A user can be a member of a primary group and many secondary groups. Depending on the group type, the settings are inherited differently.
You can find more details by consulting the official documentation.
Let’s see some usage example here.
Suppose you have the following requirements:
- each user must be restricted to a local home directory containing the username as last element of the path, for example /srv/sftpgo/data/
- for each user, the maximum upload size for a single file must be limited to 1GB
- each user must have an S3 virtual folder available in the path /s3 and each user can only access a specified “prefix” of the S3 bucket. It must not be able to access other users’ files
- each user must have an S3 virtual folder available in the path /shared. This is a folder shared with other users
- a group of users can only download and list contents in the /shared path while another group of users have full access
We can easily meet these requirements by defining two groups.
From the SFTPGo WebAdmin UI, click on “Folders” and then on the ” ” icon.
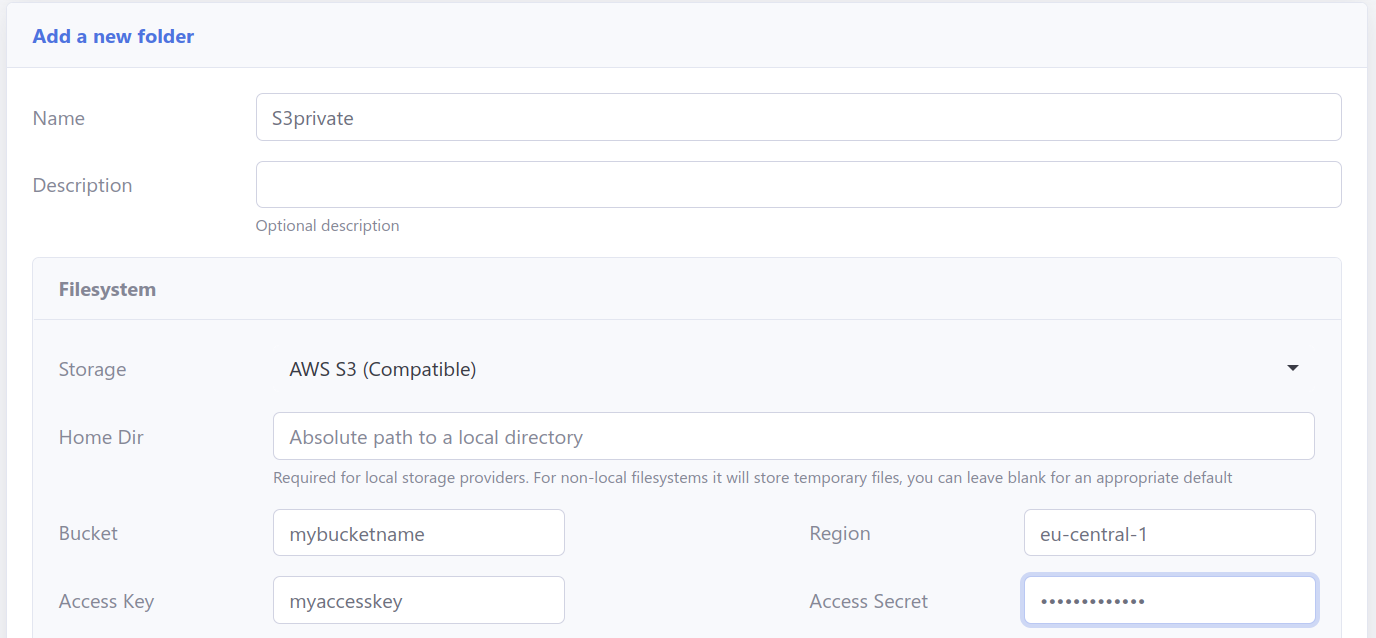
Create a folder named “S3private”.
Set the storage to “AWS S3 (Compatible)” and fill the required parameters:
- bucket name
- region
- credentials: access key and access secret
The important part is the “Key Prefix”, set it to users/%username%/.
The “Key Prefix” restrict the access to the specified bucket subfolder.
The placeholder “%username%” will be replaced with the associated username.
Create another folder named “S3shared” with the same settings as “S3private” but this time set the “Key Prefix” to shared/.
The “Key Prefix” has no placeholder, so the folder will operate on a static path that won’t change based on the associated user.
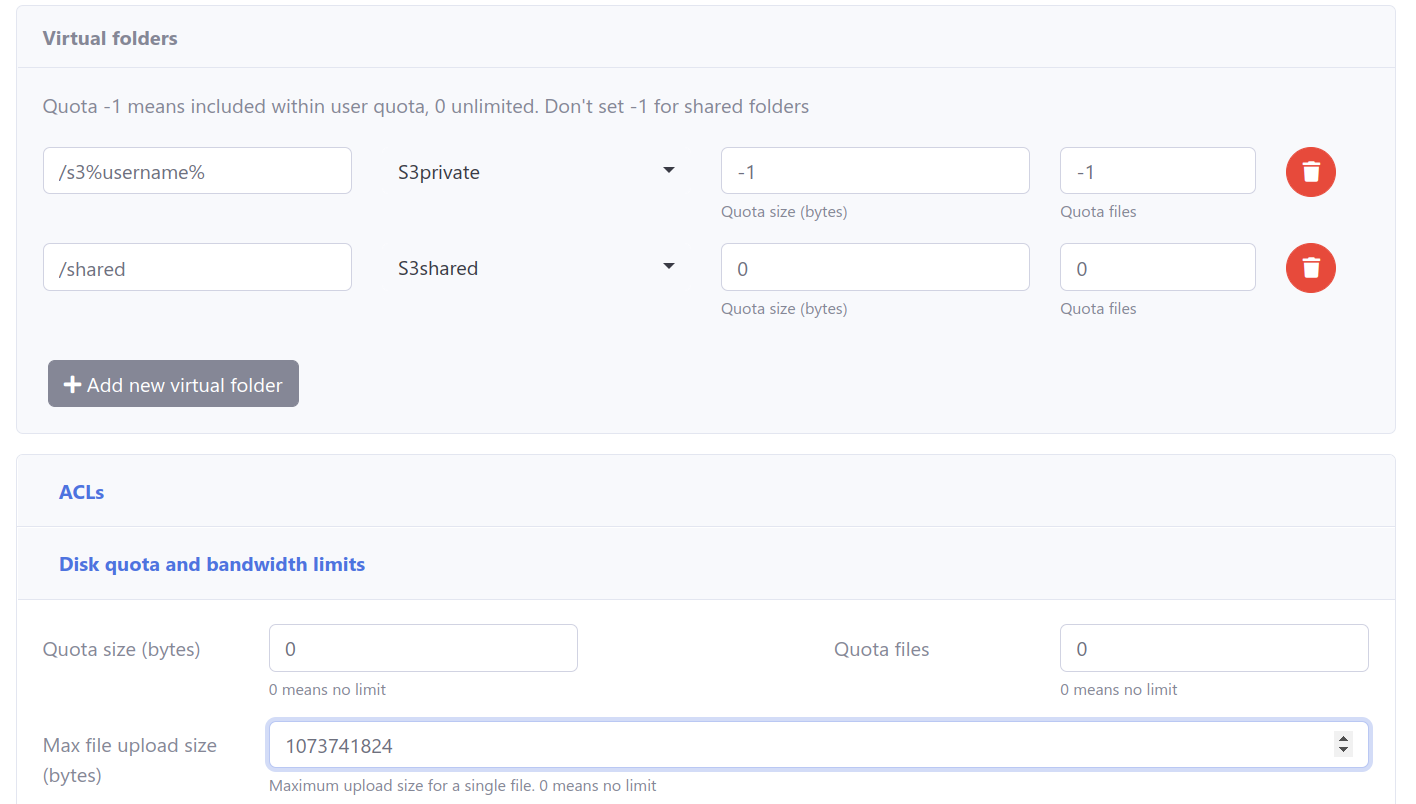
Now click on “Groups” and then on the ” ” icon and add a group named “Primary”.
Set the “Home Dir” to /srv/sftpgo/data/%username%.
As before, the placeholder “%username%” will be replaced with the associated username.
Add the two virtual folders to this group and set the “Max file upload size” to 1073741824 bytes (1GB).
Add a new group and name it “SharedReadOnly”, in the ACL section set the permission on the /shared path so that read only access is granted.
The group setup is now complete.
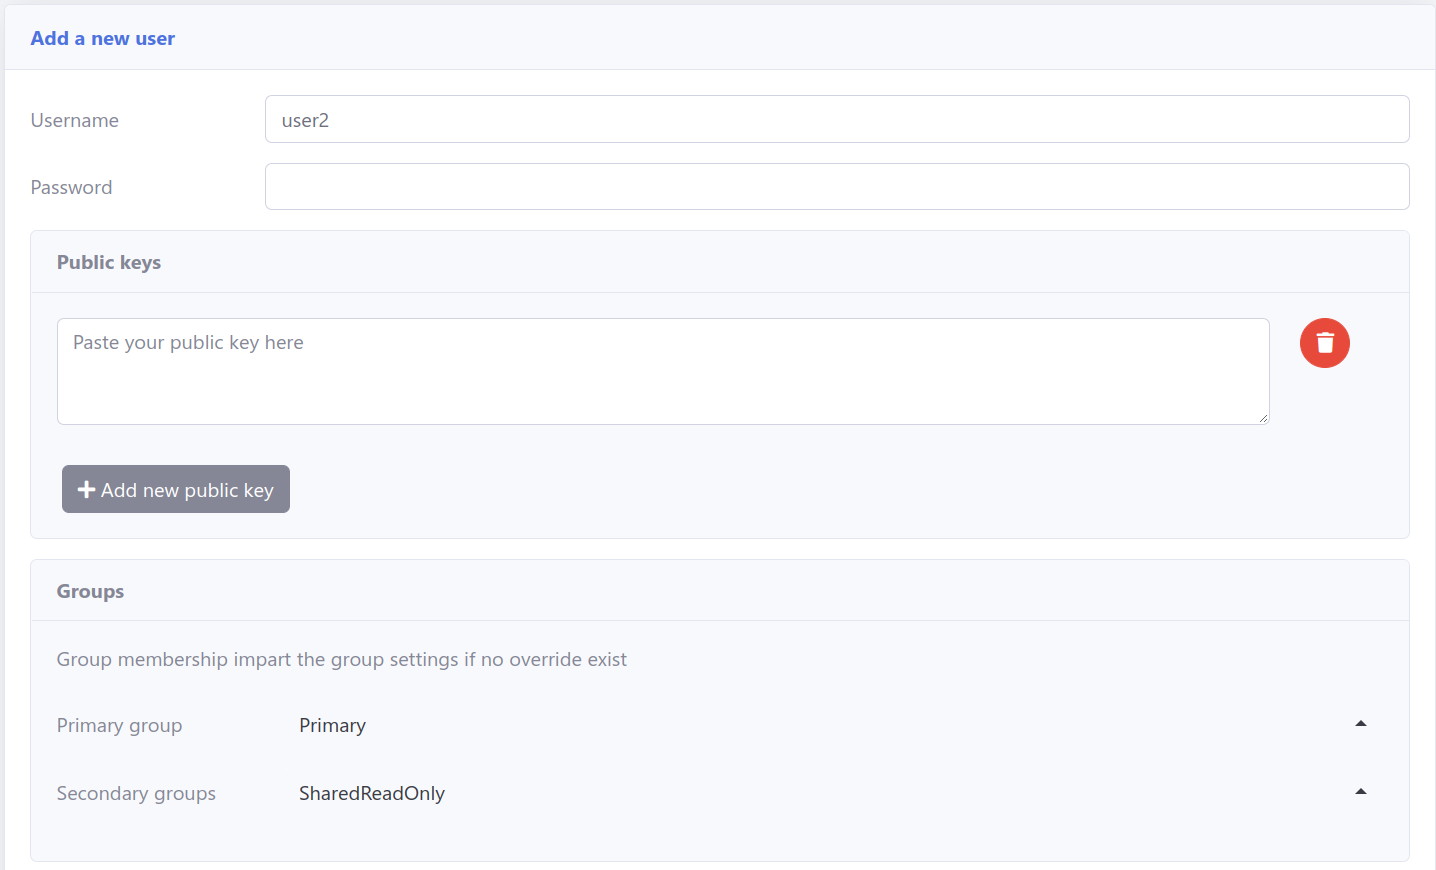
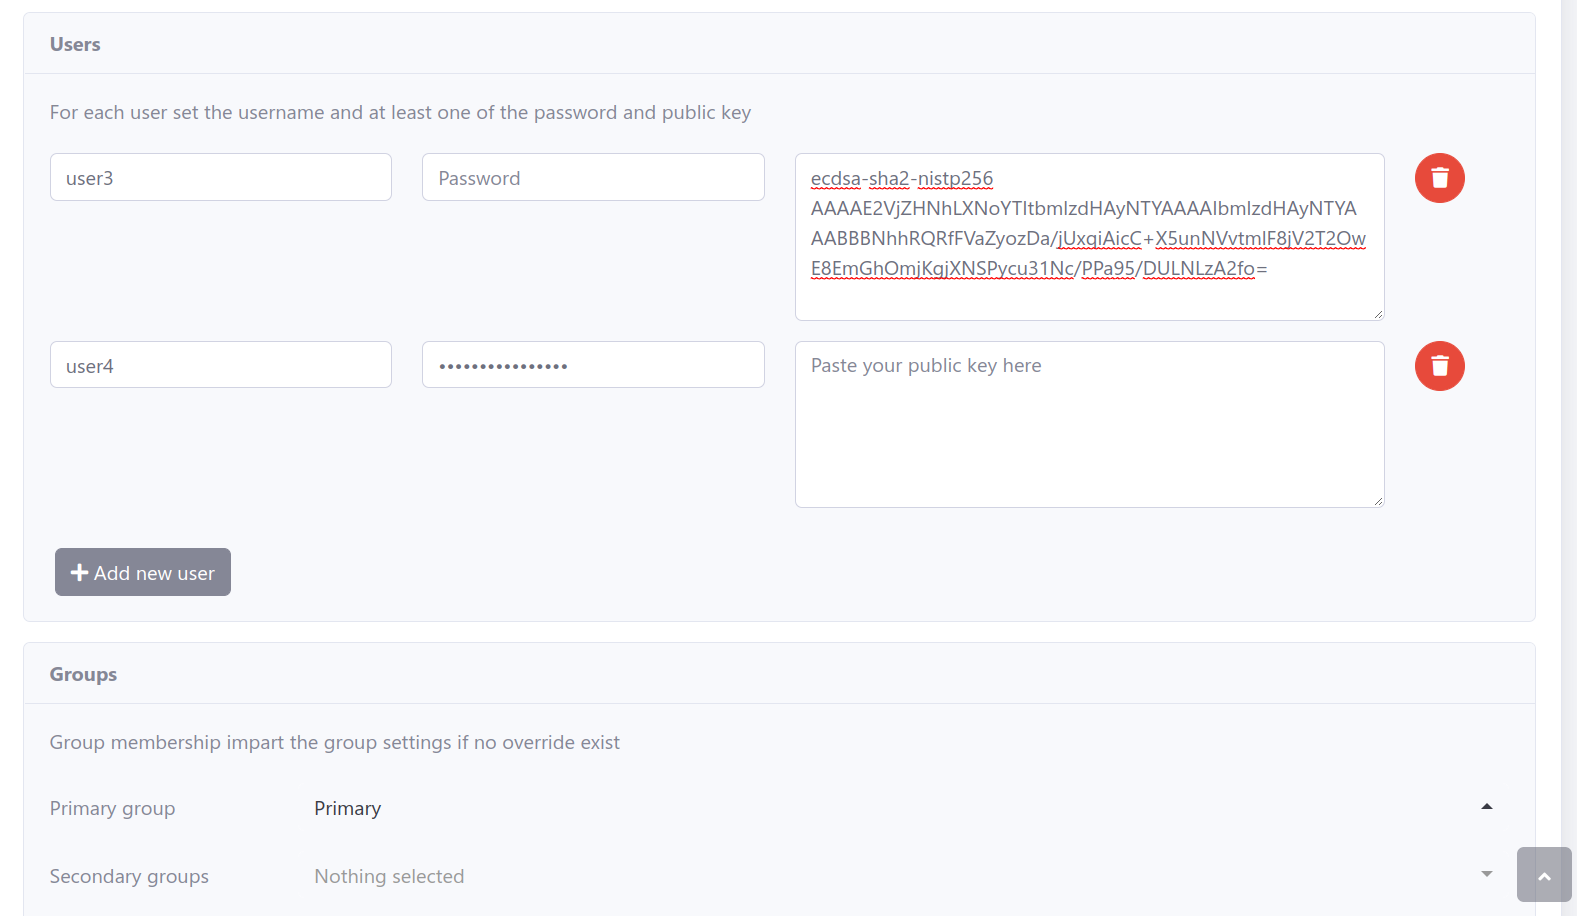
We can now create our users and set the primary group to “Primary”.
For the users who need read-only access to the /shared path we also have to set “SharedReadOnly” as a secondary group.
Click on “Users” and then on the ” ” icon and add a user named “user1”.
This user complies with the above restrictions and has full access to the /shared path.
Now create “user2” which complies with the above restrictions and has read only access to the /shared path.
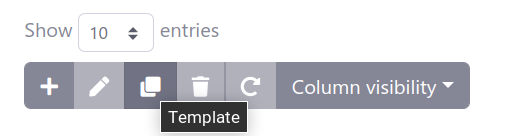
You can also create multiple users at the same time by using the template feature.
Just set usernames, credentials and the group membership.
Now you can login with any SFTP client like FileZilla, WinSCP etc. and verify that the requirements are met.
Sharing files with external users, without an SFTPGo account, is a common requirement. In v2.3.0 this feature has been improved.
The following sharing modes are supported:
- read only
- write only
- read and write
Let’s see how they work.
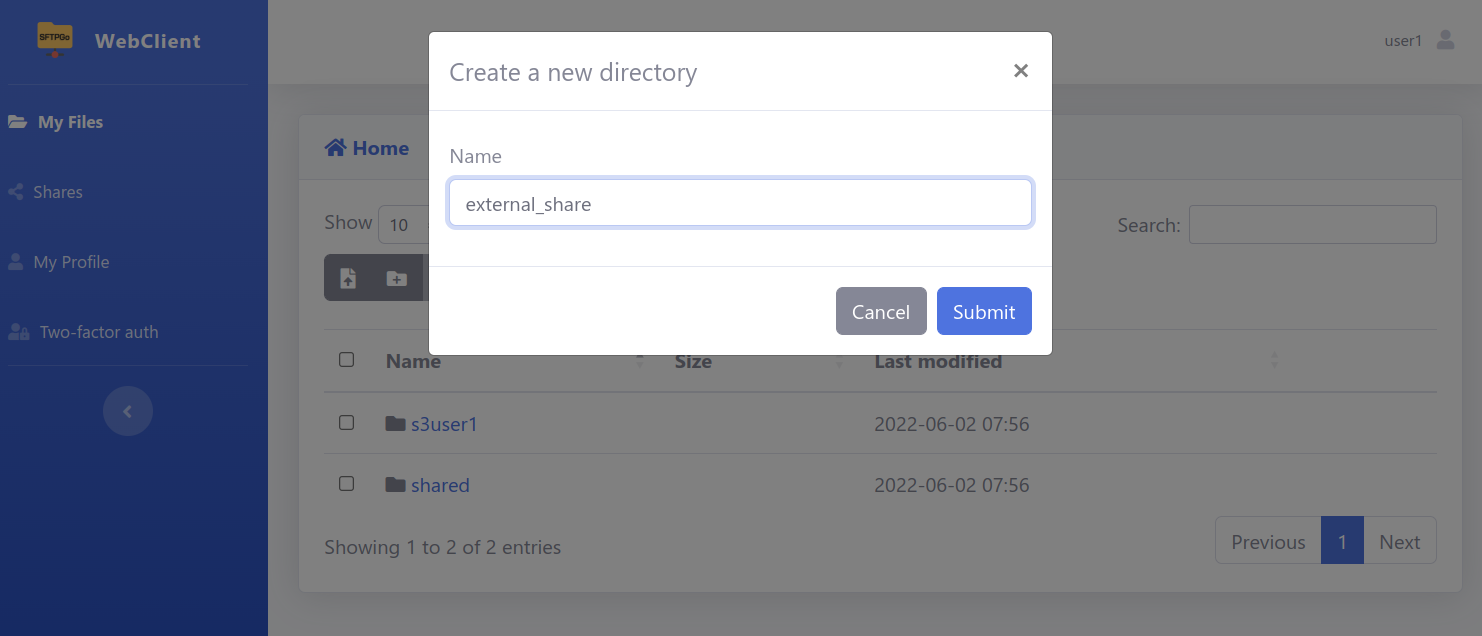
Login to the WebClient UI and create a new directory named “external_share”.
Add some files to the newly created directory.
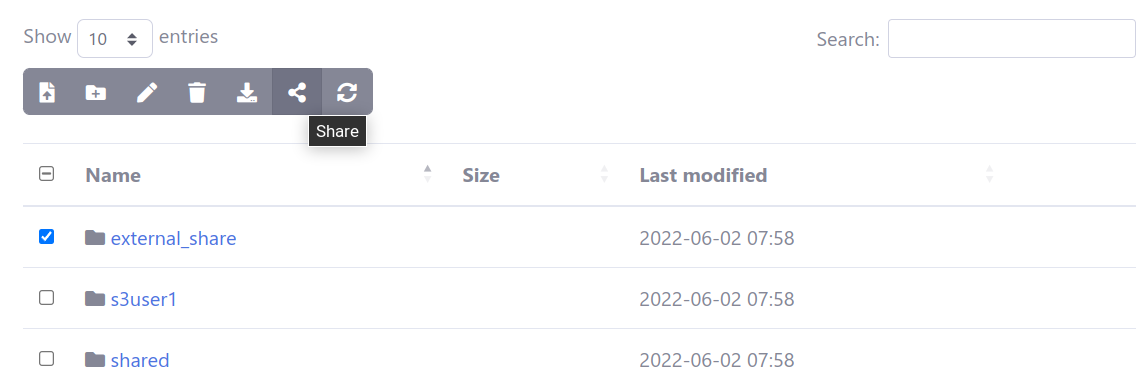
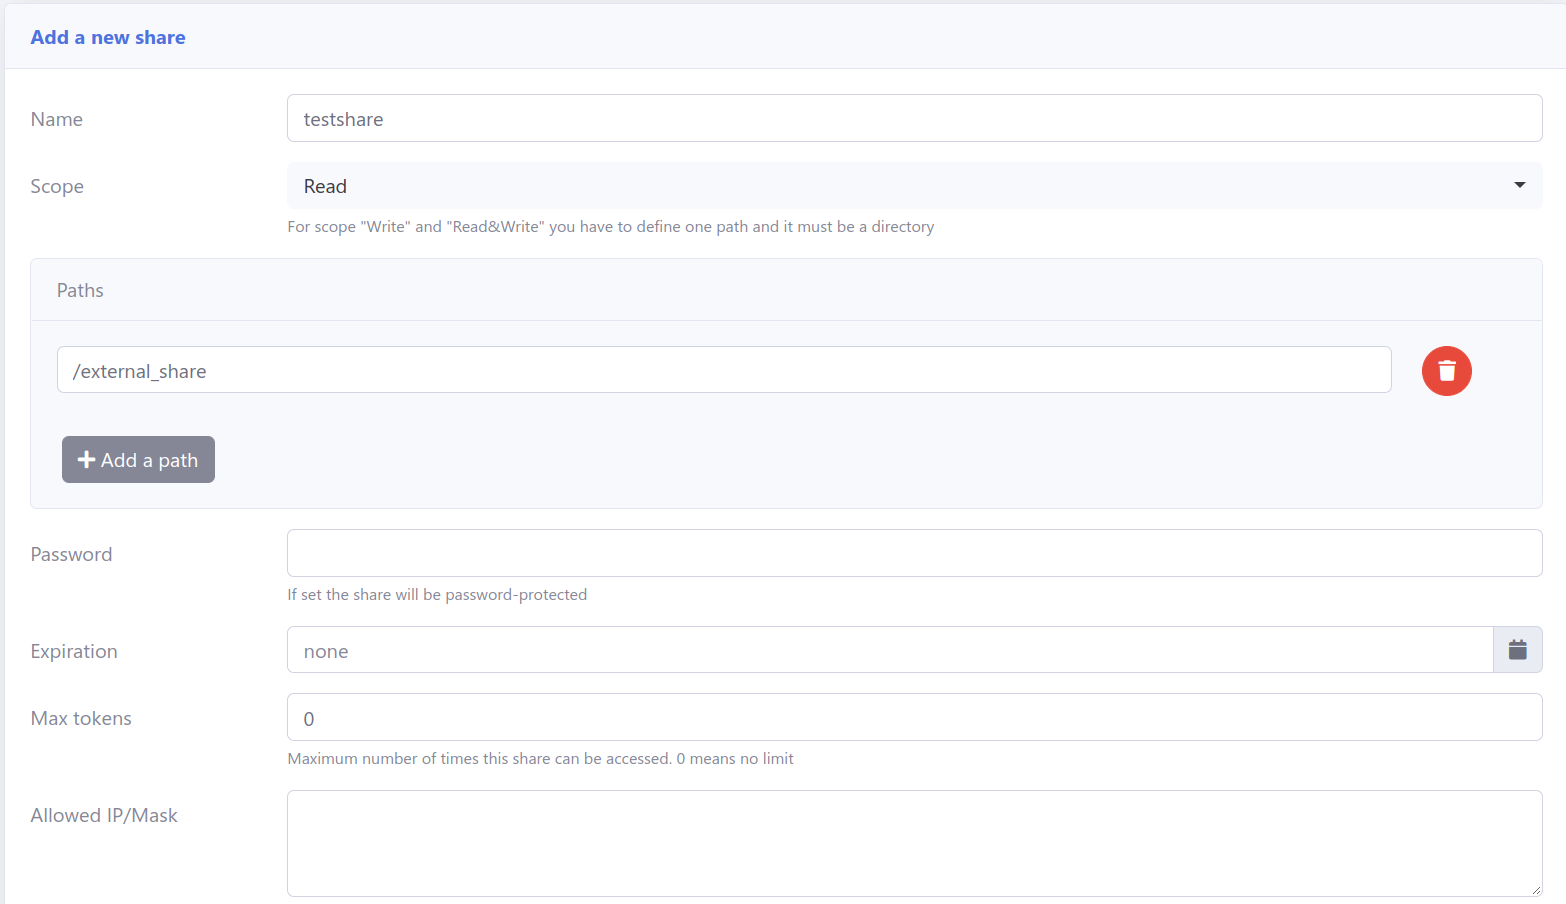
Then select the “external_share” folder and click the “Share” icon.
The “Add a new share” screen will appear, select the “Read” scope.
Optionally, you can limit the number of times the share can be used, protect the share with a password, limit access by source IP address, set an automatic expiration date.
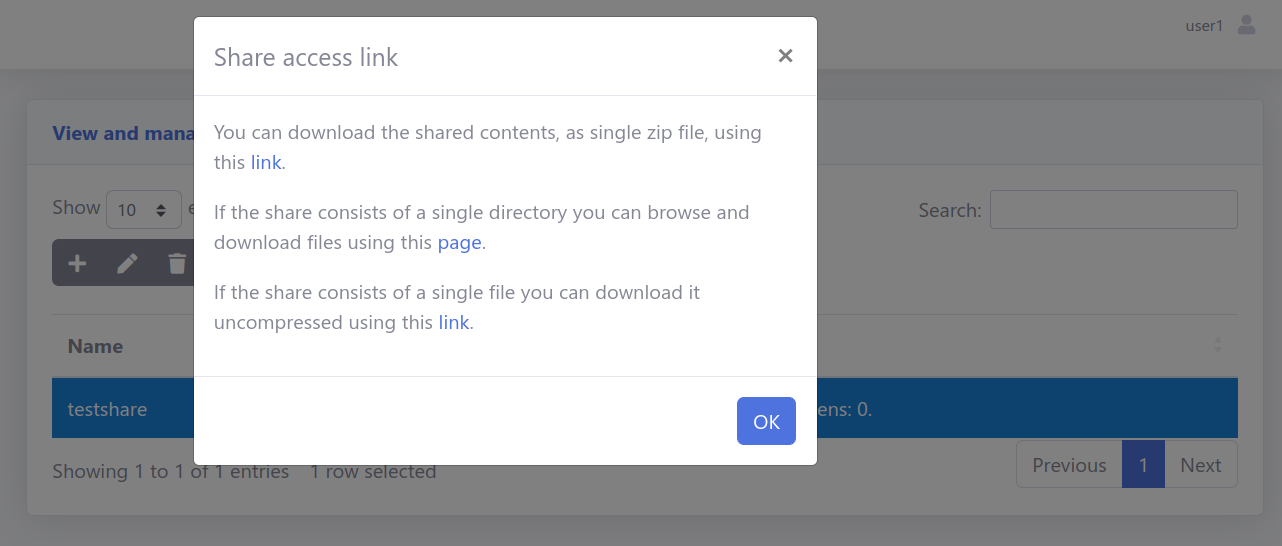
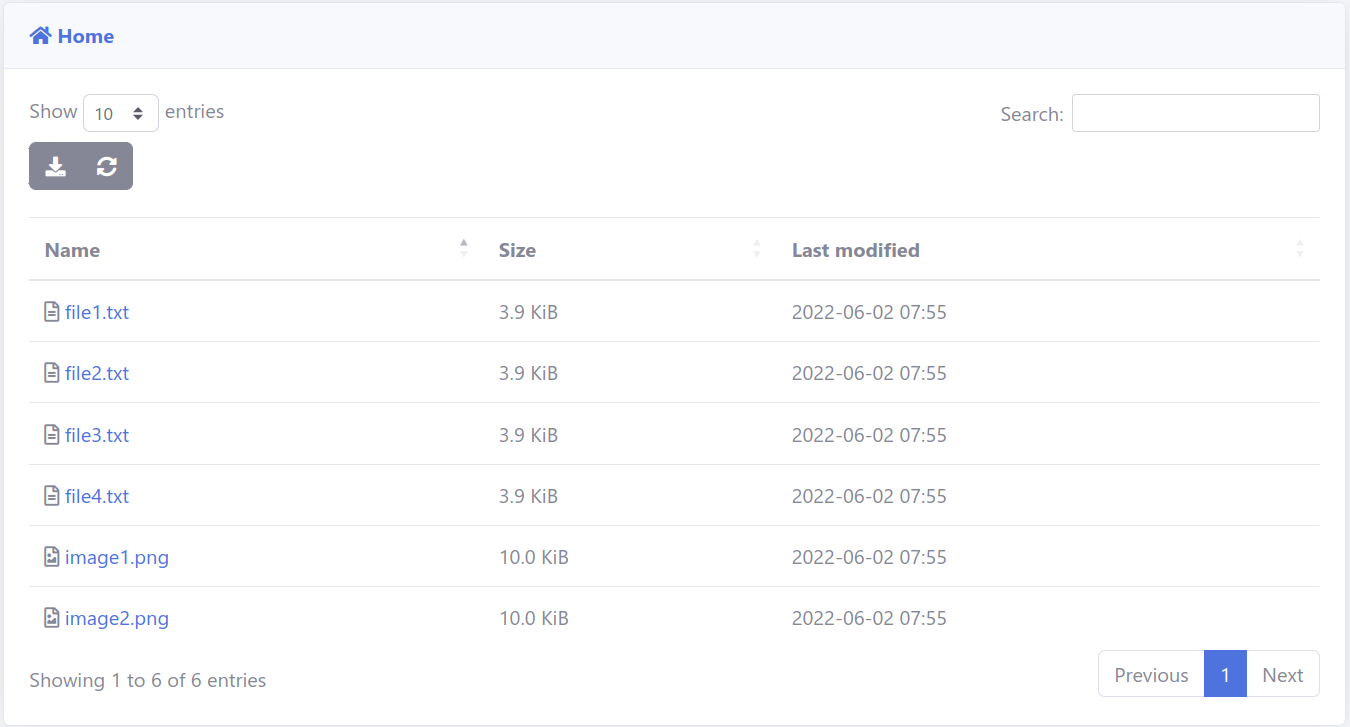
Then from the list of shares, select the share you just created and click the “Link” icon. A pop-up window will appear with instructions on how to use the share.
You can download the shared contents as a single zip file or you can browse them and download file by file.
You can copy these links and send them to your external customers.
The link to the browsable share will appear as you can see in the following screen.
Now, edit the share and change the scope to “Write”.
The link to the share will show the following screen.
So your external users can upload files, but they can’t browse or download the shared contents.
If you want to prevent overwriting of existing files, you can use standard SFTPGo per-directory permissions.
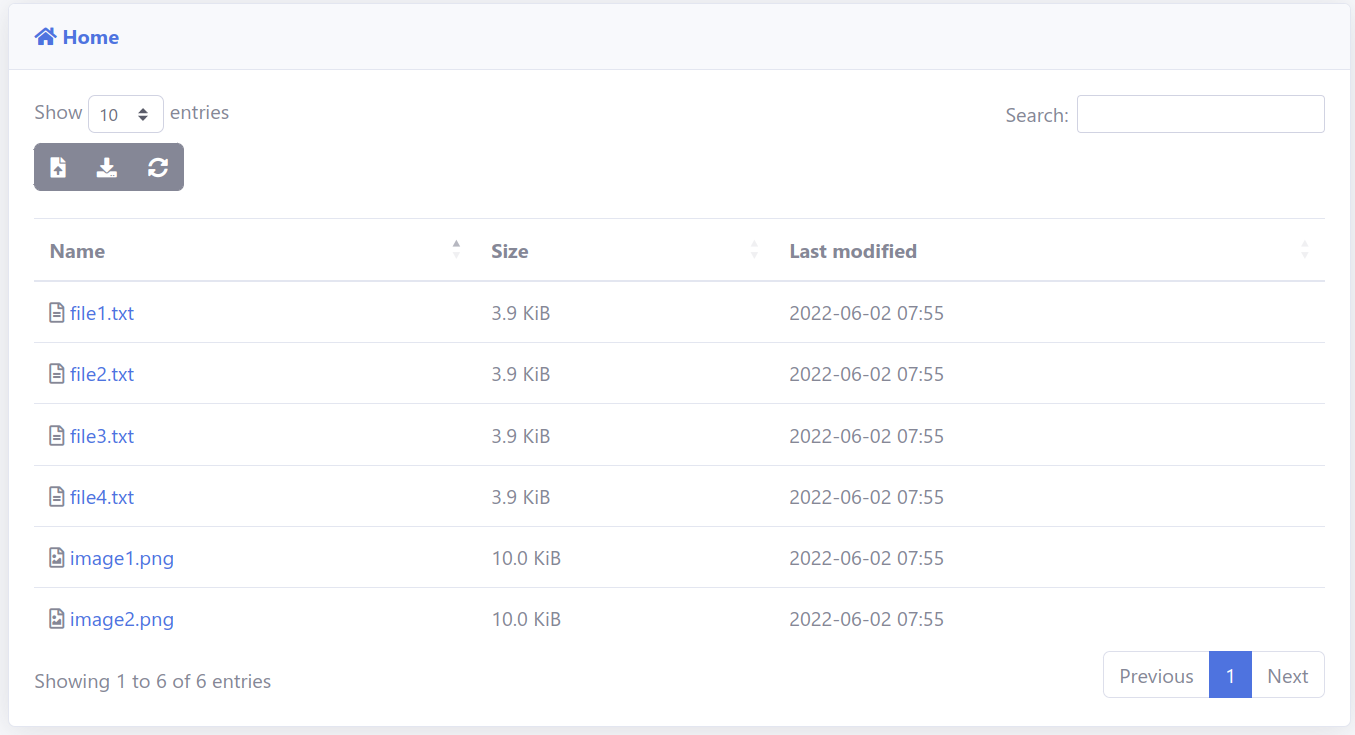
Edit again the share and change the scope to “Read/Write”.
The link to the share will show the following screen.
So now external users can browse, download and add new files to the shared directory.
Branding
The SFTPGo web UIs can be customized to match your brand. Here is the relevant configuration section in /etc/sftpgo/sftogo.json:
"branding": {
   "web_admin": {
   "name": "",
   "short_name": "",
   "favicon_path": "",
   "logo_path": "",
   "login_image_path": "",
   "disclaimer_name": "",
   "disclaimer_path": "",
   "default_css": "",
   "extra_css": []
 },
 "web_client": {
   "name": "",
   "short_name": "",
   "favicon_path": "",
   "logo_path": "",
   "login_image_path": "",
   "disclaimer_name": "",
   "disclaimer_path": "",
   "default_css": "",
   "extra_css": []
 }
}
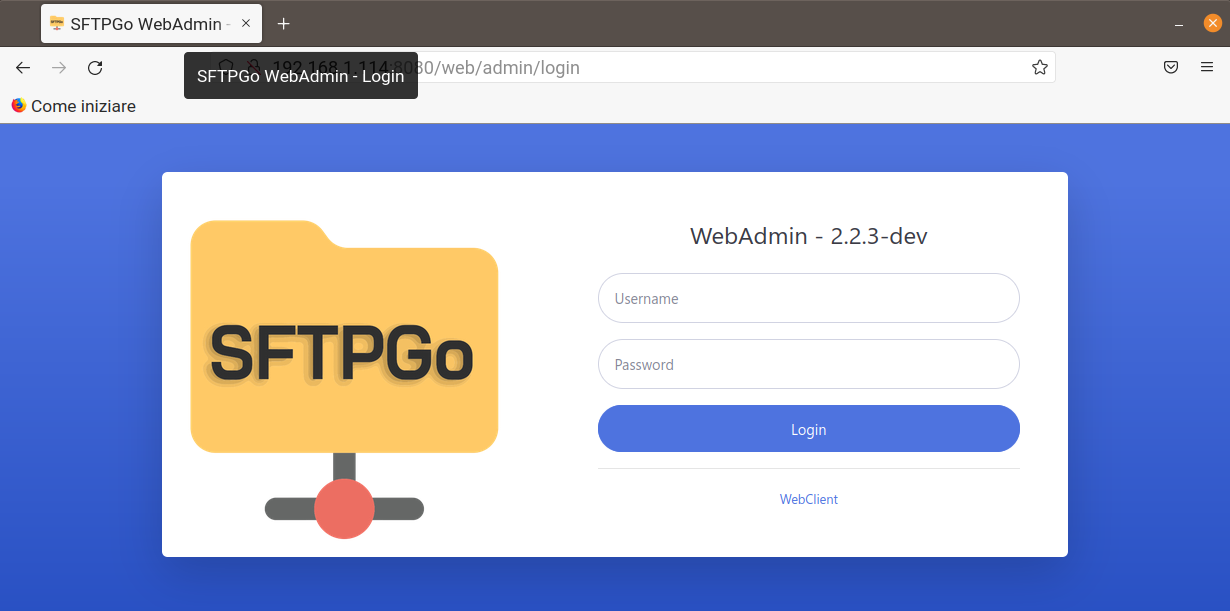
Take a look at the WebAdmin login screen.
The default “name” is “SFTPGo WebAdmin” and so the page title is “SFTPGo WebAdmin – Login”.
The default “short name” is “WebAdmin” and so the login page shows “WebAdmin – “.
You can customize the favicon by setting a “favicon_path” and the image on the left by setting a “login_image_path”.
If you set “disclaimer_name” and “disclaimer_path”, a new link will appear at the botton of the login page. You can use it for a legal disclaimer or anything else.
You can customize the logo and the label on the top left of the pages for the logged in users by setting “logo_path” and “short_name”.
SFTPGo uses the excellent SB Admin2 theme. If you want to make some minor changes to the theme you can set “extra_css” to point to the paths of your custom CSS files.
If, on the other hand, you rebuild the SB Admin 2 CSS, you can set “default_css” to the path of your custom CSS. This way we avoid loading the default theme and then overriding it with your changes.
All the configured paths (favicon_path, logo_path, etc..), must be relative to “static_files_path”.
On Linux the default “static_files_path” is /usr/share/sftpgo/static, you can create, for example, a “branding” directory and place your custom resources there.
For example you can copy your favicon to /usr/share/sftpgo/static/branding/favicon.ico and set the “favicon_path” to /branding/favicon.ico.
You can override any configuration options using environment variables, for example the web admin favicon path can be set using the SFTPGO_HTTPD__BINDINGS__0__BRANDING__WEB_ADMIN__FAVICON_PATH environment variable.
More details on configuring SFTPGo using environment variables can be found here.
After chaning the configuration file, you need to restart the SFTPGo service to apply the changes.
sudo systemctl restart sftpgo.service
OpenID Connect
If you have an existing identity provider, it likely supports the OpenID Connect standard.
You can now map your identity provider users to SFTPGo admins/users and so you can login to SFTPGo WebClient and WebAdmin UIs using your identity provider.
SFTPGo users can also be automatically created after a successful OpenID connect login by defining a pre-login hook. You can configure the token claims fields to be made available to the pre-login hook and then implement your own custom logic when creating/updating SFTPGo users within the hook.
The official SFTPGo documentation explains the steps to integrate SFTPGo with Keycloak. Other identity providers such as Google Identity, Azure Active Directory, Auth0, OneLogin were tested by SFTPGo community and have been confirmed to work.
In general, any OpenID Connect identity provider which implements the OpenID Connect Discovery specifications should work.
ACME
SFTPGo has built-in ACME (Automatic Certificate Management Environment) and so you can easily obtain and renew a free Let’s encrypt TLS certificate for the SFTPGo Web UI and REST API, the WebDAV service and the FTP service.
Obtaining a Let’s Encrypt certificate involves solving a domain validation challenge issued by an ACME (Automatic Certificate Management Environment) server. This challenge verifies your ownership of the domain(s) you’re trying to obtain a certificate for. Different challenge types exist, SFTPGo supports “HTTP-01” and “TLS-ALPN-01” challenge types.
To be able to use the ACME protocol you need a valid domain name pointed with your server IP.
Let’s see an example configuration, we make the following assumptions:
- we need a TLS certificate for the “sftpgo.com” domain
- we have an existing web server already running on port “80” for the “sftpgo.com” domain and the web root path is /var/www/sftpgo.com
Open the SFTPGo configuration file /etc/sftpgo/sftpgo.json, search for the “acme” section and change it as follow:
"acme": {
  "domains": ["sftpgo.com"],
  "email": "",
  "key_type": "4096",
  "certs_path": "https://www.howtoforge.com/var/lib/sftpgo/certs",
  "ca_endpoint": "https://acme-v02.api.letsencrypt.org/directory",
  "renew_days": 30,
  "http01_challenge": {
    "port": 80,
    "proxy_header": "",
    "webroot": "https://www.howtoforge.com/var/www/sftpgo.com"
  },
  "tls_alpn01_challenge": {
  "port": 0
 }
}
Make sure that the “sftpgo” user can write to the /var/www/sftpgo.com directory or pre-create the /var/www/sftpgo.com/.well-known/acme-challenge directory with the appropriate permissions.
Register your account and obtain certificates by running the following command:
sudo -E su - sftpgo -m -s /bin/bash -c 'sftpgo acme run -c /etc/sftpgo'
Done! From now on, the SFTPGo service will take care of the automatic renewal of certificates for the configured domains.
Certificates are stored to the /var/lib/sftpgo/certs directory by default. You can now configure the SFTPGo services to use these certificates.
For example for the web UI change the SFTPGo configuration file /etc/sftpgo/sftpgo.json as follow:
"httpd": {
  "bindings": [
   {
     "port": 9443,
     "address": "",
     "enable_web_admin": true,
     "enable_web_client": true,
     "enable_https": true,
     "certificate_file": "https://www.howtoforge.com/var/lib/sftpgo/certs/sftpgo.com.crt",
     "certificate_key_file": "https://www.howtoforge.com/var/lib/sftpgo/certs/sftpgo.com.key",
     .....
Restart the SFTPGo service to apply the changes:
sudo systemctl restart sftpgo.service
You can enable TLS for other sevices in a similar way.
Geo-IP filtering
The SFTPGO Geo-IP filtering plugin allows to accept/deny connections based on the the geographical location of the clients’ IP addresses.
The plugin can read MaxMind GeoLite2 and GeoIP2 databases. You need to download a country database in MMDB format.
Let’s see an example configuration.
We make the following assumptions:
- the Geo-IP filtering plugin is located in the /usr/local/bin/sftpgo-plugin-geoipfilter-linux-amd64 path
- the country database is located in the /var/lib/sftpgo/GeoLite2-Country.mmdb path
- we only want to allow connections from Italy
Open the SFTPGo configuration file /etc/sftpgo/sftpgo.json, search for the “plugins” section and change it as follow:
"plugins": [
   {
     "type": "ipfilter",
     "cmd": "https://www.howtoforge.com/usr/local/bin/sftpgo-plugin-geoipfilter-linux-amd64",
     "args": ["serve", "--db-file", "https://www.howtoforge.com/var/lib/sftpgo/GeoLite2-Country.mmdb", "--allowed-countries", "IT"],
     "sha256sum": "",
     "auto_mtls": true
   }
]
Restart the SFTPGo service to apply the changes:
sudo systemctl restart sftpgo.service
Done!
In the SFTPGo logs you will see something like this when a connection from a denied country is rejected:
{"level":"debug","time":"2022-06-02T14:05:48.616","sender":"plugins.ipfilter.sftpgo-plugin-geoipfilter-linux-amd64","message":"[DEBUG] country not allowed: ip=XXX.XX.XXX.XXX country=NL"}
Other SFTPGo plugins are available here.
Restrict files and directory based on shell patterns
SFTPGo supports per-user and per-directory shell like patterns filters: files can be allowed, denied and optionally hidden based on shell like patterns.
Let’s see some examples.
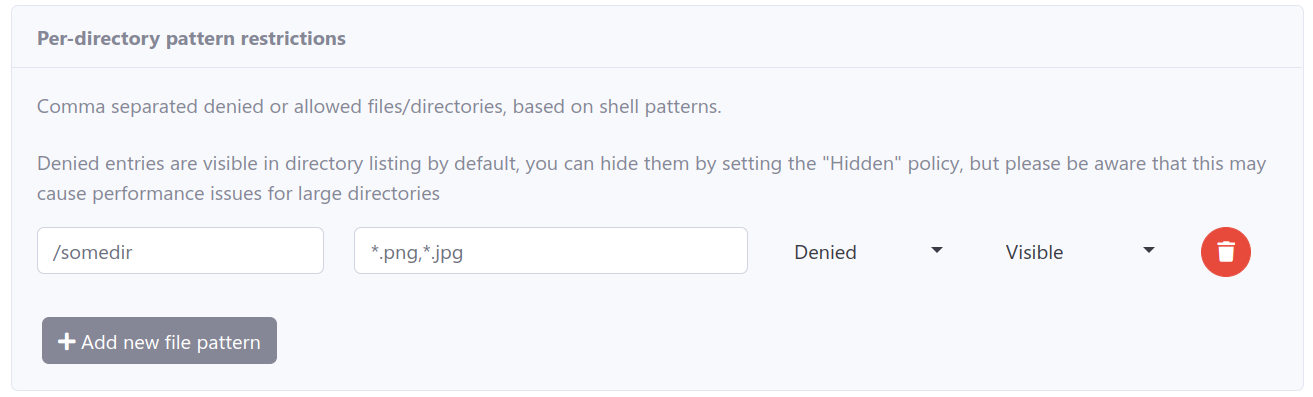
Suppose that you want to deny all the files with jpg and png extensions in a particular directory.
Select the user to modify, expand the “ACLs” section and add a shell-like pattern restriction.
This way files with png and jpg extensions cannot be downloaded or uploaded but are still visible in directory listing if already present.
You can hide them by setting the policy to “Hidden”.
The “Hidden” policy was introduced in v2.3.0.


