
Virtual Network Computing (VNC) is a desktop sharing protocol that allows you to control a computer remotely using the VNC client software. VNC is working on GUI (Graphical User Interface) environments, it transmits movements of your mouse and keyboard input over the network using the Remote Frame Buffer (RFB) protocol.
Commonly, VNC is used for technicians to control client desktops or used by someone that needs to access their Desktop in the office from their home. VNC can be used securely through the VPN network or using the SSH tunneling connection.
In this tutorial, we will show you how to install and configure the VNC Server on the latest Ubuntu Server 22.04. This guide also covers how to securely connect to the VNC Server through SSh tunneling.
Prerequisites
- An Ubuntu Server version 22.04
- A non-root user with the root privileges
Installing Desktop Environment
Firstly, you will be installing the Desktop Environment or DE on your server. There are multiple DEs on Linux that you can use, but often on the server environment, you will be installing and using lightweight DEs such as XFCE and MATE Desktop. This is because most server environment is limited, in terms of resources.
In this example, you will be using the XFCE as the default Desktop Environment for your VNC Server installation, but you will also learn how to install other DEs on your system. The XFCE is a medium desktop environment that you can install on both your server and your laptop/computer. It’s lightweight and takes no more than 600MB on your disk space, and it’s also good for the machine with low memory/RAM, 4GB of RAM is more than enough for XFCE to run.
Before you start installing any package, run the below command to update and refresh your Ubuntu repositories.
sudo apt update
Now install the XFCE desktop to your system using the following command.
sudo apt install xfce4 xfce4-goodies
Input Y to confirm and press ENTER to start the installation. And the XFCE installation will be starting.
If you want to use another DE like Gnome, you can install it using the following command.
sudo apt install ubuntu-desktop-minimal
Another great way to install DEs to your Ubuntu system is to use “tasksel“, which will automate the installation of Desktop Environment on your choices.
You can install tasksel using the below command.
sudo apt install tasksel
Input Y to confirm and press ENTER to start the installation.
After installation is completed, run the tasksel command below.
sudo tasksel
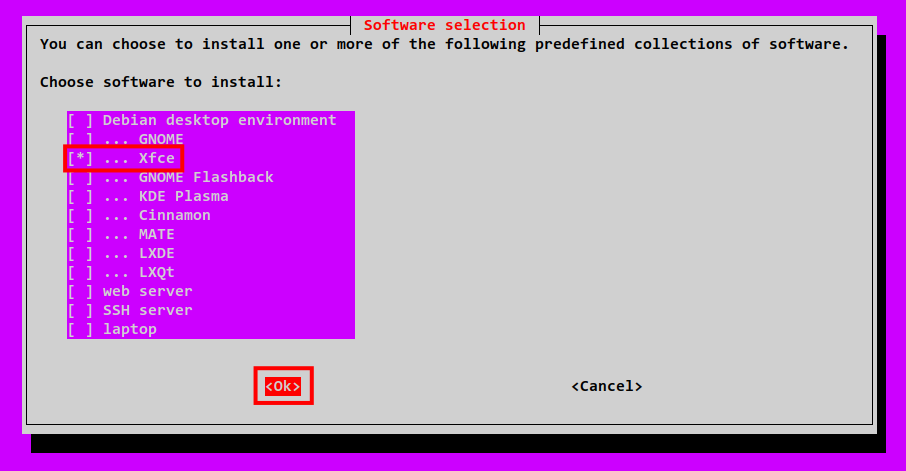
In the below screenshot you can see the menu for installing some different DEs to your system. Select the DE you want to install using the SPACE button and move the cursor to OK, and the installation will be starting.
Setting Up New User
After setting installing the Desktop Environment, now you will be setting up a new user for your VNC Server. The VNC Server can be run on every user on your system, but it’s not recommended to run the VNC Server as the root user.
In this demo, you will be creating a new user named ‘alice‘ with the additional privileges by executing the ‘sudo su‘ command to get the root privileges. And the VNC Server will be running under this user.
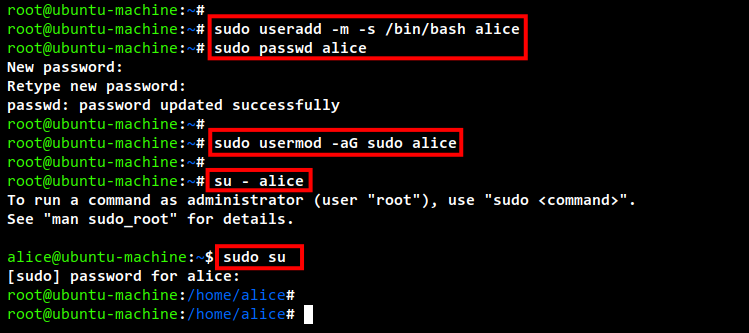
Run the following command to add a new user ‘alice‘ and set up the password for it. Be sure to use a strong password for that user.
sudo useradd -m -s /bin/bash alice
sudo passwd alice
Now add the user ‘alice‘ to the group ‘sudo‘ using the below command. This will allow the new user ‘alice’ to execute the ‘sudo su‘ command for getting the root administrator privileges.
sudo usermod -aG sudo alice
Lastly, log in as the new user ‘alice‘ and run the ‘sudo su‘ command to check and verify the root privileges.
su - alice
sudo su
Input your correct password for the user ‘alice‘. If the authentication is successful, you will get the new prompt such as ‘[email protected]‘ which means you have got the root administrator privileges.
Installing TigerVNC Server
Now it’s time to install VNC Server packages to your Ubuntu Server. In this example, you will be installing and using the TigerVNC Server package for your VNC Server. TigerVNC package is available on most Linux distributions, including Ubuntu. Also, TigerVNC provides complete packages that include the VNC Server, VNC Viewer/Client, and additional tools for VNC.
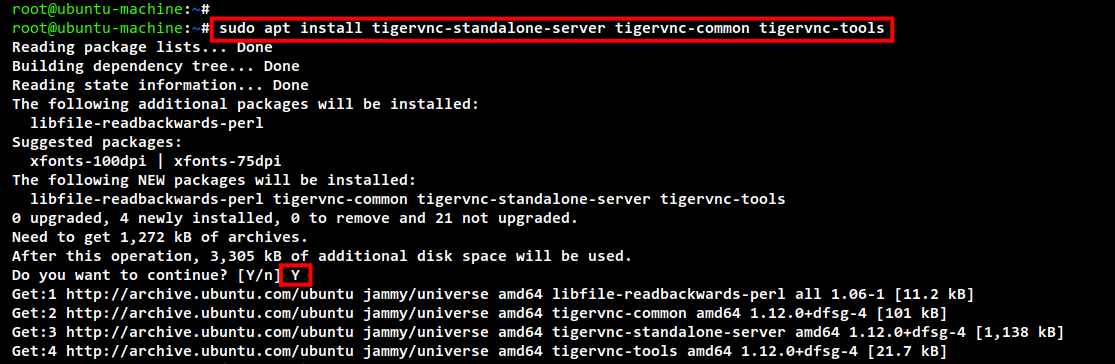
Install the TigerVNC Server package using the apt command below.Advertisement
sudo apt install tigervnc-standalone-server tigervnc-common tigervnc-tools
Input Y to confirm and press ENTER to continue the installation. Now the installation will be starting.
After all package installation is completed, move to the next stage to initialize the VNC Server configurations.
Initializing VNC Server
You have now completed the installation of TigerVNC packages to your Ubuntu Server, it’s time to set up and configure the VNC server using TigerVNC packages.
In this example, the VNC server will be running under the nee non-root user ‘alice’ with the default Desktop Environment is XFCE – The Lightweight and yet Powerful DE.
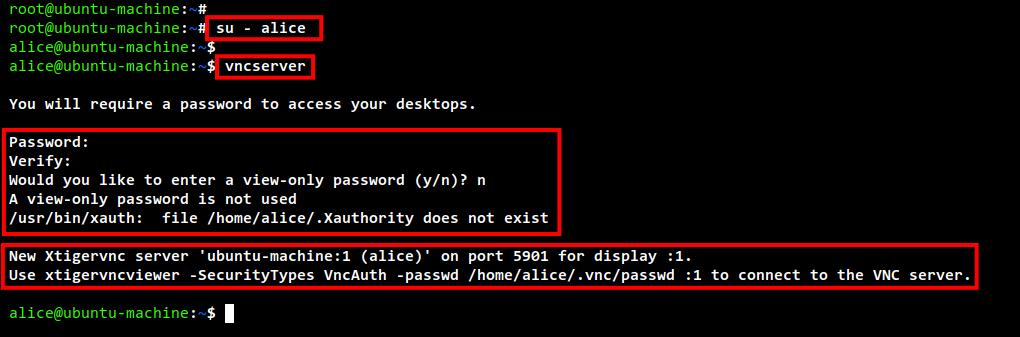
So now log in as the user ‘alice‘ using the below command.
su - alice
Initialize the VNC Server configuration using the following command. The command-line vncserver can be used to manage your VNC server configuration, this includes initializing, checking status, setup the startup script, etc.
vncserver
And now you will be asked for the following configuration of the VNC Server:
- Password configuration for the VNC Server: Input the new password for your VNC Server. This password will be used to log in to your VNC Server, the password max is 8 characters. If you input more than 8characters, then you will see an error. So be sure to use no more than 8 characters strong password and repeat the password to verify.
- View-only password settings: This option allows you to share a VNC Server or session with another user with view-only permission. This can be used if you like to demonstrate to other users but with limited view-only permission. In this example, we do not need the view-only password, so input n for no.
This command also generates a new configuration directory for the VNC Server named “~/.vnc” under the home directory.
Now when VNC Server initialization is completed and successful, you will the output message as below. The VNC Server is now running on “ubuntu-machine:1” with the default TCP port 5901. The ubuntu-machine is your system hostname and :1 means the VNC Server is running on display :1.Advertisement
New Xtigervnc server 'ubuntu-machine:1 (alice)' on port 5901 for display :1.
Use xtigervncviewer -SecurityTypes VncAuth -passwd /home/alice/.vnc/passwd :1 to connect to the VNC server.
Next, let’s kill the VNC Server ‘ubuntu-machine:1‘ and start configuring the startup script.
Kill the VNC Server process ‘ubuntu-machine:1’ using the vncserver command below.
vncserver -kill ubuntu-machine:1
Now create a new startup script ~/.vnc/xstartup using nano editor.
nano ~/.vnc/xstartup
Add the following script to it. This script will automatically execute the XFCE desktop whenever the VNC Server is started.
#!/bin/sh
# Start up the standard system desktop
unset SESSION_MANAGER
unset DBUS_SESSION_BUS_ADDRESS
/usr/bin/startxfce4
[ -x /etc/vnc/xstartup ] && exec /etc/vnc/xstartup
[ -r $HOME/.Xresources ] && xrdb $HOME/.Xresources
x-window-manager &
Save and close the file when you are done.
Lastly, run the chmod command below to make the startup script executable.
chmod x ~/.vnc/xstartup
At this point, you have now completed the initialization and basic configuration of the VNC Server on Ubuntu 22.04 with the XFCE desktop.
Adding New User to TigerVNC Server
Now you will need to add and define the VNC user to the TigerVNC Server configuration file. Your user for VNC Server should be available at the file /etc/tigervnc/vncserver.users.
Edit the file /etc/tigervnc/vncserver.users using nano editor.
sudo nano /etc/tigervnc/vncserver.users
Add the following configuration to it. The format here is the “:display=alice“, and this example here is the VNC Server is running on display “:1” for the VNC user “alice“. You have also can add multiple users to the file when you have multiple VNC Server processes.
:1=alice
Save and close the file when you are done.
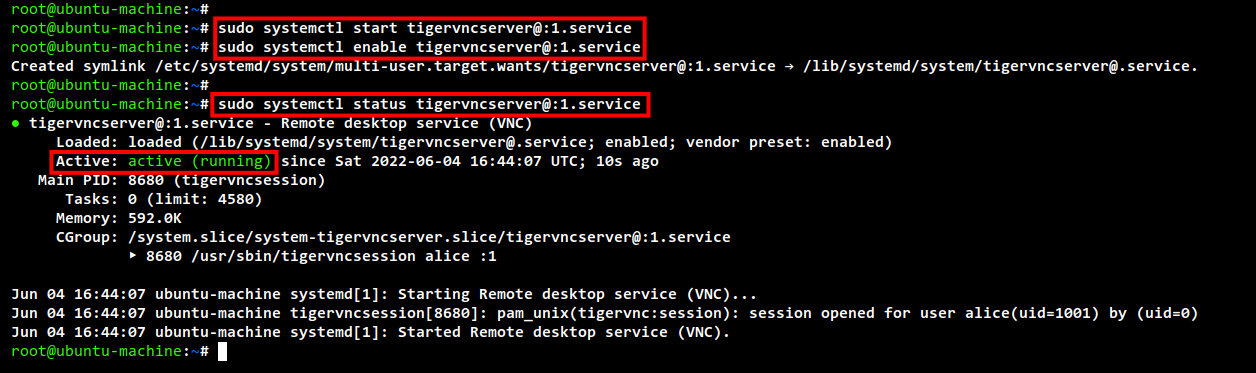
Now run the below command to start and enable the VNC Server to display “:1”. If you have multiple VNC Server processes with multiple displays, then you can change the display number at the end of the service name such as “[email protected]:N.service”, the N here is the number.
sudo systemctl start [email protected]:1.service
sudo systemctl enable [email protected]:1.service
Lastly, run the below command to check and verify the VNC Server service status.
sudo systemctl status [email protected]:1.service
In the below screenshot, you can see the [email protected]:1.service is active and running. The VNC Server is running as the user ‘alice‘ in the display “:1” with the default TCP port 5901.
Additionally, if you have an error during the VNC Server start process, you can check the log file inside the ~/.vnc directory. In this example the user is alice, so log in as user ‘alice‘ and check the detailed log files below.
su - alice
cd ~/.vnc/; ls -lah
You will see two log files of the VNC Server service. Check all of those log files whenever you got an error when starting the VNC Server service.
At this point, you have completed the installation and configuration of the VNC Server on the Ubuntu 22.04, and now you can connect to your VNC Server from your local machine.
Connecting to VNC Server Securely with SSH Tunnel
In this section, you will be checking and verifying the VNC Server installation by connecting to your VNC Server securely using the SSL Tunneling.
Before you start connecting to the VNC Server, be sure that the VNC client is installed on your local machine. For Windows and macOS, you can use RealVNC, as for Linux desktop machines, you can use the TigerVNC Viewer mostly available by default on your distribution repository.
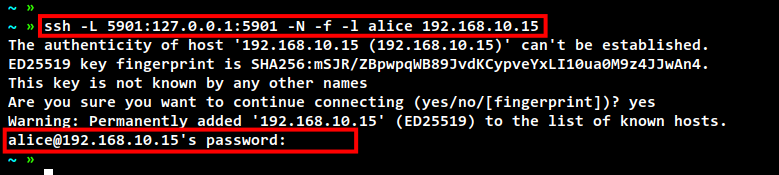
Before starting connecting to the VNC Server, run the ssh command below on your local machine to connect to your server. This command will create a secure SSH tunneling to your server, on your local machine you will open the TCP port 5901 which tunneled to your server on the same port 5901.
ssh -L 5901:127.0.0.1:5901 -N -f -l alice t 192.168.10.15
Input the password for your user. In this example, we are using the same user named ‘alice‘.
Next, open your VNC Client application and connect to your VNC Server with the address “localhost:5901”. This will automatically send the connection securely to your VNC Server through SSH tunneling.
In this example, the VNC client here is TigerVNC Viewer. Now click Connect to start connecting to the server.
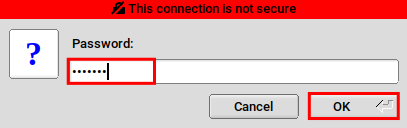
Input the password for your VNC Server and click OK to continue. Also, you can see the message that the connection is not secure. You can ignore it because in this case, you are connecting to localhost.
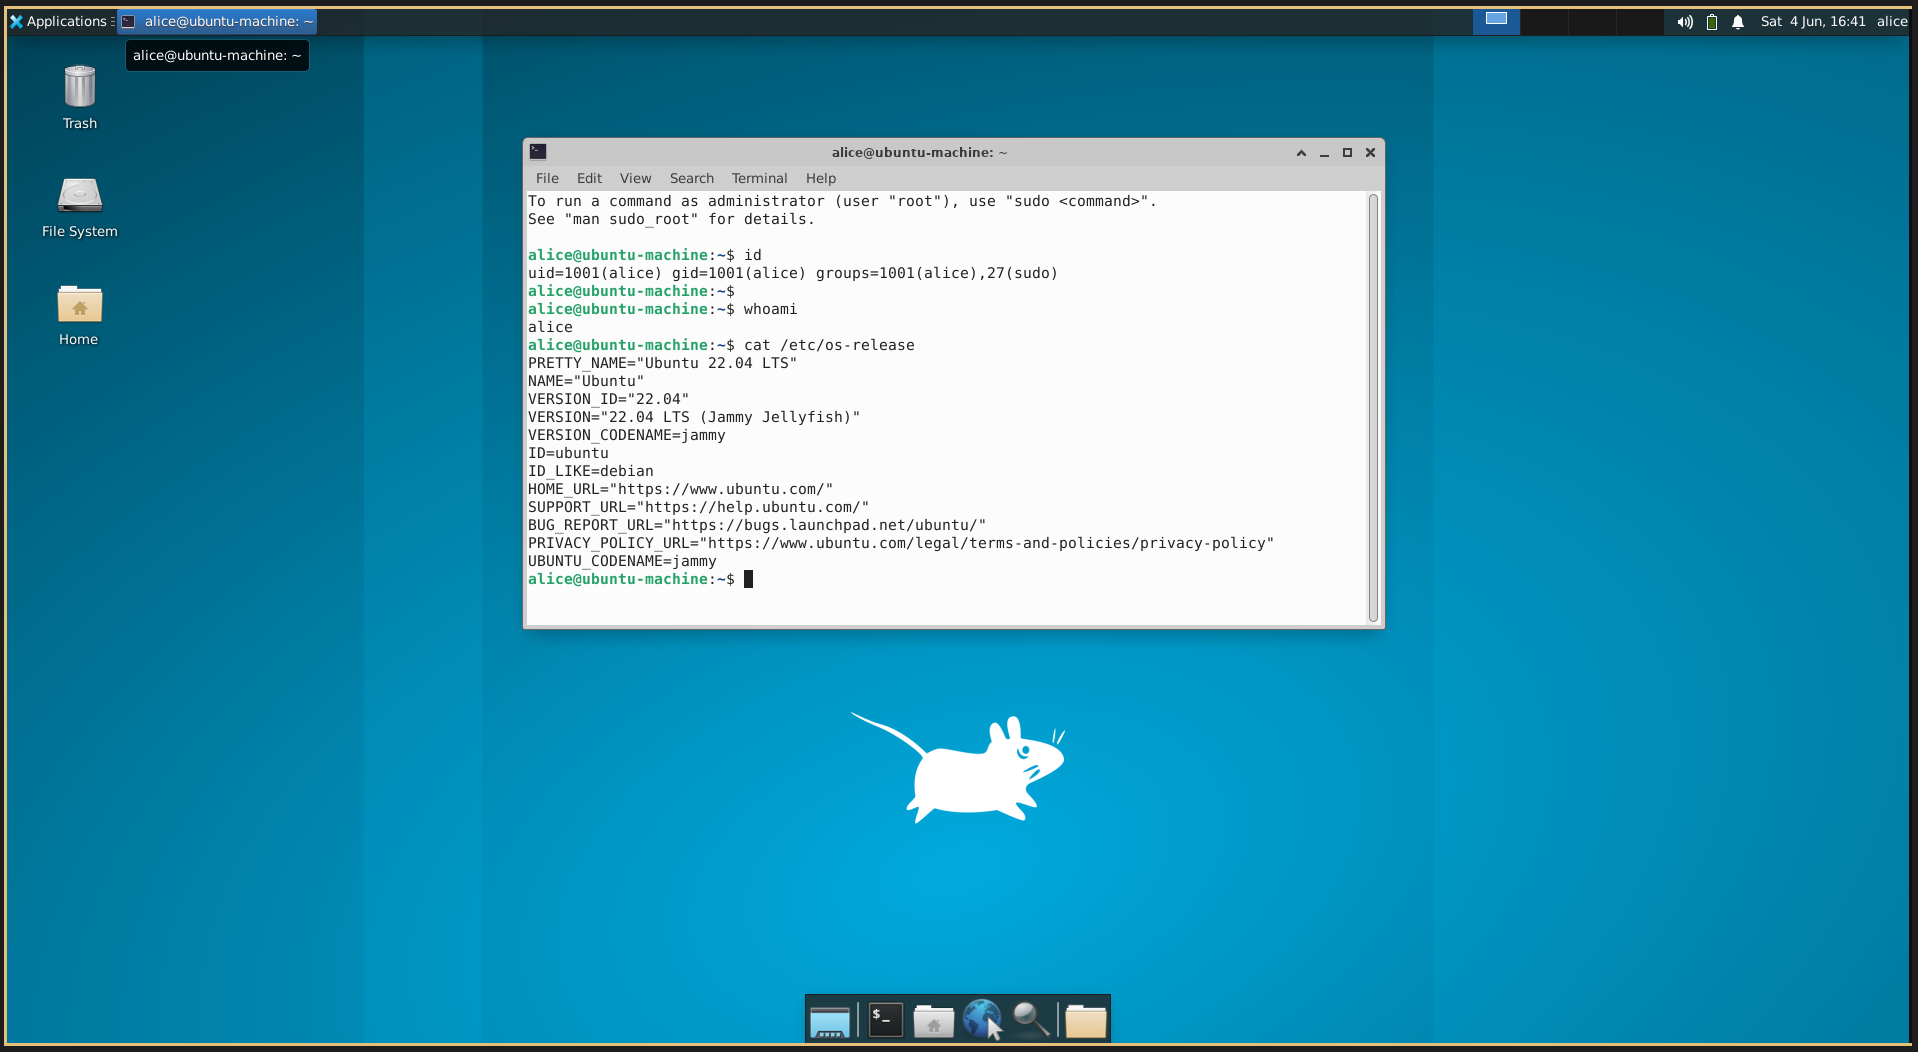
When the password is correct, you can see the VNC Server with XFCE Desktop as below. You can open the terminal on your desktop and run some commands to verify your system.
Conclusion
Congratulation! You have now successfully installed and configured the VNC Server on the latest Ubuntu 22.04 server with XFCE as the default Desktop Environment. Additionally, you have learned how to install other DEs to the Ubuntu server. In the last, you have also learned how to connect to the VNC Server securely through SSH tunneling.


