Secure Shell (SSH) is a protocol used to remotely log into a Linux system and execute commands on it. SSH provides a secure encrypted connection between two untrusted hosts over an insecure network. It is commonly used by system administrators to remotely manage servers.
One way to secure an SSH connection is by setting a custom SSH warning banner and Message of the Day (MOTD) in Linux. A warning banner is displayed when a user logs into the system using SSH, and the MOTD is displayed after the user logs in. In this article, we will guide you through the process of setting a custom SSH warning banner and MOTD in Linux.
Step 1: Create the SSH Banner File
To set a custom SSH warning banner, you will first need to create a file that contains the banner text. The banner file is usually located in the /etc/ssh directory and is named banner. To create this file, use the following command:
sudo nano /etc/ssh/banner
This will open the nano text editor, where you can enter the text for your custom banner.
For example, I am using the following message:
|
******************************* WARNING *********************************** Welcome to the [Company Name] Secure Shell. Unauthorized access is strictly prohibited and will result in immediate disciplinary action. All activity is monitored and recorded. Unauthorized access will be investigated and punished to the fullest extent of the law. By accessing this system, you acknowledge that all data stored and processed here is confidential and should not be disclosed to unauthorized parties. If you are not an authorized person, please log out immediately from the system. **************************************************************************** |
Step 2: Configure the SSH Daemon
Once the banner file has been created, you need to configure the SSH daemon to display the banner when a user logs into the system using SSH. To do this, you will need to edit the /etc/ssh/sshd_config file. To edit this file, use the following command:
sudo nano /etc/ssh/sshd_config
Find the line that starts with “Banner” and uncomment it by removing the # symbol in front of it. Then, add the path to the banner file you created in Step 1:
Step 3: Create the MOTD File
The Message of the Day (MOTD) is displayed after a user logs into the system using SSH. To set a custom MOTD, you will need to create a file that contains the MOTD text. The MOTD file is usually located in the /etc/motd directory. To create this file, use the following command:
sudo nano /etc/motd
This will open the nano text editor, where you can enter the text for your custom MOTD.
For example, I am using the following message:
Good morning! Nice to see you again.
Save the file and close it.
Step 4: Restart the SSH Daemon
Once the banner and MOTD files have been created and the SSH daemon has been configured, you need to restart the SSH daemon to apply the changes. To restart the SSH daemon, use the following command:
sudo systemctl restart ssh
Step 5: Verify Setup
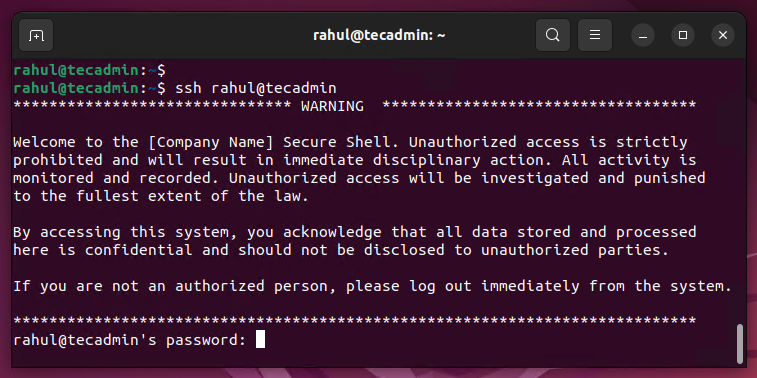
Login to your system via SSH. Before entering the authentication details, you should see the banner message. After successful authentication, the MOTD message should be displayed on the terminal.
Banner message:

Message of the day (MOTD):

Conclusion
In conclusion, setting a custom SSH warning banner and MOTD in Linux is a simple process that can be completed in just a few steps. By following the steps outlined in this article, you can secure your Linux system by providing a custom warning banner and MOTD for users who log into the system using SSH. This will help ensure that users are aware of any security policies or warnings before logging into the system.


