Pritunl VPN is one of the most secure open source VPN tools that are currently available for multi-cloud VPN peering. Pritunl VPN server uses MongoDB and can be deployed on any cloud infrastructure.
Pritunl VPN also supports OpenVPN and Wireguard. The VPN operates in a server-client architecture in such a way that the clients connect to the remote VPN server and routing is handled by the remote Pritunl VPN server.
This article shall cover how to install Pritunl VPN server on CentOS 8 | RHEL 8.
Install Pritunl VPN Server on CentOS 8 | RHEL 8
Follow the steps below to setup Pritunl VPN server on your hosted environment:
- Add the repositories for MongoDB and Pritunl –
MongoDB:
sudo tee /etc/yum.repos.d/mongodb-org.repo<<EOF
[mongodb-org]
name=MongoDB Repository
baseurl=https://repo.mongodb.org/yum/redhat/8/mongodb-org/4.4/x86_64/
gpgcheck=1
enabled=1
gpgkey=https://www.mongodb.org/static/pgp/server-4.4.asc
EOF
Add connectPritunl repository:
sudo tee /etc/yum.repos.d/pritunl.repo<<EOF
[pritunl]
name=Pritunl Repository
baseurl=https://repo.pritunl.com/stable/yum/centos/8/
gpgcheck=1
enabled=1
EOF- Add Pritunl VPN GPG keys
sudo gpg --keyserver hkp://keyserver.ubuntu.com --recv-keys 7568D9BB55FF9E5287D586017AE645C0CF8E292A
sudo gpg --armor --export 7568D9BB55FF9E5287D586017AE645C0CF8E292A > key.tmp; sudo rpm --import key.tmp; rm -f key.tmp- Install EPEL-Release
sudo dnf -y install https://dl.fedoraproject.org/pub/epel/epel-release-latest-8.noarch.rpm- Install Pritunl and MongoDB
sudo yum -y install pritunl mongodb-org- Start and enable MongoDB, Pritunl service
sudo systemctl start mongod pritunl
sudo systemctl enable mongod pritunl
Confirm stats of the services:
$ systemctl status mongod pritunl
● mongod.service - MongoDB Database Server
   Loaded: loaded (/usr/lib/systemd/system/mongod.service; enabled; vendor preset: disabled)
   Active: active (running) since Tue 2021-01-05 06:08:23 UTC; 31s ago
     Docs: https://docs.mongodb.org/manual
 Main PID: 6818 (mongod)
   Memory: 90.8M
   CGroup: /system.slice/mongod.service
           └─6818 /usr/bin/mongod -f /etc/mongod.conf

Jan 05 06:08:21 centos systemd[1]: Starting MongoDB Database Server...
Jan 05 06:08:21 centos mongod[6773]: about to fork child process, waiting until server is ready for connections.
Jan 05 06:08:21 centos mongod[6773]: forked process: 6818
Jan 05 06:08:23 centos mongod[6773]: child process started successfully, parent exiting
Jan 05 06:08:23 centos systemd[1]: Started MongoDB Database Server.

● pritunl.service - Pritunl Daemon
   Loaded: loaded (/etc/systemd/system/pritunl.service; enabled; vendor preset: disabled)
   Active: active (running) since Tue 2021-01-05 06:08:21 UTC; 33s ago
 Main PID: 6767 (pritunl)
    Tasks: 18 (limit: 4763)
   Memory: 147.0M
   CGroup: /system.slice/pritunl.service
           ├─6767 /usr/lib/pritunl/bin/python2 /usr/lib/pritunl/bin/pritunl start
           └─9918 pritunl-web

Jan 05 06:08:21 centos systemd[1]: Started Pritunl Daemon.
Jan 05 06:08:23 centos pritunl[6767]: /usr/lib/pritunl/lib/python2.7/site-packages/OpenSSL/crypto.py:12: CryptographyDeprecationWarning: Python 2 is no longer su>
Jan 05 06:08:23 centos pritunl[6767]:   from cryptography import x509
Configure Pritunl VPN Server on CentOS 8 | RHEL 8
At this point, Pritunl is up and running and can be accessible via https://server-ip. Run the following command to acquire the key that will be used for DB authentication:
sudo pritunl setup-keyCopy the output to a text editor as it will be needed in the next step.
Access the web interface and you will be presented with the interface below. Paste the output of the previous command in the ‘Enter Setup Key‘ field then save.

You will be redirected to a login page that will request a username and password. Use the following command to obtain the credentials from the server:
sudo pritunl default-passwordThis will generate an output on the terminal bearing the username and password that you should use to login on the web interface.

You can then proceed to server setup where the first step is to change the default credentials.
Then we can now access our dashboard that has no users, servers or organizations configured.

Pritunl uses organizations and groups users into the organizations so as to be able to configure access control and for centralized management. You can then create a Server that will be attached to an organization. A server can only be linked to one organization and so does users.
Configure Pritunl Server
We proceed to configuring the server.
- Go to the Users tab and select Add Organization:

Give your organization a name and click Add
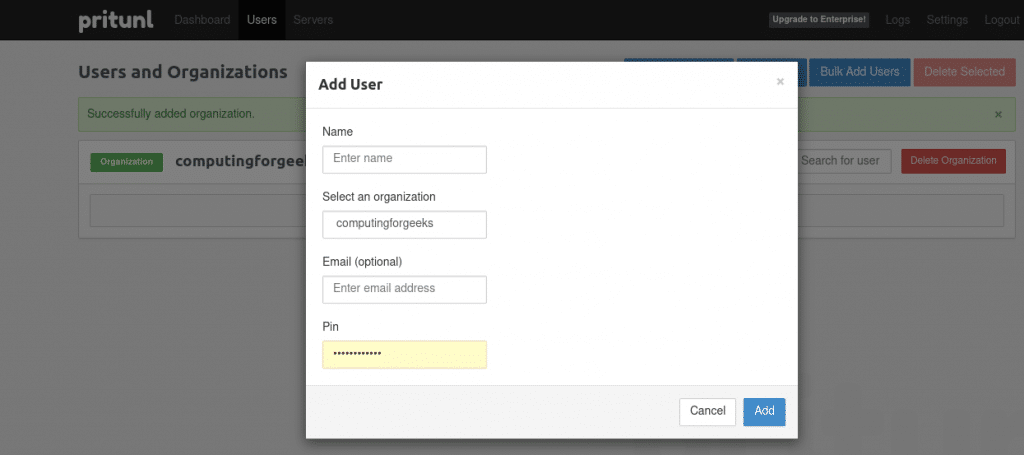
- Click on Add User to add a user and link the user to the organization we created in the previous step. Input a PIN that the user will need to input when connecting to the server.
- Add server in ther Servers tab.

Give the server a name, and specify the VPN subnet and DNS that will be used for client connectivity. You can retain the default configurations also.
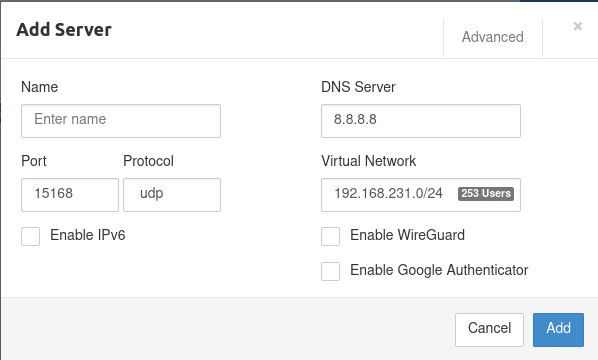
Select Enable WireGuard to activate wireguard client connectivity. You can find more advanced settings in the Advanced tab then Add.
A successfully added server will look like one below. Click on Attach Organization to link the server with the organization we created in the previous steps.
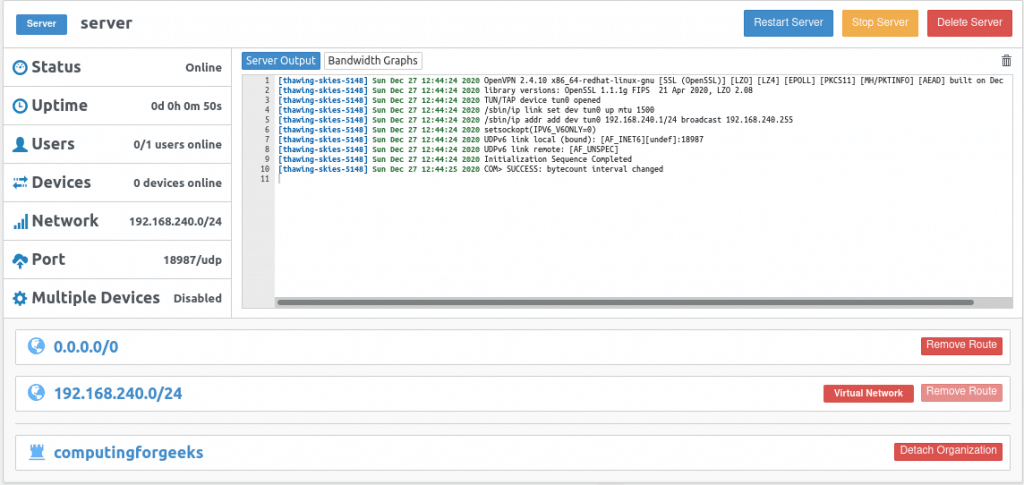
Click on Add Route to add a route to your private network that you wish VPN clients to access
We now have to download a user profile that will be used by the client for connection.
Go to the Users tab and navigate to the user that you want to download the profile. The download option is on the right of the user as shown below:

How To Configure Pritunl Client
This guide will cover how to download and install Pritunl Client on Centos 8
- Add Pritunl repo
sudo tee /etc/yum.repos.d/pritunl.repo<<EOF
[pritunl]
name=Pritunl Repository
baseurl=https://repo.pritunl.com/stable/yum/centos/8/
gpgcheck=1
enabled=1
EOF
2. Add and import Pritunl GPG key
gpg --keyserver hkp://keyserver.ubuntu.com --recv-keys 7568D9BB55FF9E5287D586017AE645C0CF8E292A
gpg --armor --export 7568D9BB55FF9E5287D586017AE645C0CF8E292A > key.tmp; sudo rpm --import key.tmp; rm -f key.tmp
3. Install Pritunl VPN client:
sudo dnf -y install https://dl.fedoraproject.org/pub/epel/epel-release-latest-8.noarch.rpm
sudo dnf -y install pritunl-client-electron
4. Launch Pritunl VPN client then click on Import Profile. Choose the profile that we downloaded in the previous steps then import.
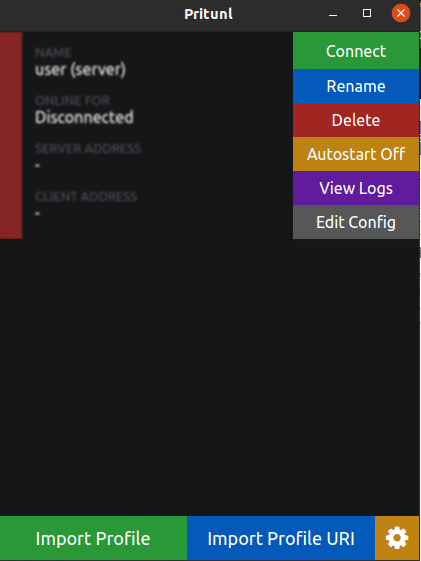
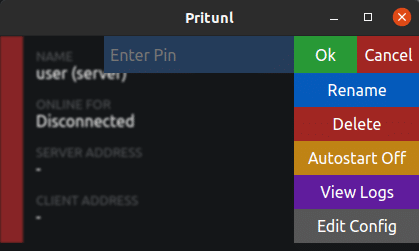
On the Menu icon at the top right, click the Connect option. This will request a PIN that was set during the user creation process that we discussed.
On successful authentication, you will be connected to the VPN adn this can be seen from the VPN server dashboard

We have successfully installed and configured Pritunl VPN on CentOS 8 and setup a client. Check out these other interesting articles:
Install and Configure OpenVPN Server on RHEL 8 / CentOS 8

