This tutorial will be showing you how to set up your own DNS over HTTPS (DoH) resolver on Ubuntu with DNSdist, so your DNS queries can be encrypted and protected from prying eyes.
What is DNS over HTTPS and Why It’s Important
DNS (Domain Name System) is responsible for translating domain names to IP addresses. It’s designed in 1987 with no security or privacy in mind. By default DNS queries are not encrypted. They are sent in plain text on the wire and can be exploited by middle entities. For example, the Great Firewall of China (GFW) uses a technique called DNS cache poison to censor the Chinese Internet. (They also use other methods, which are beyond the scope of this article.)
GFW checks every DNS query that is sent to a DNS server outside of China. Since plain text DNS protocol is based on UDP, which is a connection-less protocol, GFW can spoof both the client IP and server IP. When GFW finds a domain name on its block list, it changes the DNS response. For instance, if a Chinese Internet user wants to visit google.com, GFW returns an IP address located in China instead of Google’s real IP address, to the user’s DNS resolver. Then the DNS resolver returns the fake IP address to the user’s computer, so the user cannot visit google.com.
HTTPS is the standard way to encrypt plain text HTTP web pages. With DNS over HTTPS (DoH), your DNS queries will be encrypted, so no third parties can see your DNS queries.

Why Run Your Own DoH Resolver?
There are already some public DNS resolvers like 1.1.1.1 and 9.9.9.9 that support DNS over HTTPS, so you can use them if you don’t have the skill or time to run your own. Starting with Firefox version 61, you can enable DNS over HTTPS in the browser settings, which is a big progress for Internet security and privacy. Firefox uses Cloudflare resolvers (1.1.1.1) by default. However, some folks argue that this allows Cloudflare to gather information on Firefox users. They seem to have more trust in their ISP than Cloudflare. But I think if you are paranoid about privacy, you should run your own DoH resolver, so neither Cloudflare nor your ISP can spy on you.
DoH vs DoT
Besides DNS over HTTPS, there’s another protocol that also aims to encrypt DNS queries. It’s called DNS over TLS (DoT). Previously I wrote a guide to using DNS over TLS on Ubuntu desktop, but now I’m switching to DNS over HTTPS.
For people live in countries with severe Internet censorship like China, it’s more advantageous to use DoH rather than DoT. This is because DoT operates on TCP port 853, which can be easily blocked by a national firewall. DoH operates on TCP port 443, which is the standard port for HTTPS websites, which makes DoH super hard to block, because if TCP port 443 is blocked, then nearly all HTTPS websites will also be blocked. My DoH resolver is running on a VPS (virtual private server) located outside of China and the Great Firewall of China can’t intercept my DNS queries. I can even hide my DoH resolver’s IP address behind Cloudflare CDN (Content Delivery Network).
Another advantage of DoH is that it allows web applications to access DNS information via existing browser APIs, so no stub resolver is needed.
DoH Support in Major DNS Resolvers
- BIND will support DoH in version 9.17, which is still in development. Ubuntu 20.04 and 21.04 repository ship with BIND 9.16.
- Knot resolver supports DoH since version 4.0.0. The current latest version is 5.11. It has an official repository for Debian, Ubuntu, CentOS, Fedora.
- Unbound supports DoH since version 1.12.0.
- PowerDNS recursor doesn’t support DoH right now.
Actually, I prefer to run DoH resolver with DNSdist, which added DoH support in version 1.4.0. The current latest version is 1.5. It has an official repository for Debian, Raspbian, Ubuntu, and CentOS. DNSdist is a DNS load balancer that can forward DNS queries to a backend DNS resolver, so no matter what DNS resolver you are using, you can use DNSdist to run your own DoH server. DNSdist is developed by the PowerDNS team.
Prerequisites
It’s assumed that you have a DNS resolver running on your Ubuntu server. You can use any DNS resolver (BIND, Knot resolver, Unbound…) I personally use BIND.
- Set Up Your Own BIND9 DNS Resolver on Ubuntu 16.04/18.04
- Set Up Your Own BIND9 DNS Resolver on Ubuntu 20.04
Once your DNS resolver is up and running, follow the instructions below.
Step 1: Install DNSdist on Ubuntu Server
If you use a non-LTS Ubuntu, you have to install dnsdist from the default repository (sudo apt install dnsdist). If you use Ubuntu LTS, it’s recommended to install DNSdist from the upstream repository, so you will have the latest stable version. First, you need to create a source list file for DNSdist.
Ubuntu 20.04
echo "deb [arch=amd64] http://repo.powerdns.com/ubuntu focal-dnsdist-15 main" | sudo tee /etc/apt/sources.list.d/pdns.list
Ubuntu 18.04
echo "deb [arch=amd64] http://repo.powerdns.com/ubuntu bionic-dnsdist-15 main" | sudo tee /etc/apt/sources.list.d/pdns.list
Ubuntu 16.04
echo "deb [arch=amd64] http://repo.powerdns.com/ubuntu xenial-dnsdist-15 main" | sudo tee /etc/apt/sources.list.d/pdns.list
Next, we create a preference file for DNSdist to pin the package, so we won’t be accidentally installing DNSdist from another repository.
sudo nano /etc/apt/preferences.d/dnsdist
Add the following lines into the file.
Package: dnsdist*
Pin: origin repo.powerdns.com
Pin-Priority: 600
Save and close the file. Then run the following command to import the PowerDNS public key, so the APT package manager can verify the interity of software packages downloaded from this repository.
curl https://repo.powerdns.com/FD380FBB-pub.asc | sudo apt-key add -
Next, update the repository list and install DNSdist.
sudo apt update

sudo apt install dnsdist
By default, DNSdist tries to bind to port 53. Because you have an existing DNS resolver like BIND listening on port 53, the dnsdist.service would fail to start.

Since we are just deploying a DoH resolver and don’t care about DNS load balancing, we can configure DNSdist to listen on another port. Edit the DNSdist configuration file.
sudo nano /etc/dnsdist/dnsdist.conf
There’s no content in this file. For now, simply add the following line in this file, so DNSdist will listen on TCP and UDP port 5353, instead of port 53.
setLocal("127.0.0.1:5353")
Save and close the file. Then restart DNSdist.
sudo systemctl restart dnsdist
Check its status.
systemctl status dnsdist
It should be active (running).

Step 2: Install Let’s Encrypt Client (Certbot) on Ubuntu Server
DNS over HTTPS requires installing a TLS certificate on the server-side. We will obtain and install Let’s Encrypt certificate. The advantage of using Let’s Encrypt certificate is that it’s free, easier to set up, and trusted by client software.
Run the following commands to install Let’s Encrypt client (certbot) from the default Ubuntu repository.
sudo apt install certbot
To check the version number, run
certbot --version
Sample output:
certbot 0.40.0
Step 3: Obtain a Trusted TLS Certificate from Let’s Encrypt
I recommend using the standalone or webroot plugin to obtain TLS certificate for dnsdist.
Standalone Plugin
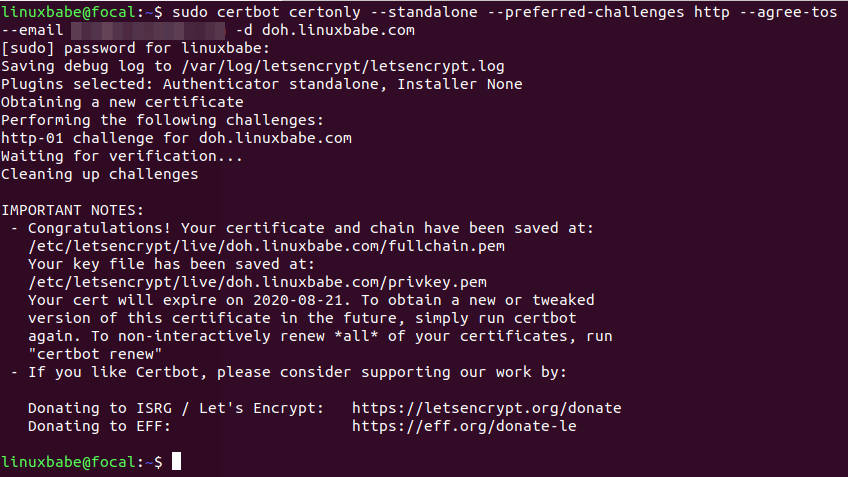
If there’s no web server running on your Ubuntu server, you can use the standalone plugin to obtain TLS certificate from Let’s Encrypt. Create DNS A record for the subdomain (doh.example.com), then run the following command.
sudo certbot certonly --standalone --preferred-challenges http --agree-tos --email [email protected] -d doh.example.com
Where:
certonly: Obtain a certificate but don’t install it.--standalone: Use the standalone plugin to obtain a certificate--preferred-challenges http: Perform http-01 challenge to validate our domain, which will use port 80.--agree-tos: Agree to Let’s Encrypt terms of service.--email: Email address is used for account registration and recovery.-d: Specify your domain name.
As you can see the from the following screenshot, I successfully obtained the certificate.
Using webroot Plugin
If your Ubuntu server has a web server listening on port 80 and 443, then it’s a good idea to use the webroot plugin to obtain a certificate because the webroot plugin works with pretty much every web server and we don’t need to install the certificate in the web server.
First, you need to create a virtual host for doh.example.com.
Apache
If you are using Apache, then
sudo nano /etc/apache2/sites-available/doh.example.com.conf
And paste the following lines into the file.
        ServerName doh.example.com

        DocumentRoot /var/www/dnsdist
Save and close the file. Then create the web root directory.
sudo mkdir /var/www/dnsdist
Set www-data (Apache user) as the owner of the web root.
sudo chown www-data:www-data /var/www/dnsdist -R
Enable this virtual host.
sudo a2ensite doh.example.com
Reload Apache for the changes to take effect.
sudo systemctl reload apache2
Once virtual host is created and enabled, run the following command to obtain Let’s Encrypt certificate using webroot plugin.
sudo certbot certonly --webroot --agree-tos --email [email protected] -d doh.example.com -w /var/www/dnsdist
Nginx
If you are using Nginx, then
sudo nano /etc/nginx/conf.d/doh.example.com.conf
Paste the following lines into the file.
server {
      listen 80;
      server_name doh.example.com;

      root /var/www/dnsdist/;

      location ~ /.well-known/acme-challenge {
         allow all;
      }
}
Save and close the file. Then create the web root directory.
sudo mkdir -p /var/www/dnsdist
Set www-data (Nginx user) as the owner of the web root.
sudo chown www-data:www-data /var/www/dnsdist -R
Reload Nginx for the changes to take effect.
sudo systemctl reload nginx
Once virtual host is created and enabled, run the following command to obtain Let’s Encrypt certificate using webroot plugin.
sudo certbot certonly --webroot --agree-tos --email y[email protected] -d doh.example.com -w /var/www/dnsdist
Step 4: Enable DoH in DNSdist
Edit the DNSdist configuration file.
sudo nano /etc/dnsdist/dnsdist.conf
Add the following lines into the file.
-- allow query from all IP addresses
addACL('0.0.0.0/0')

-- add a DoH resolver listening on port 443 of all interfaces
addDOHLocal("0.0.0.0:443", "https://www.linuxbabe.com/etc/letsencrypt/live/doh.example.com/fullchain.pem", "https://www.linuxbabe.com/etc/letsencrypt/live/doh.example.com/privkey.pem", { "/" }, { doTCP=true, reusePort=true, tcpFastOpenSize=0 })

-- downstream resolver
newServer({address="127.0.0.1:53",qps=5, name="resolver1"})
Save and close the file. DNSdist runs as the _dnsdist user, so we need to give the _dnsdist user permission to read the TLS certificate with the following commands.
sudo apt install acl

sudo setfacl -R -m u:_dnsdist:rx /etc/letsencrypt/
Then check the syntax of the configuration file.
sudo dnsdist --check-config
If the syntax is ok, restart DNSdist.
sudo systemctl restart dnsdist
Note that if there’s a web server listening on TCP port 443, DNSdist would fail to restart. You can temporarily stop the web server. I will explain how to make the web server and DNSdist use TCP port 443 at the same time at the end of this article.
Step 5: Configure DoH in Firefox Web Browser
Go to Preferences -> General and scroll down to the bottom to configure Network Settings. Enable DNS over HTTPS, and set your own DoH resolver.

We can then fine-tune the DoH configurations by going to about:config tab in Firefox.
network.trr.mode
By default, The network.trr.mode parameter in Firefox is set to 2, which means if DoH query fails, Firefox will pass the DNS query to the host system. I want to always use the DoH resolver, so change the network.trr.mode to 3 so the host resolver won’t be used. This allows us to have an easy way to test if your DoH resolver is working.
network.trr.allow-rfc1918
This is set to false by default, which means if the DNS response includes private IP addresses, then it will be considered a wrong reponse that won’t be used. If you use response policy zone in BIND, you probably have some hostnames pointing to private IP addresses, then set this value to true.
network.trr.bootstrapAddress
Firefox needs to look up the IP address of the DoH resolver in order to send DNS queries. You can put the IP address in this field to eliminate this initial query.
Testing
Now enter a domain name like linuxbabe.com in the Firefox address bar. If the web page loads normally, it’s a good sign your DoH resolver is working. Then go to the terminal console of your DNS server and check the DNS query logs. I use BIND, so I enter the following command to check the DNS query log.
Ubuntu 20.04
sudo journalctl -eu named
Ubuntu 18.04
sudo journalctl -eu bind9
As you can see from the BIND log below, Firefox queried the following domains.
- www.linuxbabe.com: my website
- fonts.gstatic.com: This serves Google fonts on my website
- cdn.shareaholic.net: a sharing widget on my website
- newsletter.linuxbabe.com: my self-hosted email marketing platform.
- translate.google.com: the Google translate widget on my website

The above query log tells me that my DNS over HTTPS resolver is working. If I stop the BIND resolver (sudo systemctl stop named), Firefox tells me it can’t find that site. And when I start BIND, the web page loads again.
Step 6: Configure DoH Client on Ubuntu Desktop
I know there are 3 open-source DNS clients on Linux that support encrypted DNS.
- systemd-resolved
- stubby
- dnscrypt-proxy
Currently, dnscrypt-proxy is the best DoH client implementation on Linux, so I will show you how to use it. Run the following command to install dnscrypt-proxy on your Ubuntu desktop.
sudo apt install dnscrypt-proxy
It will automatically start, as you can see with:
sudo systemctl status dnscrypt-proxy
If it didn’t start, you can run the following command to start it.
sudo systemctl enable dnscrypt-proxy --now
Check the listening address.
sudo ss -lnptu | grep dnscrypt-proxy

On my computer, dnscrypt-proxy listens on 127.0.2.1:53. There’s another systemd service (dnscrypt-proxy-resolvconf.service) installed by dnscrypt-proxy,
systemctl status dnscrypt-proxy-resolvconf
This is a service that sets 127.0.2.1 as the resolver on your computer. You can check the current DNS resolver for your computer with:
cat /etc/resolv.conf
By default, dnscrypt-proxy uses Clouldflare as the upstream DoH resolver. To use your own DoH resolver, edit the configuration file.
sudo nano /etc/dnscrypt-proxy/dnscrypt-proxy.toml
Find the following line
server_names = ['cloudflare']
Change it to your DoH resolver hostname. Note that the location of parameters is important. You should not put the server_names parameter in other places in this file.
server_names = ['doh.example.com']
Then comment out the [sources] section.
#[sources]
#  [sources.'public-resolvers']
#  url = 'https://download.dnscrypt.info/resolvers-list/v2/public-resolvers.md'
#  cache_file = '/var/cache/dnscrypt-proxy/public-resolvers.md'
#  minisign_key = 'RWQf6LRCGA9i53mlYecO4IzT51TGPpvWucNSCh1CBM0QTaLn73Y7GFO3'
#  refresh_delay = 72
#  prefix = ''
We need to add our own DoH resolver like below at the bottom of this file.
[static]
  [static.'doh.example.com']
  stamp = 'sdns://AgUAAAAAAAAAAAAOZG5zLmdvb2dsZS5jb20NL2V4cGVyaW1lbnRhbA'
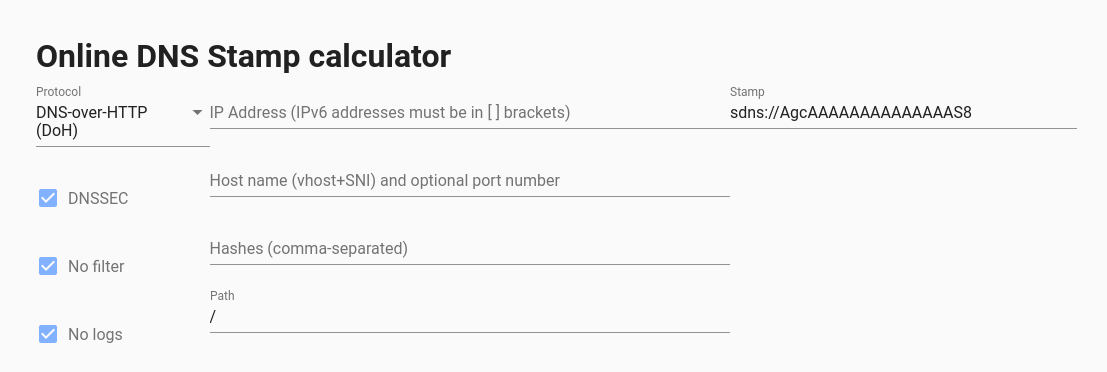
The stamp contains your DoH resolver hostname, IP address and query path. To get your own stamp, use the online DNS stamp calculator. Choose DNS-over-HTTPS as the protocol, and enter the IP address, hostname and query path. If you follow this tutorial to set up your own DoH resolver, the path should be set to just /. If you didn’t enable DNSSEC on your resolver, then untick the DNSSEC checkbox.
Once you added your DNS stamp, save and close the file. Then restart dnscrypt-proxy.
sudo systemctl restart dnscrypt-proxy
Check its status. Make sure it’s running.
systemctl status dnscrypt-proxy
Now you can test if dnscrypt-proxy is working.
If you don’t want to publish your DNS over HTTPS resolver to the world, you can delete the DNS A record of your DoH resolver hostname, because dnscrypt-proxy has the IP address in the DNS stamp.
Configure DoH on iOS
iOS supports DNS over HTTPS since iOS 14. However, there’s no a simple config option on iOS to set DoH resolver. You need to generate a .mobileconfig file and install it on iOS. It’s a little complicated to generate a signed iOS .mobileconfig file.
If your DoH resolver won’t be used publicly, you can generate a simple unsigned file. Use a text editor to create a file with .mobileconfig extension. Copy and paste the following text. Replace the IP ddress and server URL.
        PayloadContent


                        DNSSettings

                                DNSProtocol
                                HTTPS
                                ServerAddresses

                                        12.34.56.78

                                ServerURL
                                https://doh.example.com/

                        PayloadDescription
                        Configures device to use Encrypted DNS over HTTPS
                        PayloadDisplayName
                        My own DNS over HTTPS Resolver
                        PayloadIdentifier
                        com.apple.dnsSettings.managed.9d6e5fdf-e404-4f34-ae94-27ed2f636ac4
                        PayloadType
                        com.apple.dnsSettings.managed
                        PayloadUUID
                        35d5c8a0-afa6-4b36-a9fe-099a997b44ad
                        PayloadVersion
                        1
                        ProhibitDisablement


        PayloadDescription
        Adds self-hosted DoH resolver to Big Sur and iOS 14 based systems
        PayloadDisplayName
        My own DNS over HTTPS
        PayloadIdentifier
        com.example.doh
        PayloadRemovalDisallowed

        PayloadType
        Configuration
        PayloadUUID
        A4475135-633A-4F15-A79B-BE15093DC97A
        PayloadVersion
        1
Save and close the file. Then you can send the file as an email attachment to your iOS. Open the email on iOS and tap on the attachment to download the config file. After that, go to iOS Settings -> Profile Downloaded. It will prompt you to install the profile.
Tap on the Install button and enter your iOS password to install it. Tap on Install button again.
Once it’s installed, go to iOS Settings -> VPN & Network. Scroll down to the buttom to choose the DNS resolver for your iOS system. Note that this DoH resolver will override the DNS resolver provided by a VPN like ProtonVPN. Your iOS will always use your DoH resolver.
If you ever want to remove the .mobileconfig file from iOS, go to Settings -> General -> Profile.
Make DNSdist and web server use port 443 at the same time
A DNS over HTTPS resolver needs to bind to port 443. If you already have Apache/Nginx listening on port 443, then DNSdist can’t bind to port 443. Normally a port can only be used by one process. However, we can use HAproxy (High Availability Proxy) and SNI (Server Name Indication) to make DNSdist and Apache/Nginx use port 443 at the same time.
DNSdist Configuration
Edit the DNSdist configuration file.
sudo nano /etc/dnsdist/dnsdist.conf
Change the DoH listening address to 127.0.0.1.
addDOHLocal("127.0.0.1:443", "https://www.linuxbabe.com/etc/letsencrypt/live/doh.example.com/fullchain.pem", "https://www.linuxbabe.com/etc/letsencrypt/live/doh.example.com/privkey.pem", { "/" }, { doTCP=true, reusePort=true, tcpFastOpenSize=0 })
Save and close the file. Then restart DNSdist.
sudo systemctl restart dnsdist
Nginx Configuration
If you use Nginx, edit the server block file.
sudo nano /etc/nginx/conf.d/example.com.conf
In the SSL server block, find the following directive.
listen 443 ssl;
Change it to
listen 127.0.0.2:443 ssl;
This time we make it listen on 127.0.0.2:443 because 127.0.0.1:443 is already taken by DNSdist. Save and close the file. The Nginx main configuration file /etc/nginx/nginx.conf and the default server block /etc/nginx/sites-enabled/default might include a default virtual host listening on 443, so you might need to edit this file too.
Then restart Nginx.
sudo systemctl restart nginx
Apache Configuration
If you use Apache web server, edit your virtual host file.
sudo nano /etc/apache2/sites-enabled/example.com.conf
In the SSL virtual host, change
To
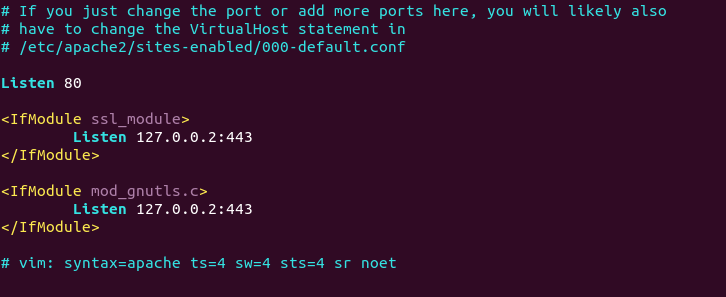
This time we make it listen on 127.0.0.2:443 because 127.0.0.1:443 is already taken by DNSdist. Save and close the file. Then edit the /etc/apache2/ports.conf file.
sudo nano /etc/apache2/ports.conf
Change
Listen 443
To
Listen 127.0.0.2:443
Save and close the file. Restart Apache.
sudo systemctl restart apache2
HAProxy Configuration
Now install HAproxy.
sudo apt install haproxy
Start HAProxy
sudo systemctl start haproxy
Edit configuration file.
sudo nano /etc/haproxy/haproxy.cfg
If you use Nginx, copy and paste the following lines to the end of the file. Replace 12.34.56.78 with the public IP address of your server. Replace doh.example.com with the domain name used by DNSdist and www.example.com with the domain name used by your web server.
frontend https
   bind 12.34.56.78:443
   mode tcp
   tcp-request inspect-delay 5s
   tcp-request content accept if { req_ssl_hello_type 1 }

   use_backend dnsdist if { req_ssl_sni -i doh.example.com }
   use_backend nginx if { req_ssl_sni -i www.example.com }
   use_backend nginx if { req_ssl_sni -i example.com }

   default_backend dnsdist

backend dnsdist
   mode tcp
   option ssl-hello-chk
   server dnsdist 127.0.0.1:443

backend nginx
   mode tcp
   option ssl-hello-chk
   server nginx 127.0.0.2:443 check
If you use Apache, copy and paste the following lines to the end of the file. Replace 12.34.56.78 with the public IP address of your server. Replace doh.example.com with the domain name used by DNSdist and www.example.com with the domain name used by your web server.
frontend https
   bind 12.34.56.78:443
   mode tcp
   tcp-request inspect-delay 5s
   tcp-request content accept if { req_ssl_hello_type 1 }

   use_backend dnsdist if { req_ssl_sni -i doh.example.com }
   use_backend apache if { req_ssl_sni -i www.example.com }
   use_backend apache if { req_ssl_sni -i example.com }

   default_backend dnsdist

backend dnsdist
   mode tcp
   option ssl-hello-chk
   server dnsdist 127.0.0.1:443

backend apache
    mode tcp
    option ssl-hello-chk
    server apache 127.0.0.2:443 check
Save and close the file. Then restart HAproxy.
sudo systemctl restart haproxy
In the configuration above, we utilized the SNI (Server Name Indication) feature in TLS to differentiate VPN traffic and normal HTTPS traffic.
- When
doh.example.comis in the TLS Client Hello, HAProxy redirect traffic to the DNSdist backend. - When
www.example.comis in the TLS Client Hello, HAProxy redirect traffic to the apache/nginx backend. - If the client doesn’t specify the server name in TLS Client Hello, then HAproxy will use the default backend (DNSdist).
You can test this setup with the openssl tool. First, run the following command multiple times.
echo | openssl s_client -connect your-server-IP:443 | grep subject
We didn’t specify server name in the above command, so HAproxy will always pass the request to the default backend (DNSdist), and its certificate will be sent to the client. Next, run the following two commands.
echo | openssl s_client -servername www.example.com -connect your-server-IP:443 | grep subject

echo | openssl s_client -servername doh.example.com -connect your-server-IP:443 | grep subject
Now we specified the server name in the commands, so HAproxy will pass requests according to the SNI rules we defined.
When renewing Let’s Encrypt certificate for your website, it’s recommended that you use the http-01 challenge instead of tls-alpn-01 challenge, because HAproxy is listening on port 443 of the public IP address, so it can interfere with the renewal process.
sudo certbot renew --preferred-challenges http-01
Wrapping Up
I hope this tutorial helped you set up a DNS over HTTPS resolver with Nginx on Ubuntu. As always, if you found this post useful, then subscribe to our free newsletter to get more tips and tricks. Take care 🙂

