In the last couple of years, the world has undergone some fascinating technological changes. Each day, something new is developed that offers an improvement over its predecessor and gives us access to a whole new dimension. One certain region that has seen a significant improvement in its features and popularity is the web development sector, particularly NodeJS, which has become many developers’ first choice for back-end development.
What actually is NodeJS?
NodeJS is an open-source JavaScript platform used for developing and executing back-end services called APIs (Advanced Programming Interfaces). These are the services that power up the client applications such as web apps that run on the browser and mobile applications. NodeJS is important because these client applications are just a surface for users to see and interact with. In addition to this, they need to talk to some service on the server or in the cloud for the storage of data, sending emails or pushing notifications. This is where NodeJS comes into the picture which allows users to create server-based applications in JavaScript and produce real time back-end services that can be used to power up client applications.
Being highly scalable and superfast, NodeJS is a great choice for development and hence today we’ll be looking at how to make a simple NodeJS application.
Step 1: Installing NodeJS
Before moving on the development phase, let us first see how to install NodeJS on our Linux based desktops. There are actually multiple ways to install NodeJS on a Linux based computer. We, however, will only be looking at two methods of installing NodeJS.
Step 1(a): Installing NodeJS using NVM
In this method, we will be using the Node Version Manager (NVM) to install NodeJS. A huge benefit of using this is that there are no permission issues for using NodeJS.
First of all, we have to install nvm which can be done by the following command:
$ wget -qO- https://raw.githubusercontent.com/nvm-sh/nvm/v0.35.1/install.sh | bash
This command adds nvm to your path profile and extracts all the nvm data in the directory ~/. nvm
To check whether nvm has been installed correctly, restart the terminal and run:
If you see nvm as the output, then it has been successfully installed.
Now we’ll be installing NodeJS and npm which is basically an ecosystem of NodeJS libraries. To do this, simply run the following command that will install the most recent version of NodeJS:
You can also install any specific version of NodeJS that you want to install. For this tutorial, we’ll be installing the version 12 of NodeJS.
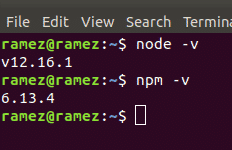
Once installed, you can check your NodeJS and npm installed versions by running the following commands:
Step 1(b): Installing NodeJS using Ubuntu official repository
One huge advantage of installing NodeJS in this way is that Ubuntu has a stable version of NodeJS in its official repository.
First of all, the following command will be run to update our system’s apt cache and packages to the latest versions so that no issues arise during installation:
Next, we will be installing NodeJS with the following command:
$ sudo apt install nodejs
Once installed, you can check your NodeJS installed version by running the following command:
In this method, we also have to install npm, the ecosystem of NodeJS libraries. This can be done by inputting the following command into the terminal:
Similarly, you can check your npm installed version by running the following command:
Step 2: Coding a NodeJS Application
For this tutorial, we’ll be creating a simple HTTP Server which will listen to the client on port number 8080 and output Hello World as a response to the client. The following is the complete code:
let http = require(‘http’)
server = http.createServer(function(request, response) {
response.write(‘Hello World’)
response.end()
})
server.listen(8080)
console.log (“Server Running”)
Let us now look at each line of code to understand what is actually happening here.
Code Explanation:
In Node JS, there are some built in modules available. These are functions that have already been defined in NodeJS and provide certain functionality in our applications. These modules can be imported using the require keyword.
let http = require(‘http’)
In the first line of our code, we are importing the HTTP built in module of NodeJS. The HTTP module is used here so that we can create a server in our application that can listen for HTTP requests on a given port.
server = http.createServer(function(request, response)
Over here, we use a method of the HTTP module called createServer which, as the name says, creates a server instance. In this, we pass a function through here which takes up two parameters – a request object and a response object. Now whenever a request is made to our server, this function will be called. The response object comes loaded with details about the request that has been made and the response object is something that we can use to send a response back to the client.
response.write(‘Hello World’)
response.end()
Over here, response.write is used to write a response to the client. This is how things can be printed on the browser. In this case, this will allow us to print Hello World on the browser. The response.end() lets the browser know that the request has ended and sends the response to the browser.
server.listen(8080)
console.log (“Server Running”)
The server.listen function is used here by our server to listen to the client on port number 8080. It is important to note that any port that is available can be used here. The last line console.log is used to print anything on the terminal. In this case, we are printing Server Running so that we know the server has started.
Step 3: Running and Testing our NodeJS Application
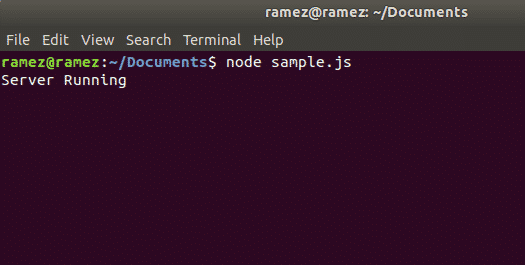
Now that we have our code written and understand what is happening in it, let us now run it and test whether it is working or not. To do this, open the directory, where you have saved your file containing the above NodeJS code and along with this, also open the terminal. In order to run a NodeJS file, simply type in the following command in the terminal:
filename here refers to the name of your file. In my case, I’ve stored my code in a file called sample.js. See below:
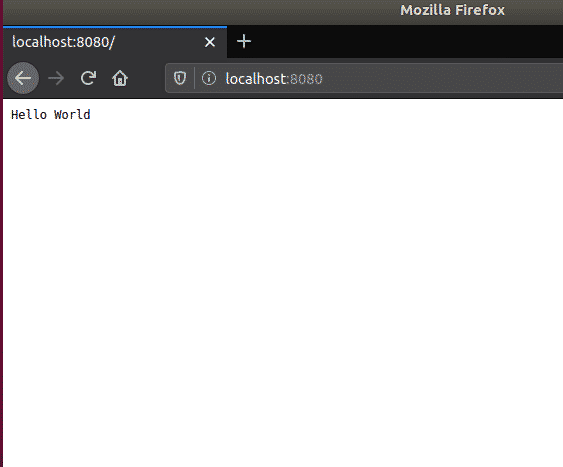
Now our server seems to be running. Let us now check to see if our response has been sent to the client. To do this, open your browser and enter localhost: port. In my case, I’ll be running the command: localhost:8080. See the image below for better understanding:
We can clearly see our output Hello World displayed on the page. Voila, we were successful in creating a simple NodeJS Server.
Why use NodeJS over its Alternatives?
In today’s world, JavaScript has completely changed the face of web development. This has thus led to NodeJS becoming a popular choice for back-end development. Along with using JavaScript as its core, NodeJS is highly fast, extremely flexible and great for prototyping and agile development. Moreover, using NPM (Node Package Manager) as its ecosystem which is the largest ecosystem available for open-source libraries, it grants multiple tools and modules to developers which further increases its demand. All these reasons make it a great choice for web development.
About the author
![]()
Zeeman Memon
Zeeman is a freelance content marketer, software engineer and tech blogger who loves to blog on his tech blog in his free time.


