Do you know what Clipping Path in Photoshop is? If you are new to the concept don’t worry, you have come to the right place. In this tutorial, we are going to look at the Clipping Path in detail. This guide covers in detail everything you need to know about the Clipping Path and how to use it in Photoshop. As most people confuse Clipping Path and Image Masking, we will discuss their differences. We will also look at a detailed step-by-step process of creating a Clipping Path. This can be very helpful for new designers.
This tutorial is targeted towards beginners, but the more advanced users can also learn something new here. So, are you ready to learn what a Clipping Path is? Let’s get started.
What is Clipping Path?
The first thing you need to do is to understand what Clipping Path really is. It is a process by which you can remove background or add a white background instead of in any image.
Clipping Path allows you to create a shape or a close vector path and cut out a portion of an image using the Pen Tool. This is a great way from removing background from an image. You can also use the Clipping path to crop out a portion of an image or change only a small region in the image.
Designers identify different types of Clipping Paths. You can either use the easy method of drawing a path around an image using Pen Tool, or you can also use the Clipping Path to do much more complex things such as diving an image into different parts and using each part separately in an image. If you want to remove background from an image then you should use clipping path techniques cause it will give you a smooth edge.
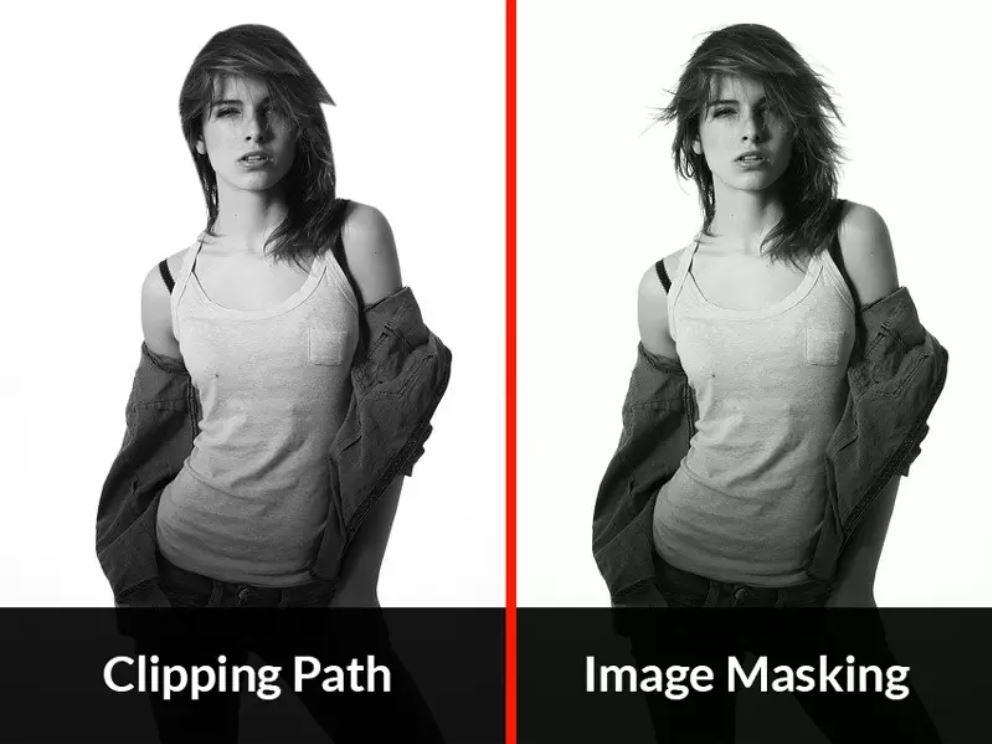
Clipping Path vs. Image Masking
A lot of people confuse the Clipping Path with the Image Mask in Photoshop. The truth is they are both extremely different things. Let’s take a look at how Clipping Path and Image Masking compare with each other.
Clipping Path and Image Masking are both useful techniques in Photoshop. They can help you separate the background from the foreground of an image. But they both vary in their methods.
Clipping Path uses Pen Tool to remove the background. On the other hand, Image Masking uses three different ways to change portions of an image. Image Masking includes Clipping Mask, Layer Mask, and Alpha Chanel Mask. They use different techniques to change portions of an image and can do much more than removing the background.
Image credit: Clipping Path Creative Inc
Clipping Path is preferred when the foreground image has sharp edges and is easy to separate from the background. It is more time-consuming as compared to Image Masking, as you have to draw the path around the image using the Pen Tool.
Both Clipping Path and Image Masking are used extensively by graphic designers to add a little flair to their designs. They can be used to combine different layers and images together and create some really beautiful posters, logos, and web images in Photoshop.
Guide to Create Clipping Path In Photoshop
Clipping Path is one of the most commonly used techniques in Photoshop, and it can considerably improve your designs. If you are new to this, you can follow our step-by-step guide to learn more.
Step-1: Open the Image
The first step is to open the image you want to clip from. Go to File-> Open and browse the image for selection. This image will appear on the background layer and you can see it in the Layers Panel.
<img data-lazy- data-lazy-src="https://kirelos.com/wp-content/uploads/2021/02/echo/word-image-32.jpeg" data-lazy- height="584" src="data:image/svg xml,” width=”602″>
Step-2: Pick the Tool
Now, you need to pick the Pen Tool from the toolbar. It is easy to spot as the icon looks like a pen. You can use this tool to draw a Clipping Path around the image. You can also use the shortcut ‘P’ to select the tool.
<img data-lazy- data-lazy-src="https://kirelos.com/wp-content/uploads/2021/02/echo/word-image-33.jpeg" data-lazy- height="445" src="data:image/svg xml,” width=”772″>
Step-3: Draw a Path
You can use the Pen Tool to create a Clipping Path around the image. This is a little time-consuming but hang in there. Add anchor points to complete the image path. You can also remove anchor points if you make any mistakes. You can see the path being created in the Paths Panel.
<img data-lazy- data-lazy-src="https://kirelos.com/wp-content/uploads/2021/02/echo/word-image-34.jpeg" data-lazy- height="543" src="data:image/svg xml,” width=”1244″>
Step-4: Save the Path
Once you have created the path with the Pen Tool you have to save it. Go to Paths Panel and find the path you have drawn. Double Click on it and click on the Save Path. You can name it whatever you want and save it.
<img alt="What is Clipping Path in Photoshop" data-lazy- data-lazy-src="https://kirelos.com/wp-content/uploads/2021/02/echo/word-image-35.jpeg" data-lazy- height="489" src="data:image/svg xml,” width=”641″>
Step-5: Clip the Path
Again go to the Paths Panel and open the menu. Find the option that says “Clipping Path”. This will convert your image into a Clipping Path.
<img alt="clipping path" data-lazy- data-lazy-src="https://kirelos.com/wp-content/uploads/2021/02/echo/word-image-36.jpeg" data-lazy- height="298" src="data:image/svg xml,” width=”322″>
Leave the flatness value blank and click ‘OK’. You can later change this value but right now you can leave it 0 and it will not cause any problems.
<img alt="Clipping Path in Photoshop" data-lazy- data-lazy-src="https://kirelos.com/wp-content/uploads/2021/02/echo/word-image-37.jpeg" data-lazy- height="474" src="data:image/svg xml,” width=”713″>
Step-6: Save as EPS
Once you have created a Clipping Path, you are now ready to use the image without its background. But first, you have to save it as EPS. Go to Save As and choose the format EPS from the dropdown list.
<img data-lazy- data-lazy-src="https://kirelos.com/wp-content/uploads/2021/02/echo/word-image-38.jpeg" data-lazy- height="630" src="data:image/svg xml,” width=”1005″>
Step-7: Use the Image
You can use this image without a background in your images. You can open this EPS file into Adobe software such as InDesign, Illustrator, and also Photoshop.
<img alt="background removal" data-lazy- data-lazy-src="https://kirelos.com/wp-content/uploads/2021/02/echo/word-image-39.jpeg" data-lazy- height="462" src="data:image/svg xml,” width=”697″>
Where Can You Use Clipping Path?
Now that you know how you can create a Clipping Path in Photoshop, you must be excited to try it yourself. You can use this technique to remove the background of an image. But there is much more you can do with the Clipping Path in Photoshop.
Edit Product Photos: You can use the Clipping Path to make your product images look great. This is an excellent way of removing clutter from the background and highlighting the product. If you run an e-commerce site, learning how to use Clipping Path can come in quite handy.
Graphic Design: Clipping Path is a great way for editing logos, images, and illustrations. You can use these images in designing posters, packaging, book illustrations, and other cool things. Clipping Path can be very helpful for graphic designers.
Make Your Banners and Web Images Stand Out: You can also use Clipping Path to create beautiful banners and images for your websites. You can use the Clipping Path to add different images to your site and grab the attention of users.
Use in Image Editing: Clipping Paths can also be useful when you are editing images or photos. It can help you combine multiple images and take your editing game up a notch. You can use the technique to remove the background and add a completely different feel to the image.
Architecture and Designs: Lastly, you can use Clipping Path to create beautiful interior and architecture designs in Photoshop. If you want to impress your clients, this technique can prove to be very useful.
These were some of the ways you can use the Clipping Path in Photoshop. There is much more you can do with this skill, once you learn how to do it properly.
Final Verdict
Clipping Path in Photoshop can be very useful for graphic designers. It can help you create some unique designs and make your work look more amazing.
We hope this tutorial was helpful for you. We covered Clipping Path in detail. The step-by-step guide can be great for beginners who are looking for an easy-to-follow guide for Clipping Path. We also looked at different ways you can use the Clipping Path in your designs.
However, if you want to become an expert, you have to keep practicing and learning. Clipping Path is not very hard to learn, but if you want to become an expert, you have to practice and try new things yourself.
References
1. https://clippingpathcreative.com/what-is-clipping-path-in-photoshop/
2. https://en.wikipedia.org/wiki/Clipping_path
About the author
<img alt="Rakhibul Hasan" data-lazy-src="https://kirelos.com/wp-content/uploads/2021/02/echo/bac68e03-5d26-49f5-ac76-10248e9e8348-150×150.jpg" height="112" src="data:image/svg xml,” width=”112″>
Rakhibul Hasan
This is Rakhibul Hasan CEO and Founder of Clipping Path Creative Inc.. We provide 100% handmade photo editing services to use Adobe Photoshop. Our services are Clipping path, Background removal, Color correction, Photo retouching, Car photo editing, drop shadow etc. Also we offer an image as a trial to judge our quality. So contact us and get instant reply.
")