Ansible playbooks are files that contain tasks that are run in order to configure the hosts with Ansible. Ansible playbooks are written in YAML format. YAML is a very simple file format just like JSON. I will show you how Ansible YAML playbooks look in a later section of this article.
Ansible Inventory files maintain a list of the hosts which you want to configure or manage with Ansible. You may group these hosts and manage them by groups, as well. You may also pass different variables for each host or for a group of hosts.
In this article, I will show you how to work with Ansible playbooks, variables, inventory files, and some common Ansible modules with practical examples. So, let us get started!
Prerequisites
If you would like to try out the examples in this article,
1) You must have Ansible installed on your computer.
2) You must have at least an Ubuntu/Debian host and a CentOS/RHEL 8 host configured for Ansible automation.
There are many articles on LinuxHint dedicated to Installing Ansible and configuring hosts for Ansible automation. You may check these articles out if needed for more information.
Creating a Project Directory
First, create a project directory ~/project/ with the following command:
$ mkdir -pv ~/project/playbooks
Navigate to the ~/project/ directory as follows:
Basic Inventory File:
Create an Ansible inventory file hosts in the project directory with the following command:
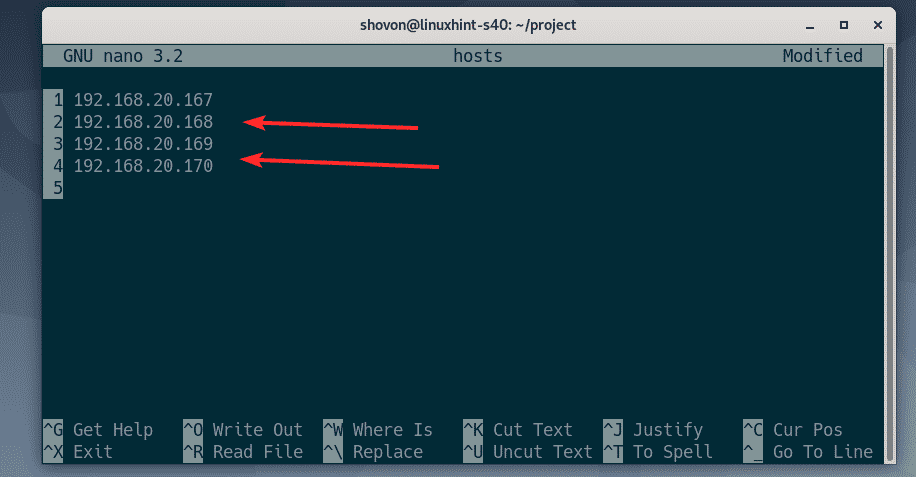
You can type the IP addresses of the hosts you wish to configure/automate using Ansible in the hosts inventory file.
192.168.20.167
192.168.20.168
192.168.20.169
192.168.20.170
Once you are finished with this step, save the file by pressing X followed by Y and .
If you wish to use DNS names instead of IP addresses in the inventory file, you may do this as well.
If you do not have a working DNS server, you may use the /etc/hosts file on your computer for local DNS resolution.
For local DNS resolution, open the /etc/hosts file with a text editor (nano, in my case) as follows:
Type in the IP addresses and your desired DNS names as follows:
192.168.20.167 vm1.nodekite.com
192.168.20.168 vm2.nodekite.com
192.168.20.169 vm3.nodekite.com
192.168.20.170 vm4.nodekite.com
Once you are finished with this step, press X followed by Y and .
Open the Ansible inventory file hosts as follows:
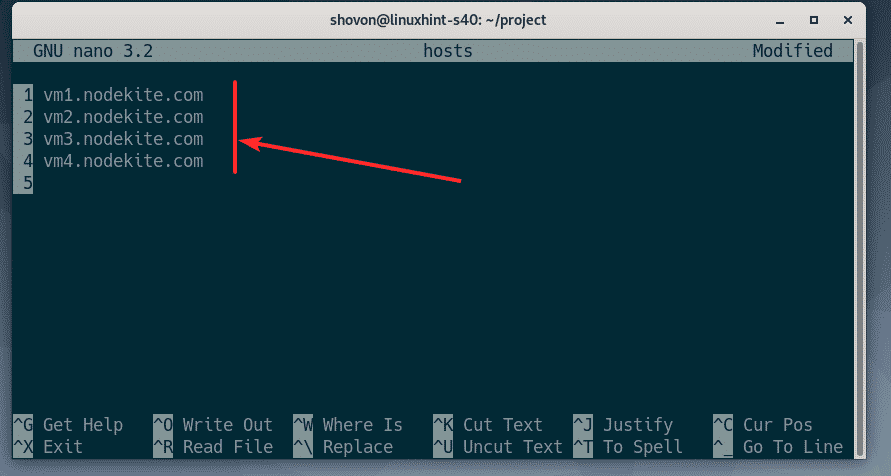
You may now type the DNS names of the hosts you want to configure/automate using Ansible in the hosts inventory file.
vm1.nodekite.com
vm2.nodekite.com
vm3.nodekite.com
vm4.nodekite.com
Once you are finished, save the hosts inventory file by pressing X followed by Y and .
Testing Connectivity to All Hosts
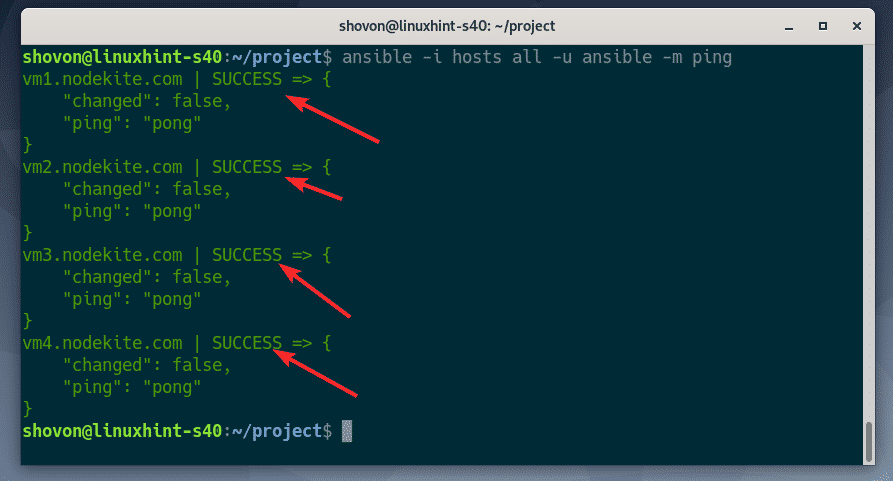
Now, you can try to ping all the hosts in the inventory file as follows:
$ ansible -i hosts all -u ansible -m ping
As you can see, all the hosts in the inventory file are reachable. So, we are ready to move on to the next section of this article.
Your First Ansible Playbook
Let us create a simple Ansible playbook ping_all_hosts.yaml in the playbooks/ directory. This action will ping all the hosts in the hosts inventory file, as before.
$ nano playbooks/ping_all_hosts.yaml
Type the following lines in the ping_all_hosts.yaml Ansible playbook file:
– hosts: all
user: ansible
tasks:
– name: Ping all hosts
ping:
Here,
hosts: all – selects all the hosts from the inventory file hosts.
user: ansible – tells Ansible to SSH into the hosts in the inventory file as the ansible user.
tasks – all the tasks that Ansible will execute in the hosts are listed here. Each of the tasks usually has a name and one or more module specific options.
The playbook ping_all_hosts.yaml has only one task, pinging all hosts in the inventory file hosts. The name of the task is Ping all hosts and it uses the ping module.
The ping module does not need any other options. So, I have left it empty (there is nothing after the colon, :)
Once you are finished with this step, save the file by pressing X followed by Y and .
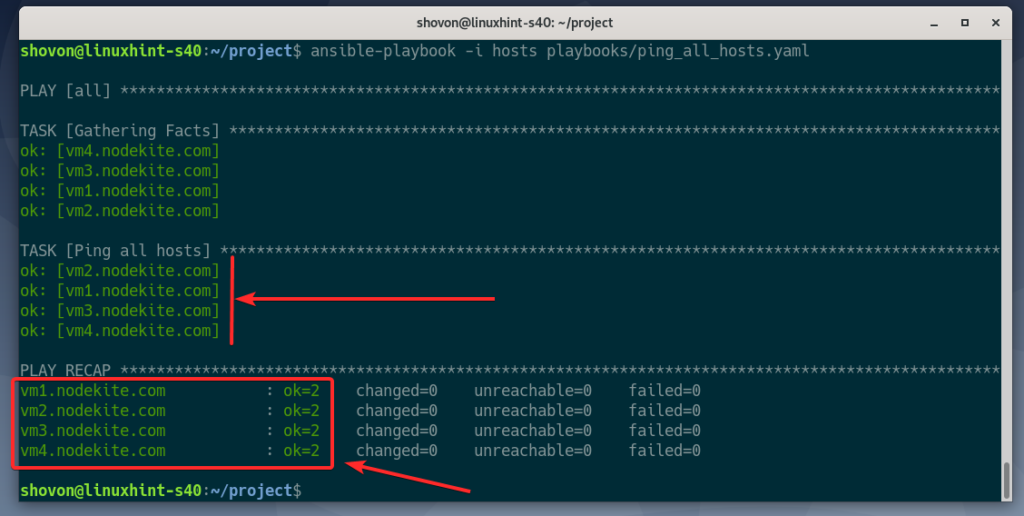
You may run the ping_all_hosts.yaml Ansible playbook as follows:
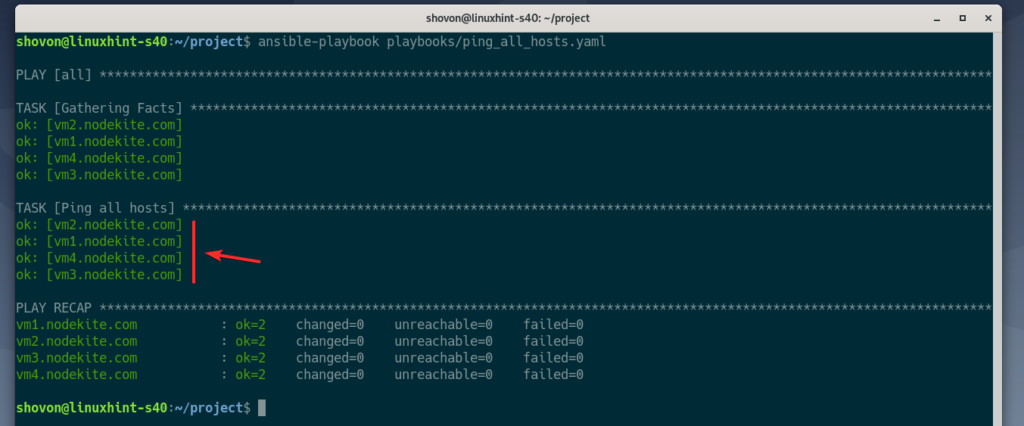
$ ansible-playbook -i hosts playbooks/ping_all_hosts.yaml
As you can see, the ping task is successful in all hosts in the inventory file.
Simple Ansible Configuration File
In the earlier example, you had to use the -i option to tell Ansible which inventory file to use. In my case, it’s the hosts inventory file.
$ ansible-playbook -i hosts playbooks/ping_all_hosts.yaml
If you do not wish to pass an inventory file with the -i option every time you run an Ansible playbook, all you have to do is to set a default inventory file for your project.
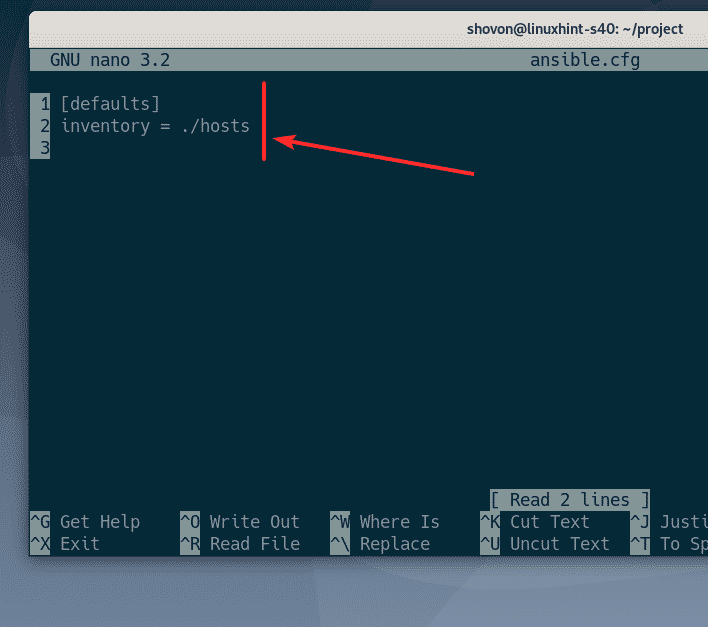
To do that, create a new Ansible configuration file ansible.cfg in your project root as follows:
Type the following lines in the ansible.cfg file:
[defaults]
inventory = ./hosts
Once you are finished, save the file by pressing X followed by Y and .
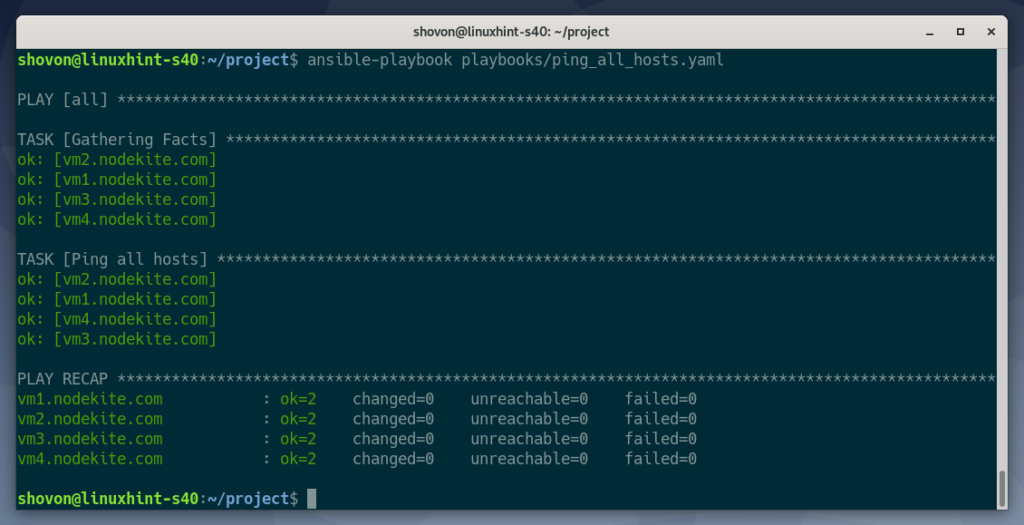
You may run the same Ansible playbook as follows:
$ ansible-playbook playbooks/ping_all_hosts.yaml
As you can see, the playbook is using the hosts inventory file by default. You may still use the -i option to specify a different inventory file, if you wish. Ansible is very flexible.
Grouping Hosts in the Inventory File
So far, I have shown you how to run a set of tasks (playbook) in all hosts in the inventory file. But what if you want to run a set of tasks in some of the hosts and another set of tasks in other hosts? You can group the hosts in the inventory file and run different tasks on the host groups.
In this section, I will show you how to group hosts in the inventory file and how to work with host groups.
First, open the inventory file hosts as follows:
Type the following lines in the hosts inventory file:
[debian10]
vm1.nodekite.com
vm2.nodekite.com
[centos8]
vm3.nodekite.com
vm4.nodekite.com
Here, I have created two host groups: debian10 and centos8.
In the debian10 group, I have two hosts: vm1.nodekite.com and vm2.nodekite.com
In the centos8 group, I have two hosts: vm3.nodekite.com and vm4.nodekite.com
Once you are finished, save the file by pressing X followed by Y and .
We will now create a new playbook ping_debian10_hosts.yaml, which will ping hosts as before, but only the hosts in the debian10 host group.
Create a playbook ping_debian10_hosts.yaml in the playbooks/ directory as follows:
$ nano playbooks/ping_debian10_hosts.yaml
Type the following lines in the ping_debian10_hosts.yaml Ansible playbook:
– hosts: debian10
user: ansible
tasks:
– name: Ping all Debian 10 hosts
ping:
Instead of hosts: all, I have added hosts: debian10 here. debian10 is the host group. This playbook will run only on the hosts in the debian10 host group.
Once you are finished, save the file by pressing X followed by Y and .
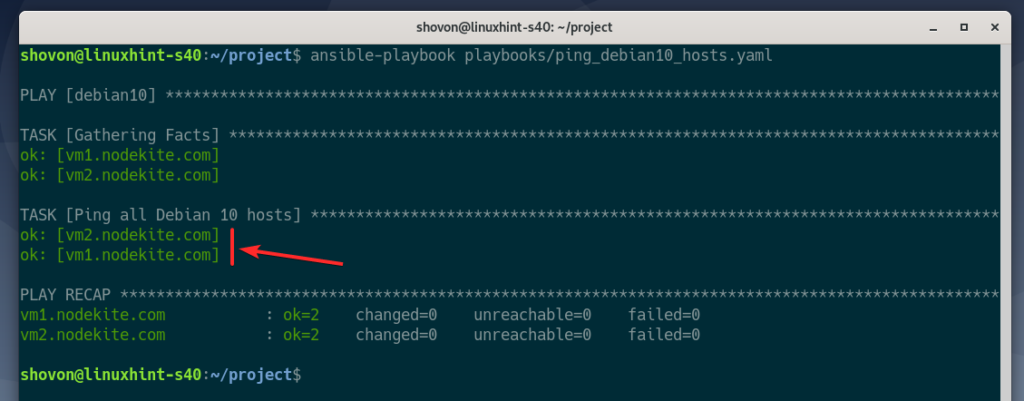
Run the playbook as follows:
$ ansible-playbook playbooks/ping_debian10_hosts.yaml
As you can see, only the hosts in the debian10 host group are pinged.
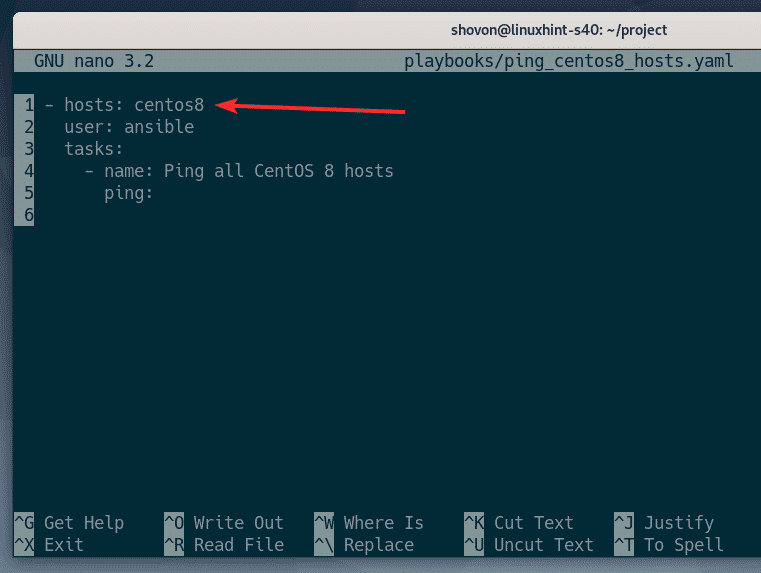
Using the same method, create another playbook ping_centos8_hosts.yaml as follows:
$ nano playbooks/ping_centos8_hosts.yaml
Type the following lines in the ping_centos8_hosts.yaml Ansible playbook:
– hosts: centos8
user: ansible
tasks:
– name: Ping all CentOS 8 hosts
ping:
The same way, I have added hosts: centos8 here. centos8 is the host group. This playbook will run only on the hosts in the centos8 host group.
Once you are finished, save the file by pressing X followed by Y and .
Run the playbook as follows:
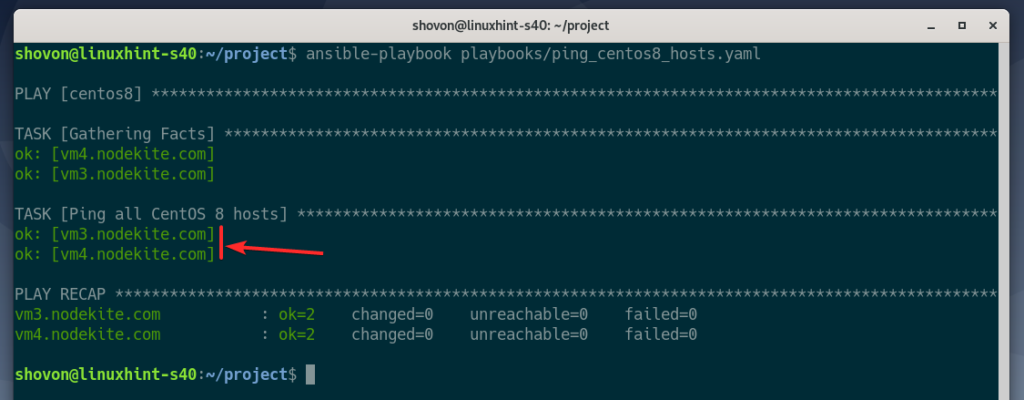
$ ansible-playbook playbooks/ping_centos8_hosts.yaml
As you can see, only the hosts in the centos8 host group are pinged.
Ansible Variable Types
There are different types of variables in Ansible. The main variable types are Ansible Facts variables and User-defined variables.
Ansible Facts variables: Depending on the host Ansible is working on, Ansible generates Ansible facts variables. Ansible facts variables contains information about the host, such as IP addresses, hostname, domain name, date, time, shell environment variables, and more.
User-defined variables: These are custom variables defined by the user. You may pass user-defined variables from the command line, or using the inventory file.
Mainly user-defined variables are of two types: Group variables and Host variables.
Ansible Variable Precedence
The variable precedence of Ansible is: Command Line Variables > Host Variables > Group Variables
If you set the same variable as the host variable and group variable, the host variable will be applied.
Similarly, the variables you set from the command line while running a playbook will replace both the host and group variables.
Working with Ansible Facts Variables
In this section, I will show you how to work with Ansible facts variables. So, let us get started!
You may list all the Ansible Facts variable of the hosts in your hosts inventory file as follows:
$ ansible all -u ansible -m setup
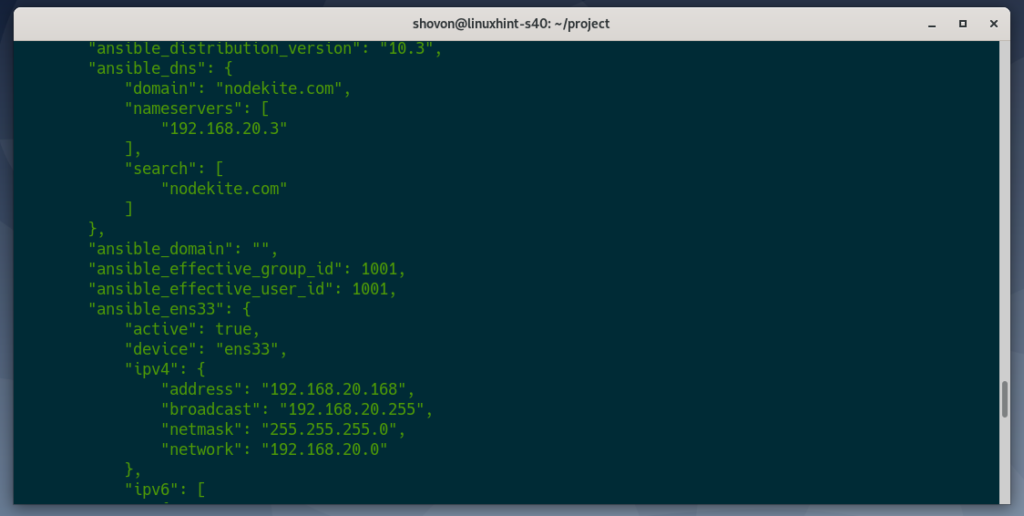
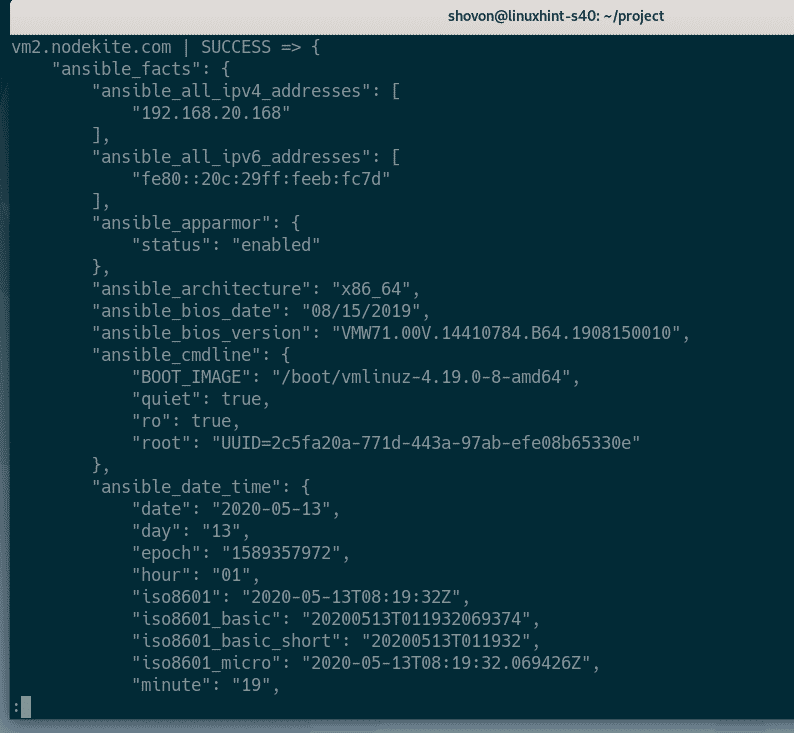
As you can see, all the Ansible Facts variables are listed in JSON format. It is a very long list.
As the list is quite long, you may open it with a pager program such as less as follows:
$ ansible all -u ansible -m setup | less
Now, you may scroll the output up, down, left, and right as required.
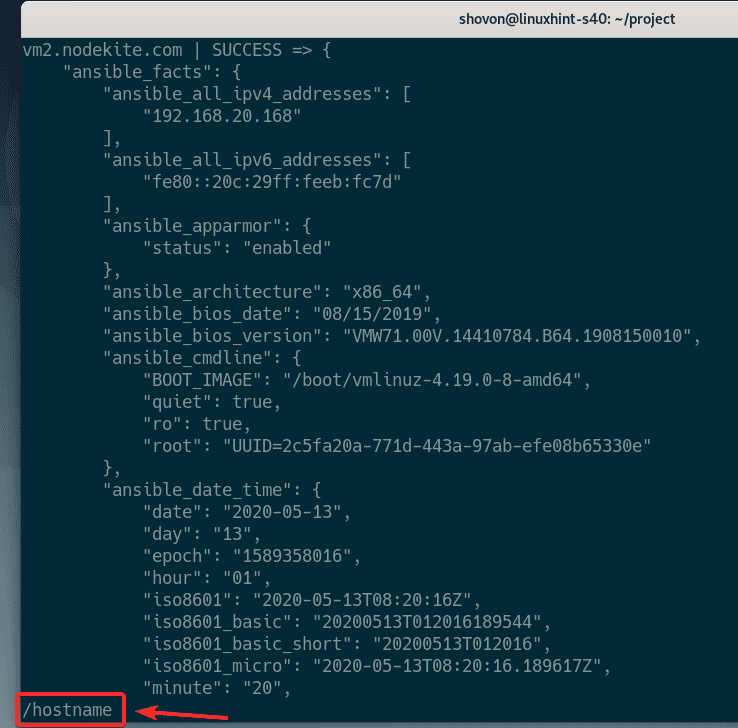
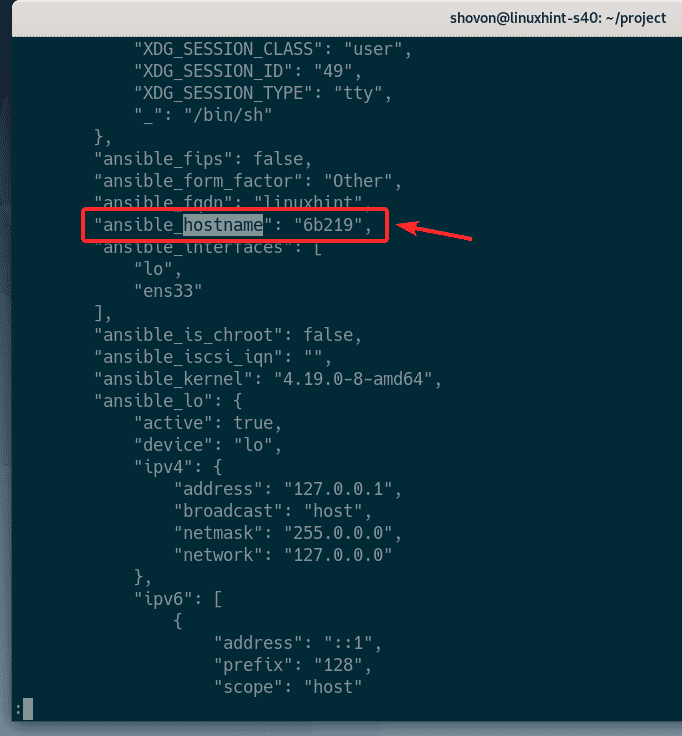
You may also search for variable names from the pager. To do that, press the / key on your keyboard. Then, type in the search string (hostname in my case) and press .
As you can see, the Ansible facts variable that matched the search string is ansible_hostname. You may press N to go to the next match and P to go to the previous match from the pager. This is how you find the Ansible facts variable that you need for your Ansible project.
Let us now see how to access the Ansible facts variables.
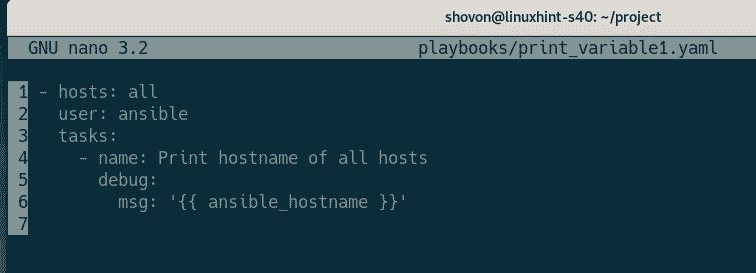
Create a new playbook print_variable1.yaml as follows:
$ nano playbooks/print_variable1.yaml
Type the following lines in the print_variable1.yaml file:
– hosts: all
user: ansible
tasks:
– name: Print hostname of all hosts
debug:
msg: ‘{{ ansible_hostname }}’
Here, I have added one task Print hostname of all hosts. This task uses the Ansible debug module to print a message when the playbook runs.
msg is the only required parameter of the debug module. The msg parameter accepts a string in quotes, which is the message that will be printed on the console.
Here, {{ variable_name }} format is used to access a variable. In this case, {{ ansible_hostname }} is used to print the ansible_hostname variable of each of the hosts in the inventory file.
Once you are finished, save the file by pressing X followed by Y and .
You may also access the Ansible facts variable as ansible_facts[“variable_name”]. So, the ansible_hostname variable will become ansible_facts[“hostname”].
We can re-write the print_variable1.yaml playbook like this as well. We will get the same output.
– hosts: all
user: ansible
tasks:
– name: Print hostname of all hosts
debug:
msg: ‘{{ ansible_facts[“variable_name”] }}’
Run the playbook print_variable1.yaml as follows:
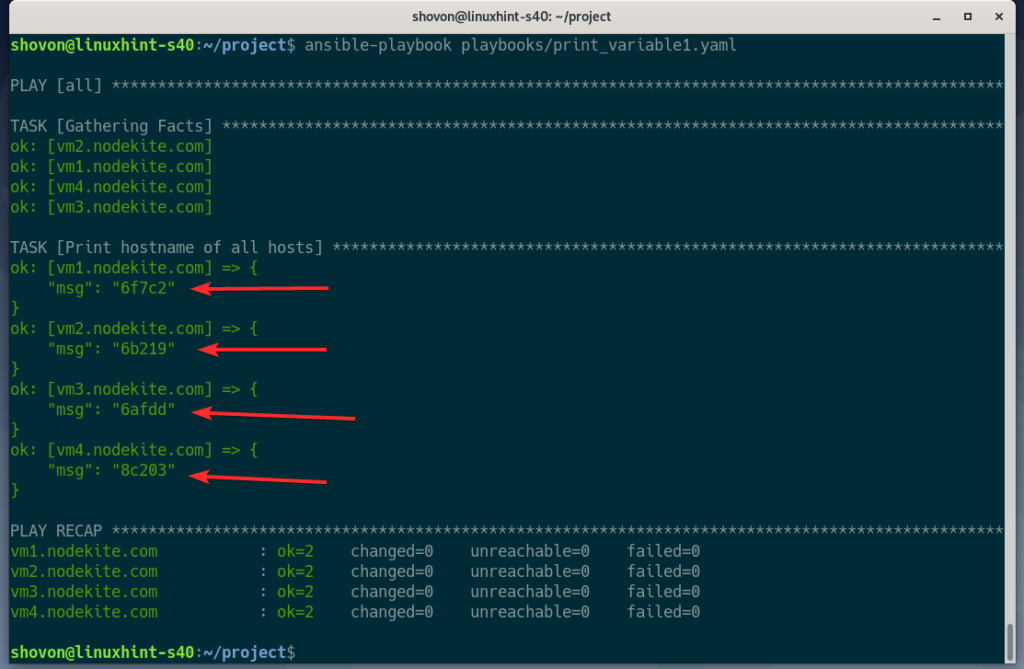
$ ansible-playbook playbooks/print_variable1.yaml
As you can see, the hostname of each of the hosts in the inventory file is printed on the console.
Let us now print the default IPv4 address of each hosts along with the hostname. As you can see, the default IPv4 address of the host can be accessed using the address property of the ansible_default_ipv4 object.
Create a new playbook print_variable2.yaml as follows:
$ nano playbooks/print_variable2.yaml
Type the following lines in the print_variable2.yaml file:
– hosts: all
user: ansible
tasks:
– name: Print hostname of all hosts
debug:
msg: ‘{{ ansible_hostname }} – {{ ansible_default_ipv4.address }}’
This playbook is the same as before. The only difference is the new variable {{ ansible_default_ipv4.address }} in the msg option of the debug module.
Once you are finished, save the file by pressing X followed by Y and .
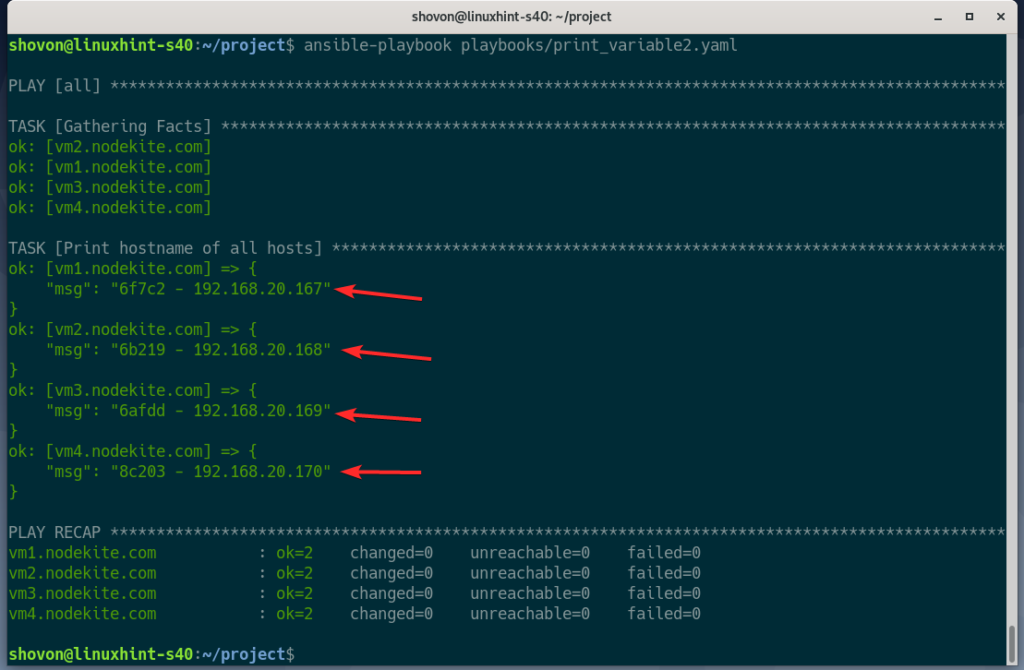
Run the print_variable2.yaml playbook as follows:
$ ansible-playbook playbooks/print_variable2.yaml
As you can see, the default IPv4 address and the hostname of the hosts are printed on the console.
So, this is how you work with Ansible Facts variables.
Setting User-defined Variables from the Command Line:
In this section, I will show you how to set user-defined variables from the command line while running Ansible playbooks.
First, create a new playbook print_variable3.yaml as follows:
$ nano playbooks/print_variable3.yaml
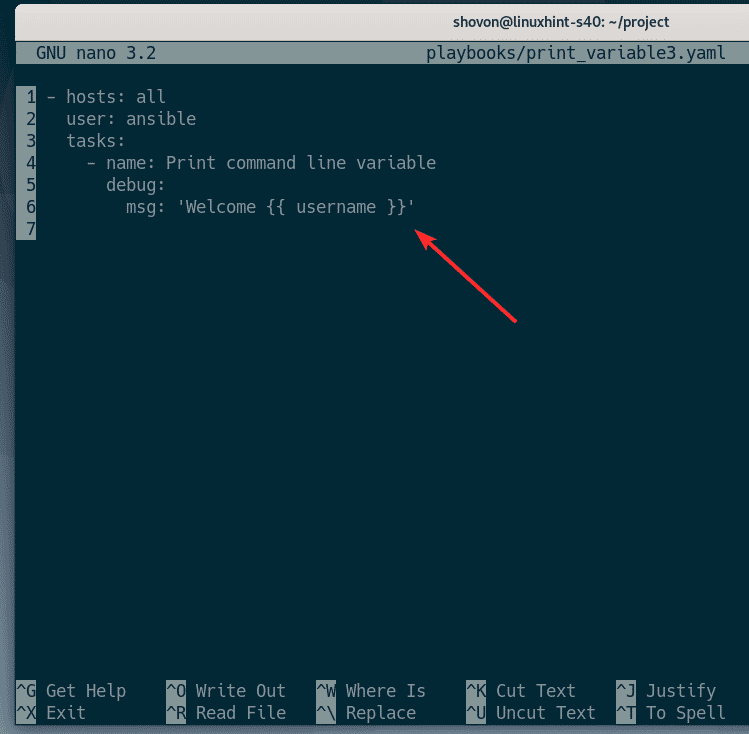
Type the following lines in the print_variable3.yaml file:
– hosts: all
user: ansible
tasks:
– name: Print command line variable
debug:
msg: ‘Welcome {{ username }}’
Here, I have used the debug module to print the message Welcome {{ username }}. username is a variable which will be substituted when we run the playbook.
Once you are finished, save the file by pressing X followed by Y and .
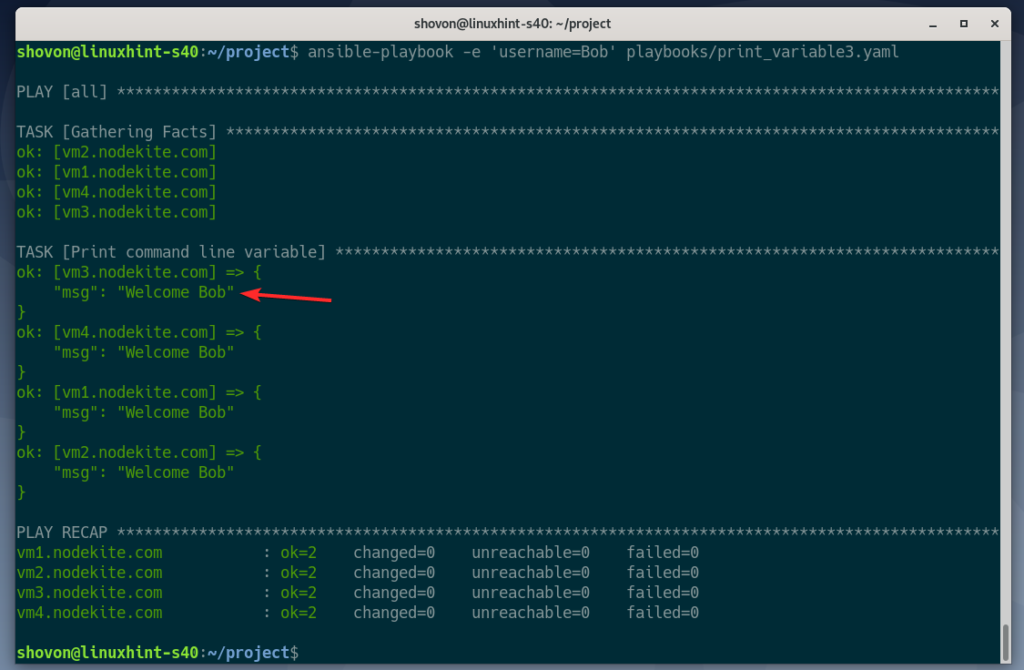
Run the playbook print_variable3.yaml as follows:
$ ansible-playbook -e ‘username=Bob’ playbooks/print_variable3.yaml
NOTE: Here, -e option is used to pass a username variable with the value Bob to the playbook print_variable3.yaml from the command line.
As you can see, the message Welcome Bob is printed on the console.
Let us now discover how to pass multiple variables from the command line.
Create a new playbook print_variable4.yaml as follows:
$ nano playbooks/print_variable4.yaml
Type the following lines in the print_variable4.yaml file:
– hosts: all
user: ansible
tasks:
– name: Print user defined variables
debug:
msg: ‘username={{ username }} http_port={{ http_port }}’
The playbook should be very familiar to you right now. All it does is to print the 2 variables username and http_port on the console.
Once you are finished, save the file by pressing X followed by Y and .
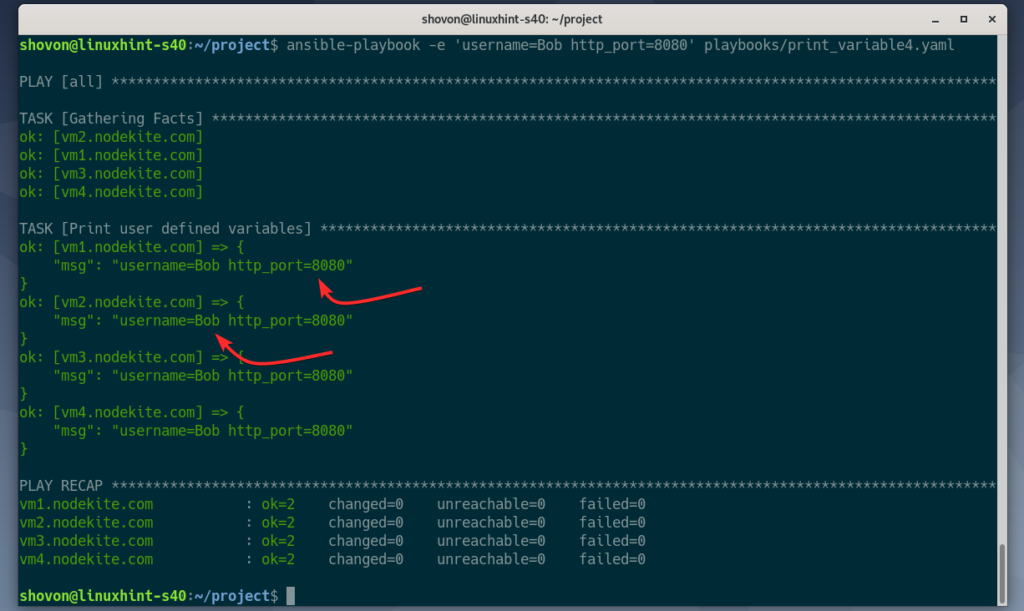
You may now pass the username and http_port variable to the playbook using two different -e option as follows:
$ ansible-playbook -e ‘username=Bob’ -e ‘http_port=8080’
playbooks/print_variable4.yaml
Or, you may simply separate the variables with a whitespace, as follows:
$ ansible-playbook -e ‘username=Bob http_port=8080’
playbooks/print_variable4.yaml
As you can see, the username and http_port variables are printed on the console.
Working with User-Defined Group Variables
Say, you want to add some variables to a group of hosts. This action is very easy to do in Ansible.
First, open your hosts inventory file as follows:
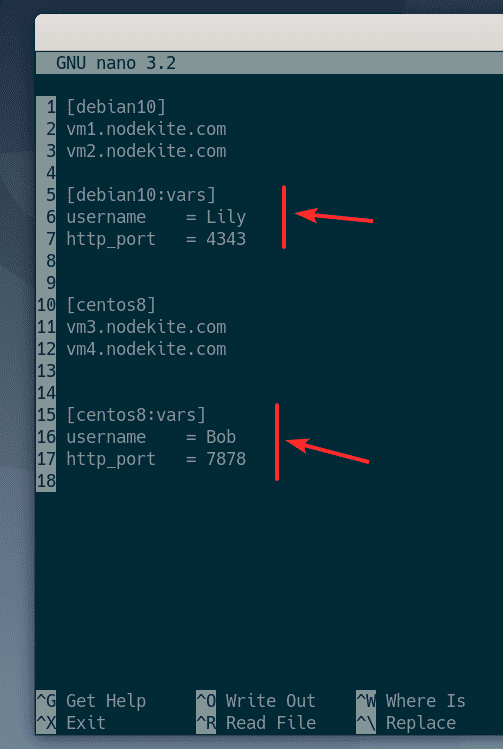
Type the following lines in your hosts inventory file:
[debian10]
vm1.nodekite.com
vm2.nodekite.com
[debian10:vars]
username = Lily
http_port = 4343
[centos8]
vm3.nodekite.com
vm4.nodekite.com
[centos8:vars]
username = Bob
http_port = 7878
As you can see, I have created a new section [debian10:vars] for debian10 host group and added the variables (username and http_port) for debian10 host group there.
The same way, I have created a new section [centos8:vars] for centos8 host group and added the variables (username and http_port) for centos8 host group there.
Once you are finished, save the hosts inventory file by pressing X followed by Y and .
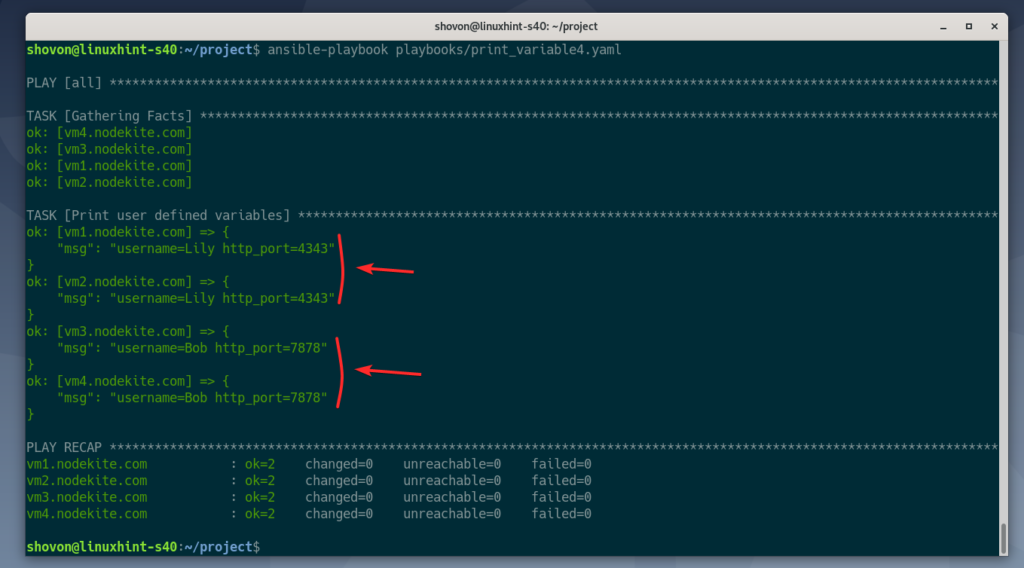
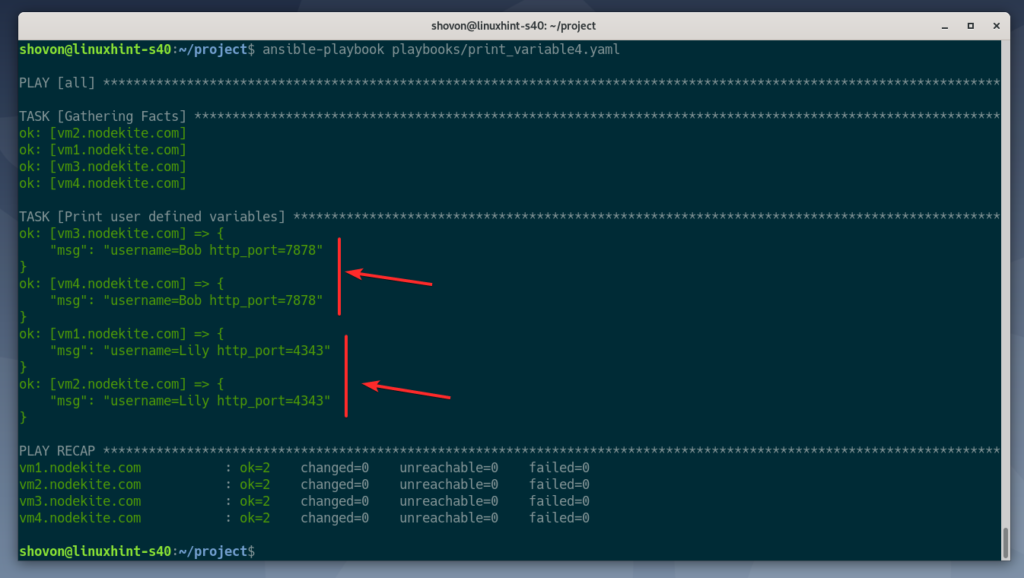
Run the print_variable4.yaml playbooks as follows:
$ ansible-playbook playbooks/print_variable4.yaml
As you can see, the correct variables are passed to each of the hosts depending on their host group.
Working with User-Defined Host Variables
In this section, I will show you how to set variables for specific hosts in the inventory file.
First, open the hosts inventory file as follows:
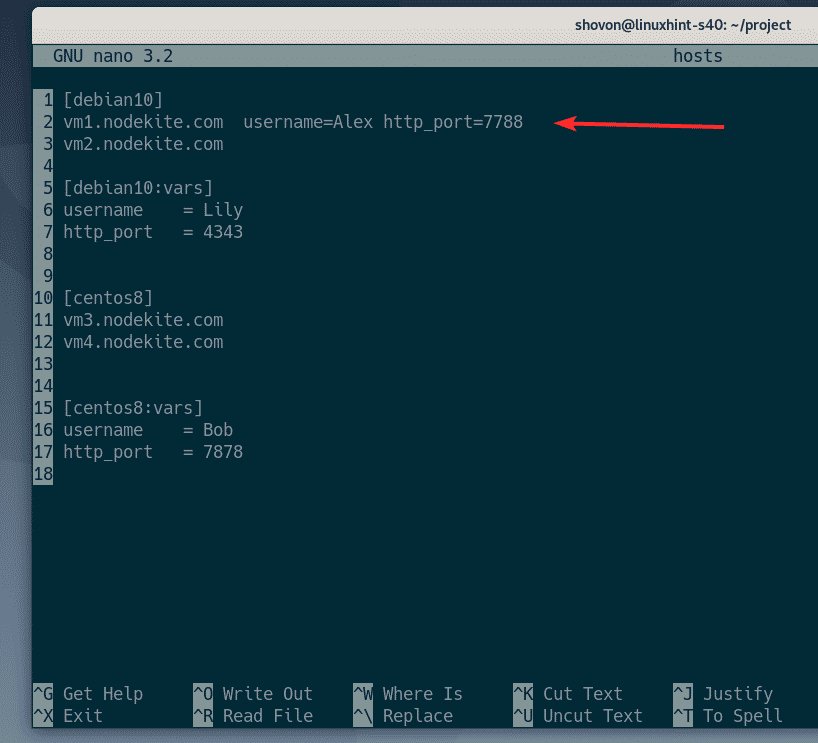
To add variables to a specific host (say, vm1.nodekite.com), just add a space/tab after the host IP/DNS name and type in your variables, as shown in the screenshot below.
You may add multiple variables, as well. Simply separate each variables with a space.
Once you are finished, save the inventory file by pressing X followed by Y and .
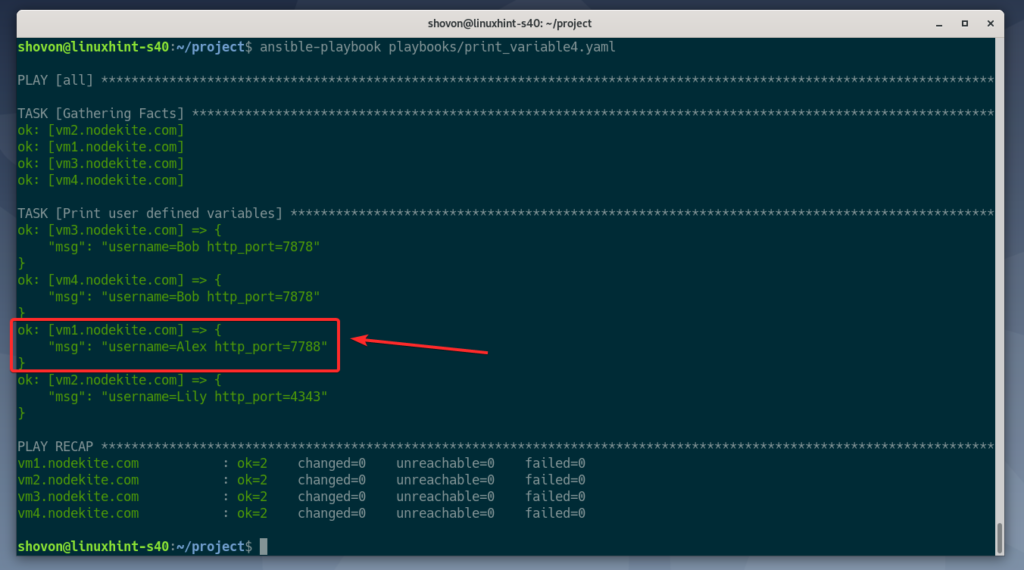
Run the print_variable4.yaml playbooks as follows:
$ ansible-playbook playbooks/print_variable4.yaml
As you can see, the variables are only set for the vm1.nodekite.com host. The other hosts has group variables applied to them.
Generating Inventory Files Quickly with Ranges
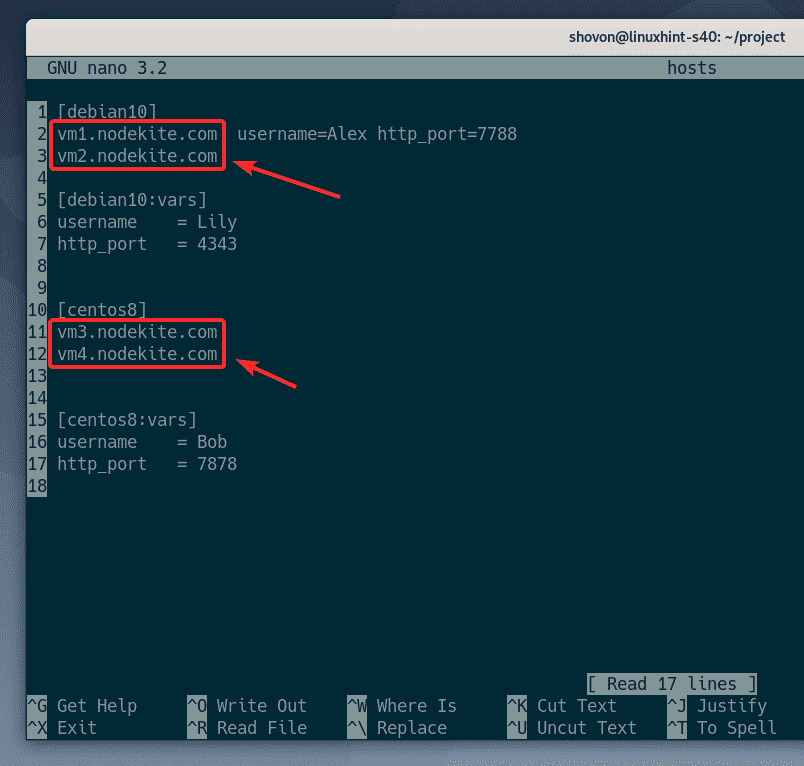
You may use ranges to quickly generate Ansible inventory files if your host IP addresses or DNS names are consistent (i.e., have a specific format).
In the earlier examples, I have used the hosts vm1.nodekite.com, vm2.nodekite.com, vm3.nodekite.com and vm4.nodekite.com. Instead of typing in 4 lines, I could have just typed vm[1:4].nodekite.com in the inventory file.
For experimenting with ranges, open the hosts inventory file as follows:
Remove all the hosts and variables from the inventory files.
We may now replace vm1.nodekite.com and vm2.nodekite.com with vm[1:2].nodekite.com for debian10 host group as follows.
The same way, we can replace vm3.nodekite.com and vm4.nodekite.com with vm[3:4].nodekite.com for centos8 host group.
Once you are finished, save the file by pressing X followed by Y and .
Run the ping_all_hosts.yaml as follows:
$ ansible-playbook playbooks/ping_all_hosts.yaml
As you can see, the host ranges were expanded when I ran the playbook.
Storing Variables in Different Files
Storing the group variables and host variables in the same inventory file is very easy. But, you may be looking for more flexibility. Especially when you want to use ranges in your inventory file as you can no longer set host variables if you use ranges. Well, you may store group variables and host variables in different files. In this section, I will show you how it’s done.
By default, Ansible looks for group variables in the group_vars/ directory and host variables in the host_vars/ directory.
So, create the group_vars/ and host_vars/ directory as follows:
$ mkdir -pv {host,group}_vars
To set group variables for the debian10 host group, create a file debian10 (same as group name) in the group_vars/ directory as follows:
$ nano group_vars/debian10
Type in your variables as follows:
username: Lily
http_port: 4343
Once you are finished, save the file by pressing X followed by Y and .
The same way, to set group variables for the centos8 host group, create a file centos8 (same as group name) in the group_vars/ directory as follows:
$ nano group_vars/centos8
Type in your variables as follows:
username: Bob
http_port: 7878
Once you are finished, save the file by pressing X followed by Y and .
Run the print_variable4.yaml playbook as follows:
$ ansible-playbook playbooks/print_variable4.yaml
As you can see, the group variables are correctly set for each host groups.
To set host variables for the host vm1.nodekite.com, create a file vm1.nodekite.com (same as the host name or IP address) in the host_vars/ directory as follows:
Type in your host variables as follows:
username: Alex
http_port: 7788
Once you are finished, save the file by pressing X followed by Y and .
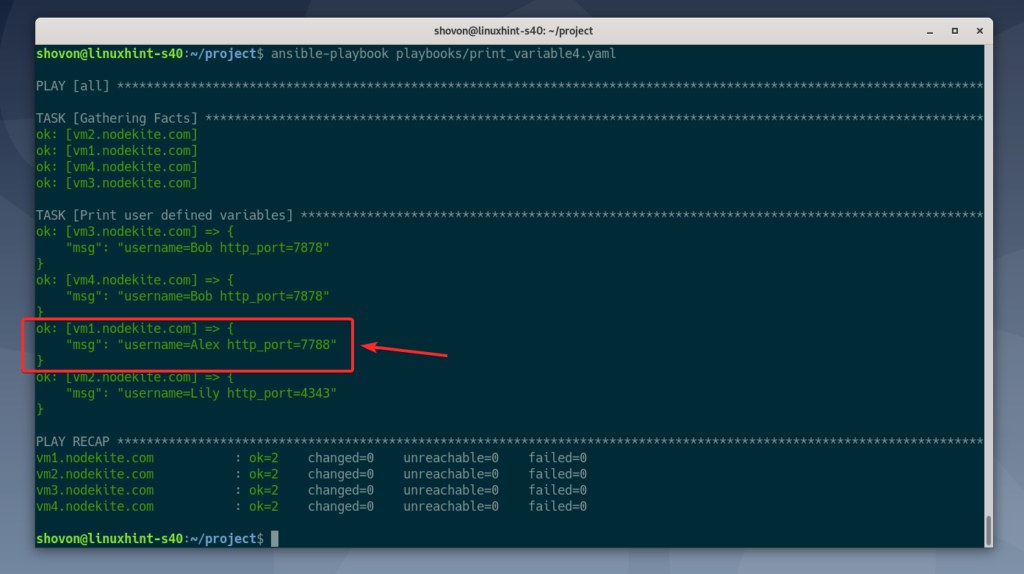
Run the print_variable4.yaml playbook as follows:
$ ansible-playbook playbooks/print_variable4.yaml
[
As you can see, the host variables are correctly set for the host vm1.nodekite.com.
Working with Loops in Ansible
In this section, I will show you how to use loops in Ansible.
First, create a new playbook loop1.yaml in the playbooks/ directory as follows:
$ nano playbooks/loop1.yaml
Type the following lines in the loop1.yaml playbook:
– hosts: all
user: ansible
tasks:
– name: Print User list
debug:
msg: ‘User: {{ item }}’
with_items:
– Alex
– Bob
– Lily
Here, I have 1 task which prints a list of users using loop.
To set the iteration values for the task, you use the with_items module. Then, you add the values one by one.
with_items:
– Alex
– Bob
– Lily
You access the value of the current iteration using the item variable.
debug:
msg: ‘User: {{ item }}’
Once you are finished, save the file by pressing X followed by Y and .
Run the loop1.yaml playbook as follows:
$ ansible-playbook playbooks/loop1.yaml
As you can see, the same task ran for each item on each host. So, the loop is working.
Working with Conditions in Ansible
If you wish to run tasks based on certain conditions, then this section is for you.
To run tasks based on condition, you may use the when module of Ansible. Let us see an example of this module. First, create a new playbook condition1.yaml as follows:
$ nano playbooks/condition1.yaml
Type the following lines in the condition1.yaml playbook:
– hosts: all
user: ansible
tasks:
– name: Run this task only on Debian
debug:
msg: ‘this task is running on Debian’
when: ansible_facts[‘distribution’] == ‘Debian’
Here,
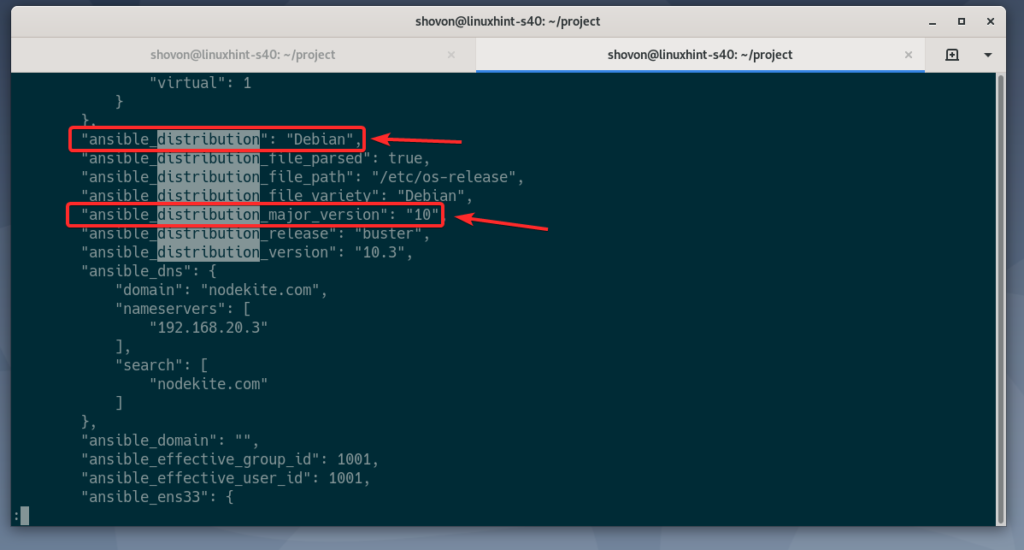
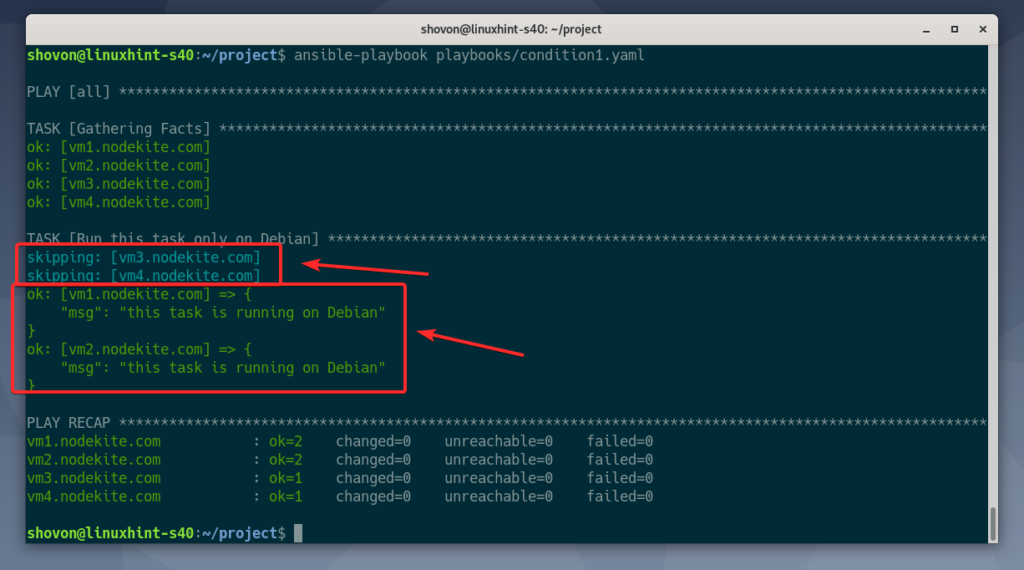
ansible_facts[‘distribution’] == ‘Debian’ is used to check whether the distribution is Debian. The task will run only if the distribution is Debian.
The ansible_facts[‘distribution’] is used to access the Ansible Facts variable ansible_distribution. You may also check for distribution version using the ansible_distribution_major_version variable.
Once you are finished, save the file by pressing X followed by Y and .
Run the condition1.yaml playbook as follows:
$ ansible-playbook playbooks/condition1.yaml
As you can see, the task ran only on the Debian hosts. The task did not run on the CentOS hosts.
You may also check for multiple conditions at the same time and run the task only if all the conditions are true. Let us see an example.
Create a new playbook condition2.yaml as follows:
$ nano playbooks/condition2.yaml
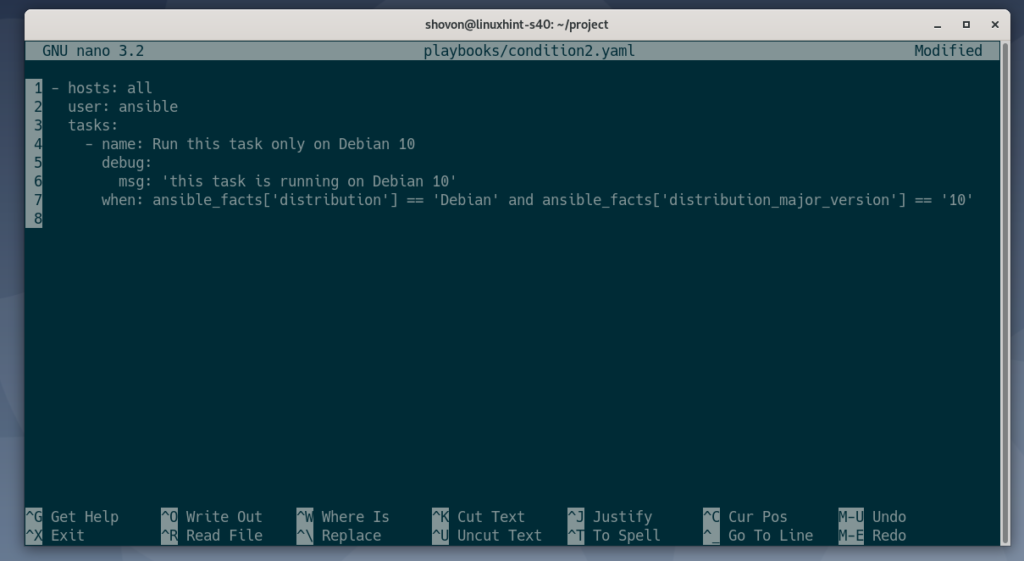
Type the following lines in the condition2.yaml file:
– hosts: all
user: ansible
tasks:
– name: Run this task only on Debian 10
debug:
msg: ‘this task is running on Debian 10’
when: ansible_facts[‘distribution’] == ‘Debian’
and ansible_facts[‘distribution_major_version’] == ’10’
Here, the task will only run if the distribution is Debian (ansible_facts[‘distribution’] == ‘Debian’) and the version is 10 (ansible_facts[‘distribution_major_version’] == ’10’). If both the conditions are true, then the task will run. Othewise, the task will not run.
I have used the and keyword to check if both the conditions are true here. If you want to check whether any of the condition is true, then you may use the or keyword instead.
Once you are finished, save the file by pressing X followed by Y and .
Run the playbook condition2.yaml as follows:
$ ansible-playbook playbooks/condition2.yaml
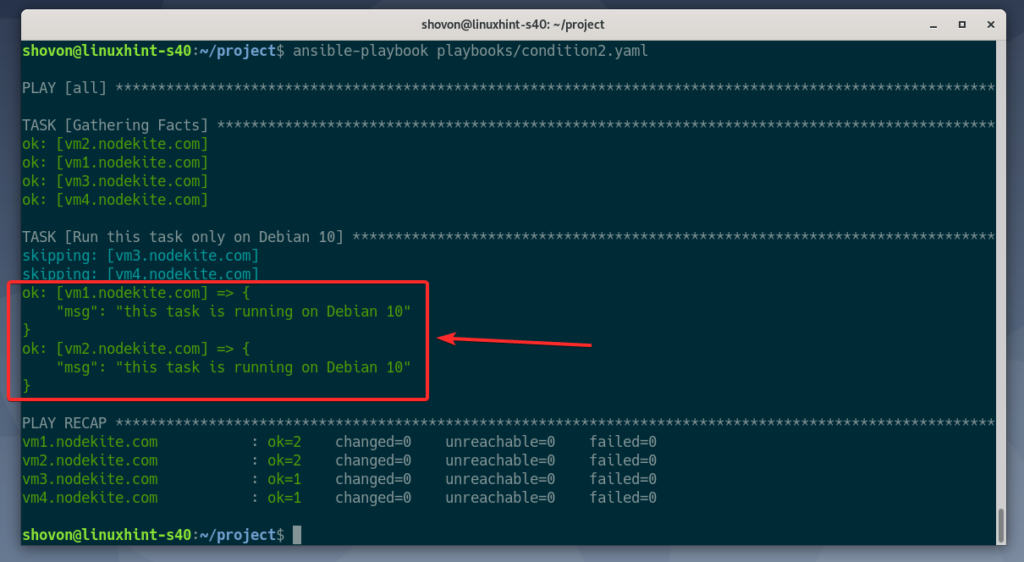
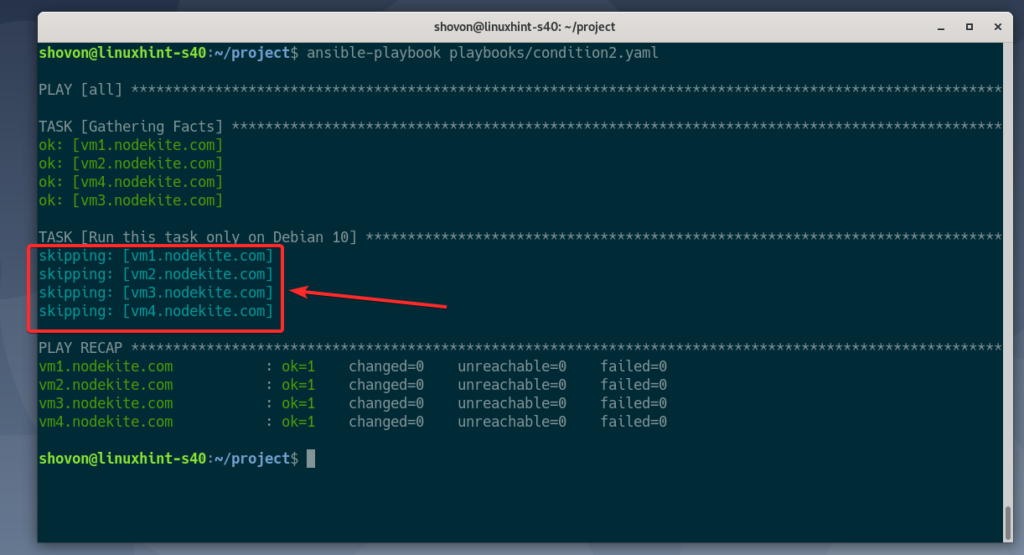
As you can see, the task ran only on the Debian 10 hosts.
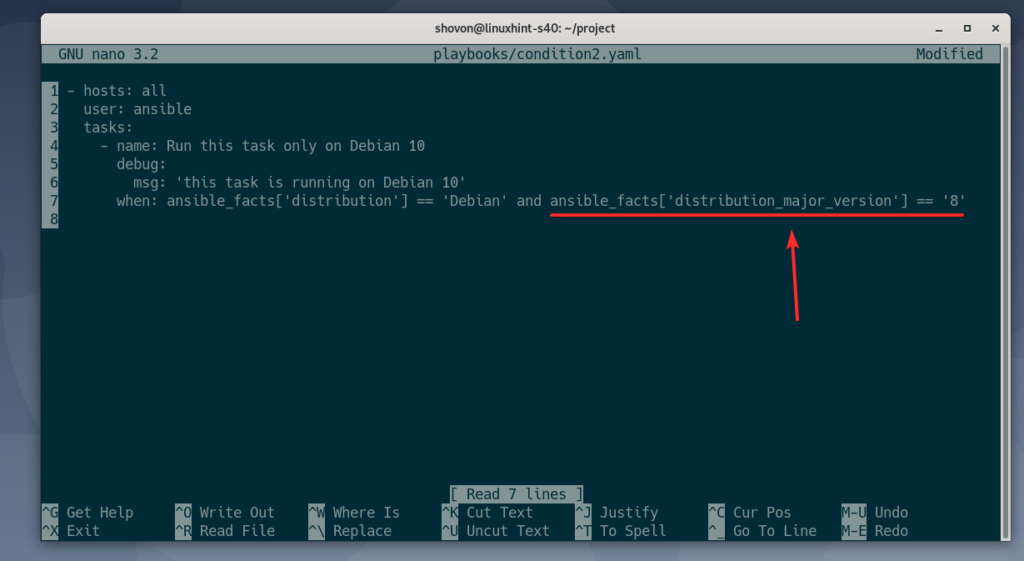
Let us change the playbook condition2.yaml to run the task only on Debian 8 hosts as follows.
As you can see, all the hosts were skipped as I do not have any Debian 8 hosts in the inventory file.
Working with Ansible apt Module
The apt module of Ansible is used to install a specific software package on Ubuntu/Debian hosts. Let us see how to use this module.
First, create a new playbook apt1.yaml in the playbooks/ directory as follows:
$ nano playbooks/apt1.yaml
Type the following lines in the apt1.yaml playbook:
– hosts: debian10
user: ansible
become: True
tasks:
– name: Install apache2
apt:
name: apache2
state: latest
The apt module requires only the name of the package that you wish to install/upgrade/remove and the state of the package.
Here, I am trying to install the apache2 package (name: apache2) on my Debian 10 hosts. As I am trying to install a package and also upgrade it if a new version is available, the state should be latest.
state also accepts the following options:
– absent – The package will be removed if already installed.
– latest – The package will be upgraded if an update is available. If the package is not already installed, it will be installed.
– present – The package will be installed if not already installed. But the package will not be upgraded if an update is available.
Notice that I have added become: True in the playbook. This will give the ansible user sudo privileges for modifying the filesystem structure (i.e. install/upgrade/remove packages). Without become: True, the apt module will not be able to install the apache2 package.
Once you are finished, save the playbook by pressing X followed by Y and .
Run the apt1.yaml playbook as follows:
$ ansible-playbook playbooks/apt1.yaml
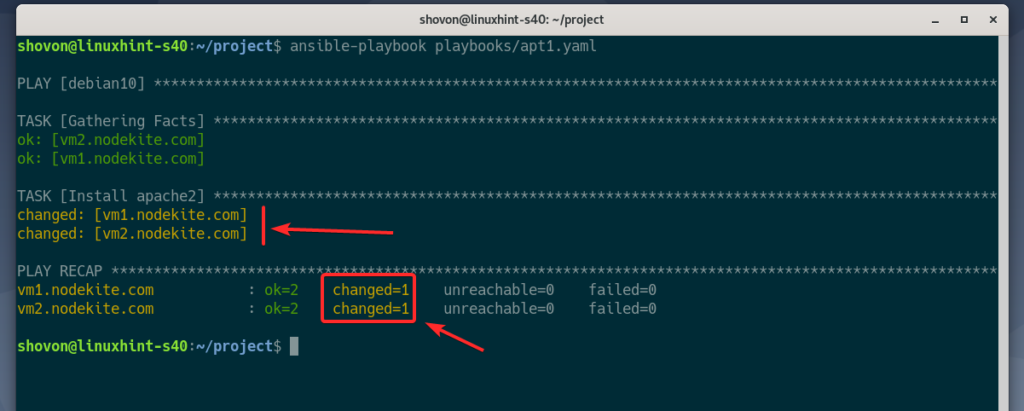
As you can see, the playbook successfully ran on the Debian 10 hosts.
As you can see, the apache2 package is installed on my Debian 10 hosts.
Working with Ansible dnf/yum Module
The dnf and yum module of Ansible is used to install a specific software package on CentOS/RHEL hosts. You may use this module the same way you did the apt module in the earlier section of this article.
Both the dnf and yum modules accept the same parameters. You may use the dnf module on CentOS/RHEL 8 hosts, and yum on CentOS/RHEL 7 or older.
Let us now look at an example of this module.
First, create a new playbook dnf1.yaml in the playbooks/ directory as follows:
$ nano playbooks/dnf1.yaml
Type the following lines in the dnf1.yaml playbook:
– hosts: centos8
user: ansible
become: True
tasks:
– name: Install httpd package
dnf:
name: httpd
state: latest
The dnf and yum module requires only the name of the package which you want to install/upgrade/remove and the state of the package.
Here, I am trying to install the httpd package (name: httpd) on my CentOS 8 hosts. As I am trying to install a package, and I would also like to upgrade it if a new version is available, the state should be latest.
state accepts the following options:
– absent – The package will be removed if already installed.
– latest – The package will be upgraded if an update is available. If the package is not already installed, it will be installed.
– present – The package will be installed if not already installed. But the package will not be upgraded if an update is available.
Notice that I have added become: True in the playbook. This gives the ansible user sudo privileges for modifying the filesystem structure (i.e. install/upgrade/remove packages). Without become: True, the apt module will not be able to install the httpd package.
Once you are finished, save the playbook by pressing X followed by Y and .
Run the dnf1.yaml playbook as follows:
$ ansible-playbook playbooks/dnf1.yaml
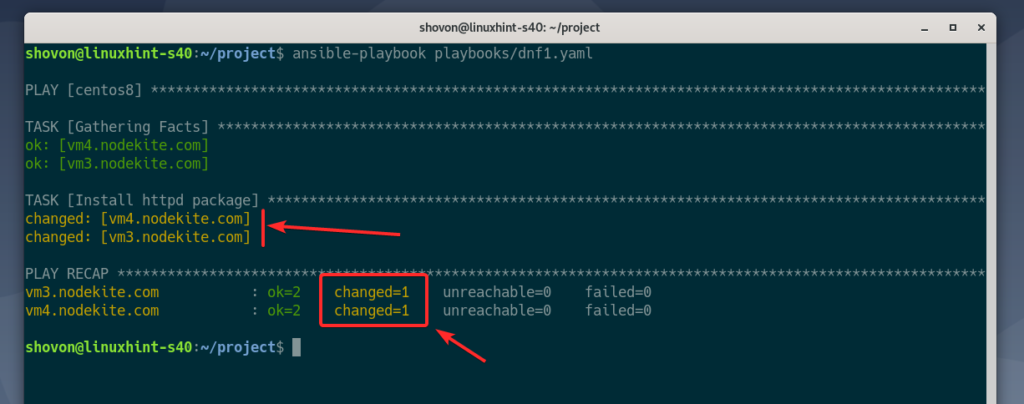
As you can see, the playbook successfully ran on the CentOS 8 host.
Working with Ansible service Module
The service module of Ansible is used to start, stop, restart, enable (add service to the startup), and disable (remove service from the startup) services in your hosts.
In earlier sections, I showed you how to install the Apache HTTP server package using the Ansible apt, dnf and yum modules. Let us now ensure that the Apache HTTP server service is running and has been added to the system startup.
I will work with my Debian 10 hosts. But, you may work with CentOS 8 hosts, if you wish. Simply adjust the playbook accordingly.
First, create a new Ansible playbook apt2.yaml as follows:
$ nano playbooks/apt2.yaml
Type the following lines in the apt2.yaml playbook:
– hosts: debian10
user: ansible
become: True
tasks:
– name: Install apache2
apt:
name: apache2
state: latest
– name: Start the apache2 service
service:
name: apache2
state: started
enabled: True
Here, I have added a new task, Start the apache2 service.
name: apache2 – the service I am working on is apache2.
state: started – the service must be running.
enabled: True – the service must be added to the system startup.
The state parameter accepts other values.
– reloaded – The service must reload the configuration files.
– restarted – The service must be restarted.
– started – The service must be running. If the service is not running, start the service.
– stopped – The service must be stopped. If the service is running, stop the service.
Run the playbook apt2.yaml as follows:
$ ansible-playbook playbooks/apt2.yaml
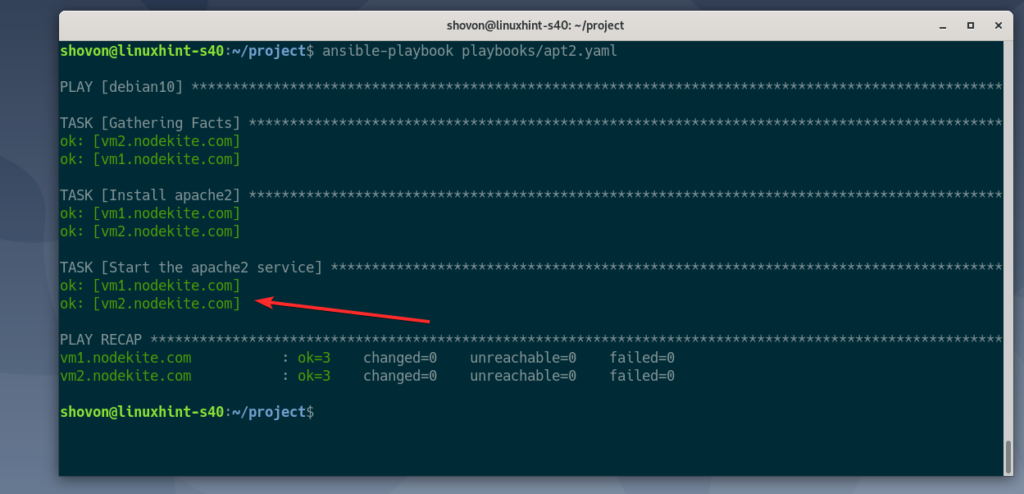
As you can see, the playbook ran successfully.
As you can see, the apache2 service is running on my Debian 10 hosts.
Working with Ansible copy Module
The Ansible copy module is mainly used to copy files from your computer to remote hosts.
In the earlier section, I installed the Apache 2 web server on my Debian 10 hosts. Let us now copy an index.html file to the webroot of the Debian 10 hosts.
First, create a new directory files/ as follows:
Create a new file index.html in the files/ directory as follows:
Type the following lines in the index.html file:
Once you are finished, save the file by pressing X followed by Y and .
Create a new Ansible playbook apt3.yaml as follows:
$ nano playbooks/apt3.yaml
Type the following lines in the apt3.yaml file:
– hosts: debian10
user: ansible
become: True
tasks:
– name: Install apache2
apt:
name: apache2
state: latest
– name: Copy index.html to server
copy:
src: ../files/index.html
dest: /var/www/html/index.html
mode: 0644
owner: www-data
group: www-data
– name: Start the apache2 service
service:
name: apache2
state: started
enabled: True
Here, the task Copy index.html to server copies the index.html from the files/ directory to the /var/www/html/ directory of the Debian 10 hosts.
src: ../files/index.html – The source file path.
dest: /var/www/html/index.html – The destination file path.
mode: 0644 – The permissions for the file user (6 – read and write), group (4 – read), and others (4 – read).
owner: www-data – Set the owner of the file to www-data.
group: www-data – Set the group of the file to www-data.
Once you are finished, save the file by pressing X followed by Y and .
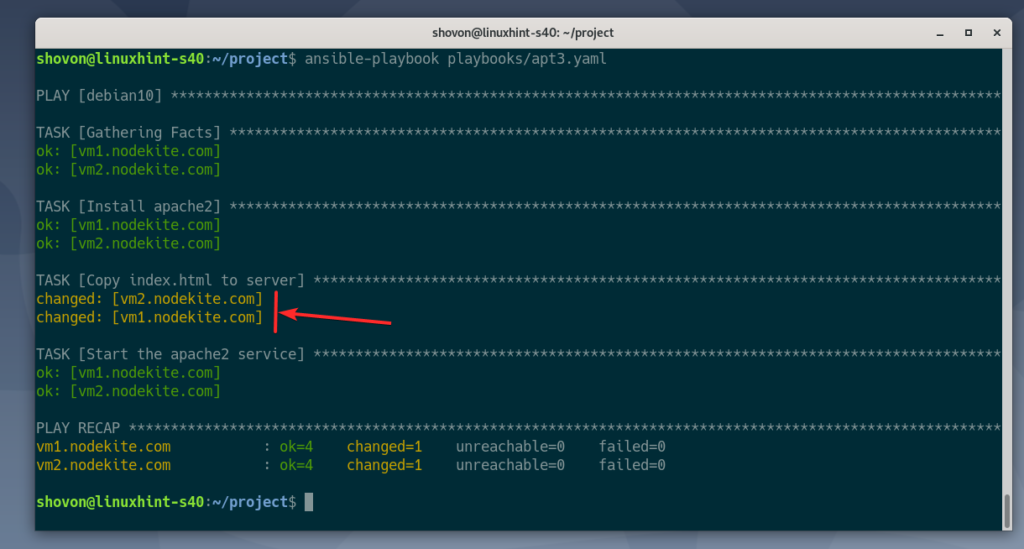
Run the apt3.yaml playbook as follows:
$ ansible-playbook playbooks/apt3.yaml
As you can see, the task Copy index.html to server is successful.
As you can see, the index.html file was copied to the Debian 10 hosts.
As you can see, the Debian 10 webserver serves the index.html page that I have just copied to the Debian 10 hosts.
So, these are the basics of Ansible. You may learn more about Ansible by reading the official documentation of Ansible. Thank you for reading this article.
About the author

Shahriar Shovon
Freelancer & Linux System Administrator. Also loves Web API development with Node.js and JavaScript. I was born in Bangladesh. I am currently studying Electronics and Communication Engineering at Khulna University of Engineering & Technology (KUET), one of the demanding public engineering universities of Bangladesh.


