
Docker has become a hot topic of conversation nowadays especially among developers. So what is docker? Docker is an opensource platform that rides on the Linux kernel and allows developers to build and deploy their applications in containers. Containers provide an isolated environment for running applications and they come bundled with their own libraries, dependencies and configuration files which are essential for the automatic deployment of applications.
In this guide, we will walk you through how you can build a NodeJS app on docker. You will learn how to build a demo NodeJS application on your server and later push it to Docker hub. In this guide, we are using Ubuntu 18.04 LTS for our testing environment.
So why would anyone want to push their applications on docker? As we saw earlier, Docker ships applications in containers that bundle libraries and dependencies. This constitutes a fully-fledged environment for deploying your applications. Additionally, the constituency of the development environment ensures that the application will work in the same way across many developers and client machines.
Prerequisites for NodeJS Docker Developement
This guide assumes you have a working knowledge of Docker and also some familiarity with the structure of a NodeJS application.
Before we go any further, ensure that the following is installed on your testing environment:
- Docker
- NodeJS & NPM
Let’s now get our hands dirty.
Step 1: Create a Node.JS application
First, start off by creating a NodeJS application. We will create a new directory and then navigate inside it as shown.
$ mkdir mynode-app && cd mynode-app
Next use npm, short for NodeJS Package Manager, to initialize the directory.
The command creates a file called package.json . You will be prompted for details of the JSON file such as name, version, description, keywords and the author to mention just a few.
At the very end type yes to confirm the preferred details of the json file.
Next, add the express framework by executing the command:
$ npm install express –-save
You should get an output as shown below
Step 2: Create a Node.JS application
In this step, we need to create files needed for the NodeJS application. Let’s create 2 sample files as follows:
- js
- html
For the index.js file, copy and paste the content below:
const express = require(‘express’)
const app = express()
app.get(‘/’, ( req, res ) => {
res.sendFile(`${__dirname}/index.html`)
})
app.listen(3000, () => {
console.log(‘Listening on port 3000!’)
})
The file creates a route for index.html file which is going to listen on port 3000
For the index.html file, paste the following configuration
We are now ready to launch the NodeJS app.
Step 3: Run the NodeJS application
To launch the application, simply issue the command
From the output, we can see that the application is listening on port 3000. To confirm this, open your browser and browse your server’s IP as shown
Step 4: Dockerize the NodeJS application
Next, we are going to create a Docker file
Next, Paste the configuration below
FROM node:carbon
WORKDIR /usr/src/app
COPY package*.json ./
RUN npm install
COPY . .
EXPOSE 3000
CMD [“node”, “index.js”]
Let’s break this down:
The first line shows that we intend to use the latest version of Node to build our image. Node.JS usually uses Chemical elements to name its LTS versions on Node.
The second line points to the creation of the /usr/src/app directory which will accommodate the application’s code in the image.
Lines 3 and 4 directs the copying of the package.json file and the execution of the npm install command
COPY . . This packages the NodeJS application – Comprising the HTML and JS files – in the Docker Image.
EXPOSE 3000 This defines the port that the NodeJS app will use
CMD [“node”, “index.js”] This displays the command that needs to be executed for the application to start.
Step 5. Build the Node.JS application
After creating the Docker file, we are now going to build the NodeJS app using the command indicated below. Be keen to include a space and a period at the very end as shown. The -t option helps us to tag the image to make it easier to locate it when we run the docker images command.
$ docker build -t mynode-app .
To confirm the existence of the image, run the command:
Step 6. Running the docker container
With our image ready let’s now launch it using the command:
# docker run -p 8080:3000 -d node-app
The command will direct the application to listen on port 8080 instead of port 3000. To confirm this, open your browser and browse the server’s URL as shown
Step 7. Pushing the application to docker hub
This is the final step having already built our application and ensured that all is working as expected.
Before proceeding, ensure that you have created an account at docker hub
Next, build the image once more using your Docker credentials
# docker build -t [USERNAME]/tag .
The username is your docker hub login username and the tag is your application’s tag. In my case, the command will be a shown
# docker build -t jayarthur/mynode-app .
Now login to docker hub a shown.
Provide your username and password and hit ENTER
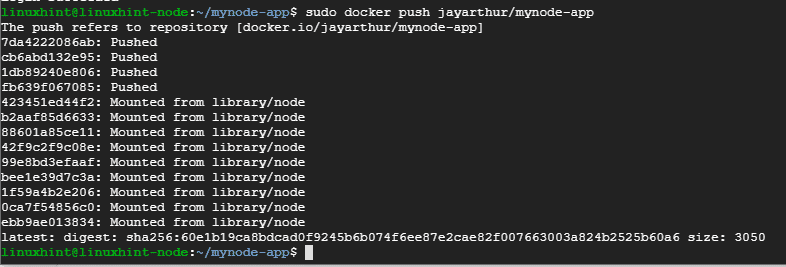
The only thing left now is to push the image to the docker hub. To achieve this, execute the command:
# docker push jayarthur/mynode-app
Finally, log into your Docker hub and confirm the existence of the application’s image.
And this brings us the end of this tutorial. Feel free to reach out with your feedback. Thanks.
About the author
James Kiarie
Hey there, this is James Kiarie, a certified Linux administrator with over 4 years of experience in the installation and configuration of Linux servers. Additionally, I have over 2 years in penning down high-quality technical articles in Linux, Windows and tech gadgets. In my free time, catch me listening to music, biking, swimming and playing video games.


