An Amazon Machine Image (AMI) provides the information required to launch an instance. An EC2 instance can not be launched without an AMI. We can create as many instances as we want from a single AMI when we need multiple instances with the same configuration. To create an instance we can use readily available AMI or we can create our own AMI.
To create a custom AMI we need to first launch an instance using one of the available AMIs, make the required configuration on the instance and then use that instance to create an AMI. Instances launched from this new custom AMI include the customizations that we made when we created the AMI. We can create AMIs from either running or stopped instances.
Once we create an AMI, we can either keep it private so that only we can use it, or we can share it with a specified list of AWS accounts. We can also make our custom AMI public so that the community can use it.
We can also deregister the AMI that is no more needed. After we deregister the AMI, it can’t be used to launch new instances. Existing instances created from the deleted AMI can still function and are not affected
In this article, we will see how to create an AMI from an existing EC2 instance and use it to create a new EC2 instance.
Pre-requisites
- AWS Account (Create if you don’t have one).
What we will do?
- Login to AWS.
- Create an AMI
- Use the AMI to create an EC2 instance.
Login to AWS
- Click here to go to AWS Login Page.
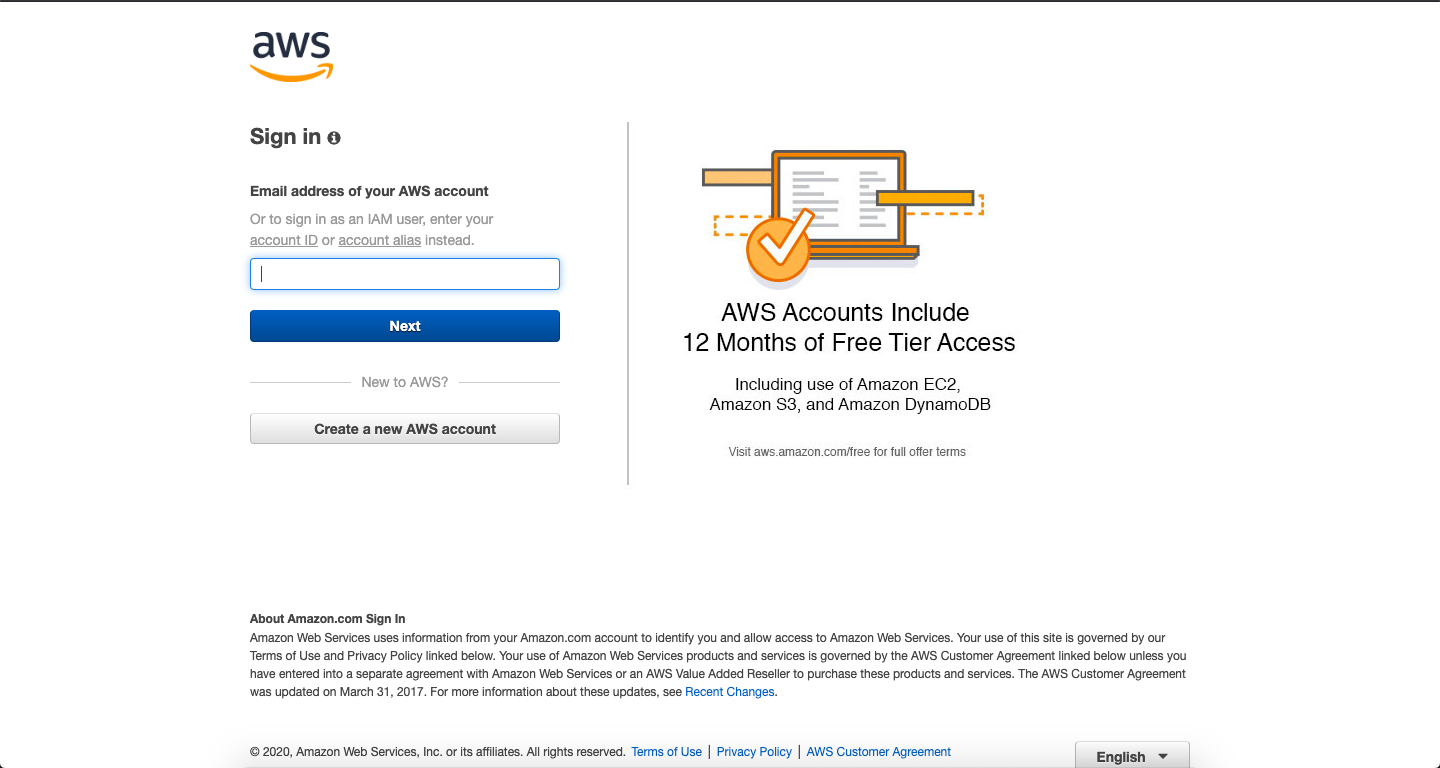
When we hit the above link, we will see a web page as follows where we are required to login using our login details.
<img alt="Sign-in to AWS" data-ezsrc="https://kirelos.com/wp-content/uploads/2021/10/echo/Screenshot_2020-01-13_at_5.33_.57_PM_.png6176fcb122982.jpg" ezimgfmt="rs rscb5 src ng ngcb5" height="400" loading="lazy" src="data:image/svg xml,” width=”750″>
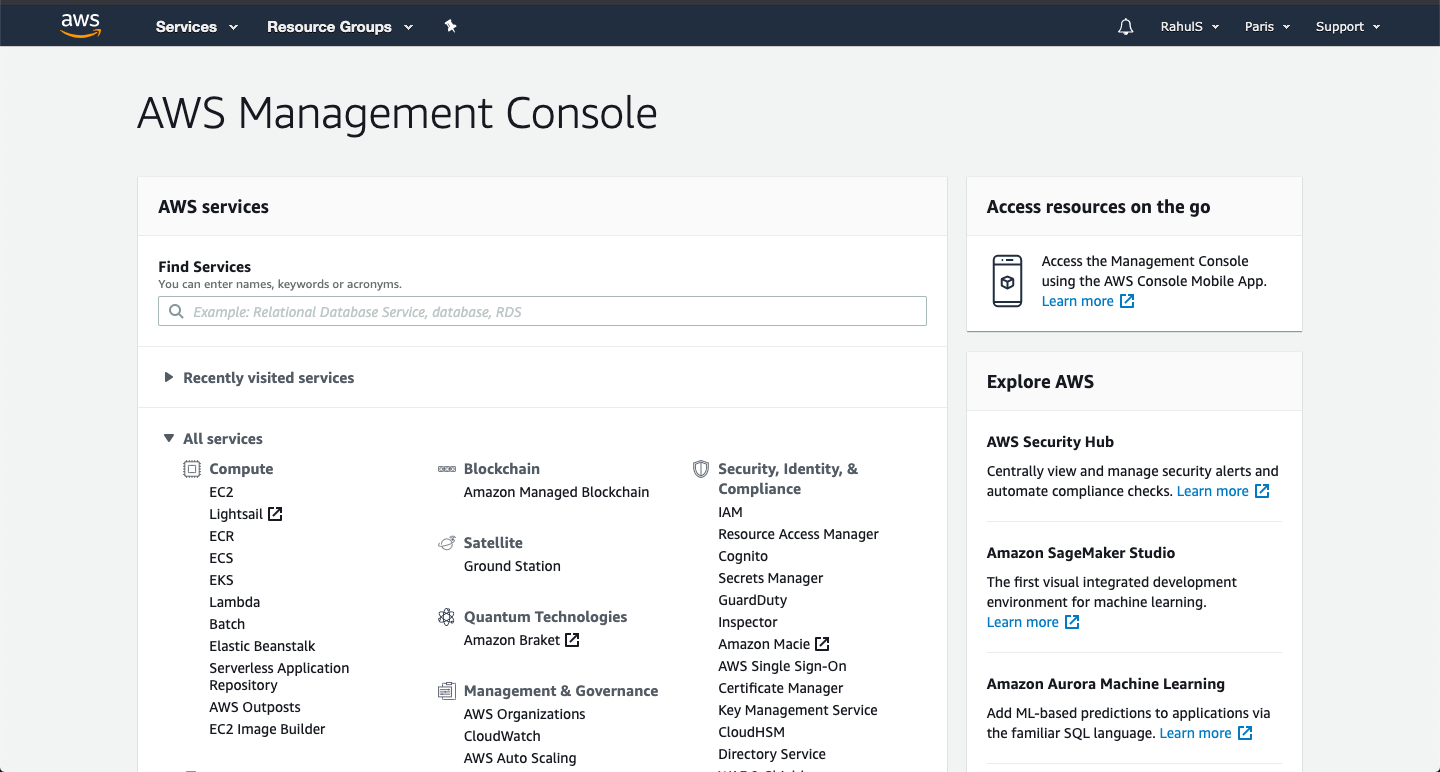
Once we login into AWS successfully, we will see the main console with all the services listed as follows.
<img alt="AWS Management console" data-ezsrc="https://kirelos.com/wp-content/uploads/2021/10/echo/Screenshot_2020-01-13_at_5.34_.52_PM_.png6176fcb143878.jpg" ezimgfmt="rs rscb5 src ng ngcb5" height="402" loading="lazy" src="data:image/svg xml,” width=”750″>
Create an AMI
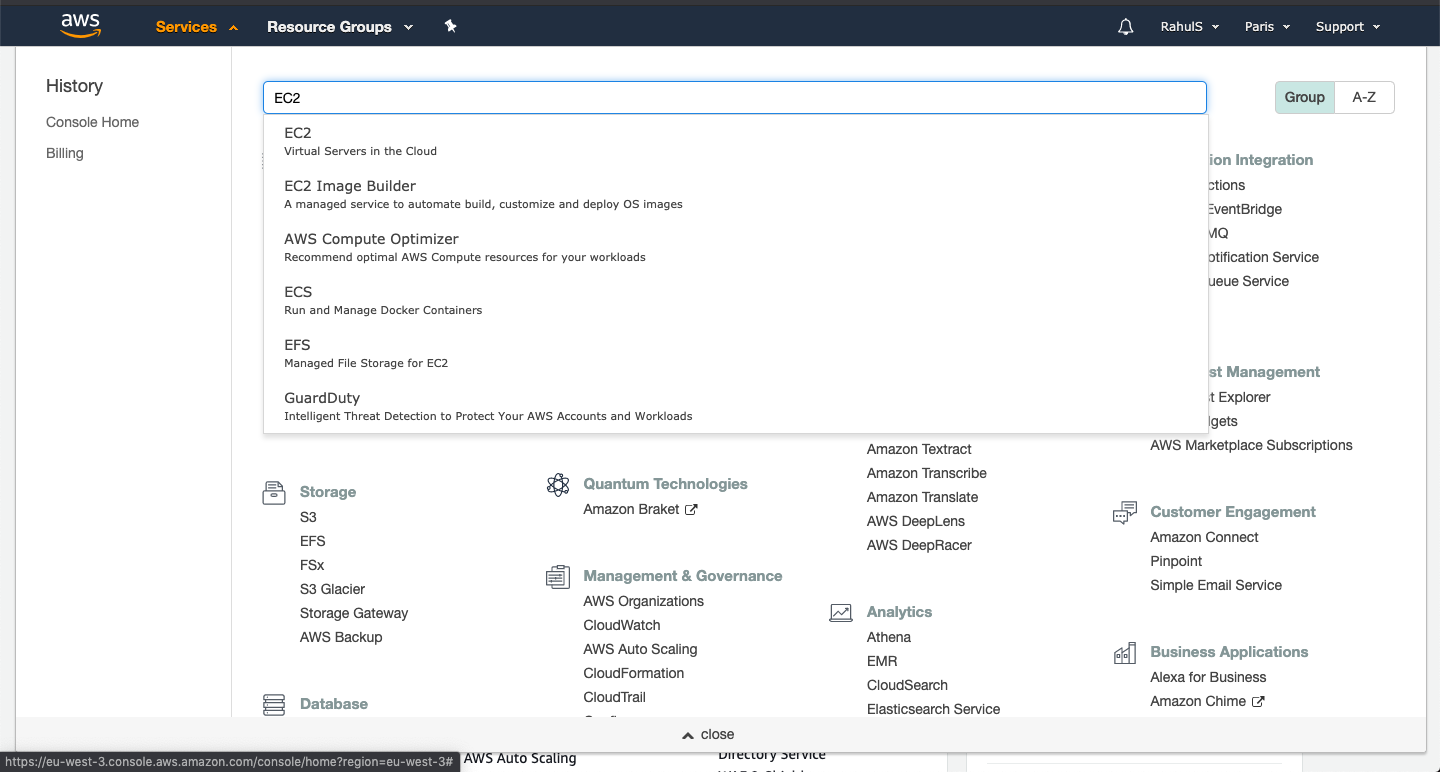
Click on “Services” at the top left menu and search for “EC2”.
<img alt="Create an AMI" data-ezsrc="https://kirelos.com/wp-content/uploads/2021/10/echo/Screenshot_2020-01-13_at_5.35_.05_PM_.png6176fcb15f8ab.jpg" ezimgfmt="rs rscb5 src ng ngcb5" height="402" loading="lazy" src="data:image/svg xml,” width=”750″>
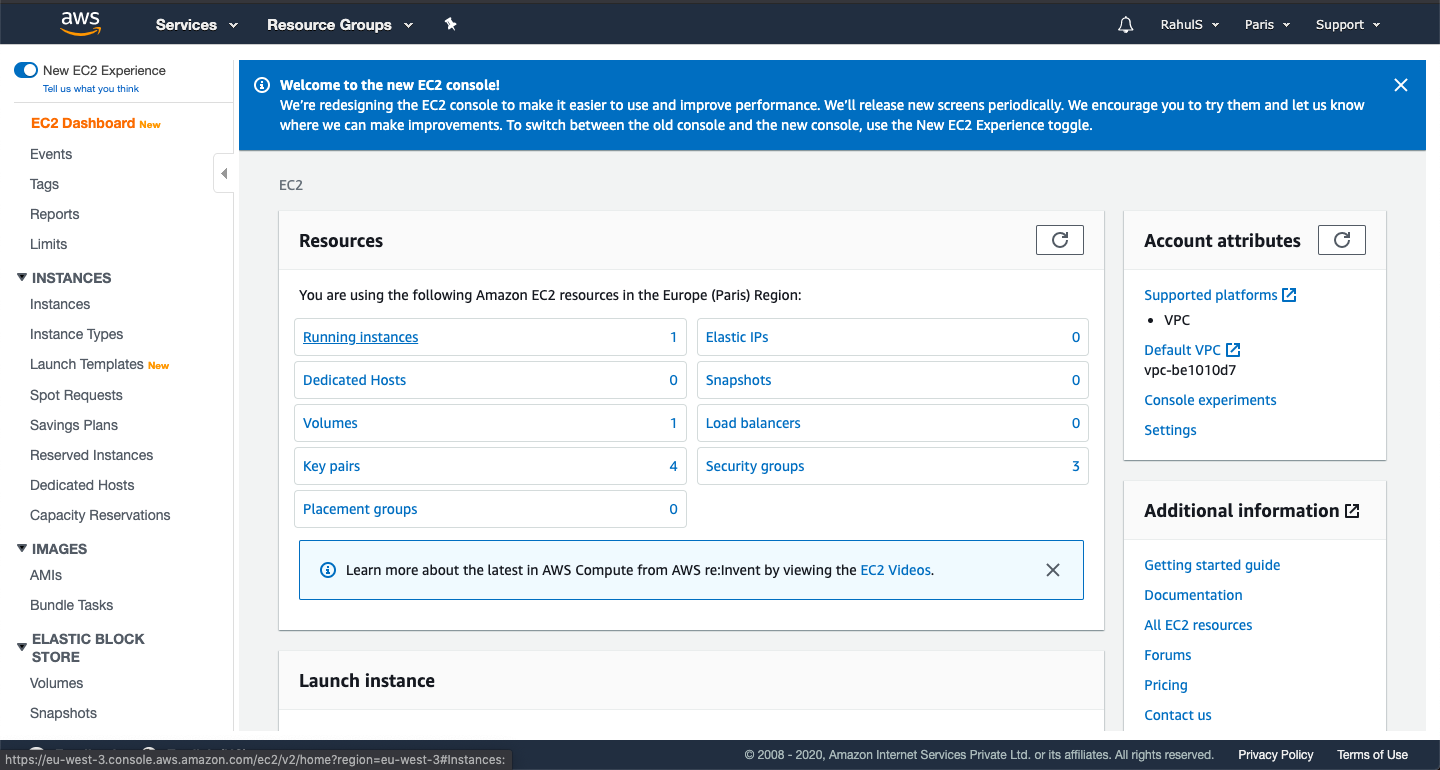
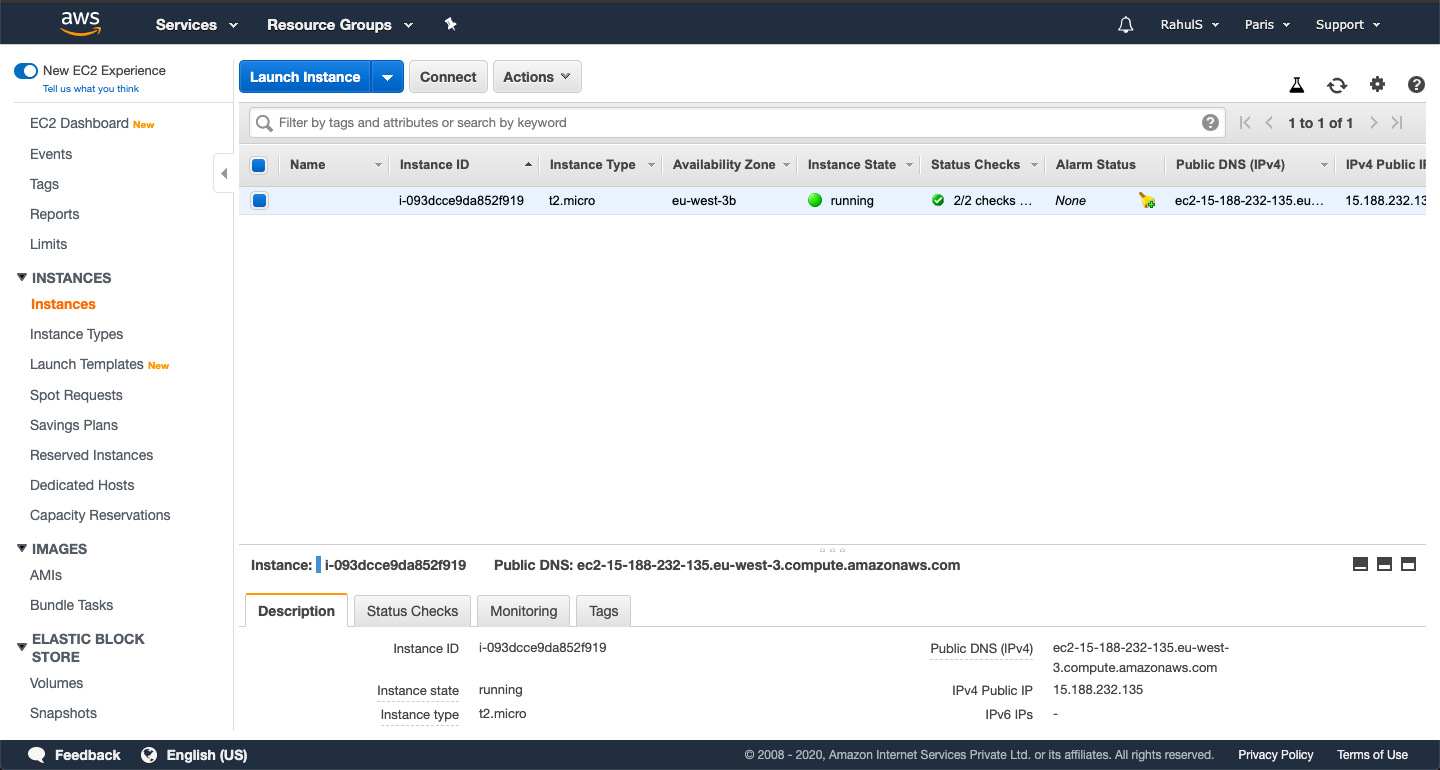
On the main EC2 dashboard, click on Running instances.
<img alt="Running instances" data-ezsrc="https://kirelos.com/wp-content/uploads/2021/10/echo/Screenshot_2020-01-13_at_5.39_.00_PM_.png6176fcb1857d6.jpg" ezimgfmt="rs rscb5 src ng ngcb5" height="401" loading="lazy" src="data:image/svg xml,” width=”750″>
Select the instance we want to use as the basis for our AMI then click on Actions -> Image -> Create Image
![]() Image -> Create Image” data-ezsrc=”https://kirelos.com/wp-content/uploads/2021/10/echo/Screenshot_2020-01-13_at_5.39_.58_PM_.png6176fcb1ad54e.jpg” ezimgfmt=”rs rscb5 src ng ngcb5″ height=”400″ loading=”lazy” src=”data:image/svg xml,” width=”750″>
Image -> Create Image” data-ezsrc=”https://kirelos.com/wp-content/uploads/2021/10/echo/Screenshot_2020-01-13_at_5.39_.58_PM_.png6176fcb1ad54e.jpg” ezimgfmt=”rs rscb5 src ng ngcb5″ height=”400″ loading=”lazy” src=”data:image/svg xml,” width=”750″>
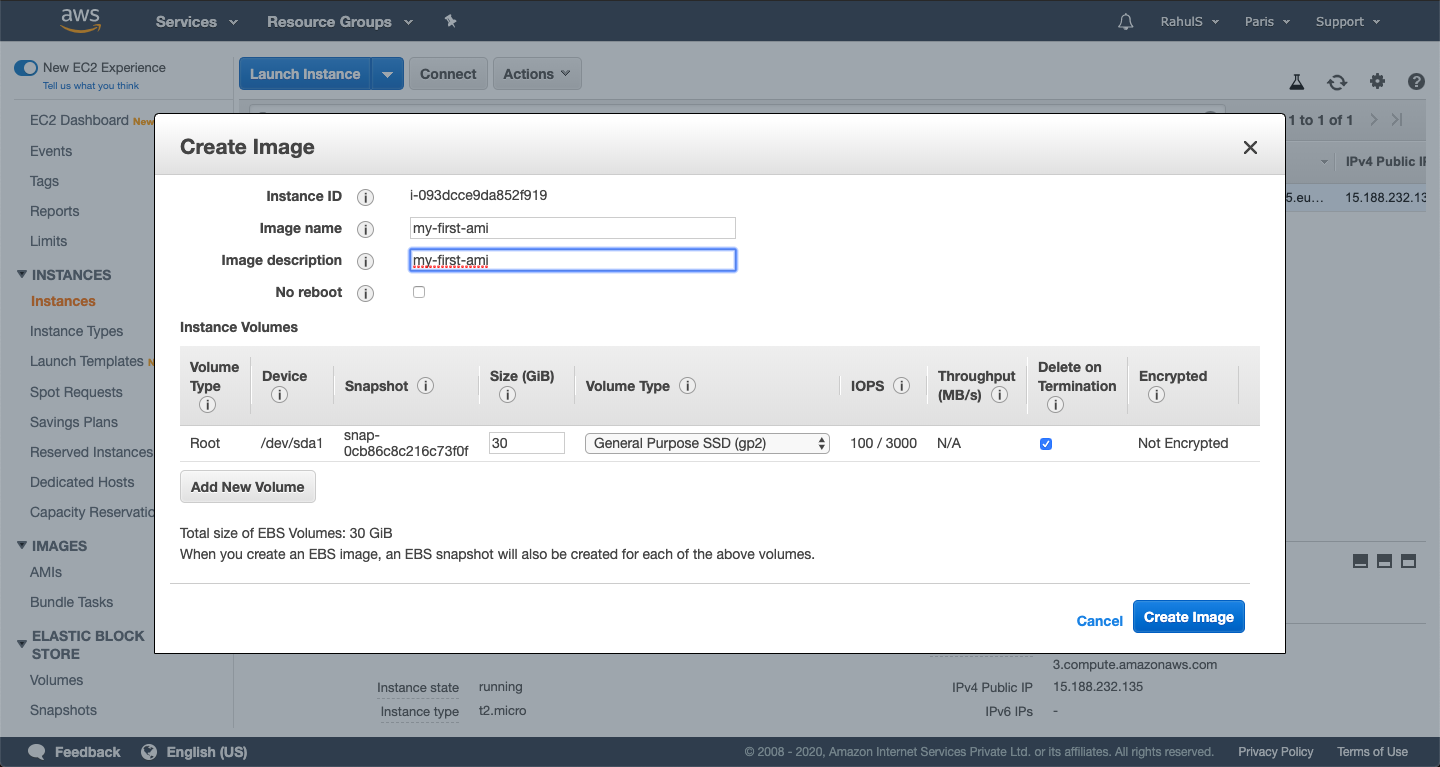
On the “Create Image” screen, type a unique name and description of the AMI to be created, and then choose “Create Image”. You can change the Root Volume size as well.
<img alt="Create image" data-ezsrc="https://kirelos.com/wp-content/uploads/2021/10/echo/Screenshot_2020-01-13_at_5.40_.48_PM_.png6176fcb1d1f0b.jpg" ezimgfmt="rs rscb5 src ng ngcb5" height="399" loading="lazy" src="data:image/svg xml,” width=”750″>
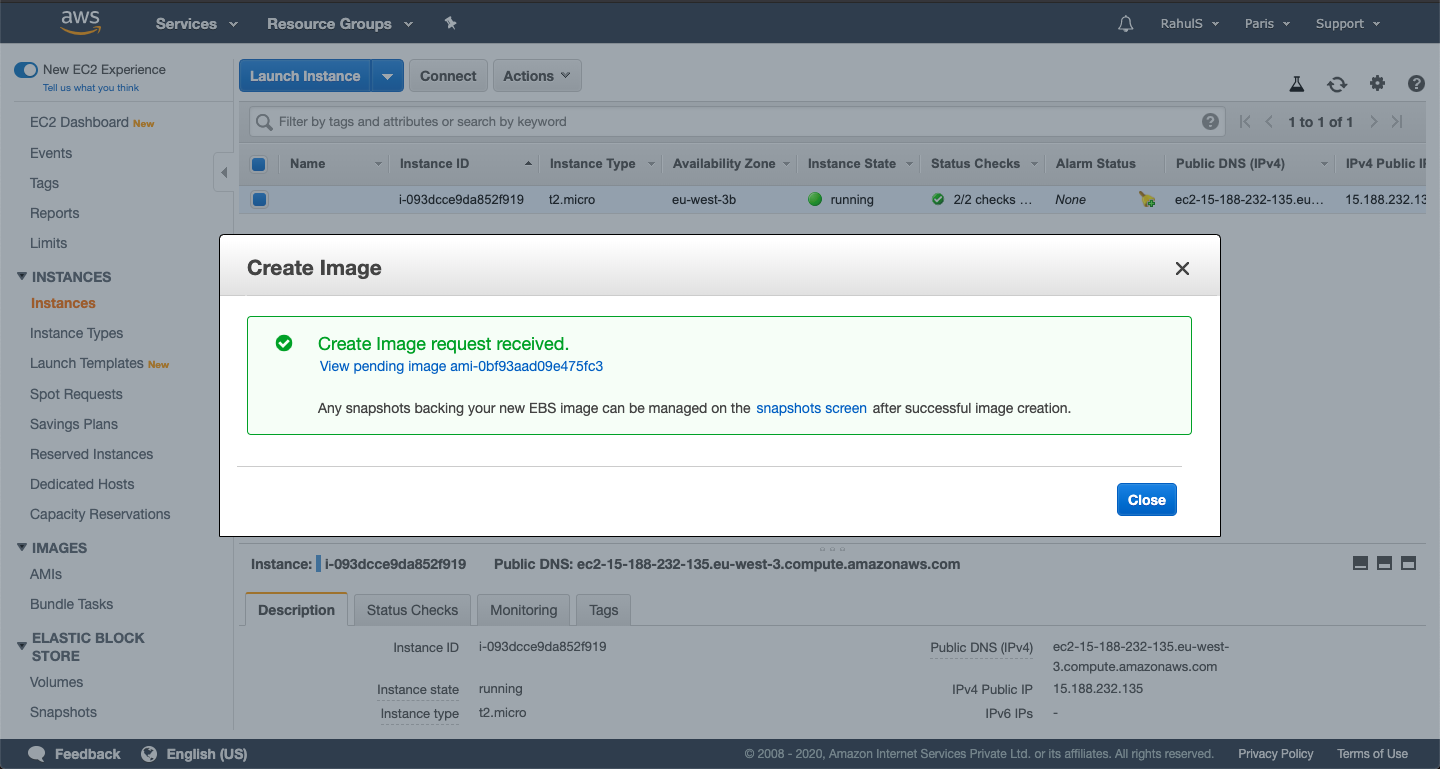
This will take some time, Click on “View pending image ” to see the status.
<img alt="View pending image" data-ezsrc="https://kirelos.com/wp-content/uploads/2021/10/echo/Screenshot_2020-01-13_at_5.40_.58_PM_.png6176fcb1f2132.jpg" ezimgfmt="rs rscb5 src ng ngcb5" height="401" loading="lazy" src="data:image/svg xml,” width=”750″>
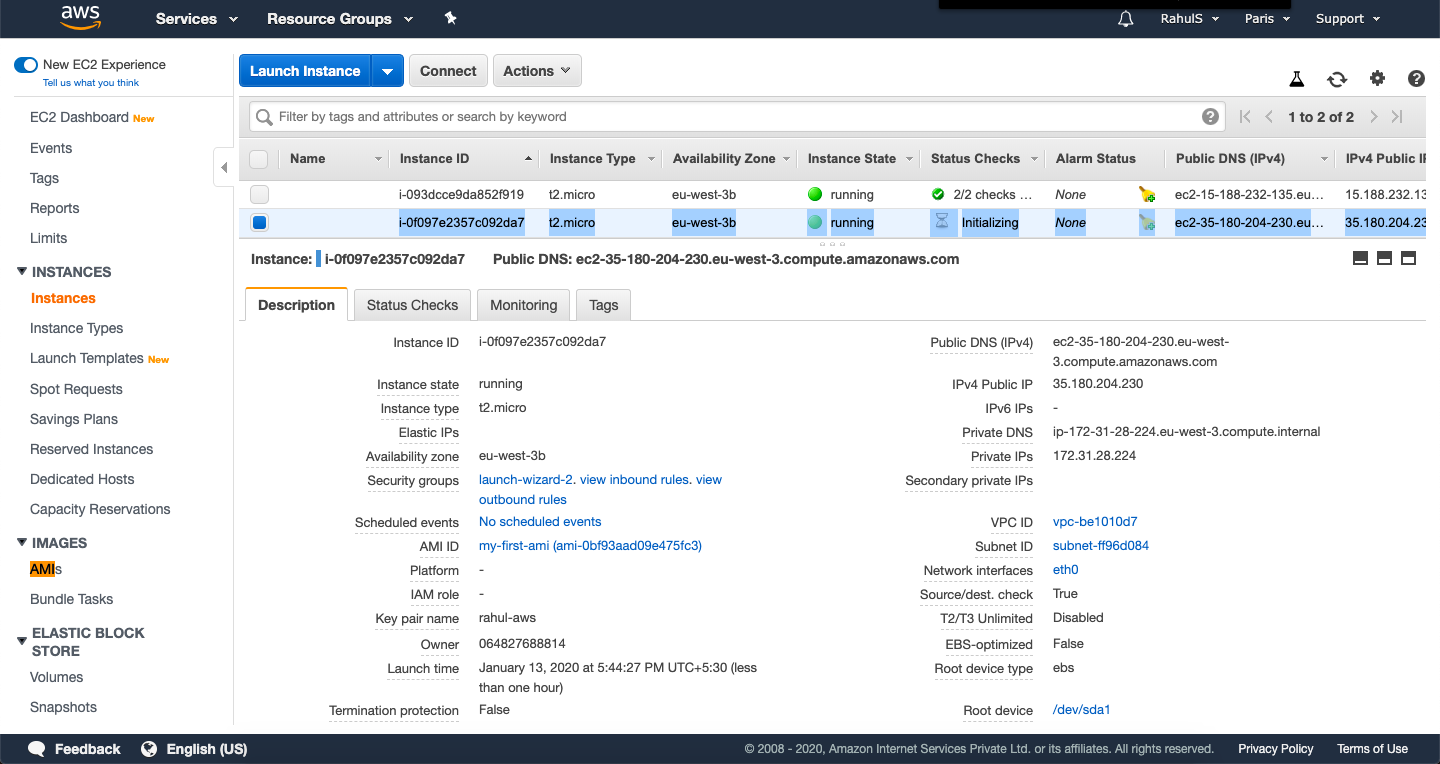
When the AMI first appears, it may be in a pending state, but after a few moments, it transitions to an available state.
<img alt="Launch" data-ezsrc="https://kirelos.com/wp-content/uploads/2021/10/echo/Screenshot_2020-01-13_at_5.42_.14_PM_.png6176fcb224e83.jpg" ezimgfmt="rs rscb5 src ng ngcb5" height="400" loading="lazy" src="data:image/svg xml,” width=”750″>
Create an EC2 instance from the AMI we created
To create an EC2 instance from the AMI we created, click on Instances from the Left Panel.
<img alt="Create EC2 from AMI" data-ezsrc="https://kirelos.com/wp-content/uploads/2021/10/echo/Screenshot_2020-01-13_at_5.42_.59_PM_.png6176fcb2507e4.jpg" ezimgfmt="rs rscb5 src ng ngcb5" height="401" loading="lazy" src="data:image/svg xml,” width=”750″>
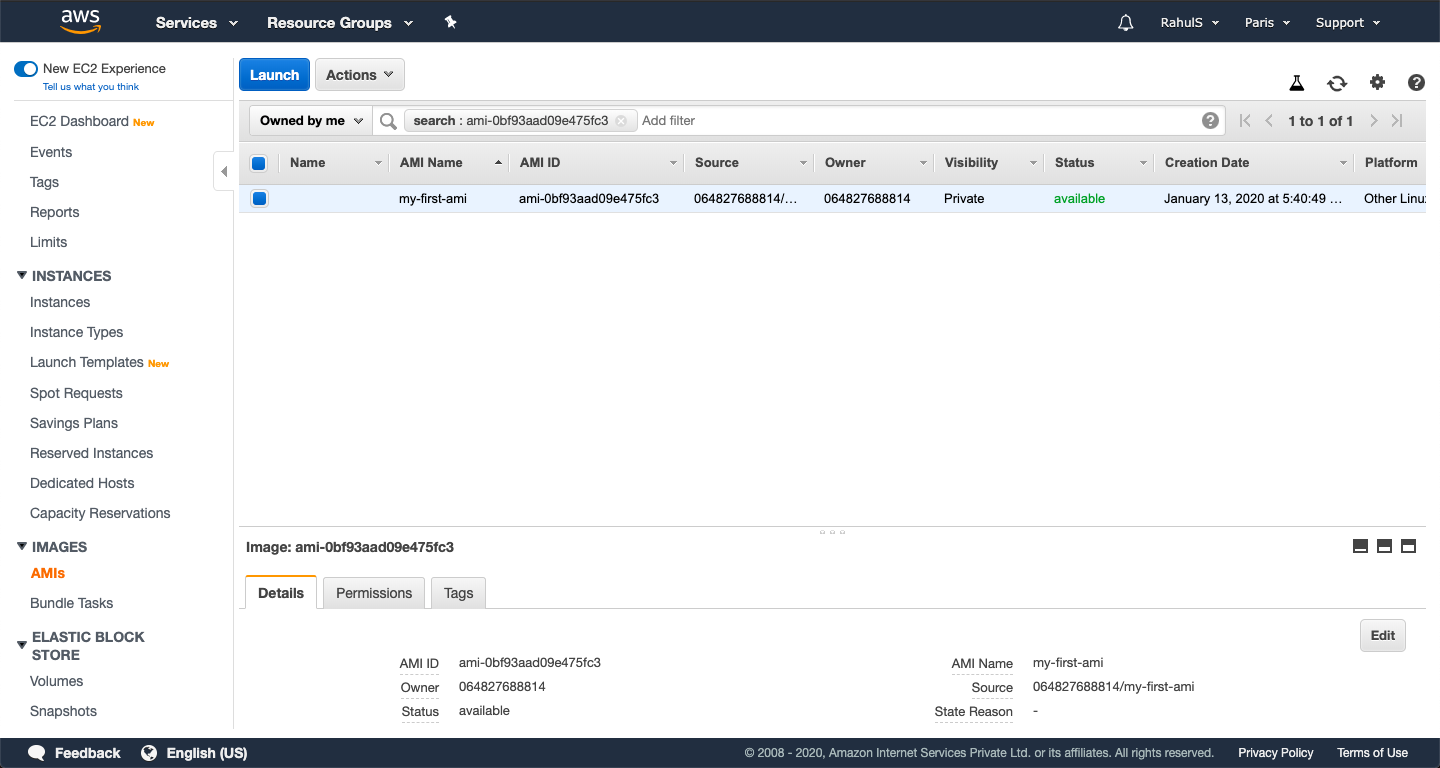
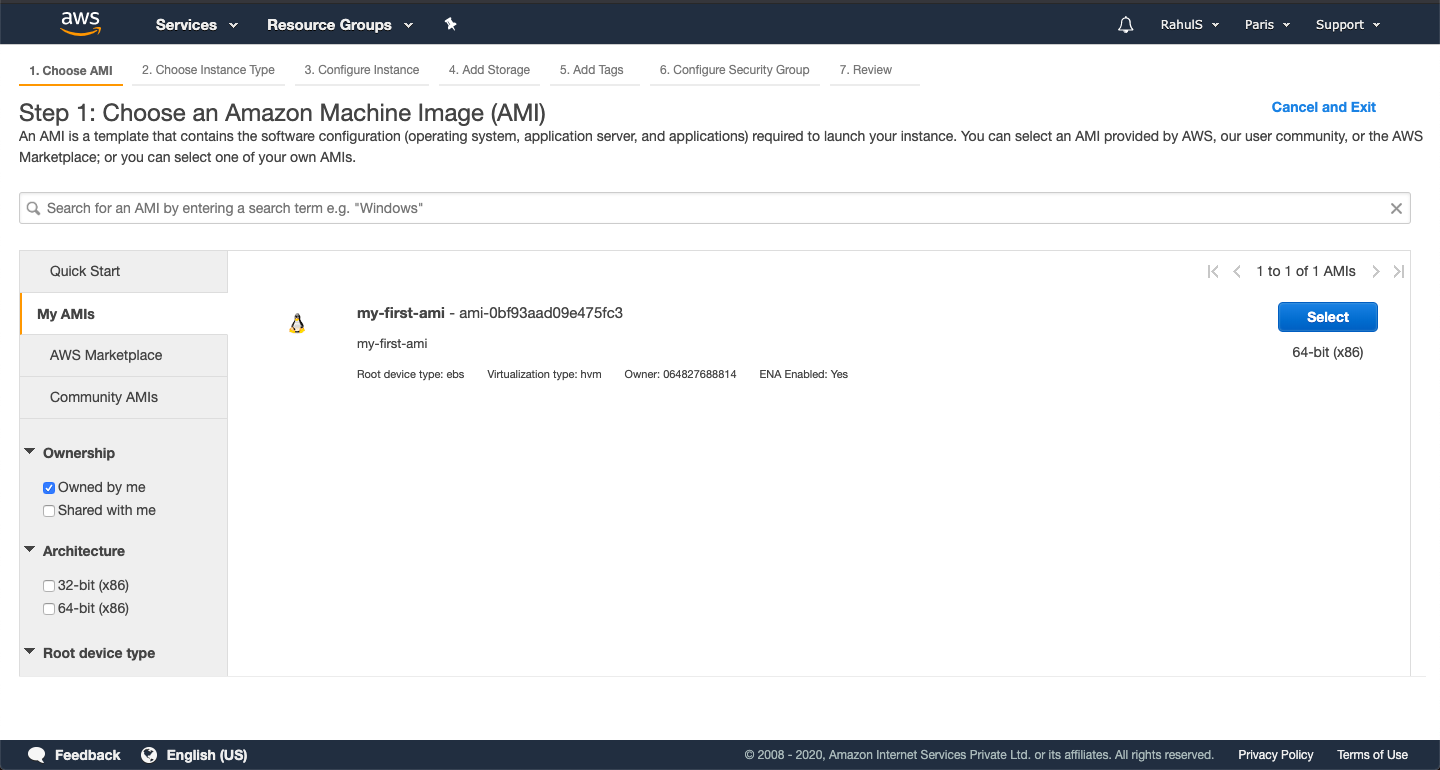
Click on My AMIs, this page will then display all the AMIs that we have created and are available to use.
<img alt="List AMI" data-ezsrc="https://kirelos.com/wp-content/uploads/2021/10/echo/Screenshot_2020-01-13_at_5.43_.15_PM_.png6176fcb2749b3.jpg" ezimgfmt="rs rscb5 src ng ngcb5" height="401" loading="lazy" src="data:image/svg xml,” width=”750″>Advertisement
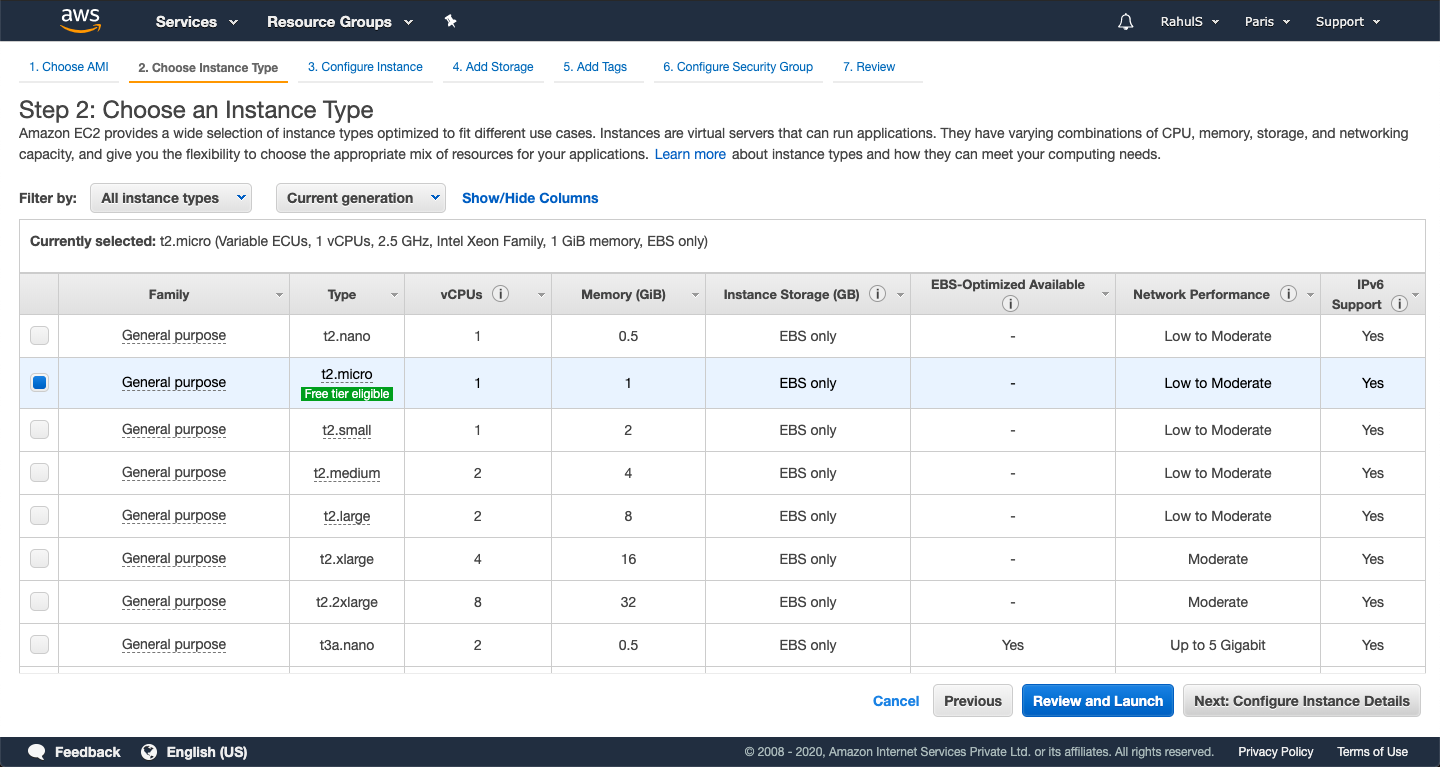
Once you have selected an AMI, it’s time to select the Instance Type. Here, we shall proceed with “t2.micro” as it is eligible for Free Tier Account.
<img alt="Choose an instance type" data-ezsrc="https://kirelos.com/wp-content/uploads/2021/10/echo/Screenshot_2020-01-13_at_5.43_.23_PM_.png6176fcb291ef3.jpg" ezimgfmt="rs rscb5 src ng ngcb5" height="399" loading="lazy" src="data:image/svg xml,” width=”750″>
On this screen, you can specify the details or you can just click on “Next: Add Storage” to proceed with the default settings. Here, we shall proceed with the default settings.
<img alt="Configure instance details" data-ezsrc="https://kirelos.com/wp-content/uploads/2021/10/echo/Screenshot_2020-01-13_at_5.43_.30_PM_.png6176fcb2b0f66.jpg" ezimgfmt="rs rscb5 src ng ngcb5" height="401" loading="lazy" src="data:image/svg xml,” width=”750″>
You can specify the size for the root partition. We have specified Root Partition Size as 30 GBs. Click on “Next: Add Tags” to proceed.
<img alt="Add storage" data-ezsrc="https://kirelos.com/wp-content/uploads/2021/10/echo/Screenshot_2020-01-13_at_5.43_.37_PM_.png6176fcb2cb6a7.jpg" ezimgfmt="rs rscb5 src ng ngcb5" height="401" loading="lazy" src="data:image/svg xml,” width=”750″>
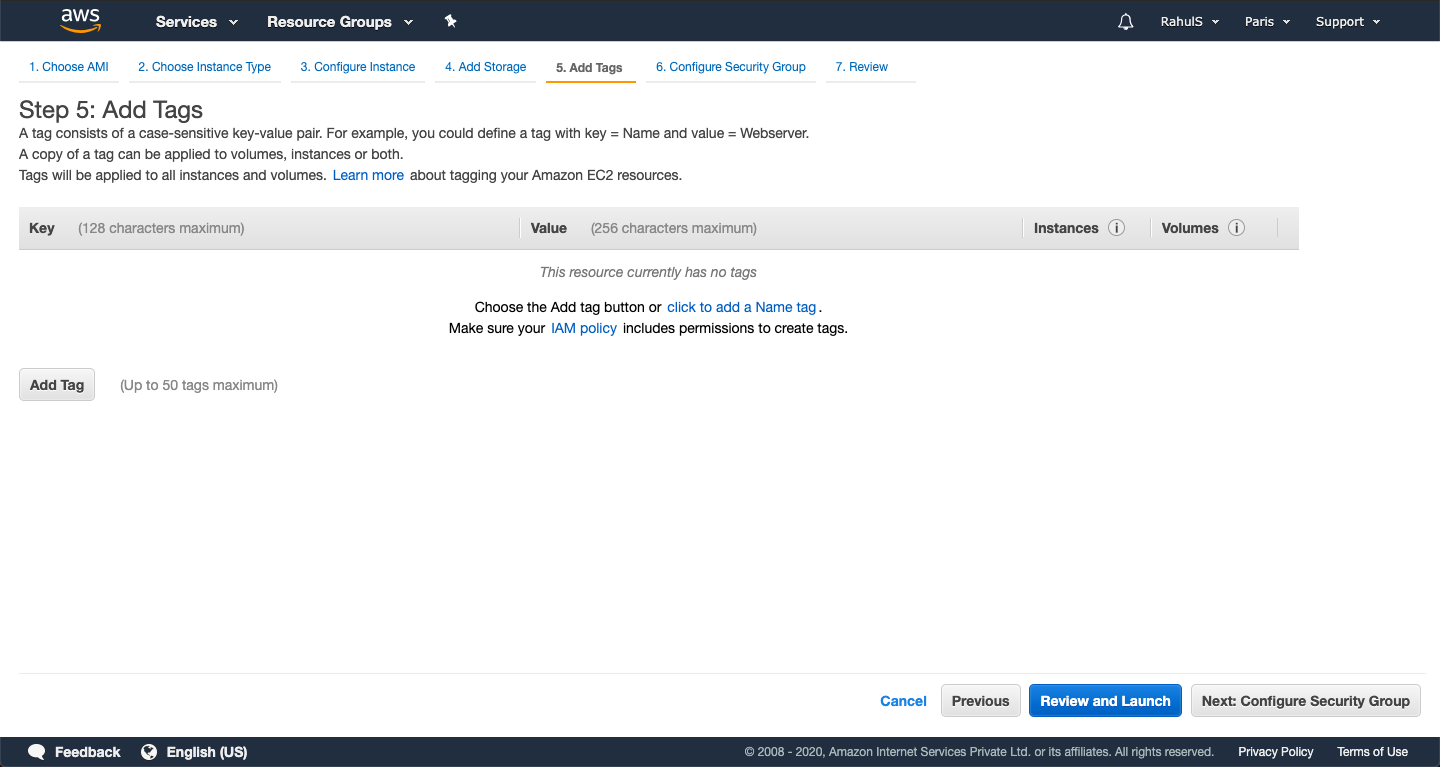
You can specify Tags (Key:Value) or can skip this step and Click on “Next: Configure Security Group”.
<img alt="Add tags" data-ezsrc="https://kirelos.com/wp-content/uploads/2021/10/echo/Screenshot_2020-01-13_at_5.43_.49_PM_.png6176fcb2e89dc.jpg" ezimgfmt="rs rscb5 src ng ngcb5" height="399" loading="lazy" src="data:image/svg xml,” width=”750″>
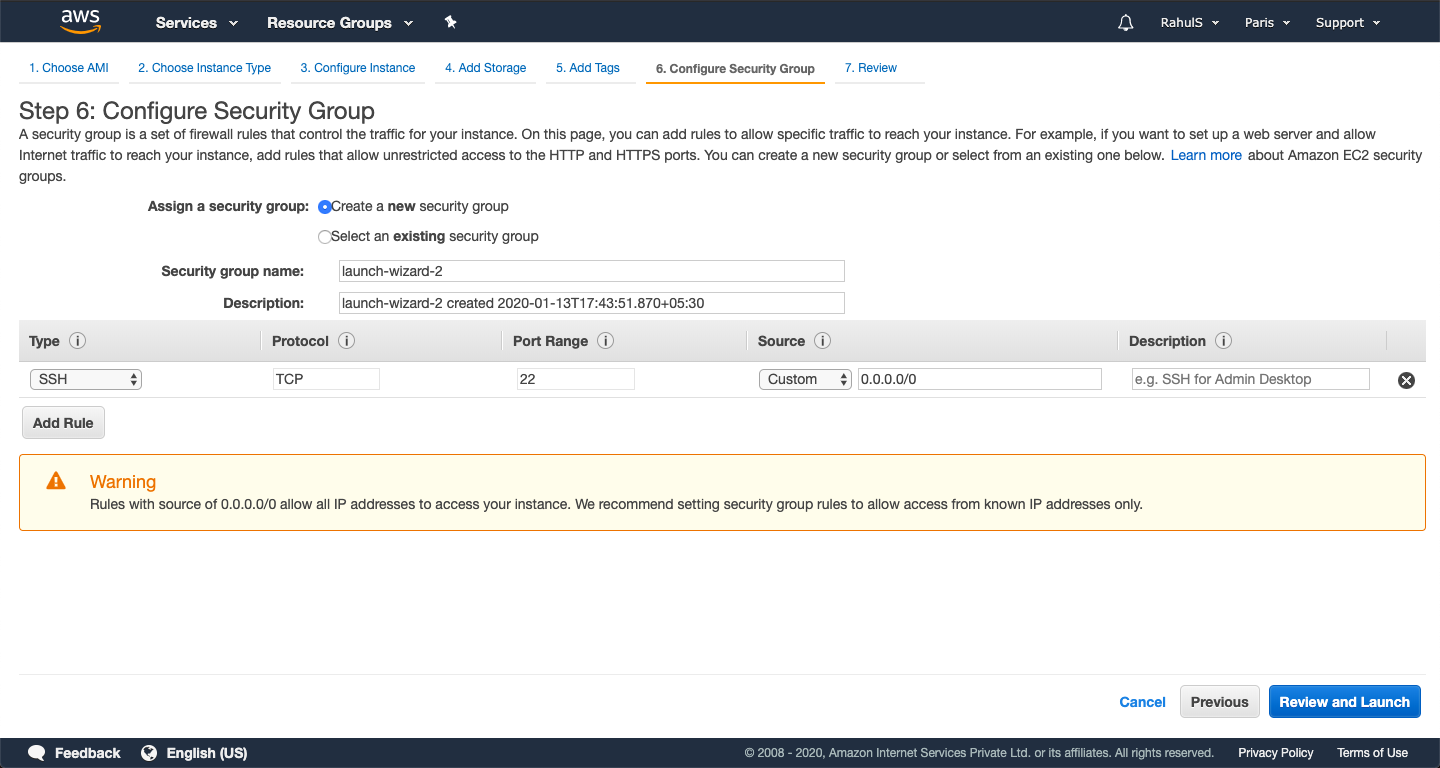
If you have an existing Security Group you can select that or can create a new one. We shall create a new Security Group by just selecting “Create a new security Group” radio button. Click on “Review and Launch”
<img alt="Configure security group" data-ezsrc="https://kirelos.com/wp-content/uploads/2021/10/echo/Screenshot_2020-01-13_at_5.44_.00_PM_.png6176fcb30e872.jpg" ezimgfmt="rs rscb5 src ng ngcb5" height="400" loading="lazy" src="data:image/svg xml,” width=”750″>
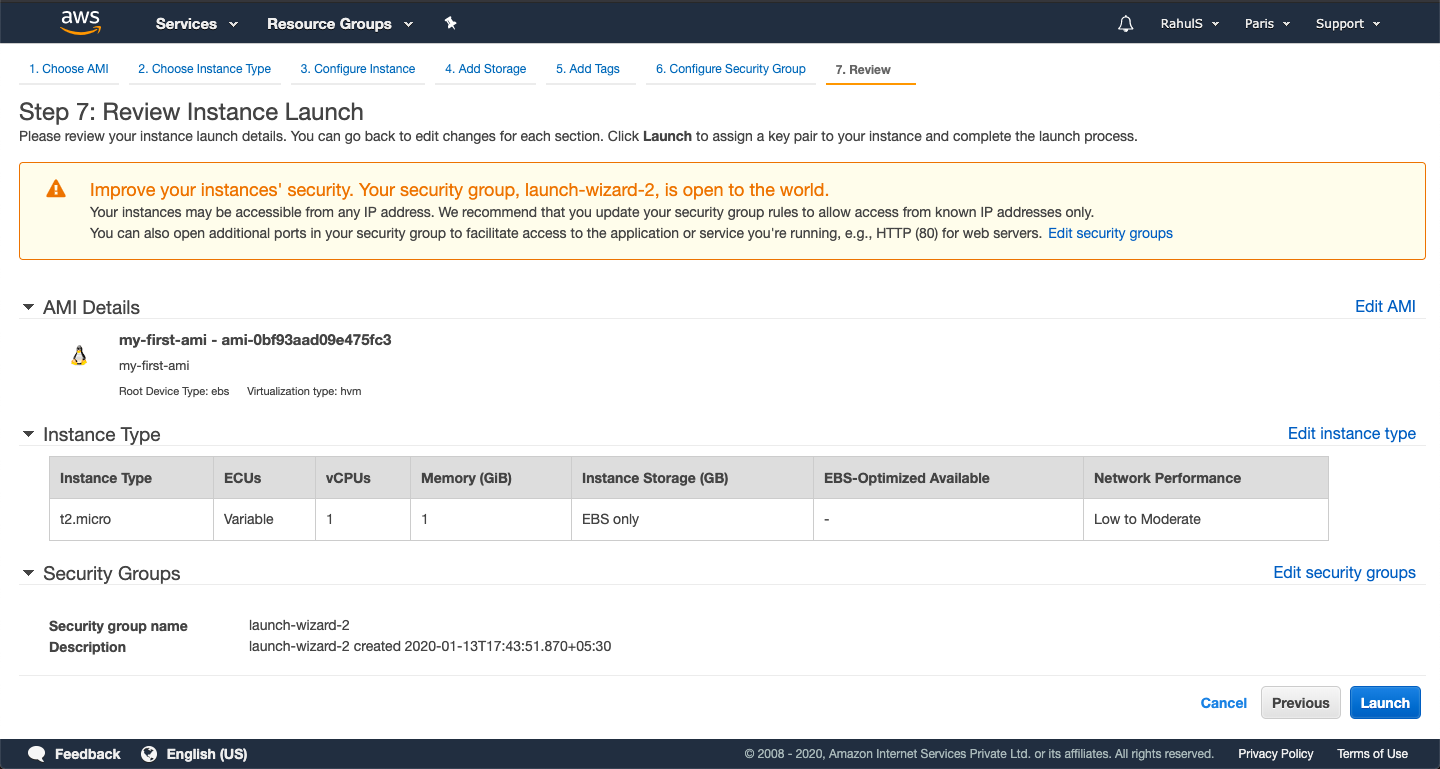
Now, review your configuration and click on “Launch”.
<img alt="Review settings" data-ezsrc="https://kirelos.com/wp-content/uploads/2021/10/echo/Screenshot_2020-01-13_at_5.44_.11_PM_.png6176fcb329602.jpg" ezimgfmt="rs rscb5 src ng ngcb5" height="401" loading="lazy" src="data:image/svg xml,” width=”750″>
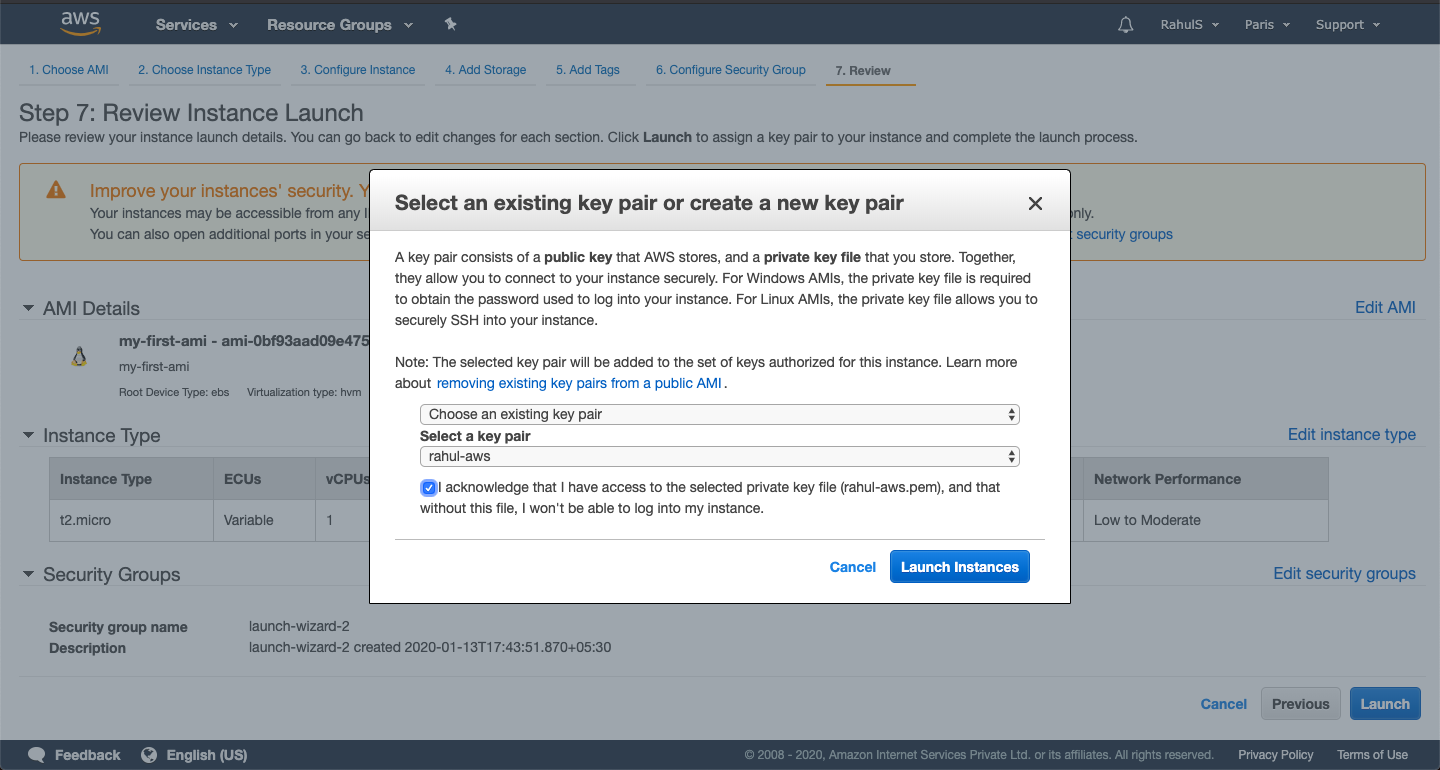
Before the instance creation starts, we need to select a Key-Pair which is then required to take ssh access to the server. To create a new Key-Pair, select “Create a new Key-Pair” from the drop-down menu, give a name to the Key-Pair, and download it. Keep this Key-Pair at a safe place.
<img alt="Select key pair" data-ezsrc="https://kirelos.com/wp-content/uploads/2021/10/echo/Screenshot_2020-01-13_at_5.44_.24_PM_.png6176fcb346272.jpg" ezimgfmt="rs rscb5 src ng ngcb5" height="401" loading="lazy" src="data:image/svg xml,” width=”750″>
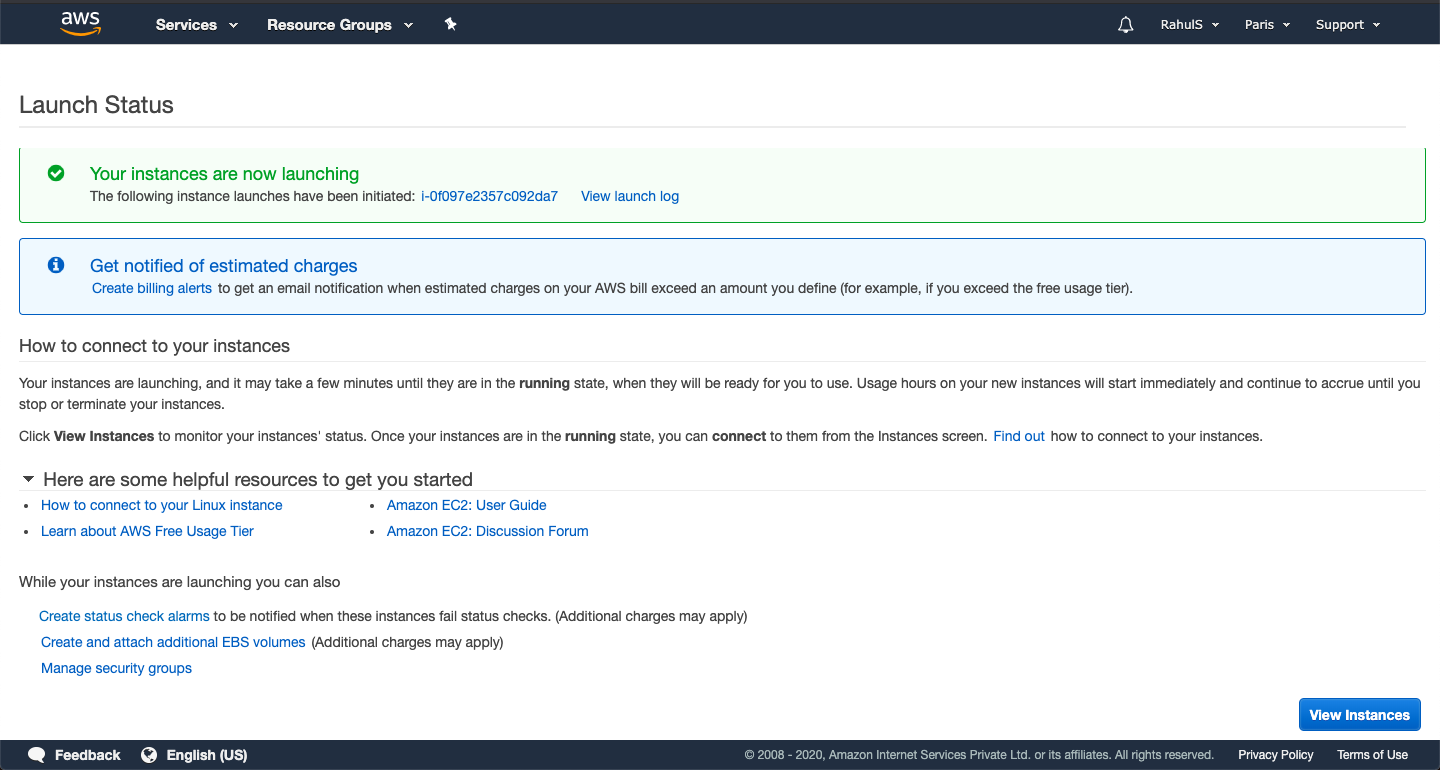
Wait for some time till the instance gets created. Click on “View Instances” to check the Instance State and other details.
<img alt="Launch status" data-ezsrc="https://kirelos.com/wp-content/uploads/2021/10/echo/Screenshot_2020-01-13_at_5.44_.35_PM_.png6176fcb36709d.jpg" ezimgfmt="rs rscb5 src ng ngcb5" height="401" loading="lazy" src="data:image/svg xml,” width=”750″>
Once the Instance State changes from “pending” to ‘running’ you can connect to the instance.
<img alt="Connect to instance" data-ezsrc="https://kirelos.com/wp-content/uploads/2021/10/echo/Screenshot_2020-01-13_at_5.45_.27_PM_.png6176fcb389d2b.jpg" ezimgfmt="rs rscb5 src ng ngcb5" height="398" loading="lazy" src="data:image/svg xml,” width=”750″>
Conclusion
In this article, we saw the steps to create a custom AMI from the existing EC2 instance and created a new EC2 instance using the AMI we created.
 and use it on AWS")
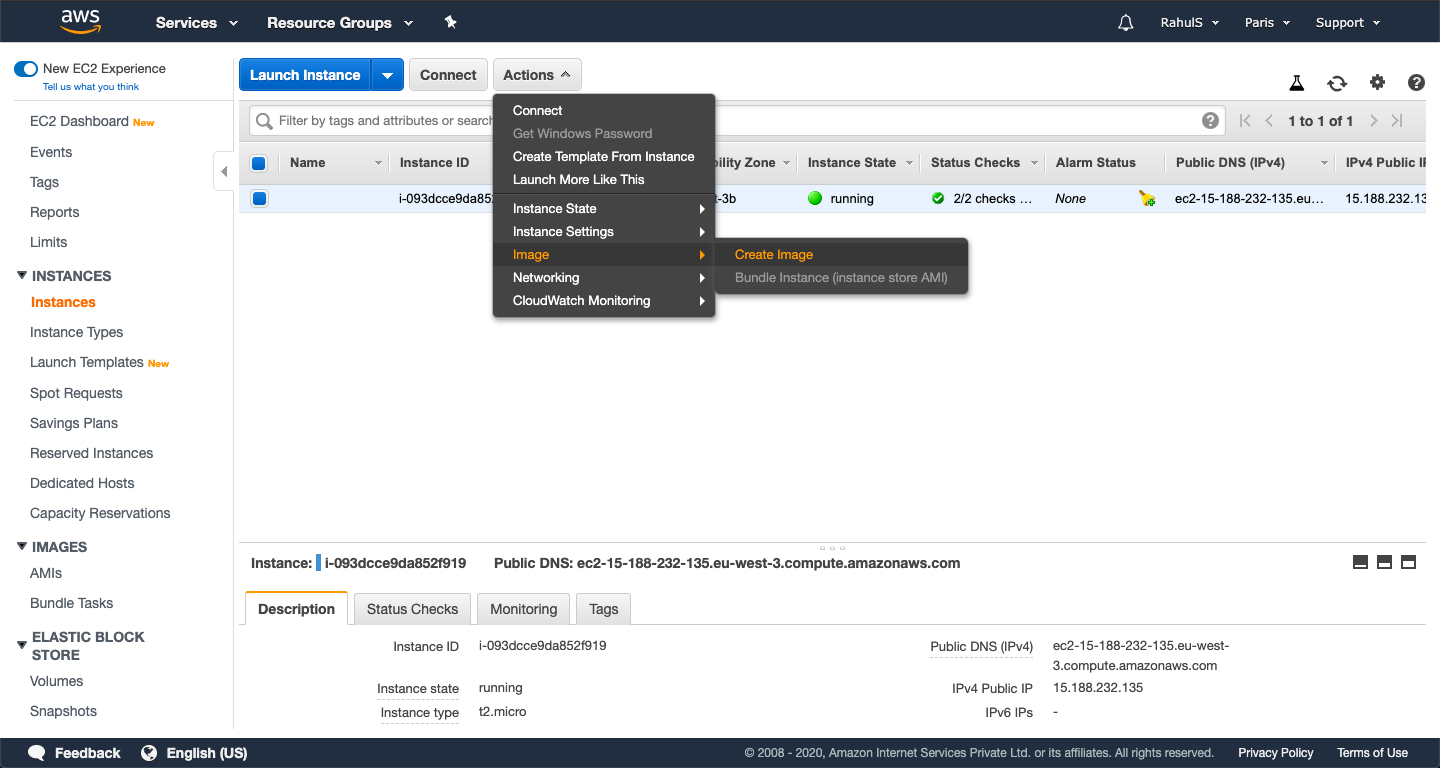 Image -> Create Image” data-ezsrc=”https://kirelos.com/wp-content/uploads/2021/10/echo/Screenshot_2020-01-13_at_5.39_.58_PM_.png6176fcb1ad54e.jpg” ezimgfmt=”rs rscb5 src ng ngcb5″ height=”400″ loading=”lazy” src=”data:image/svg xml,” width=”750″>

