
Adminer formerly known as phpMinAdmin is a full-featured database management tool written in PHP. With Adminer, you can manage several databases including, MySQL, MariaDB, PostgreSQL, SQLite, MS SQL, Oracle, Elasticsearch, MongoDB, and more. It is simple, lightweight, and designed with strong security and user experience in mind.
In this tutorial, I will explain how to install Adminer on Alma Linux 8.
Prerequisites
- A server running Alma Linux 8.
- A valid domain name pointed with your server IP.
- A root password is configured on the server.
Install LAMP Server
Before starting, you will need to install the Apache webserver, MariaDB database server, and PHP on your server. You can install all of them by running the following command:
dnf install httpd mariadb-server php php-mysqli php-curl php-json -y
After installing all the packages, start and enable Apache and MariaDB service with the following command:
systemctl start httpd mariadb
systemctl enable httpd mariadb
Once you are finished, you can proceed to the next step.
Create a Database for Adminer
Next, you will need to create a database and user for Adminer. To do so, log in to the MariaDB shell with the following command:
mysql
Once you are log in, create a database and user with the following command:
MariaDB [(none)]> CREATE DATABASE adminer;
MariaDB [(none)]> CREATE USER 'adminer'@'localhost' IDENTIFIED BY 'password';
Next, grant all the privileges to the Adminer database with the following command:
MariaDB [(none)]> GRANT ALL ON adminer.* TO 'adminer'@'localhost';
Next, flush the privileges and exit from the MariaDB shell with the following command:
MariaDB [(none)]> FLUSH PRIVILEGES;
MariaDB [(none)]> EXIT;
Download Adminer
Next, you will need to download the latest version of Adminer on your server. First, create a directory for Adminer inside the Apache web root using the following command:
mkdir /var/www/html/adminer
Next, change the directory to Adminer and download Adminer with the following command:
cd /var/www/html/adminer
wget -O index.php https://github.com/vrana/adminer/releases/download/v4.8.1/adminer-4.8.1.php
Once the download is completed, change the ownership and permission of the Adminer directory to apache user:
chown -R apache:apache /var/www/html/adminer/
chmod -R 775 /var/www/html/adminer/
Once you are finished, you can proceed to the next step.
Configure Apache for Adminer
nano /etc/httpd/conf.d/adminer.conf
Add the following lines:
     ServerAdmin [email protected]
     DocumentRoot /var/www/html/adminer/
     ServerName adminer.exampledomain.com
     DirectoryIndex index.php
     ErrorLog /var/log/httpd/adminer-error.log
     CustomLog /var/log/httpd/adminer-access.log combined
Save and close the file then restart the Apache service to apply the changes:
systemctl restart httpd
You can also check the status of the Apache with the following command:
systemctl status httpd
You should see the following output:
? httpd.service - The Apache HTTP Server
   Loaded: loaded (/usr/lib/systemd/system/httpd.service; disabled; vendor preset: disabled)
  Drop-In: /usr/lib/systemd/system/httpd.service.d
           ??php-fpm.conf
   Active: active (running) since Fri 2022-03-11 11:28:37 UTC; 10s ago
     Docs: man:httpd.service(8)
 Main PID: 39037 (httpd)
   Status: "Running, listening on: port 80"
    Tasks: 213 (limit: 23696)
   Memory: 24.5M
   CGroup: /system.slice/httpd.service
           ??39037 /usr/sbin/httpd -DFOREGROUND
           ??39039 /usr/sbin/httpd -DFOREGROUND
           ??39040 /usr/sbin/httpd -DFOREGROUND
           ??39041 /usr/sbin/httpd -DFOREGROUND
           ??39042 /usr/sbin/httpd -DFOREGROUND

Mar 11 11:28:37 almalinux systemd[1]: httpd.service: Succeeded.
Mar 11 11:28:37 almalinux systemd[1]: Stopped The Apache HTTP Server.
Mar 11 11:28:37 almalinux systemd[1]: Starting The Apache HTTP Server...
At this point, the Apache webserver is installed and configured to serve Adminer. You can now proceed to the next step.
Access Adminer Web Interface
Now, open your web browser and access the Adminer web interface using the URL http://adminer.exampledomain.com. You should see the following page:
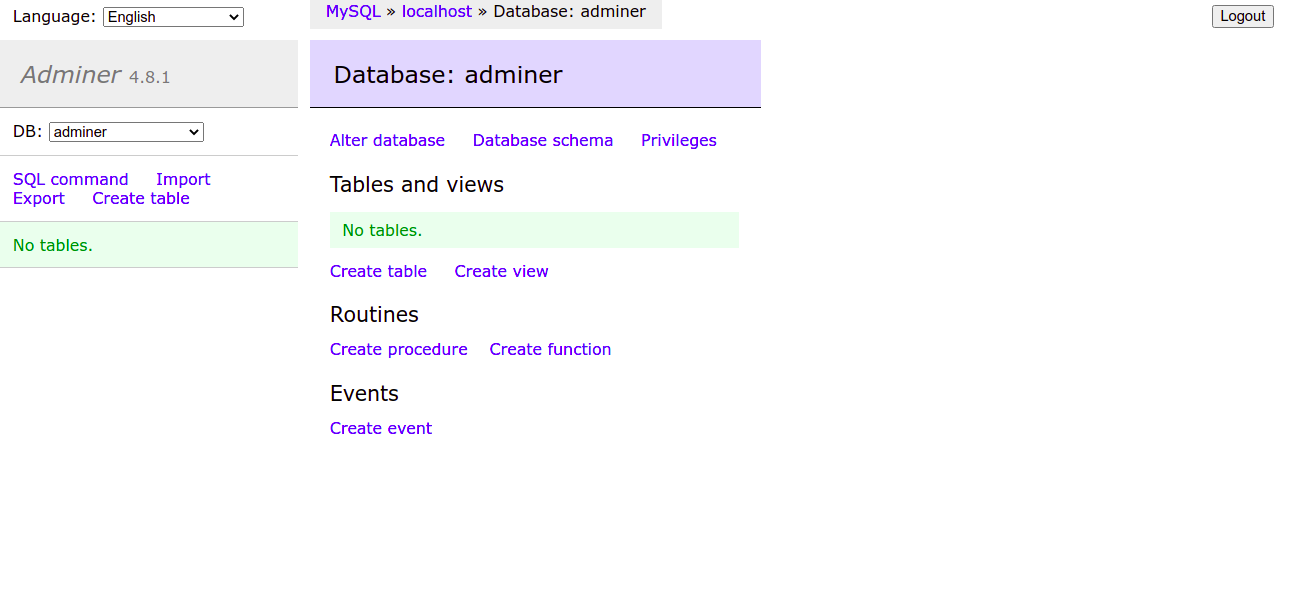
Provide your MySQL or MariaDB host address, database name, username, password, and click on the Login button. Once you are connected to the MariaDB, you should see the following page:
From here, you can perform several database operations such as, creating tables, views, procedures, functions, and more via a web browser.
Conclusion
Congratulations! you have successfully installed Adminer on Alma Linux 8. You can now add remote database servers to the Adminer and manage them from the central location. Feel free to ask me if you have any questions.


