DHCP (Dynamic host configuration protocol) used to assign an IP address automatically to Mobile, Laptop, PC, and other network devices so they can communicate. It employs a connectionless service model, using the UDP (User Datagram Protocol). DHCP uses a well-known UDP port 67 for the DHCP Server and the UDP Port 68 for the client. DHCP operations fall into four phases: server discovery, IP lease offer, IP lease request, and IP lease acknowledgment. These stages are often abbreviated as DORA for discovery, offer, request, and acknowledgment. In this tutorial, we will learn how to install and configure DHCP Server on Centos8. So, let’s get started.
I have a DHCP-Server with a static IP address 192.168.1.1/24. The DHCP server will automatically assign an IP address to the other devices in the network 192.168.1.0/24.
I have an interface ens37 which is used for DHCP-Server. To assign a static IP address to this interface you can use the following command:
# nmtui edit

You can also assign an IP address to go on a network setting as well.
To verify the IP Address is assigned or not use anyone of the following command:
# ip a
# ifconfig

At this point, the IP address is assigned which is 192.168.1.1/24.
To install DHCP packages open up the terminal and use the following command.
# dnf install –y dhcp-server

After the package is installed, it’s time to configure a DHCP-Server.
Configuring DHCP Server
The main configuration file of the DHCP Server is /etc/dhcp/dhcpd.conf. Before starting to configure take a copy of the original backup file with the help of the following command:
# cp /etc/dhcp/dhcpd.conf /etc/dhcp/dhcpd.conf.bk

To configure DHCP Server, edit the configuration file /etc/dhcp/dhcpd.conf, by using following command:
# vim /etc/dhcp/dhcpd.conf

default-lease-time 600;
max-lease-time 7200;
ddns-update-style none;
authoritative;
subnet 192.168.1.0 netmask 255.255.255.0 {
  range 192.168.1.50 192.168.15.200;
  option routers 192.168.1.1;
  option subnet-mask 255.255.255.0;
  option domain-name-servers 192.168.1.1;

}
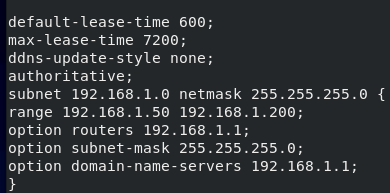
Here, the DHCP Server will reserve the IP address for 10 min (600 Sec) and at maximum for 2 hours (7200 Sec) for a specific device.
The Subnet section defines the DHCP Configuration for 192.168.1.0/24 Network:
The Range section defines the assignable IP address from 192.168.1.50 – 192.168.1.200.
The Routers defines the default gateway.
The Subnet-mask defines the subnet mask that will be assigned to each host.
The Domain-Name-Server defines the DNS name servers which will be assigned to each host.
You can add more than One Subnet according to your need. Once, you’re done with the configuration file Start the Service with the help of this command:
# systemctl enable dhcpd
# systemctl start dhcpd


To verify the DHCP Service is running use the following command:
# systemctl status dhcpd

Configuring the Firewall
Once, the service is restarted allow DHCP service through the firewall using the following command:
# firewall-cmd --add-service=dhcp --permanent

Reload the firewall to take effect, for this use the following command:
# firewall-cmd --reload

Testing the DHCP Server on Centos
As you can see Client Machine (Centos) automatically got the IP address 192.168.1.128 from Server 192.168.1.1.
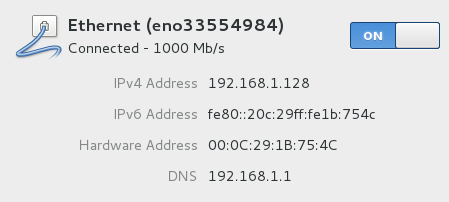
Testing the DHCP Server on Windows
As you can see in the Windows Client Machine Network Adapter Status, the machine automatically got the IP address 192.168.1.128 from Server 192.168.1.1, as shown in the figure.
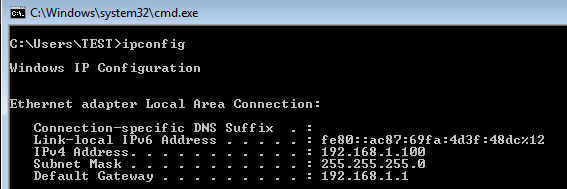
Reserve IP address on DHCP Server
If you have a MAC address of a device, you can also bind an IP address with them, for this open up the configuration file vim /etc/dhcp/dhcpd.conf and add these following lines at the end of the page to bind an IP address with the specific device.
host vitux {
  hardware ethernet 00:50:56:8c:20:fd;
  fixed-address 192.168.1.150;
}

It will bind the IP address 192.168.1.150 with the machine whose MAC address is 00:50:56:8c:20:fd.
Conclusion
In this tutorial, we learn how to configure DHCP Server on Centos8. We saw that the host machine automatically got an IP address from the DHCP server and we also saw how to bind the IP address with a specific machine using MAC address.

