
Graphite is an open-source tool used to track and graph the performance of computer systems. You can use it to track the performance of websites, applications, business services, and networked servers. It is highly flexible and can be configured so that you can gain the benefits of both detailed representation and broad overviews of the performance and health of the metrics you are tracking.
Graphite is made of several components: the web application, a storage backend called Carbon, and the database library called whisper. In this tutorial, you will learn to install and configure Graphite on a Ubuntu 22.04 server.
Prerequisites
-
A server running Ubuntu 22.04.
-
A Fully Qualified domain name (FQDN) pointing to the server. For our tutorial, we will use the
graphite.example.comdomain. -
A non-root user with sudo privileges.
-
The uncomplicated Firewall(UFW) is enabled and running.
-
Make sure everything is updated.
$ sudo apt update && sudo apt upgrade
-
Install basic utility packages. Some of them may already be installed.
$ sudo apt install wget curl nano unzip -y
Step 1 – Configure Firewall
Before installing any packages, the first step is configuring the firewall to allow HTTP and HTTPS connections.
Check the status of the firewall.
$ sudo ufw status
You should see something like the following.
Status: active

To                         Action      From
--                         ------      ----
OpenSSH                    ALLOW       Anywhere
OpenSSH (v6)               ALLOW       Anywhere (v6)
Allow HTTP and HTTPs ports.
$ sudo ufw allow http
$ sudo ufw allow https
Check the status again to confirm.
$ sudo ufw status
Status: active

To                         Action      From
--                         ------      ----
OpenSSH                    ALLOW       Anywhere
80/tcp                     ALLOW       Anywhere
443                        ALLOW       Anywhere
OpenSSH (v6)               ALLOW       Anywhere (v6)
80/tcp (v6)                ALLOW       Anywhere (v6)
443 (v6)                   ALLOW       Anywhere (v6)
Step 2 – Install Required Packages
We will install Graphite using the PIP Python package manager. The first step is to install the packages required for the installation.
$ sudo apt install vim python3-dev python3-pip libcairo2-dev libffi-dev build-essential
Step 3 – Install Graphite and Graphite Web
We will install Graphite in the /opt/graphite directory.
$ export PYTHONPATH="https://www.howtoforge.com/opt/graphite/lib/:/opt/graphite/webapp/"
$ sudo pip install --no-binary=:all: https://github.com/graphite-project/whisper/tarball/master
$ sudo pip install --no-binary=:all: https://github.com/graphite-project/carbon/tarball/master
$ sudo pip install --no-binary=:all: https://github.com/graphite-project/graphite-web/tarball/master
Step 4 – Install and Configure PostgreSQL
We will use PostgreSQL’s official APT repository to install. Run the following command to add the PostgreSQL GPG key.
$ curl https://www.postgresql.org/media/keys/ACCC4CF8.asc | gpg --dearmor | sudo tee /usr/share/keyrings/postgresql-key.gpg >/dev/null
Add the APT repository to your sources list.
$ sudo sh -c 'echo "deb [signed-by=/usr/share/keyrings/postgresql-key.gpg arch=amd64] http://apt.postgresql.org/pub/repos/apt $(lsb_release -cs)-pgdg main" > /etc/apt/sources.list.d/pgdg.list'
Update the system repository.
$ sudo apt update
Now, you can install PostgreSQL and helper packages using the following command.
$ sudo apt install postgresql postgresql-contrib libpq-dev
Check the status of the PostgreSQL service.
$ sudo systemctl status postgresql
? postgresql.service - PostgreSQL RDBMS
     Loaded: loaded (/lib/systemd/system/postgresql.service; enabled; vendor preset: enabled)
     Active: active (exited) since Tue 2022-09-27 10:09:35 UTC; 4s ago
    Process: 4456 ExecStart=/bin/true (code=exited, status=0/SUCCESS)
   Main PID: 4456 (code=exited, status=0/SUCCESS)
        CPU: 1ms

Sep 27 10:09:35 matrix systemd[1]: Starting PostgreSQL RDBMS...
Sep 27 10:09:35 matrix systemd[1]: Finished PostgreSQL RDBMS.
You can see that the service is enabled and running by default.
Log in to the PostgreSQL shell.
$ sudo -su postgres psql
Create a database user for Graphite.
postgres=# CREATE USER graphite WITH PASSWORD 'your_password';
Create a database for Graphite and give ownership to the graphite user.
postgres=# CREATE DATABASE graphitedb WITH OWNER graphite;
Exit the PostgreSQL shell.
postgres=# q
Step 5 – Configure Graphite Carbon and Web
The next step is to configure Graphite Carbon and Graphite web.
Configure Carbon
Carbon comprises of three services:
- carbon-cache: accepts metrics and writes them to the disk.
- carbon-relay: replicates the data.
- carbon-aggregator: runs in front of carbon-cache service to buffer metrics over time before forwarding them into Whisper.
Configuring carbon-cache is necessary, but carbon-relay and carbon-aggregator are optional.
Create the carbon.conf file using the given example file.
$ sudo cp /opt/graphite/conf/carbon.conf.example /opt/graphite/conf/carbon.conf
Next, create the storage schemas configuration.
$ sudo cp /opt/graphite/conf/storage-schemas.conf.example /opt/graphite/conf/storage-schemas.conf
Open the storage schema configuration file.
$ sudo nano /opt/graphite/conf/storage-schemas.conf
Inside, you will find entries like
[carbon]
pattern = ^carbon.
retentions = 60:90d
This implies a pattern that matches a regular expression ^carbon. should retain the data with retention policy 60:90d which means
- how often a metric is recorded: 60 seconds
- length of time to store those values: 90 days
You can add your own entry. Let’s take an example test i.e. monitoring data points and our data point entries will start with the string test. This entry should be added before the default entry mentioned at the bottom of the file.
[test]
pattern = ^test.
retentions = 10s:10m,1m:1h
This will match any metrics beginning with test. It will store the data it collects two times, in varying detail. The first definition (1s:10m) will create a data point every ten seconds. It will store the data only for ten minutes. The second definition will create a data point every minute. It will gather all the data from the past minute (six points, since the previous definition creates a point every ten seconds) and aggregate it to create the point. It stores the data at this level of detail for one hour.
Save the file by pressing Ctrl X and entering Y when prompted.
Start the carbon-cache service.
$ sudo /opt/graphite/bin/carbon-cache.py start
Configure the Graphite Web
The next step is to configure the Graphite web app.
Generate a secret key for the Graphite application. Copy the displayed key for later use.
$ python3 -c 'from django.core.management.utils import get_random_secret_key; print(get_random_secret_key())'
spq)6b$%^bc(7xpz1d!)x3(azog01&k^8l02*!y0#)72p07y
Create the web app settings file.
$ sudo cp /opt/graphite/webapp/graphite/local_settings.py.example /opt/graphite/webapp/graphite/local_settings.py
You need to configure the Graphite web application with the database settings. Open the local_settings.py for editing.
$ sudo nano /opt/graphite/webapp/graphite/local_settings.py
Uncomment the SECRET_KEY variable and enter a random value for it.
SECRET_KEY = 'your-secret-key'
Uncomment the ALLOWED_HOSTS variable.
ALLOWED_HOSTS = [ '*' ]
Uncomment the TIME_ZONE variable and set it to the appropriate value.
TIME_ZONE = 'Asia/Kolkata'
Uncomment the USE_REMOTE_USER_AUTHENTICATION variable and set it to TRUE so that the remote user gets authenticated before making any database changes.
USE_REMOTE_USER_AUTHENTICATION = True
Change the database settings.
DATABASES = {
    'default': {
        'NAME': 'graphitedb',
        'ENGINE': 'django.db.backends.postgresql_psycopg2',
        'USER': 'graphite',
        'PASSWORD': 'your_password',
        'HOST': '127.0.0.1',
        'PORT': ''
    }
}
Save the file by pressing Ctrl X and entering Y when prompted.
Install some prerequisites for Python’s PostgreSQL wrapper.
$ sudo pip install psycopg2-binary
Run the following command to import the database schema.
$ sudo PYTHONPATH=/opt/graphite/webapp/ django-admin.py migrate --settings=graphite.settings
You will get the following output.
Operations to perform:
  Apply all migrations: account, admin, auth, contenttypes, dashboard, events, sessions, tagging, tags, url_shortener
Running migrations:
  Applying contenttypes.0001_initial... OK
  Applying auth.0001_initial... OK
  Applying account.0001_initial... OK
  Applying admin.0001_initial... OK
  Applying admin.0002_logentry_remove_auto_add... OK
  Applying admin.0003_logentry_add_action_flag_choices... OK
  Applying contenttypes.0002_remove_content_type_name... OK
  Applying auth.0002_alter_permission_name_max_length... OK
  Applying auth.0003_alter_user_email_max_length... OK
  Applying auth.0004_alter_user_username_opts... OK
  Applying auth.0005_alter_user_last_login_null... OK
  Applying auth.0006_require_contenttypes_0002... OK
  Applying auth.0007_alter_validators_add_error_messages... OK
  Applying auth.0008_alter_user_username_max_length... OK
  Applying auth.0009_alter_user_last_name_max_length... OK
  Applying auth.0010_alter_group_name_max_length... OK
  Applying auth.0011_update_proxy_permissions... OK
  Applying auth.0012_alter_user_first_name_max_length... OK
  Applying dashboard.0001_initial... OK
  Applying events.0001_initial... OK
  Applying sessions.0001_initial... OK
  Applying tagging.0001_initial... OK
  Applying tagging.0002_on_delete... OK
  Applying tags.0001_initial... OK
  Applying url_shortener.0001_initial... OK
Next, collect the static files.
$ sudo PYTHONPATH=/opt/graphite/webapp/ django-admin.py collectstatic --settings=graphite.settings
Set the correct ownership settings.
$ sudo chown -R www-data:www-data /opt/graphite/storage/
$ sudo chown -R www-data:www-data /opt/graphite/static/
$ sudo chown -R www-data:www-data /opt/graphite/webapp/
Create a root user for login.
$ sudo PYTHONPATH=/opt/graphite/webapp/ django-admin.py createsuperuser --settings=graphite.settings
Username (leave blank to use 'root'): navjot
Email address: [email protected]
Password:
Password (again):
Superuser created successfully.
It will ask you to create a superuser. This user will be used later to connect to the Graphite application.
Step 6 – Configure Apache
Graphite ships with Apache configuration files by default. Install Apache server.
$ sudo apt install apache2 libapache2-mod-wsgi-py3
Create the mod_wsgi file.
$ sudo cp /opt/graphite/conf/graphite.wsgi.example /opt/graphite/conf/graphite.wsgi
Copy the graphite example configuration file to the Apache location.
$ sudo cp /opt/graphite/examples/example-graphite-vhost.conf /etc/apache2/sites-available/graphite.conf
Open the Graphite configuration file for editing.
$ sudo nano /etc/apache2/sites-available/graphite.conf
Change the port number in the first line from 80 to 127.0.0.1:8080. Putting 127.0.0.1 in front of it restricts it from being accessible over the web.
Add your domain name.
ServerName graphite.example.com #Replace with your domain
Add the following lines below the line Alias /static/ /opt/graphite/static/.
#Add below lines

     Require all granted
Save the file by pressing Ctrl X and entering Y when prompted.
Disable the default virtual host and enable the Graphite virtual host file.
$ sudo a2dissite 000-default
$ sudo a2ensite graphite
We will also need to tell Apache to listen to port 8080 and stop listening to port 80 because we will be using Nginx as a proxy server.
Open the file /etc/apache2/ports.conf for editing.
$ sudo nano /etc/apache2/ports.conf
Find the line Listen 80 and replace it with the following.
Listen 127.0.0.1:8080
Save the file by pressing Ctrl X and entering Y when prompted.
Restart the Apache server.
$ sudo systemctl restart apache2
To verify that Graphite is working properly and is accessible, run the following command.
$ curl 127.0.0.1:8080
You will get the following output.
Graphite Browser
This confirms it is working fine.
Step 7 – Install Nginx
We will use Nginx as a proxy server for Apache. This way we get to reap the benefits of security, and obscurity all the while using the existing configuration provided by Graphite.
Ubuntu 22.04 ships with an older version of Nginx. To install the latest version, you need to download the official Nginx repository.
Import Nginx’s signing key.
$ curl https://nginx.org/keys/nginx_signing.key | gpg --dearmor
| sudo tee /usr/share/keyrings/nginx-archive-keyring.gpg >/dev/null
Add the repository for Nginx’s stable version.
$ echo "deb [signed-by=/usr/share/keyrings/nginx-archive-keyring.gpg arch=amd64]
http://nginx.org/packages/ubuntu `lsb_release -cs` nginx"
| sudo tee /etc/apt/sources.list.d/nginx.list
Update the system repositories.
$ sudo apt update
Install Nginx.
$ sudo apt install nginx
Verify the installation.
$ nginx -v
nginx version: nginx/1.22.0
Start the Nginx server.
$ sudo systemctl start nginx
Step 8 – Install SSL
We need to install Certbot to generate the SSL certificate. You can either install Certbot using Ubuntu’s repository or grab the latest version using the Snapd tool. We will be using the Snapd version.
Ubuntu 22.04 comes with Snapd installed by default. Run the following commands to ensure that your version of Snapd is up to date.
$ sudo snap install core
$ sudo snap refresh core
Install Certbot.
$ sudo snap install --classic certbot
Use the following command to ensure that the Certbot command can be run by creating a symbolic link to the /usr/bin directory.
$ sudo ln -s /snap/bin/certbot /usr/bin/certbot
Run the following command to generate an SSL Certificate.
$ sudo certbot certonly --nginx --agree-tos --no-eff-email --staple-ocsp --preferred-challenges http -m [email protected] -d graphite.example.com
The above command will download a certificate to the /etc/letsencrypt/live/graphite.example.com directory on your server.
Generate a Diffie-Hellman group certificate.
$ sudo openssl dhparam -dsaparam -out /etc/ssl/certs/dhparam.pem 4096
Check the Certbot renewal scheduler service.
$ sudo systemctl list-timers
You will find snap.certbot.renew.service as one of the services scheduled to run.
NEXT                        LEFT          LAST                        PASSED   UNIT                           ACTIVATES

.................................................................................................................................
Wed 2022-09-28 00:00:00 UTC 7h left       Tue 2022-09-27 00:00:01 UTC 16h ago  logrotate.timer                logrotate.service
Wed 2022-09-28 02:39:09 UTC 10h left      Tue 2022-09-27 09:42:42 UTC 6h ago   apt-daily.timer                apt-daily.service
Wed 2022-09-28 06:02:00 UTC 13h left      n/a                         n/a      snap.certbot.renew.timer       snap.certbot.renew.service
To check whether the SSL renewal is working fine, do a dry run of the process.
$ sudo certbot renew --dry-run
If you see no errors, you are all set. Your certificate will renew automatically.
Step 9 – Configure Nginx
Open the file /etc/nginx/nginx.conf for editing.
$ sudo nano /etc/nginx/nginx.conf
Add the following line before the line include /etc/nginx/conf.d/*.conf;.
server_names_hash_bucket_size 64;
Save the file by pressing Ctrl X and entering Y when prompted.
Create and open the file /etc/nginx/conf.d/uvdesk.conf for editing.
$ sudo nano /etc/nginx/conf.d/graphite.conf
Paste the following code in it.
server {
    listen       443 ssl http2;
    listen       [::]:443 ssl http2;
    server_name  graphite.example.com;

    access_log  /var/log/nginx/graphite.access.log;
    error_log   /var/log/nginx/graphite.error.log;

	# SSL
    ssl_certificate      /etc/letsencrypt/live/graphite.example.com/fullchain.pem;
    ssl_certificate_key  /etc/letsencrypt/live/graphite.example.com/privkey.pem;
    ssl_trusted_certificate /etc/letsencrypt/live/graphite.example.com/chain.pem;
    ssl_session_timeout  5m;
    ssl_session_cache shared:MozSSL:10m;
    ssl_session_tickets off;
    ssl_protocols TLSv1.2 TLSv1.3;
    ssl_prefer_server_ciphers on;
    ssl_ciphers ECDHE-ECDSA-AES128-GCM-SHA256:ECDHE-RSA-AES128-GCM-SHA256:ECDHE-ECDSA-AES256-GCM-SHA384:ECDHE-RSA-AES256-GCM-SHA384:ECDHE-ECDSA-CHACHA20-POLY1305:ECDHE-RSA-CHACHA20-POLY1305:DHE-RSA-AES128-GCM-SHA256:DHE-RSA-AES256-GCM-SHA384;
    ssl_ecdh_curve X25519:prime256v1:secp384r1:secp521r1;
    ssl_stapling on;
    ssl_stapling_verify on;
    ssl_dhparam /etc/ssl/certs/dhparam.pem;
    resolver 8.8.8.8;

    location / {
       proxy_set_header Connection "upgrade";
       proxy_set_header Upgrade $http_upgrade;
       proxy_http_version 1.1;

       proxy_set_header Host $http_host;
       proxy_set_header X-Real-IP $remote_addr;
       proxy_set_header X-Forwarded-For $proxy_add_x_forwarded_for;
       proxy_set_header X-Forwarded-Proto $scheme;
       proxy_set_header X-NginX-Proxy true;

       proxy_pass http://127.0.0.1:8080;
       proxy_redirect off;
    }
}

# enforce HTTPS
server {
    listen       80;
    listen       [::]:80;
    server_name  graphite.example.com;
    return 301   https://$host$request_uri;
}
Save the file by pressing Ctrl X and entering Y when prompted once finished.
Verify the Nginx configuration file syntax.
$ sudo nginx -t
nginx: the configuration file /etc/nginx/nginx.conf syntax is ok
nginx: configuration file /etc/nginx/nginx.conf test is successful
Restart the Nginx service.
$ sudo systemctl restart nginx
Step 10 – Access and Use Graphite
Visit the URL https://graphite.example.com in your browser and you will get the following screen.
Click the Login link on the top right to open the login page. Enter your superuser credentials created in step 5 and press the login button to proceed.
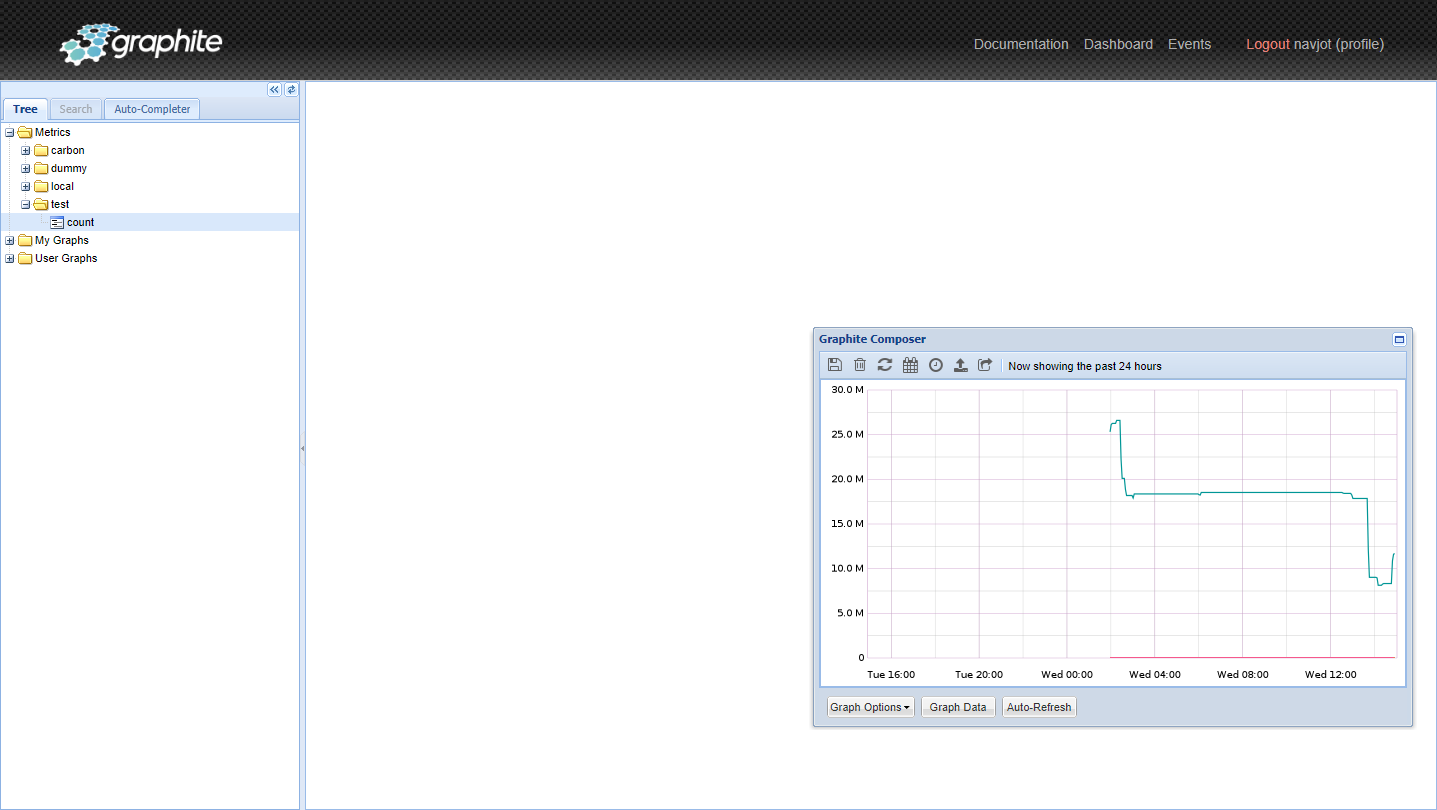
There are several methods to feed data to Graphite. We added a pattern matcher in Storage schema, according to which any pattern that starts with the test, will be recorded as our pattern. Let’s add some random data using the following command.
$ echo "test.count 9 `date %s`" | nc -q0 127.0.0.1 2003;
This will add one data metric of value 9 to the system. Let’s add some more data by looping through values.
$ for i in 4 6 8 16 2; do echo "test.count $i `date %s`" | nc -q0 127.0.0.1 2003; sleep 6; done
Go back to the Graphite dashboard and open Metrics >> test >> count from the left sidebar. You should see something like the following.
You can now start using it for monitoring. You can also combine it with Grafana to get a high level of customization.
Conclusion
This concludes our tutorial on installing and configuring Graphite on a Ubuntu 22.04 server along with Nginx as a proxy server. If you have any questions, post them in the comments below.


