
FileRun is a self-hosted file sync and share web-based application. It can run on any server including Linux, Windows, NAS, etc. The files are accessible on the web and mobile using a PWA app. It is compatible with Nextcloud so you can use its desktop and mobile apps to access your files. You can also access the files using the WebDAV protocol. FileRun can also be used as a Google Photos replacement and has support for office and image plugins.
FileRun is available as a free version which can support up to 10 accounts and as an enterprise version if you want more features and accounts. In this tutorial, you will learn how to install FileRun using a Docker environment on your Linux server. We will also configure Elasticsearch to provide full-text search support.
Prerequisites
-
A Linux server with a minimum of 2 CPU cores and 2GB of RAM. This tutorial will run on every Linux distribution.
-
A non-root user with sudo privileges.
-
A fully qualified domain name (FQDN) pointing to the server. For our purposes, we will use
filerun.example.comas the domain name. -
Make sure everything is updated.
## Ubuntu/Debian
$ sudo apt update && sudo apt upgrade

## CentOS/Fedora/Rocky Linux/AlmaLinux
$ sudo dnf update
-
Install basic utility packages. Some of these may already be installed.
## Ubuntu/Debian
$ sudo apt install wget curl nano unzip -y

## CentOS/Rocky Linux/AlmaLinux
$ sudo dnf install wget curl nano unzip yum-utils -y
Step 1 – Configure Firewall
Cent OS/Rocky Linux/Alma Linux
You should have the Firewalld firewall installed. Check the firewall’s status.
$ sudo firewall-cmd --state
running
Open ports 80, 9443, and 443. Portainer uses port 9443 to expose its web UI via HTTPS. Nginx Proxy Manager uses port 81 for its UI.
$ sudo firewall-cmd --permanent --add-service=http
$ sudo firewall-cmd --permanent --add-service=https
Reload the firewall to enable the changes.
$ sudo firewall-cmd --reload
Ubuntu/Debian
Ubuntu and Debian systems use ufw (Uncomplicated Firewall) by default.
Check if the firewall is running.
$ sudo ufw status
If it is running, then open HTTP and HTTPS ports.
$ sudo ufw allow http
$ sudo ufw allow https
Open the SSH port if the firewall isn’t running.
$ sudo ufw allow "OpenSSH"
Enable the firewall if it is not running.
$ sudo ufw enable
If it is running, reload it to apply the changes.
$ sudo ufw reload
Step 2 – Install Docker and Docker Compose
Run the following command to install Docker.
CentOS/Rocky Linux/Alma Linux
$ sudo dnf install -y yum-utils
$ sudo yum-config-manager
    --add-repo
    https://download.docker.com/linux/centos/docker-ce.repo
$ sudo dnf install docker-ce docker-ce-cli containerd.io docker-compose-plugin
You may get the following error while trying to install Docker.
ror:
 Problem: problem with installed package buildah-1:1.26.2-1.el9_0.x86_64
  - package buildah-1:1.26.2-1.el9_0.x86_64 requires runc >= 1.0.0-26, but none of the providers can be installed
  - package containerd.io-1.6.9-3.1.el9.x86_64 conflicts with runc provided by runc-4:1.1.3-2.el9_0.x86_64
  - package containerd.io-1.6.9-3.1.el9.x86_64 obsoletes runc provided by runc-4:1.1.3-2.el9_0.x86_64
  - cannot install the best candidate for the job
Use the following command if you get the error above.
$ sudo dnf install docker-ce docker-ce-cli containerd.io docker-compose-plugin --allowerasing
Ubuntu
$ sudo apt install ca-certificates curl gnupg lsb-release
$ curl -fsSL https://download.docker.com/linux/ubuntu/gpg | sudo gpg --dearmor -o /etc/apt/keyrings/docker.gpg
$ echo
  "deb [arch=$(dpkg --print-architecture) signed-by=/etc/apt/keyrings/docker.gpg] https://download.docker.com/linux/ubuntu
  $(lsb_release -cs) stable" | sudo tee /etc/apt/sources.list.d/docker.list > /dev/null
$ sudo apt update
$ sudo apt install docker-ce docker-ce-cli containerd.io docker-compose-plugin
Debian
$ sudo apt install ca-certificates curl gnupg lsb-release
$ curl -fsSL https://download.docker.com/linux/debian/gpg | sudo gpg --dearmor -o /etc/apt/keyrings/docker.gpg
$ echo
  "deb [arch=$(dpkg --print-architecture) signed-by=/etc/apt/keyrings/docker.gpg] https://download.docker.com/linux/debian
  $(lsb_release -cs) stable" | sudo tee /etc/apt/sources.list.d/docker.list > /dev/null
$ sudo apt update
$ sudo apt install docker-ce docker-ce-cli containerd.io docker-compose-plugin
Enable and Start the Docker service.
$ sudo systemctl start docker --now
Add your username to the Docker group.
$ sudo usermod -aG docker $USER
Log out of the system and log back in to apply the change.
Step 3 – Create FileRun Docker Configuration
Create a directory for Filerun Docker Configuration.
$ mkdir dockerfilerun
Switch to the directory.
$ cd ~/dockerfilerun
Create and open the Docker compose file for editing.
$ nano docker-compose.yml
Paste the following code in it.
version: '3.8'

services:
  db:
    image: mariadb:10.5
    container_name: filerun_mariadb
    environment:
      MYSQL_ROOT_PASSWORD: your_mysql_root_password
      MYSQL_USER: your_filerun_username
      MYSQL_PASSWORD: your_filerun_password
      MYSQL_DATABASE: your_filerun_database
    volumes:
      - ./db:/var/lib/mysql

  web:
    image: filerun/filerun
    container_name: filerun_web
    environment:
      FR_DB_HOST: db
      FR_DB_PORT: 3306
      FR_DB_NAME: your_filerun_database
      FR_DB_USER: your_filerun_username
      FR_DB_PASS: your_filerun_password
      APACHE_RUN_USER: www-data
      APACHE_RUN_USER_ID: 33
      APACHE_RUN_GROUP: www-data
      APACHE_RUN_GROUP_ID: 33
    depends_on:
      - db
    links:
      - db
      - tika
      - elasticsearch
    ports:
      - "8080:80"
    volumes:
      - ./html:/var/www/html
      - ./user-files:/user-files

  tika:
    image: apache/tika
    container_name: filerun_tika

  elasticsearch:
    image: docker.elastic.co/elasticsearch/elasticsearch:6.8.23
    container_name: filerun_search
    environment:
      - cluster.name=docker-cluster
      - bootstrap.memory_lock=true
      - "ES_JAVA_OPTS=-Xms512m -Xmx512m"
    ulimits:
      memlock:
        soft: -1
        hard: -1
      nofile:
        soft: 65535
        hard: 65535
    mem_limit: 1g
    volumes:
      - ./esearch:/usr/share/elasticsearch/data
Save the file by pressing Ctrl X and entering Y when prompted.
Let us go through the compose file.
- First, we pull the MariaDB docker image for storing the data. Enter a root password, MySQL username, MySQL password, and the name of the database for FileRun. We backup the database by mounting it in the
~/dockerfilerun/dbdirectory. - Next, we pull the FileRun container which connects to the MariaDB image using the same database credentials. It also runs the Apache server in-house and exposes FileRun via port 80. We also mount a public directory on the host at
~/dockerfilerun/htmldirectory and corresponding user-uploaded files at the~/dockerfilerun/user-filesdirectory. - Next, we pull the Apache Tika container which helps Filerun reads the metadata of the files.
- And lastly, we pull the Elasticsearch container which helps with running a full-text search on content uploaded on FileRun. FIleRun supports only Elasticsearch 6.8.x at the moment. You can use the environment variables to control the memory limit with respect to the available memory on your server. We will mount the Elasticsearch data in the
~/dockerfilerun/esearchdirectory.
Create the directory for Elasticsearch. Docker creates directories for volumes automatically but Elasticsearch only works when the local directory is owned by the user and the group has 1000 as its ID.
$ mkdir esearch
Set the correct permissions using the following commands.
$ chmod g rwx esearch
$ sudo chgrp 1000 esearch
Before starting the container, we need to increase the limits on mmap counts for Elasticsearch to work. Open the /etc/sysctl.conf file for editing.
$ sudo nano /etc/sysctl.conf
Paste the following line at the bottom.
vm.max_map_count = 262144
Save the file by pressing Ctrl X and entering Y when prompted. This will make the change permanent but only if you restart the system.
Run the following command to implement the change right now.
$ sudo sysctl -w vm.max_map_count=262144
Restart the Docker service.
$ sudo systemctl restart docker
Step 4 – Run the FileRun Docker Container
Run the following command to launch the Docker container.
$ docker compose up -d
The process will take some time to complete which includes grabbing the Docker images, creating a network, and launching the required containers.
Check the status of the containers.
$ docker ps
You will get a similar output.
The next step is to install SSL using Nginx to make it more secure. We will use the Nginx server to do that.
Step 5 – Install Nginx
CentOS/Rocky Linux/Alma Linux
To install the latest version of Nginx, you need to install the official Nginx repository.
Install the pre-requisite package.
$ sudo dnf install yum-utils
Create and open the Nginx yum repository.
$ sudo nano /etc/yum.repos.d/nginx.repo
Paste the following code.
[nginx-stable]
name=nginx stable repo
baseurl=http://nginx.org/packages/centos/$releasever/$basearch/
gpgcheck=1
enabled=1
gpgkey=https://nginx.org/keys/nginx_signing.key
module_hotfixes=true

[nginx-mainline]
name=nginx mainline repo
baseurl=http://nginx.org/packages/mainline/centos/$releasever/$basearch/
gpgcheck=1
enabled=0
gpgkey=https://nginx.org/keys/nginx_signing.key
module_hotfixes=true
Save the file by pressing Ctrl X and entering Y when prompted.
Install Nginx.
$ sudo dnf install nginx
Enable and start the Nginx server.
$ sudo systemctl start nginx --now
Configure SELinux to allow network connections from Filerun.
$ sudo setsebool -P httpd_can_network_connect on
Ubuntu/Debian
Ubuntu 22.04 and Debian 11 ship with an older version of Nginx. To install the latest version, you need to download the official Nginx repository.
Import Nginx’s signing key.
$ curl https://nginx.org/keys/nginx_signing.key | gpg --dearmor
| sudo tee /usr/share/keyrings/nginx-archive-keyring.gpg >/dev/null
Add the repository for Nginx’s stable version.
$ echo "deb [signed-by=/usr/share/keyrings/nginx-archive-keyring.gpg arch=amd64]
http://nginx.org/packages/ubuntu `lsb_release -cs` nginx"
| sudo tee /etc/apt/sources.list.d/nginx.list
For Debian, use the following command instead.
$ echo "deb [signed-by=/usr/share/keyrings/nginx-archive-keyring.gpg]
http://nginx.org/packages/debian `lsb_release -cs` nginx"
| sudo tee /etc/apt/sources.list.d/nginx.list
Update the system repositories.
$ sudo apt update
Install Nginx.
$ sudo apt install nginx
Verify the installation.
$ nginx -v
nginx version: nginx/1.22.1
Step 6 – Install SSL
Ubuntu/Debian
We need to install Certbot to generate the SSL certificate. You can either install Certbot using Ubuntu’s repository or grab the latest version using the Snapd tool. We will be using the Snapd version.
Ubuntu 22.04 and Debian 11 come with Snapd installed by default. Run the following commands to ensure that your version of Snapd is up to date.
$ sudo snap install core
Install Certbot.
$ sudo snap install --classic certbot
Use the following command to ensure that the Certbot command can be run by creating a symbolic link to the /usr/bin directory.
$ sudo ln -s /snap/bin/certbot /usr/bin/certbot
CentOS/Rocky Linux/Alma Linux
Certbot requires the EPEL repository to work.
$ sudo dnf install epel-release
We will use Snapd to install Certbot. Install Snapd.
$ sudo dnf install snapd
Enable and Start the Snap service.
$ sudo systemctl enable snapd --now
Install the Snap core package.
$ sudo snap install core
$ sudo snap refresh core
Create necessary links for Snapd to work.
$ sudo ln -s /var/lib/snapd/snap /snap
$ echo 'export PATH=$PATH:/var/lib/snapd/snap/bin' | sudo tee -a /etc/profile.d/snapd.sh
Issue the following command to install Certbot.
$ sudo snap install --classic certbot
Enable Certbot by creating the symlink to its executable.
$ sudo ln -s /snap/bin/certbot /usr/bin/certbot
Run the following command to generate an SSL Certificate.
$ sudo certbot certonly --nginx --agree-tos --no-eff-email --staple-ocsp --preferred-challenges http -m [email protected] -d filerun.example.com
We have generated the SSL certificate using the certonly option of Certbot using Nginx. It installs the certificate using the Nginx server but doesn’t modify anything.
The above command will download a certificate to the /etc/letsencrypt/live/filerun.example.com directory on your server.
Generate a Diffie-Hellman group certificate.
$ sudo openssl dhparam -dsaparam -out /etc/ssl/certs/dhparam.pem 4096
To check whether the SSL renewal is working fine, do a dry run of the process.
$ sudo certbot renew --dry-run
If you see no errors, you are all set. Your certificate will renew automatically.
Step 7 – Configure Nginx
Open the file /etc/nginx/nginx.conf for editing.
$ sudo nano /etc/nginx/nginx.conf
Add the following line before the line include /etc/nginx/conf.d/*.conf;.
server_names_hash_bucket_size 64;
Save the file by pressing Ctrl X and entering Y when prompted.
Create and open the file /etc/nginx/conf.d/filerun.conf for editing.
$ sudo nano /etc/nginx/conf.d/filerun.conf
Paste the following code in it. Replace filerun.example.com with your domain name.
upstream backend {
   server 127.0.0.1:8080;
   keepalive 32;
}

server {
  listen 80 default_server;
  server_name filerun.example.com;
  return 301 https://$server_name$request_uri;
}

server {
   listen 443 ssl http2;
   server_name filerun.example.com;

   http2_push_preload on; # Enable HTTP/2 Server Push

   ssl_certificate /etc/letsencrypt/live/filerun.example.com/fullchain.pem;
   ssl_certificate_key /etc/letsencrypt/live/filerun.example.com/privkey.pem;
   ssl_trusted_certificate /etc/letsencrypt/live/filerun.example.com/chain.pem;
   ssl_session_timeout 1d;

   # Enable TLS versions (TLSv1.3 is required upcoming HTTP/3 QUIC).
   ssl_protocols TLSv1.2 TLSv1.3;

   # Enable TLSv1.3's 0-RTT. Use $ssl_early_data when reverse proxying to
   # prevent replay attacks.
   #
   # @see: https://nginx.org/en/docs/http/ngx_http_ssl_module.html#ssl_early_data
   ssl_early_data on;

   ssl_ciphers 'ECDHE-ECDSA-AES256-GCM-SHA384:ECDHE-RSA-AES256-GCM-SHA384:ECDHE-ECDSA-CHACHA20-POLY1305:ECDHE-RSA-CHACHA20-POLY1305:ECDHE-ECDSA-AES256-SHA384:ECDHE-RSA-AES256-SHA384';
   ssl_prefer_server_ciphers on;
   ssl_session_cache shared:SSL:50m;
   # OCSP Stapling --- fetch OCSP records from URL in ssl_certificate and cache them
   ssl_stapling on;
   ssl_stapling_verify on;
   ssl_dhparam /etc/ssl/certs/dhparam.pem;

   add_header X-Early-Data $tls1_3_early_data;

   access_log /var/log/nginx/filerun.access.log main;
   error_log  /var/log/nginx/filerun.error.log;

   location / {
       client_max_body_size 50M;
       proxy_set_header Connection "";
       proxy_set_header Host $http_host;
       proxy_set_header X-Real-IP $remote_addr;
       proxy_set_header X-Forwarded-For $proxy_add_x_forwarded_for;
       proxy_set_header X-Forwarded-Proto $scheme;
       proxy_set_header X-Forwarded-Protocol $scheme;
       proxy_buffers 256 16k;
       proxy_buffer_size 16k;
       proxy_read_timeout 1800s;
       proxy_connect_timeout 1800s;
       proxy_http_version 1.1;
       proxy_pass http://backend;
   }
}

# This block is useful for debugging TLS v1.3. Please feel free to remove this
# and use the `$ssl_early_data` variable exposed by NGINX directly should you
# wish to do so.
map $ssl_early_data $tls1_3_early_data {
  "~." $ssl_early_data;
  default "";
}
Save the file by pressing Ctrl X and entering Y when prompted.
Verify your Nginx configuration.
$ sudo nginx -t
Restart the Nginx server.
$ sudo systemctl restart nginx
Step 8 – Access and Configure FileRun
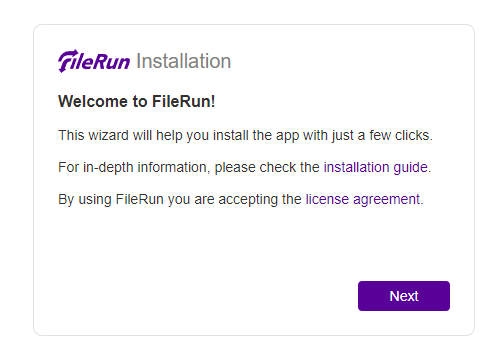
Visit the URL https://filerun.example.com and you will get the following screen.
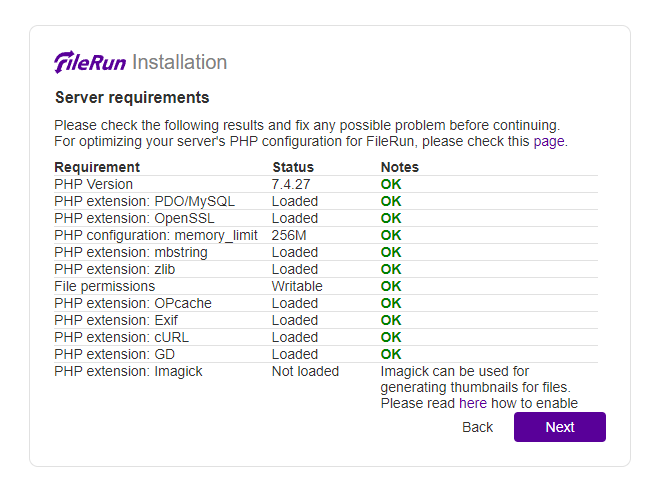
Click the Next button to open the system requirements page.
If everything is okay, click the Next button to move ahead to the database setup page.
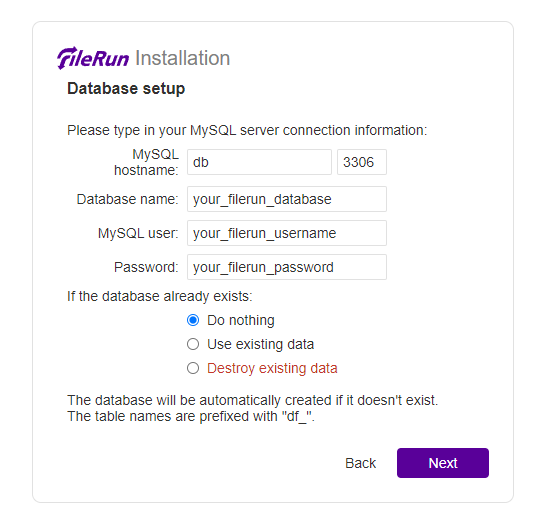
Fill in your database name, user, and password, and click the Next button to proceed.
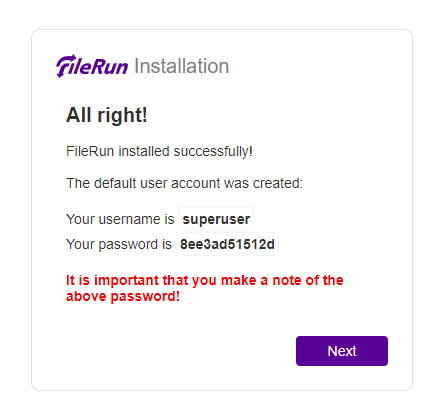
Here you will be provided with the login details. Click the Next button to open the login page.
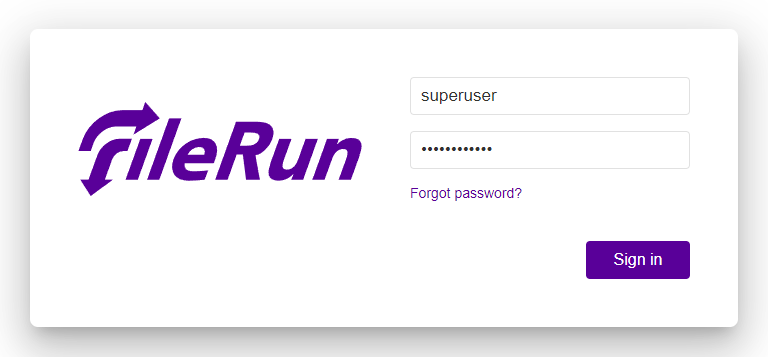
Enter your login credentials from the previous step and click the Sign in button to open FileRun’s dashboard.
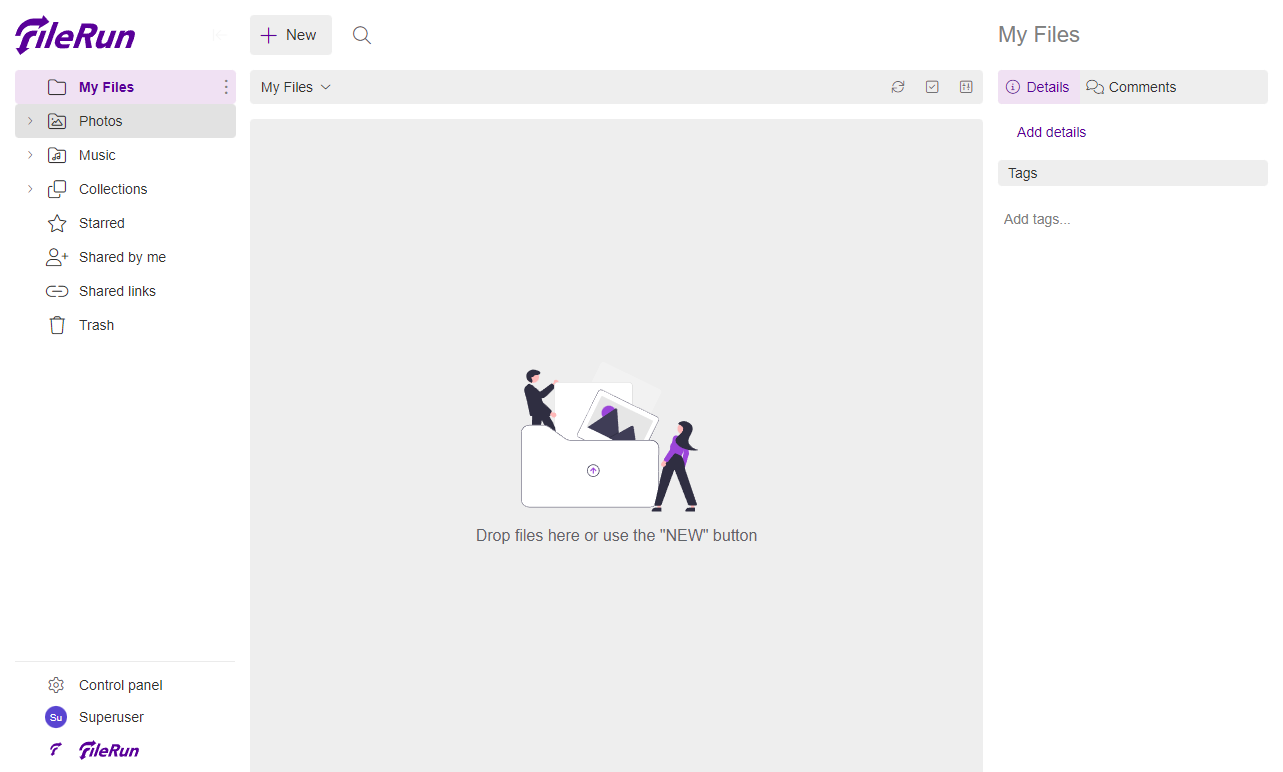
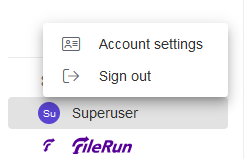
Click the Superuser link at the left-most bottom of the screen and click Account Settings.
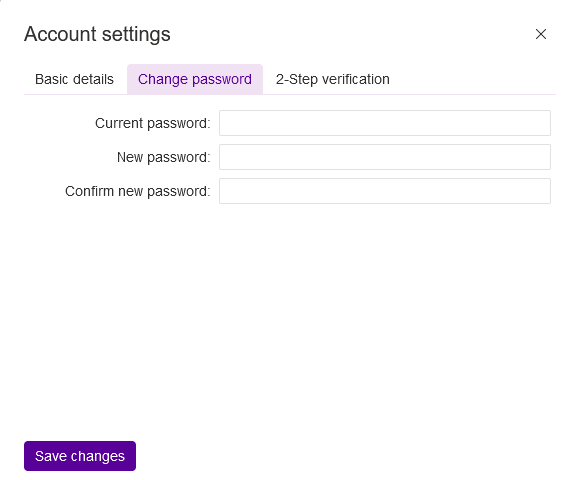
Click the Change password tab to access the following page where you can change your default password. Click the Save changes button to save.
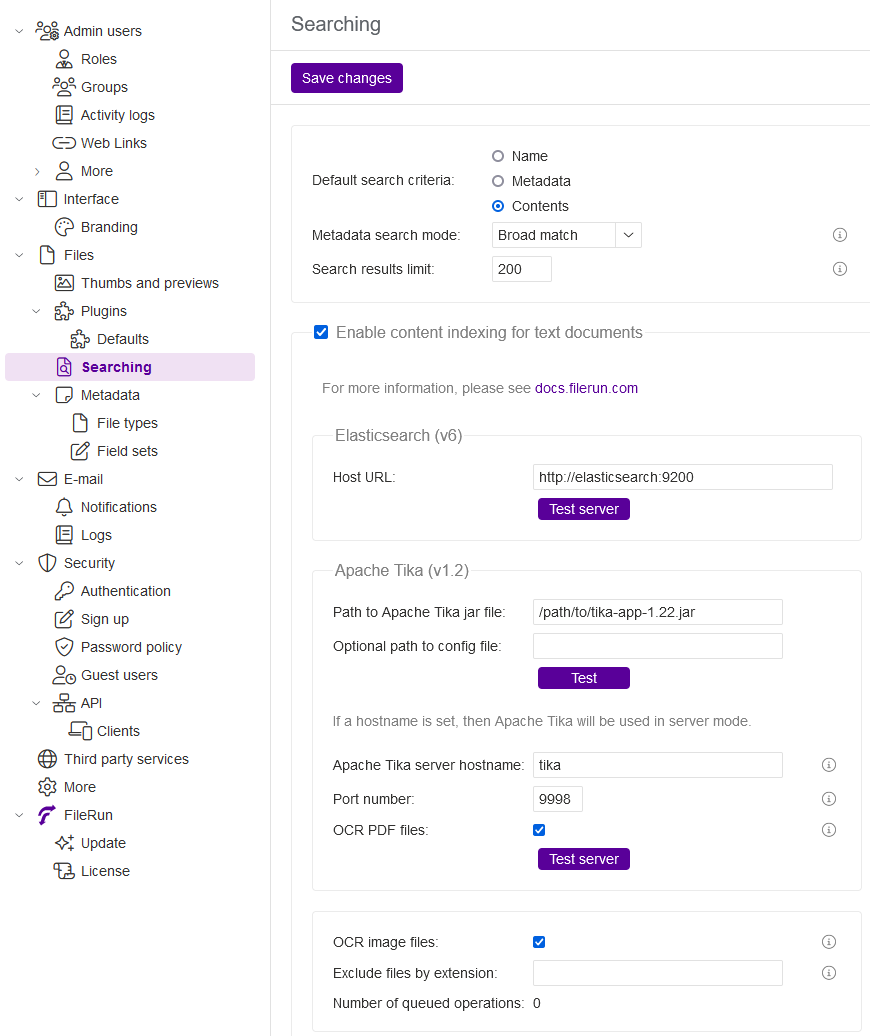
Click the Control Panel link from the bottom left of the page to access the FileRun Control Panel. Visit the Files >> Searching section of the page. Here we will enable some advanced file search and OCR features.
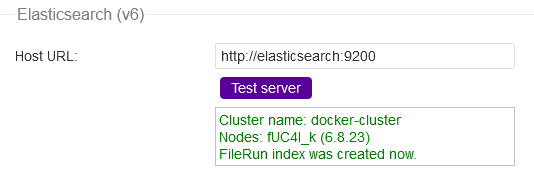
Enter http://elasticsearch:9200 as the ElasticSearch Host URL. The Hostname refers to Elastic’s service name in the docker file. Click the Test server button to test if it is working properly.
You should get a similar output above which confirms it is working properly.
Enter tika as the Apache Tika Server hostname. Enter 9998 as the port number. Check the OCR PDF Files button. Click the Test server button to test if it is working properly.
You should get a similar output for the Tika server which confirms it is working properly. Also, click the OCR image files button. Click the Save changes button at top of the page.
Next, change the value of the Default search criteria option from Name to Contents to enable full-text search. Click the Save changes button again to finish the process.
Step 9 – Update FileRun
Upgrading FileRun is a simple step. Switch to FileRun’s Docker compose directory.
$ cd ~/dockerfilerun
Next, stop and remove the existing container. Your data will be retained though.
$ docker compose down --remove-orphans
Pull the latest version of the FileRun docker image.
$ docker compose pull
Start the containers again.
$ docker compose up -d
Your FileRun installation is updated and started again.
Conclusion
This concludes the tutorial where you learned how to install FileRun file hosting software using Docker on a Linux server. If you have any questions, post them in the comments below.


