
Joomla is an award-winning content management system (CMS) that is used for making dynamic websites. It is open-source and is available for free under GPL (general public license). It is based on a model–view–controller framework. It powers millions of websites around the world. It can be used to develop websites for different purposes like business websites, online magazines, e-commerce, portals etc. Joomla has large community of users to provide support.
Benefits of Using Joomla CMS
- Joomla provides many third-party extensions from its extension directory and these extensions are verified.
- Lots of free and paid high-quality templates can be used to build a customized website.
- It comes with powerful SEO tools to give optimum performance related to search engine queries.
- With the support of a large community of developers, designers etc, Joomla lives with the notion “Free forever Open Source software”.
- To take security to the next level, Joomla has two-factor authentication and advanced access control features.
- Over 70 languages are supported out of the box, making the task of building a multilingual website very simple.
- It powers about 2 million websites that are active all over the world.
What will we cover?
In this guide, we will learn to install the Joomla CMS on Ubuntu 20.04. At the time of writing this article, the available stable version is Joomla 3.9.27. Version 4 is currently in beta release. Let’s dive into the installation process.
Pre-Flight Check
Before we begin to install Joomla on Ubuntu 20.04, check out the technical requirements for Joomla 3.x version.
- PHP ≥ 5.3.10 (Recommended 7.3 )
- MySQL ≥ 5.5.3 (Recommended 5.1 )
- Apache ≥ 2.0 (Recommended 2.4 )
- A user account with administrative access or ‘sudo’ privileges.
- Access to the internet.
Installing Apache, MySQL and PHP (LAMP Stack)
Joomla requires Apache, MariaDB (Mysql) server and php for its web server.
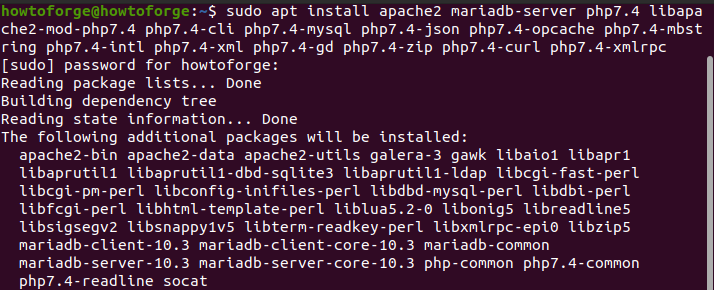
Step 1. To install Apache, MariaDB (MySql), PHP and other dependencies in one go, use the below command:
sudo apt install apache2 mariadb-server php7.4 libapache2-mod-php7.4 php7.4-cli php7.4-mysql php7.4-json php7.4-opcache php7.4-mbstring php7.4-intl php7.4-xml php7.4-gd php7.4-zip php7.4-curl php7.4-xmlrpc
Sample Output:
Reading package lists... Done
Building dependency tree
Reading state information... Done
The following additional packages will be installed:
  apache2-bin apache2-data apache2-utils galera-3 gawk libaio1 libapr1
  libaprutil1 libaprutil1-dbd-sqlite3 libaprutil1-ldap libcgi-fast-perl
  libcgi-pm-perl libconfig-inifiles-perl libdbd-mysql-perl libdbi-perl
  libfcgi-perl libhtml-template-perl liblua5.2-0 libonig5 libreadline5
  libsigsegv2 libsnappy1v5 libterm-readkey-perl libxmlrpc-epi0 libzip5
  mariadb-client-10.3 mariadb-client-core-10.3 mariadb-common
  mariadb-server-10.3 mariadb-server-core-10.3 php-common php7.4-common
  php7.4-readline socat
<img alt="Install Apache MariaDB PHP" data-ezsrc="https://kirelos.com/wp-content/uploads/2021/06/echo/20210614_075602.png60cb3738e68ac.jpg" ezimgfmt="rs rscb3 src ng ngcb3" height="290" loading="lazy" src="data:image/svg xml," width="714">
Step 2. Now that the Apache and MariaDB are installed, we can start and enable these services using the command:
sudo systemctl start apache2 mariadb
sudo systemctl enable apache2 mariadb
Setting Up MariaDB Server
Step 3. After installing MariaDB server, head over to ‘mysql_secure_installation‘ script to secure the database:
sudo mysql_secure_installation
Answer the series of questions that will appear on the screen and choose the settings as desired. We have provided the answers for our case in bolded text as shown below:
Enter current password for user root (enter for none) : [Press enter key]
Set root password? [Y/n] [Press y and enter new password and re-enter to confirm it]
Remove anonymous users? [Y/n] [ y]
Disallow root login remotely? [Y/n] [y]
Remove test database and access to it? [Y/n] [y]
Reload privilege tables now? [Y/n] [y]
That’s all, we can now move on to configure the database for Joomla.
Step 4. If everything has been set up correctly, we are ready to login to the MariaDB server and create a database ‘test_db’ and a user ‘test_user’ with the password ‘howtoforge’. These steps are explained below:
1. Login to the MariaDB database server:
sudo mysql -u root
2. Create a database named as “test_db” using the command:
create database test_db;
3. Create a user named as “test_user” with the command:
create user 'test_user'@'localhost' identified by 'howtoforge';
4. Give the required permissions to the above user by running:
grant all privileges on test_db.* to 'test_user'@'localhost';
5. Now just reload the grant tables to flush the privileges:
flush privileges;
6. At last we will exit the database using the command:
exit;
Downloading and Configuring Joomla
Step 5. Now we are all set to download the Joomla setup file and configure it. Open a terminal window and download the file using the ‘wget’ command. We can also download the file from the official website directly, but for now we will move on with the former way:
wget -O joomla.tar.bz https://downloads.joomla.org/cms/joomla3/3-9-27/Joomla_3-9-27-Stable-Full_Package.tar.bz2
<img alt="Downloading Joomla setup file" data-ezsrc="https://kirelos.com/wp-content/uploads/2021/06/echo/20210614_080610.png60cb3739c8e24.jpg" ezimgfmt="rs rscb3 src ng ngcb3" height="508" loading="lazy" src="data:image/svg xml,” width=”750″>
Step 6. Now make a directory ‘joomla3.9.27’ for joomla installation inside the apache web root directory (/var/www/html):
sudo mkdir /var/www/html/joomla3.9.27
Step 7. Extract the downloaded archive file inside the joomla installation directory we have just created:
sudo tar -xjf joomla.tar.bz -C /var/www/html/joomla3.9.27
Step 8. Now we will proceed by setting the required ownership and permission for the joomla directory. For this run the following two commands:
sudo chown -R www-data:www-data /var/www/html/joomla3.9.27/
sudo chmod -R 755 /var/www/html/joomla3.9.27/
Configuring Apache Web Server
Step 9. Next, we will now create a new configuration file ‘joomla.conf’ to be used with Joomla. Create this file with any text editor like ‘nano’:
sudo nano /etc/apache2/sites-available/joomla.conf
Inside the file, put the following entry and save the file:
DirectoryIndex index.html index.php
DocumentRoot /var/www/html/joomla3.9.27ErrorLog ${APACHE_LOG_DIR}/error.log
CustomLog ${APACHE_LOG_DIR}/access.log combined
DirectoryIndex index.html index.html.var index.php
Options FollowSymlinks
Allowoverride All
Require all granted
Step 10. To enable our new virtual host’s file, first disable the default site configuration using the command:
sudo a2dissite 000-default.conf
Now enable new site, using:
sudo a2ensite joomla.conf
Sample Output:
Enabling site joomla.
To activate the new configuration, you need to run:
  systemctl reload apache2
Step 11. For changes to take effect, reload the apache service with:
sudo systemctl reload apache2
Or you can also restart the apache service by making use of the restart command:
sudo systemctl restart apache2
Setting up Joomla from browser
From now onwards we need to only use the web browser to configure Joomla.
Step 12. The settings and configurations from the command line are all set now, we will now move with further steps from the browser end. Open a web browser (Mozilla Firefox, Google Chrome etc) and go to the url:
http://localhost/ (If you are developing on local development environment)
or
http://system_ip/ ( use your IP address )
Step 13. On the web page displayed after the above step, select a language from the drop box menu and inside the ‘Main Configuration’ section, fill in the details like site name, email address, description about site etc.
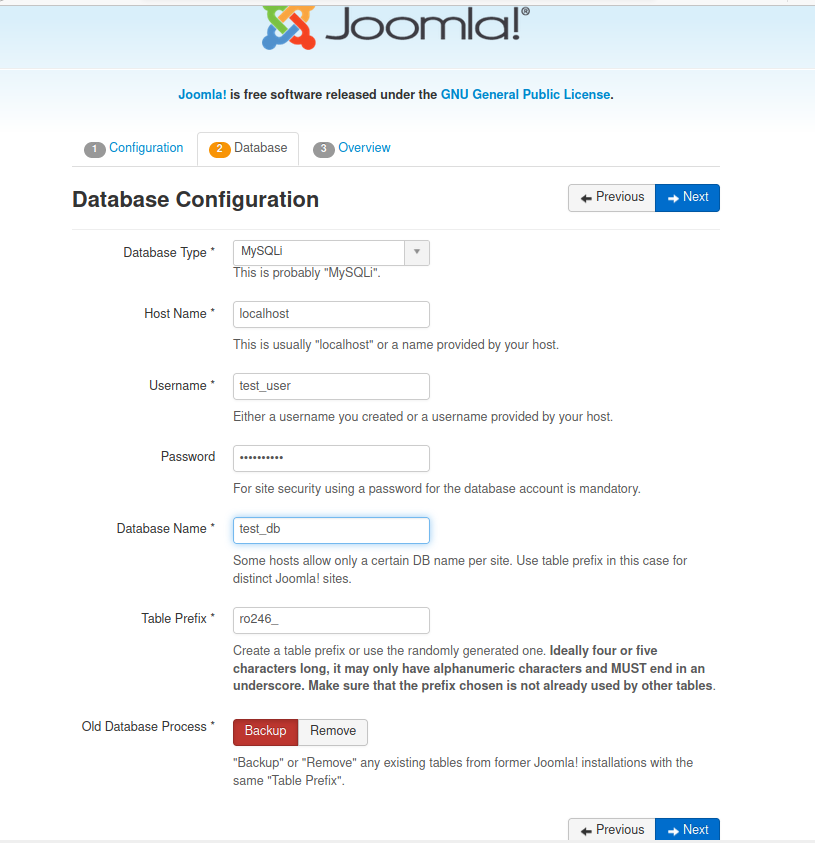
Step 14. Now we will connect the MariaDB database with our Joomla server. For this, enter the details of the database configuration we have used earlier. This includes database username, database name, and database password. Click ‘Next’ to continue:
<img alt="Connect to database" data-ezsrc="https://kirelos.com/wp-content/uploads/2021/06/echo/20210614_080653.png60cb373b71a59.jpg" ezimgfmt="rs rscb3 src ng ngcb3" height="750" loading="lazy" src="data:image/svg xml,” width=”725″>
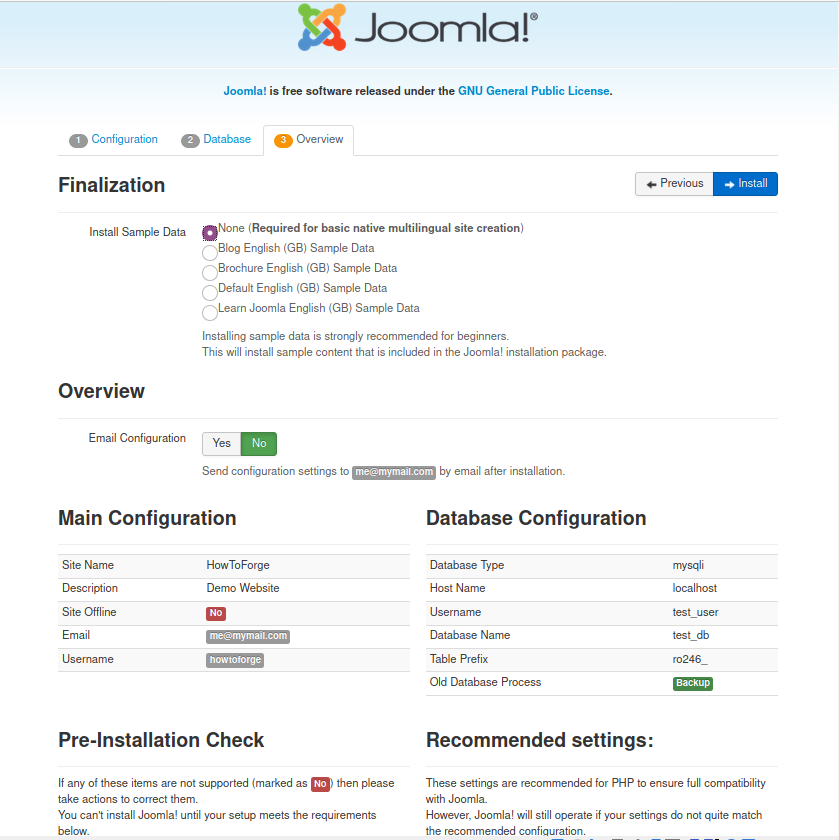
Step 15. On this page, you can review the settings you have set so far and check the recommended settings and pre-installation notes. If everything is set properly, you can continue, else go back and correct any error present:
Step 16. When you enter ‘Install’ button on the above page, Joomla installation should begin as shown below:
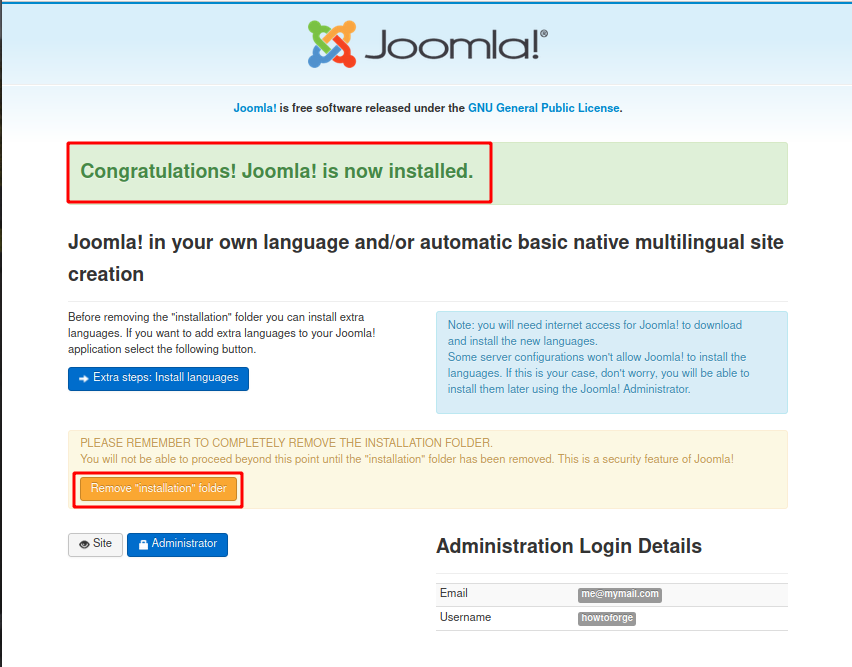
Step 17. When the installation is complete you will see the below page. It will ask you to remove the installation folder for security reasons. Just click the button ‘Remove “installation” folder’ to remove the folder.
Conclusion
In this guide, we have successfully demonstrated the steps of installing Joomla CMS on an Ubuntu 20.04 system. If you want to explore more features of Joomla CMS, try to build a website or blog and experience its extensive features with available plugins.


