Nginx (pronounced “engine x”) is a free, open-source, high-performance HTTP server. Nginx is known for its stability, rich feature set, simple configuration, and low resource consumption. This tutorial shows how you can install Nginx on an Ubuntu 15.10 server with PHP support (through PHP-FPM) and MariaDB (as MySQL replacement). The term LEMP stands for: Linux Nginx MySQL PHP.
1 Preliminary Note
In this tutorial, I will use the hostname server1.example.com with the IP address 192.168.1.100. These settings might differ for you, so you have to replace them where appropriate.
2 Installing MariaDB
I will install MariaDB instead od MySQL, MariaDB is a MySQL fork maintained by the original MySQL founder Monty Widenius which has some speed and feature improvements in comparison to MySQL. In order to install MariaDB, run:
sudo apt-get -y install mariadb-server mariadb-client
MariaDB has currently no password set for the root user. Run the mysql_secure_installation command to configure a password and remove the test database.
sudo mysql_secure_installation
You will be asked these questions:
Enter current password for root (enter for none): <-- press enter
Set root password? [Y/n] <-- y
New password: <-- Enter the new MariaDB root password here
Re-enter new password: <-- Repeat the password
Remove anonymous users? [Y/n] <-- y
Disallow root login remotely? [Y/n] <-- y
Reload privilege tables now? [Y/n] <-- y
3 Installing Nginx
Nginx is available as a package for Ubuntu 15.10. It might be that the apache web server is installed on your server and this might cause a conflict. Check that apache is not running:
ps aux | grep apache2
If this command does not return any results, proceed with the Nginx installation.
Remove apache in case that the above command shows some apache processes with these commands:
sudo systemctl stop apache2.service
sudo systemctl disable apache2.service
sudo apt-get remove apache2
Now we can install nginx.
sudo apt-get install nginx
Start Nginx afterward:
sudo systemctl start nginx.service
sudo systemctl enable nginx.service
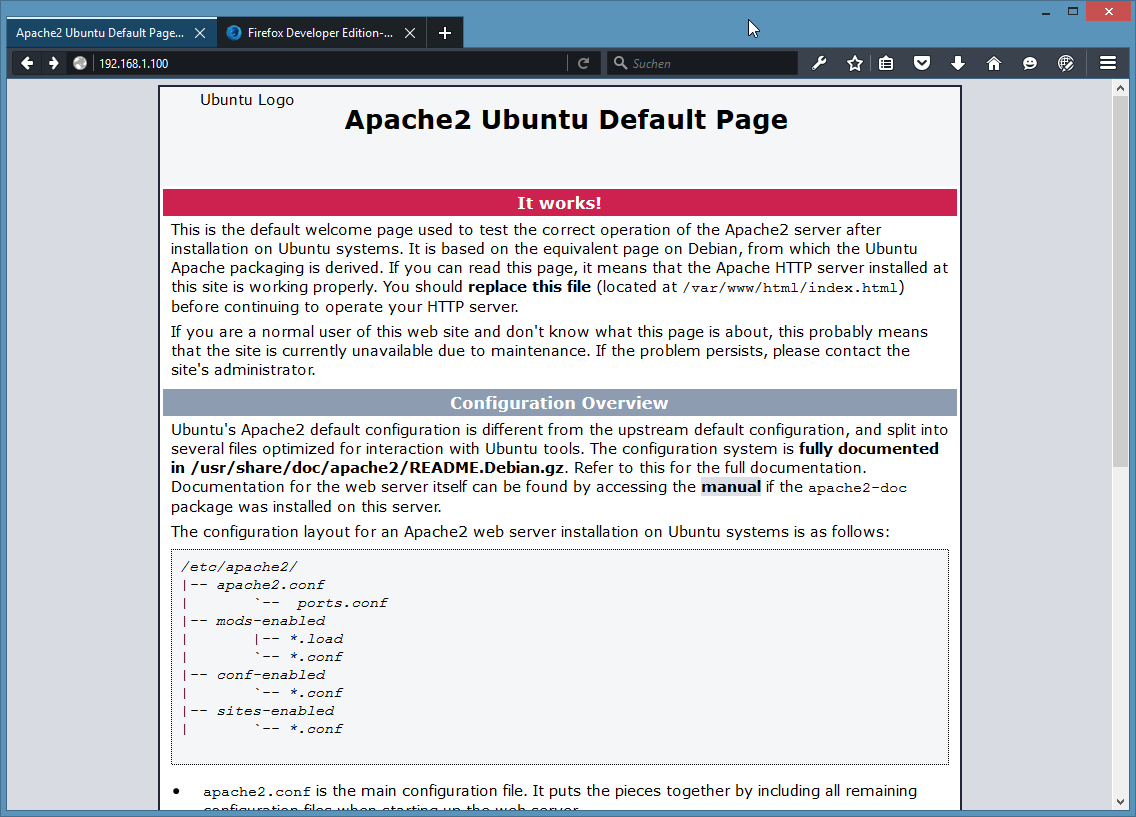
Type in your web server’s IP address or hostname into a browser (e.g. http://192.168.1.100), and you should see the following page:
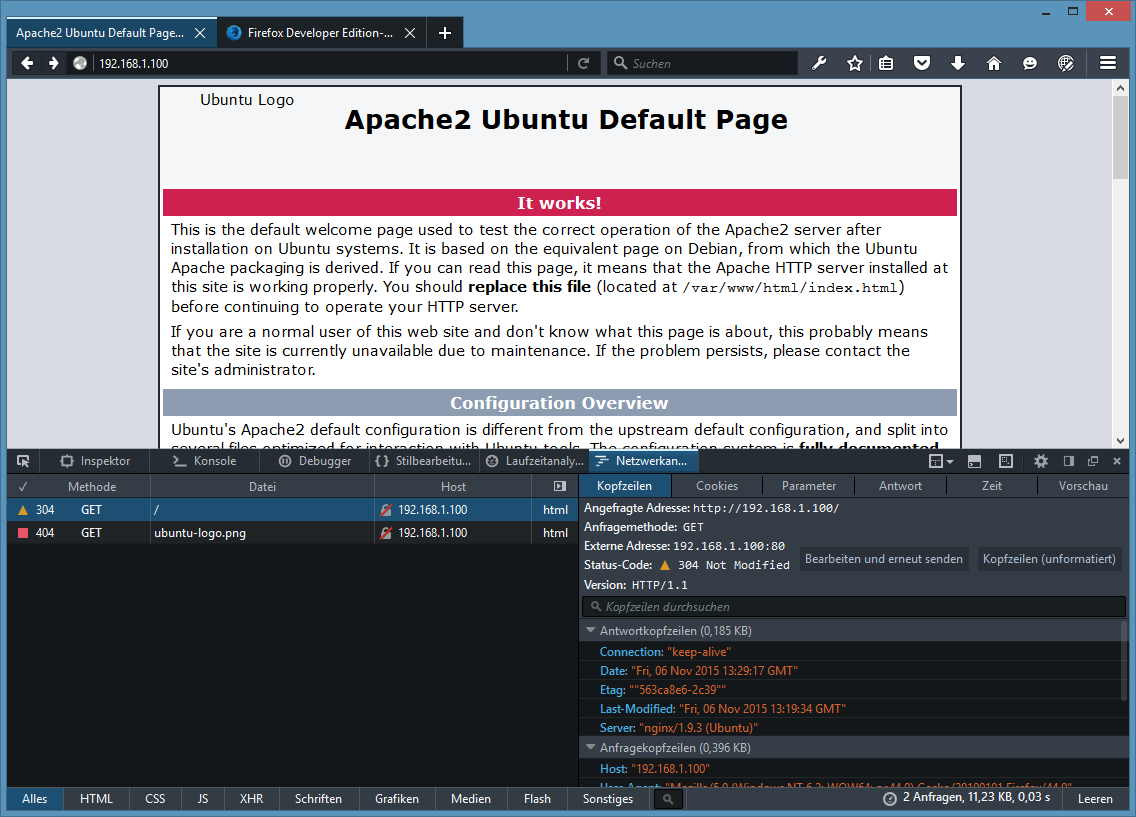
Why does it show “Apache2” instead of Nginx in that page? The text of the page does not reflect the actual running web server, the above page is just the default page on Ubuntu in the document root /var/www/html/ that is used by Apache and Nginx. To verify that Nginx is actually serving this page, you can either take look at the HTTP headers in the Firefox Network analysis console:
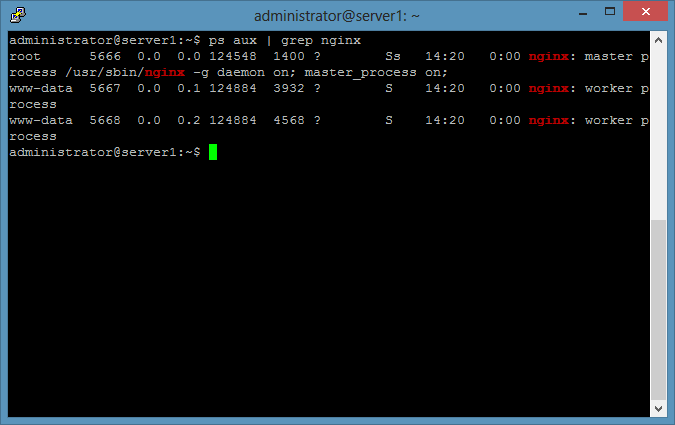
Or you check on the shell that nginx is running with:
ps aux | grep nginx
The result should show the nginx processes like this:
4 Installing PHP5
We can make PHP5 work in Nginx through PHP-FPM. PHP-FPM (FastCGI Process Manager) is an alternative PHP FastCGI implementation with some additional features useful for sites of any size, especially busier sites) which we install as follows:
sudo apt-get install php5-fpm
PHP-FPM is a daemon process (with the init script php5-fpm) that runs a FastCGI server on the socket /var/run/php5-fpm.sock.
5 Configuring Nginx
The Nginx configuration is in the file /etc/nginx/nginx.conf which we open now in the nano editor:Advertisement
sudo nano /etc/nginx/nginx.conf
The configuration is easy to understand (you can learn more about it here: http://wiki.nginx.org/NginxFullExample and here: http://wiki.nginx.org/NginxFullExample2)
First (this is optional) set the keepalive_timeout to a reasonable value:
[...]
    keepalive_timeout   2;
[...]
The virtual hosts are defined in server {} containers. The default vhost is defined in the file /etc/nginx/sites-available/default – let’s modify it as follows:
sudo nano /etc/nginx/sites-available/default
##
# You should look at the following URL's in order to grasp a solid understanding
# of Nginx configuration files in order to fully unleash the power of Nginx.
# http://wiki.nginx.org/Pitfalls
# http://wiki.nginx.org/QuickStart
# http://wiki.nginx.org/Configuration
#
# Generally, you will want to move this file somewhere, and start with a clean
# file but keep this around for reference. Or just disable in sites-enabled.
#
# Please see /usr/share/doc/nginx-doc/examples/ for more detailed examples.
### Default server configuration
#
server {
listen 80 default_server;
listen [::]:80 default_server;# SSL configuration
#
# listen 443 ssl default_server;
# listen [::]:443 ssl default_server;
#
# Note: You should disable gzip for SSL traffic.
# See: https://bugs.debian.org/773332
#
# Read up on ssl_ciphers to ensure a secure configuration.
# See: https://bugs.debian.org/765782
#
# Self signed certs generated by the ssl-cert package
# Don't use them in a production server!
#
# include snippets/snakeoil.conf;root /var/www/html;
# Add index.php to the list if you are using PHP
index index.php index.html index.htm index.nginx-debian.html;server_name _;
location / {
# First attempt to serve request as file, then
# as directory, then fall back to displaying a 404.
try_files $uri $uri/ =404;
}# pass the PHP scripts to FastCGI server listening on 127.0.0.1:9000
#
location ~ .php$ {
include snippets/fastcgi-php.conf;# With php5-cgi alone:
# fastcgi_pass 127.0.0.1:9000;
# With php5-fpm:
fastcgi_pass unix:/var/run/php5-fpm.sock;
}# deny access to .htaccess files, if Apache's document root
# concurs with nginx's one
#
#location ~ /.ht {
# deny all;
#}
}# Virtual Host configuration for example.com
#
# You can move that to a different file under sites-available/ and symlink that
# to sites-enabled/ to enable it.
#
#server {
# listen 80;
# listen [::]:80;
#
# server_name example.com;
#
# root /var/www/example.com;
# index index.html;
#
# location / {
# try_files $uri $uri/ =404;
# }
#}
server_name _; makes this a default catchall vhost (of course, you can as well specify a hostname here like www.example.com).
I’ve added index.php to the index line. root /usr/share/nginx/html; means that the document root is the directory /usr/share/nginx/html.
The important part for PHP is the location ~ .php$ {} stanza. Uncomment it to enable it. Please note that it is important to enable the line “include snippets/fastcgi-php.conf;” within the PHP location stanza to prevent zero-day exploits (see http://wiki.nginx.org/Pitfalls#Passing_Uncontrolled_Requests_to_PHP and http://forum.nginx.org/read.php?2,88845,page=3).
Now save the file and reload nginx:
sudo service nginx reload
Next open /etc/php5/fpm/php.ini…
sudo nano /etc/php5/fpm/php.ini
… and set cgi.fix_pathinfo=0:
[...]
; cgi.fix_pathinfo provides *real* PATH_INFO/PATH_TRANSLATED support for CGI.  PHP's
; previous behaviour was to set PATH_TRANSLATED to SCRIPT_FILENAME, and to not grok
; what PATH_INFO is.  For more information on PATH_INFO, see the cgi specs.  Setting
; this to 1 will cause PHP CGI to fix its paths to conform to the spec.  A setting
; of zero causes PHP to behave as before.  Default is 1.  You should fix your scripts
; to use SCRIPT_FILENAME rather than PATH_TRANSLATED.
; http://php.net/cgi.fix-pathinfo
cgi.fix_pathinfo=0
[...]
Reload PHP-FPM:
sudo service php5-fpm reload
Now create the following PHP file in the document root /var/www/html:
sudo nano /var/www/html/info.php
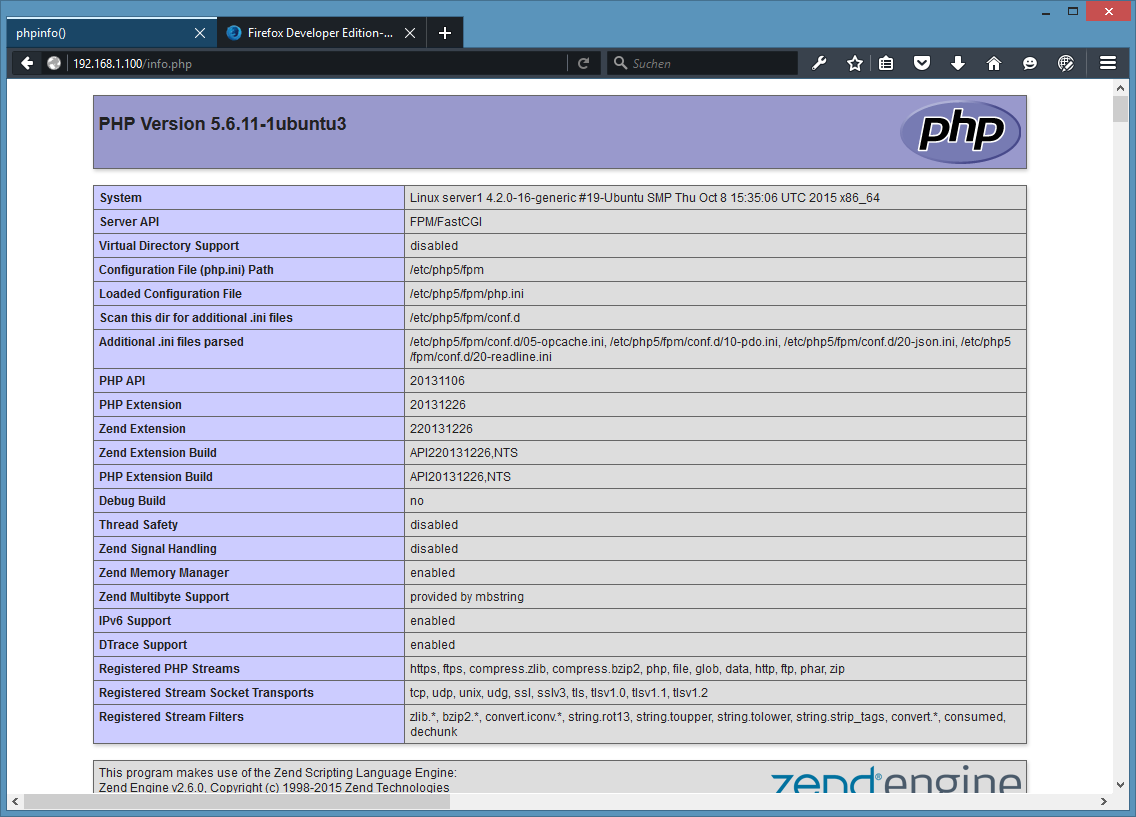
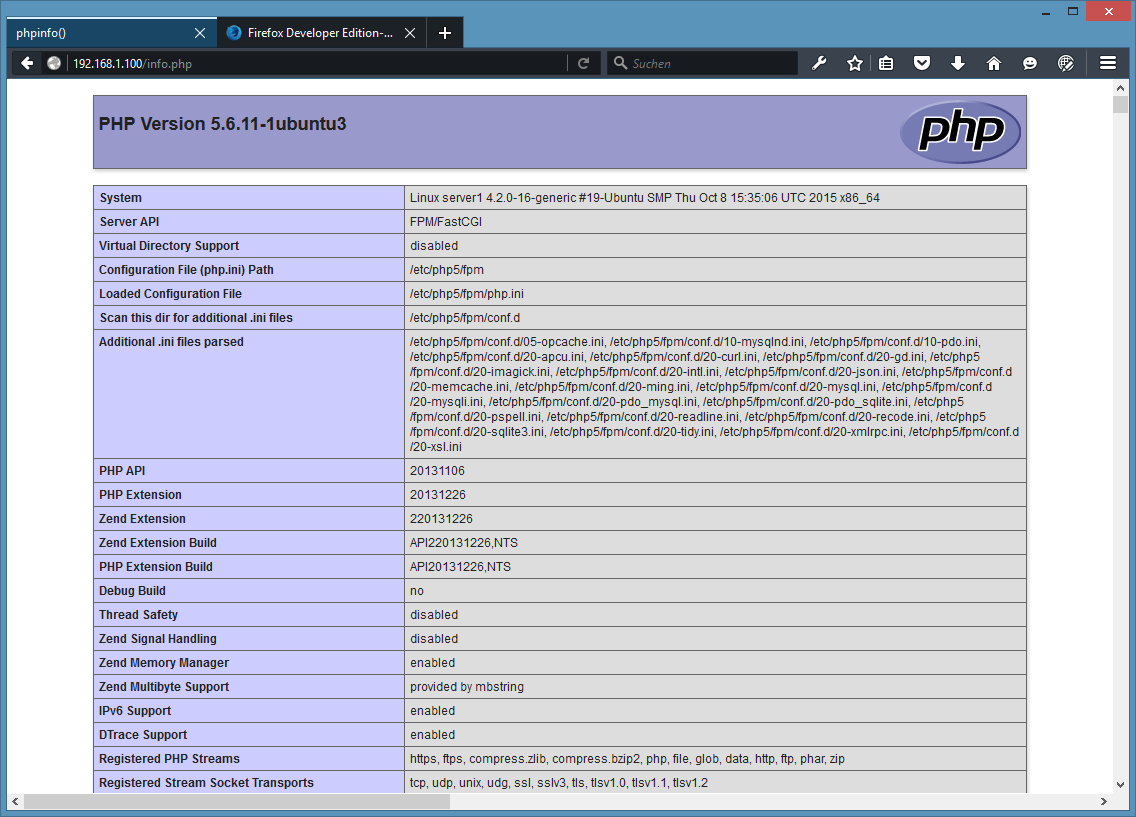
Now we call that file in a browser (e.g. http://192.168.1.100/info.php):
As you see, PHP5 is working, and it’s working through FPM/FastCGI, as shown in the Server API line. If you scroll further down, you will see all modules that are already enabled in PHP5. MySQL is not listed there which means we don’t have MySQL support in PHP5 yet.
6 Getting MariaDB / MySQL Support in PHP
To get MySQL support in PHP, we can install the php5-mysqlnd package. It’s a good idea to install some other PHP5 modules as well as you might need them for your applications. You can search for available PHP5 modules like this:
apt-cache search php5
Pick the ones you need and install them like this:
sudo apt-get install php5-mysqlnd php5-curl php5-gd php5-intl php-pear php5-imagick php5-imap php5-mcrypt php5-memcache php5-ming php5-ps php5-pspell php5-recode php5-sqlite php5-tidy php5-xmlrpc php5-xsl
APCu is a free PHP opcode cacher for caching and optimizing PHP intermediate code. It’s similar to other PHP opcode cachers, such as eAccelerator and Xcache. It is strongly recommended to have one of these installed to speed up your PHP page.
APC can be installed as follows:
sudo apt-get install php5-apcu
Now reload PHP-FPM:
sudo service php5-fpm reload
Now reload http://192.168.1.100/info.php in your browser and scroll down to the modules section again. You should now find lots of new modules there, including the MySQL module:
7 Making PHP-FPM use a TCP Connection
By default PHP-FPM is listening on the socket /var/run/php5-fpm.sock. It is also possible to make PHP-FPM use a TCP connection. To do this, open /etc/php5/fpm/pool.d/www.conf…
sudo nano /etc/php5/fpm/pool.d/www.conf
… and make the listen line look as follows:
[...]
;listen = /var/run/php5-fpm.sock
listen = 127.0.0.1:9000
[...]
This will make PHP-FPM listen on port 9000 on the IP 127.0.0.1 (localhost). Make sure you use a port that is not in use on your system.
Then reload PHP-FPM:
sudo php5-fpm reload
Next go through your nginx configuration and all your vhosts and change the line fastcgi_pass unix:/var/run/php5-fpm.sock; to fastcgi_pass 127.0.0.1:9000;, e.g. like this:
sudo nano /etc/nginx/sites-available/default
[...]
location ~ .php$ {
include snippets/fastcgi-php.conf;# With php5-cgi alone:
fastcgi_pass 127.0.0.1:9000;
# With php5-fpm:
# fastcgi_pass unix:/var/run/php5-fpm.sock;
}
[...]
Finally reload nginx:
sudo service nginx reload
8 Virtual machine image download of this tutorial
This tutorial is available as ready to use virtual machine image in ovf/ova format, compatible with VMWare and Virtualbox. The virtual machine image uses the following login details:
SSH / Shell Login
Username: administrator
Password: howtoforge
This user has sudo rights.
MariaDB Login
Username: root
Password: howtoforge
The IP of the VM is 192.168.1.100, it can be changed in the file /etc/network/interfaces. Please change all the above passwords to secure the virtual machine.
9 Links
- nginx: http://nginx.net/
- nginx Wiki: http://wiki.codemongers.com/Main
- PHP: http://www.php.net/
- PHP-FPM: http://php-fpm.org/
- MySQL: http://www.mysql.com/
- Ubuntu: http://www.ubuntu.com/


