
Odoo, previously known as OpenERP, is one of the leading ERP software used to manage business processes. It comes with business-related applications and modules like CRM, Sales, billing, accounting, manufacturing, warehouse, and more. It is a good ERP solution for small businesses and some mid-sized companies. Odoo ERP is used in many industries, including Manufacturing companies, Distribution companies, R&D companies, Service companies, Accounting firms, and more.
This post will show you how to install Odoo 15 ERP on Ubuntu 22.04.
Prerequisites
- A server running Ubuntu 22.04.
- A valid domain name is pointed with your server IP.
- A root password is configured on the server.
Getting Started
Before starting, updating all system packages to the latest version is recommended. You can update them by running the following command:
apt update -y
Once your system is updated, install the Python and other dependencies using the following command:
apt install python3-pip wget python3-dev python3-venv python3-wheel libxml2-dev libpq-dev libjpeg8-dev liblcms2-dev libxslt1-dev zlib1g-dev libsasl2-dev libldap2-dev build-essential git libssl-dev libffi-dev libmysqlclient-dev libjpeg-dev libblas-dev libatlas-base-dev -y
Once all Python dependencies are installed, install the wkhtmltopdf package with the following command:
apt-get install wkhtmltopdf -y
Next, verify the version of wkhtmltopdf using the following command:
wkhtmltopdf --version
You should see the following output:
wkhtmltopdf 0.12.6
Odoo uses PostgreSQL as a database backend so you will also need to install it on your server. You can install it using the following command:
apt install postgresql -y
Once the PostgreSQL is installed, create a PostgreSQL user for Odoo using the following command:
su - postgres -c "createuser -s odoo15"
Install and Configure Odoo 15
Before starting, it is good idea to create a dedicated user to run the Odoo instance. You can create a new user named odoo15 using the following command:
useradd -m -d /opt/odoo15 -U -r -s /bin/bash odoo15
Once the user is created, switch the user to Odoo15 and download the latest version of Odoo with the following command:
su - odoo15
git clone https://www.github.com/odoo/odoo --depth 1 --branch 15.0 /opt/odoo15/odoo
Next, change the directory to Odoo15 and create a Python virtual environment using the following command:
cd /opt/odoo15
python3 -m venv odoo15-venv
Next, activate the virtual environment using the following command:
source odoo15-venv/bin/activate
Next, install the wheel package with the following command:
pip3 install wheel
Next, edit the requirements.txt file and update some requirements:
nano /opt/odoo15/odoo/requirements.txt
Change the following lines:
gevent>=20.9.0 ; python_version >= '3.8'
greenlet>=0.4.17 ; python_version > '3.7'
Save and close the file then install all the dependencies using the following command:
pip3 install -r odoo/requirements.txt
Once all the dependencies are installed, deactivate from the virtual environment using the following command:
deactivate
Next, create a directory to store Odoo addons and exit from the Odoo user with the following command:
mkdir /opt/odoo15/custom-addons
exit
Next, edit the Odoo configuration file with the following command:
nano /etc/odoo15.conf
Add the following lines:
[options]
; This is the password that allows database operations:
admin_passwd = adminpassword
db_host = False
db_port = False
db_user = odoo15
db_password = False
xmlrpc_port = 8069
logfile = /var/log/odoo15/odoo.log
addons_path = /opt/odoo15/odoo/addons,/opt/odoo15/custom-addons
Save and close the file then create a directory to store the Odoo log and change the ownership:
mkdir /var/log/odoo15
chown odoo15:root /var/log/odoo15
Create a Systemd Service File for Odoo 15
Next, you will need to create a systemd service file to manage the Odoo service. You can create it with the following command:
nano /etc/systemd/system/odoo15.service
Add the following lines:
[Unit]
Description=Odoo15
Requires=postgresql.service
After=network.target postgresql.service
[Service]
Type=simple
SyslogIdentifier=odoo15
PermissionsStartOnly=true
User=odoo15
Group=odoo15
ExecStart=/opt/odoo15/odoo15-venv/bin/python3 /opt/odoo15/odoo/odoo-bin -c /etc/odoo15.conf
StandardOutput=journal console
[Install]
WantedBy=multi-user.target
Save and close the file then reload the systemd daemon with the following command:
systemctl daemon-reload
Next, start the Odoo service and enable it to start at system reboot:
systemctl enable --now odoo15
You can now check the status of the Odoo service using the following command:
systemctl status odoo15
You should see the active status of the Odoo instance in the following output:
? odoo15.service - Odoo15
     Loaded: loaded (/etc/systemd/system/odoo15.service; enabled; vendor preset: enabled)
     Active: active (running) since Sun 2022-05-22 10:08:36 UTC; 9s ago
   Main PID: 74016 (python3)
      Tasks: 4 (limit: 2292)
     Memory: 110.3M
        CPU: 1.403s
     CGroup: /system.slice/odoo15.service
             ??74016 /opt/odoo15/odoo15-venv/bin/python3 /opt/odoo15/odoo/odoo-bin -c /etc/odoo15.conf

May 22 10:08:36 ubuntu2204 systemd[1]: Started Odoo15.
Configure Nginx as a Reverse Proxy for Odoo
It is a good idea to configure Nginx as a reverse proxy for Odoo. First, install the Nginx package using the following command:
apt-get install nginx -y
Once the Nginx is installed, create an Nginx virtual host configuration file for Odoo:
nano /etc/nginx/conf.d/odoo15.conf
Add the following lines:
# Odoo servers
upstream odoo {
 server 127.0.0.1:8069;
}

upstream odoochat {
 server 127.0.0.1:8072;
}

server {
    listen 80;
    server_name odoo15.example.com;

    proxy_read_timeout 720s;
    proxy_connect_timeout 720s;
    proxy_send_timeout 720s;

    # Proxy headers
    proxy_set_header X-Forwarded-Host $host;
    proxy_set_header X-Forwarded-For $proxy_add_x_forwarded_for;
    proxy_set_header X-Forwarded-Proto $scheme;
    proxy_set_header X-Real-IP $remote_addr;

    # log files
    access_log /var/log/nginx/odoo.access.log;
    error_log /var/log/nginx/odoo.error.log;

    # Handle longpoll requests
    location /longpolling {
        proxy_pass http://odoochat;
    }

    # Handle / requests
    location / {
       proxy_redirect off;
       proxy_pass http://odoo;
    }

    # Cache static files
    location ~* /web/static/ {
        proxy_cache_valid 200 90m;
        proxy_buffering on;
        expires 864000;
        proxy_pass http://odoo;
    }

    # Gzip
    gzip_types text/css text/less text/plain text/xml application/xml application/json application/javascript;
    gzip on;
}
Save and close the file then verify the Nginx for any syntax configuration error:
nginx -t
You should see the following output:
nginx: the configuration file /etc/nginx/nginx.conf syntax is ok
nginx: configuration file /etc/nginx/nginx.conf test is successful
Finally, restart the Nginx service to apply the changes:
systemctl restart nginx
Next, edit the Odoo configuration file and enable the proxy setting:
nano /etc/odoo15.conf
Add the following line:
proxy_mode = True
Save and close the file then restart the Odoo service to apply the changes:
systemctl restart odoo15
You can now verify the Nginx status using the following command:
systemctl status nginx
You will get the following output:
? nginx.service - A high performance web server and a reverse proxy server
     Loaded: loaded (/lib/systemd/system/nginx.service; enabled; vendor preset: enabled)
     Active: active (running) since Sun 2022-05-22 10:10:55 UTC; 18s ago
       Docs: man:nginx(8)
    Process: 74717 ExecStartPre=/usr/sbin/nginx -t -q -g daemon on; master_process on; (code=exited, status=0/SUCCESS)
    Process: 74718 ExecStart=/usr/sbin/nginx -g daemon on; master_process on; (code=exited, status=0/SUCCESS)
   Main PID: 74719 (nginx)
      Tasks: 2 (limit: 2292)
     Memory: 2.6M
        CPU: 28ms
     CGroup: /system.slice/nginx.service
             ??74719 "nginx: master process /usr/sbin/nginx -g daemon on; master_process on;"
             ??74720 "nginx: worker process" "" "" "" "" "" "" "" "" "" "" "" "" "" "" "" "" "" "" "" "" "" "" "" "" "" "" ""

May 22 10:10:55 ubuntu2204 systemd[1]: Starting A high performance web server and a reverse proxy server...
May 22 10:10:55 ubuntu2204 systemd[1]: Started A high performance web server and a reverse proxy server.
Once you are finished, you can proceed to access the Odoo 15 web interface.
Access Odoo 15 Web Interface
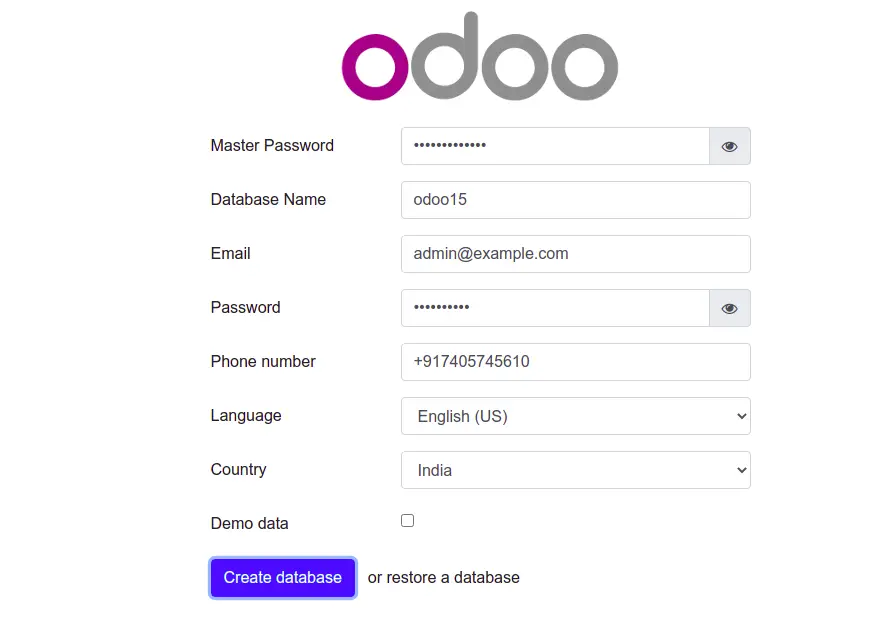
Now, open your web browser and access the Odoo 15 web interface using the URL http://odoo15.example.com. You should see the Odoo 15 database configuration page:
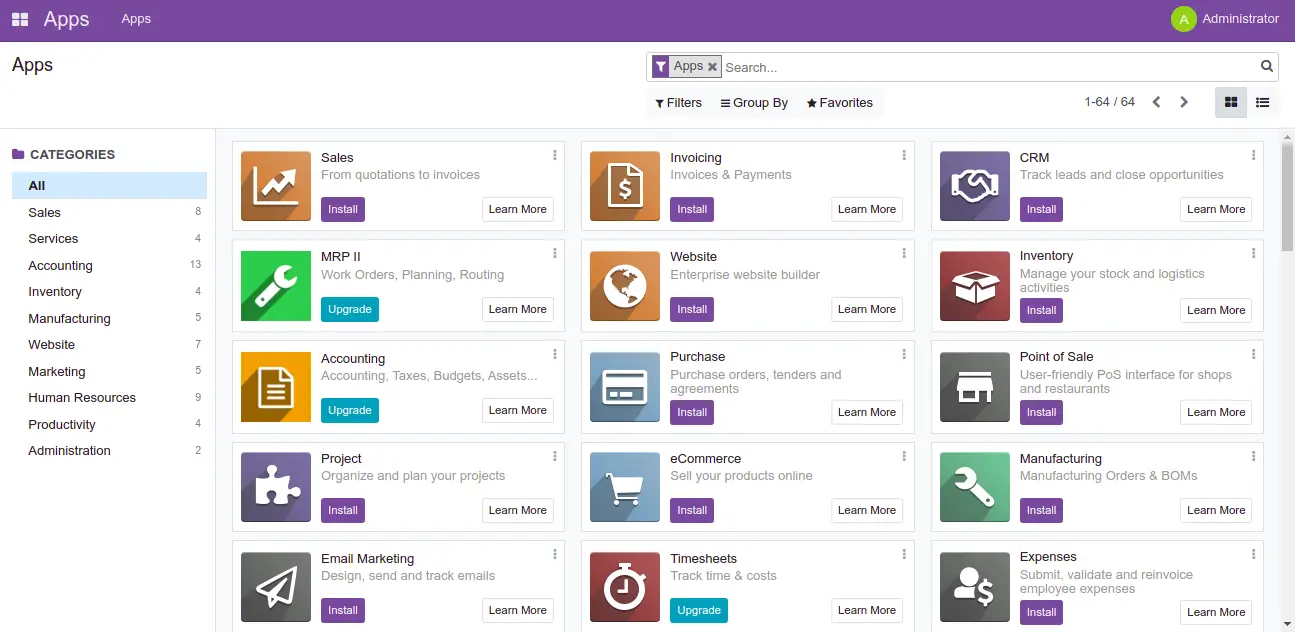
Provide your Odoo master password, email, and database, and click on the Create Database button. You should see the Odoo 15 dashboard on the following page:
Conclusion
Congratulations! you have successfully installed Odoo 15 with Nginx as a reverse proxy on Ubuntu 22.04. You can now use Odoo in your company and start managing the business processes. Feel free to ask me if you have any questions.


