Qbittorent is an open-source and freely available peer-to-peer bit torrent client. It is small and does not load the memory disk. This application is known to work effectively and efficiently on many operating systems such as Linux, Microsoft Windows and FreeBSD. It is written in the C language. It has a similar interface to u torrent. Qbittorent also supports major bit torrent extensions like peer exchange and full encryption, etc. This article will help you to get the instructions for installing qbittorent on Linux operating system.
To follow this article, you should have an Ubuntu 20.04 desktop installed and your user must have sudo permissions.
qBittorrent Installation via terminal
System update
The initial step in this approach is to update the system. We want to ensure that all the packages are updated. This method will first demand the sudo account passcode, the password for the authentication of the user, once it is verified then it proceeds further.
$ sudo apt update
System upgrade
The second step is to upgrade the packages after they are updated. This is done by the system by navigating through all the package lists and dependencies are built. Furthermore, all the new packages that need to be installed are mentioned here. The basic difference in both the update and upgrade is that in the case of updating a system, all packages are refreshed from their websites or are downloaded to the system. Whereas, in the case of upgrading the system, all the already downloaded or refreshed packages are ranked or increased by the latest version.
$ sudo apt upgrade
In this procedure, the disk space is required, so the system asks in the command prompt from the user whether to proceed forward or not. So if your option is “yes” then press the key “y” and then press enter.
This update process requires some time to be completed. As all the packages need up-gradation, so a bit longer time is required by the system. The below-appended image shows the improvement in this process with time and weightage.
Qbittorent PPA addition on Ubuntu 20.04
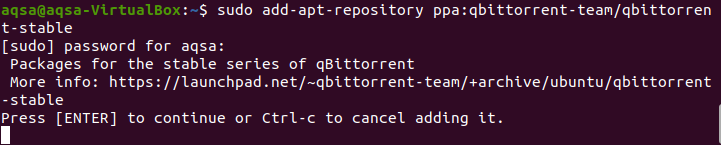
The PPA (personal package archive) of qbittorent is added to the Ubuntu system from the website. Make sure your internet connection is ok. Because it takes some time to get stable. Run the below command to continue.
$ sudo add-apt-repository ppa:qbittorrent-team/qbittorrent-stable
This will also require the Sudo account password to verify the authentic user. All the packages of the apt repositories are added to the Linux operating system. During the process of adding all repositories in the system, the system will ask the user if he wants to proceed further then press enter or the other key to quit this procedure. Press Enter to continue.
System updating
Again the system needs to be updated. All the repositories that are added to the system need updation so that these repositories can work easily and effectively in the system. When all the packages in the list are navigated by the system it shows the done message and proceeds further.
$ sudo apt update
Qbittorent installation
After the addition of the PPA repository in the system, our Ubuntu system is now ready to install the qbittorrent application to the system. For this purpose, we have used the apt package to update and upgrade the packages and repositories while using the sudo rights in our commands. So now we will run the installation query.
$ sudo apt install qbittorent
As the command is executed, the packages are read by the system, also it will start to build the dependencies that are required in the installation of any new application in the system. State information is also accessed and hence shown to the user.
In addition, all the packages that are installed automatically without permission are also displayed here. While in the installation process, the user’s permission is required in the proceeding process as there is a requirement of disk space. So the system notifies the user that after the process will finish it will occupy a specific range of space in the hard disk. So if it’s not empty you need to remove the extra items to ensure free space. You will continue by using “y” and if not then press the other option and then “enter”.
The installation process requires some time. The progress is seen through the image.
Launch qBittorent
As the installation, to open or launch the application, all you need is to go to the main application menu. Navigate to the search bar and type the qbittorent name, as it is fetched by the system then open it.
Before the application starts, you will see a notice, which is an alarming sign of finishing your privacy because it will share everything publically. You may select Cancel to close it or agree option to move forward.
As the application opened, you will see the interface having a navigation bar on the left side of the page.Advertisement
Now navigate to the top menu bar and select the option tools, further select preferences from the drop-down bar.
Then the interface will change into a new page. Now select the web UI option from the left bar. Web UI can control torrent clients from the web browser. Port 8080 is used to run this specific program.
All you need is to provide your information like name and password for the authentication. A web browser will be opened. Enter the username and password for login.
Uninstall qbittorent
To remove this application from the system, use this sudo-remove command.
$ sudo apt remove qbittorent
Conclusion
Qbittorent works in the same way as Utorrent does. It was developed to act as an alternative to Utorrent. I hope this article will prove to be helpful for you in installing and using this application after launch.


