 on Ubuntu 20.04")
Founded in 2011, Zoom has now become one of the most used services for video conferencing and online meetings. People from different professions like educational institutes, businesses, individuals are using Zoom for their day-to-day work. It has become a prominent tool for working from home, delivering online lectures, conducting online exams, helding business meetings, and much more.
The ongoing COVID-19 pandemic crisis has transformed the working culture of the world into a new normal. Businesses have started to adopt this culture with their workforces being trained to use necessary online tools. Among these online tools, Zoom has emerged as one of the most dominating platforms for video conferencing and other related purposes.
Zoom is available for installation on Windows, Mac, Linux, Android, and IOS. It also provides a browser extension for Mozilla Firefox and Google Chrome, so you can start or schedule Zoom meetings. Some services are provided for free in the basic license. The pro and business license comes with a higher price tag. To join a meeting you don’t need an account.
What will we cover
In this guide, we will see three different ways of installing the Zoom app on a Ubuntu 20.04 system. Let’s get started with this HowTo guide.
How to join a Zoom Meeting
Zoom uses a unique ID of 9-11 digit for each meeting which is also called ‘meeting ID’. This ID is required by anyone who wants to join a Zoom meeting. You can also join via a landline telephone or mobile phone by using a teleconferencing number (given in an invite). Anyone who wants to join has to enter this ‘meeting ID’ field in the Zoom app on his device (mobile, desktop etc) to connect. You can choose to turn on or off the video and audio features and share only the screen. Meetings can also be scheduled using Google calendar, Zoom Website
What will you need
- Ubuntu 20.04 installed on your computer.
- An account with ‘sudo’ privileges.
- Access to the internet.
Method 1. Installing Zoom from Ubuntu Software Center
This is the simplest and most recommended method for most beginners for installing Zoom. The snap package for zoom is an unofficial repacked version of the Debian installer package from https://zoom.us The source code for the same is available on GitHub at https://github.com/ogra1/zoom-snap
Follow the steps below to install Zoom:
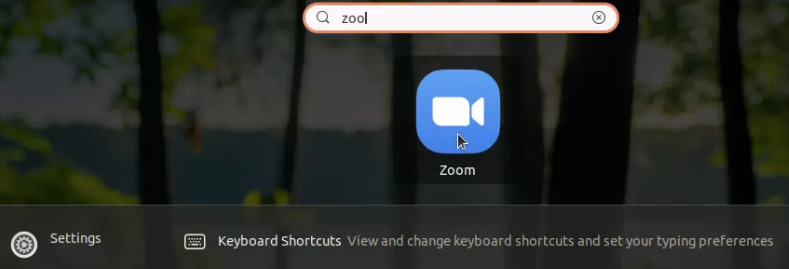
Step 1. Launch “Ubuntu Software” application and type “zoom” in the left search icon at top bar.
Step 2. In the search results, select the “zoom-client” option from the list.
Step 3. Click the Install button to install the application.
Step 4. Once installed, Zoom can be launched from the Activities menu.
Method 2. Installing Zoom from Snap repository for Ubuntu 20.04
Snap version is also available for installing Zoom, but this requires the Snap to be installed first. This method is actually a command line version of the above method. To install snap on Ubuntu 20.04, just issue the below two command:
sudo apt update
sudo apt install snapd
Another way to install snap is using Ubuntu Software Centre (search for snapd), which is just like installing any software on Ubuntu. Once the snapd is installed, either log out and log in again or reboot the system. This will make sure that the snap’s paths are properly set.
Step 1. Update the software repository on Ubuntu 20.04 using the following command:
sudo apt update
Step 2. Upgrade the installed packages on Ubuntu 20.04 using the following command.
sudo apt upgrade
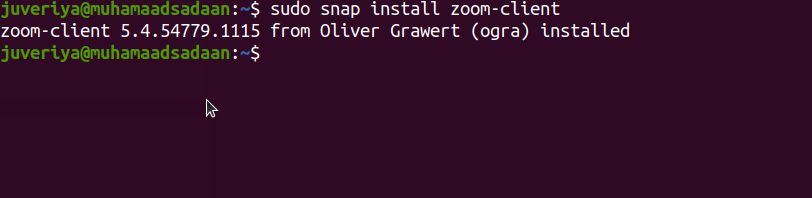
Step 3. Now install the Zoom application using snap command.
sudo snap install zoom-client
<img alt="zoom-client snap install" data-ezsrc="https://kirelos.com/wp-content/uploads/2021/06/echo/4.png60b63b5f02222.jpg" ezimgfmt="rs rscb3 src ng ngcb3" height="182" loading="lazy" src="data:image/svg xml,” width=”750″>
Method 3. Installing Zoom from the official Debian Installer Package
This method installs the latest version of the Zoom application. The download center of Zoom has many installer packages for different types of linux like Ubuntu, Debian, RedHat, Mint etc. You can select the installer package by specifying the type of Linux, OS architecture and OS version. We have selected Ubuntu with 64-bit OS and 16.04 OS version from the drop-down lists.
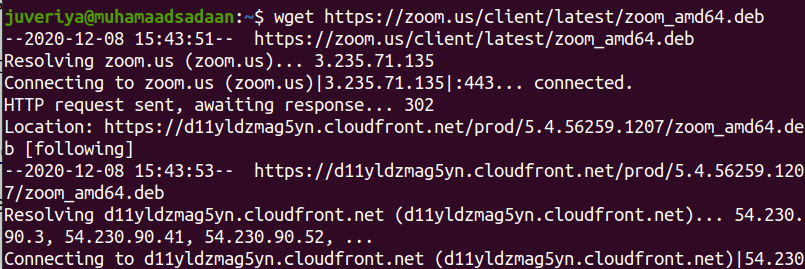
Step 1. Open a terminal and enter the following command to download the latest version of Zoom from the official website. This command is for 64-bit and 16.04 Ubuntu.
wget https://zoom.us/client/latest/zoom_amd64.deb
Step 2. After downloading the .deb package, install the Zoom app by running the following command with sudo privileges:
sudo apt install ./zoom_amd64.deb
Run the above two commands in the same directory to prevent any issue, otherwise specify the path of the downloaded file on the terminal as:
sudo apt install /path/to the/file/zoom_amd64.deb
Step 3. Now you can launch the Zoom app from the terminal by typing ‘zoom’ or from the Activities menu as shown in the above method.
Conclusion
In this guide, we have seen three different ways of installing the Zoom application on Ubuntu 20.04. If you are excited to give Zoom a try, you can use the free tier that allows up to 100 participants in a meeting.


