
Syncthing is an open source continuous file synchronization used to sync files between two or more computers in a network. This tutorial is written to help you install and configure Syncthing on CentOS 8 / CentOS 7 Linux machine. Syncthing is easy to install, maintain and provides an easy way of sync files between computers in a local network and over the internet.
Core design principles of Syncthing
Syncthing is built with below core goals.
- Safe From Data Loss – Protecting the user’s data by ensuring there no corruption to user’s files.
- Easy to Use – Syncthing should be approachable, understandable and inclusive.
- Secure Against Attackers – Never allow the user’s data to be susceptible to eavesdropping or modification by unauthorized parties.
- For Individuals – Syncthing is primarily about empowering the individual user with safe, secure and easy to use file synchronization.
- Automatic – User interaction should be required only when absolutely necessary.
- Universally Available – Syncthing should run on every common computer.
Install Syncthing on CentOS 8 / CentOS 7
For CentOS and other family of RHEL Linux distribution, there is no officially supported repository which provides RPM packages for installation. Because of this, we’ll download and install Syncthing on CentOS 8 / CentOS 7 from official source archive.
Grab the latest release of Syncthing for your operating system:
curl -s https://api.github.com/repos/syncthing/syncthing/releases/latest | grep browser_download_url | grep linux-amd64 | cut -d '"' -f 4 | wget -qi -Unpack the archive downloaded.
tar xvf syncthing-linux-amd64*.tar.gzThere will be a binary called syncthing in the folder created from extraction. Let’s copy the binary file to /usr/local/bin directory.
sudo cp syncthing-linux-amd64-*/syncthing /usr/local/bin/
Confirm the binary file is copied by checking Syncthing version.
$ syncthing --version
syncthing v1.3.4 "Fermium Flea" (go1.13.7 linux-amd64) [email protected] 2020-01-14 07:01:03 UTC
Configure Syncthing to Automatically Start on boot
We’ll use the Linux Systemd to manage the Syncthing service – enables users to start, stop, enable, and disable the service units.
Let’s create a new file.
sudo vi /etc/systemd/system/[email protected]Paste below contents into the file.
[Unit]
Description=Syncthing - Open Source Continuous File Synchronization for %I
Documentation=man:syncthing(1)
After=network.target

[Service]
User=%i
ExecStart=/usr/local/bin/syncthing -no-browser -gui-address="0.0.0.0:8384" -no-restart -logflags=0
Restart=on-failure
SuccessExitStatus=3 4
RestartForceExitStatus=3 4

# Hardening
ProtectSystem=full
PrivateTmp=true
SystemCallArchitectures=native
MemoryDenyWriteExecute=true
NoNewPrivileges=true

[Install]
WantedBy=multi-user.target
Update systemd service list:
sudo systemctl daemon-reloadEnable and start the service.
sudo systemctl start [email protected]$USER
sudo systemctl enable [email protected]$USER
Confirm service status.
$ sudo systemctl status [email protected]$USER
● [email protected] - Syncthing - Open Source Continuous File Synchronization for cloud/user
   Loaded: loaded (/etc/systemd/system/[email protected]; disabled; vendor preset: disabled)
   Active: active (running) since Sun 2020-03-08 21:19:04 EAT; 1min 7s ago
     Docs: man:syncthing(1)
 Main PID: 7739 (syncthing)
    Tasks: 9 (limit: 11512)
   Memory: 29.1M
   CGroup: /system.slice/system-syncthing.slice/[email protected]
           └─7739 /usr/local/bin/syncthing -no-browser -no-restart -logflags=0

Mar 08 21:19:05 cent8.novalocal syncthing[7739]: [BAMMV] INFO: Loading HTTPS certificate: open /home/cloud-user/.config/syncthing/https-cert.pem: no su>
Mar 08 21:19:05 cent8.novalocal syncthing[7739]: [BAMMV] INFO: Creating new HTTPS certificate
Mar 08 21:19:05 cent8.novalocal syncthing[7739]: [BAMMV] INFO: TCP listener ([::]:22000) starting
Mar 08 21:19:05 cent8.novalocal syncthing[7739]: [BAMMV] INFO: Relay listener (dynamic https://relays.syncthing.net/endpoint) starting
Mar 08 21:19:05 cent8.novalocal syncthing[7739]: [BAMMV] INFO: GUI and API listening on 127.0.0.1:8384
Mar 08 21:19:05 cent8.novalocal syncthing[7739]: [BAMMV] INFO: Access the GUI via the following URL: http://127.0.0.1:8384/
Mar 08 21:19:05 cent8.novalocal syncthing[7739]: [BAMMV] INFO: My name is "cent8.novalocal"
Mar 08 21:19:05 cent8.novalocal syncthing[7739]: [BAMMV] INFO: Completed initial scan of sendreceive folder "Default Folder" (default)
Mar 08 21:19:20 cent8.novalocal syncthing[7739]: [BAMMV] INFO: Detected 1 NAT service
Mar 08 21:19:36 cent8.novalocal syncthing[7739]: [BAMMV] INFO: Joined relay relay://85.10.202.70:22067
You can also use a separate user account to start service by replacing $USER with the name of user.
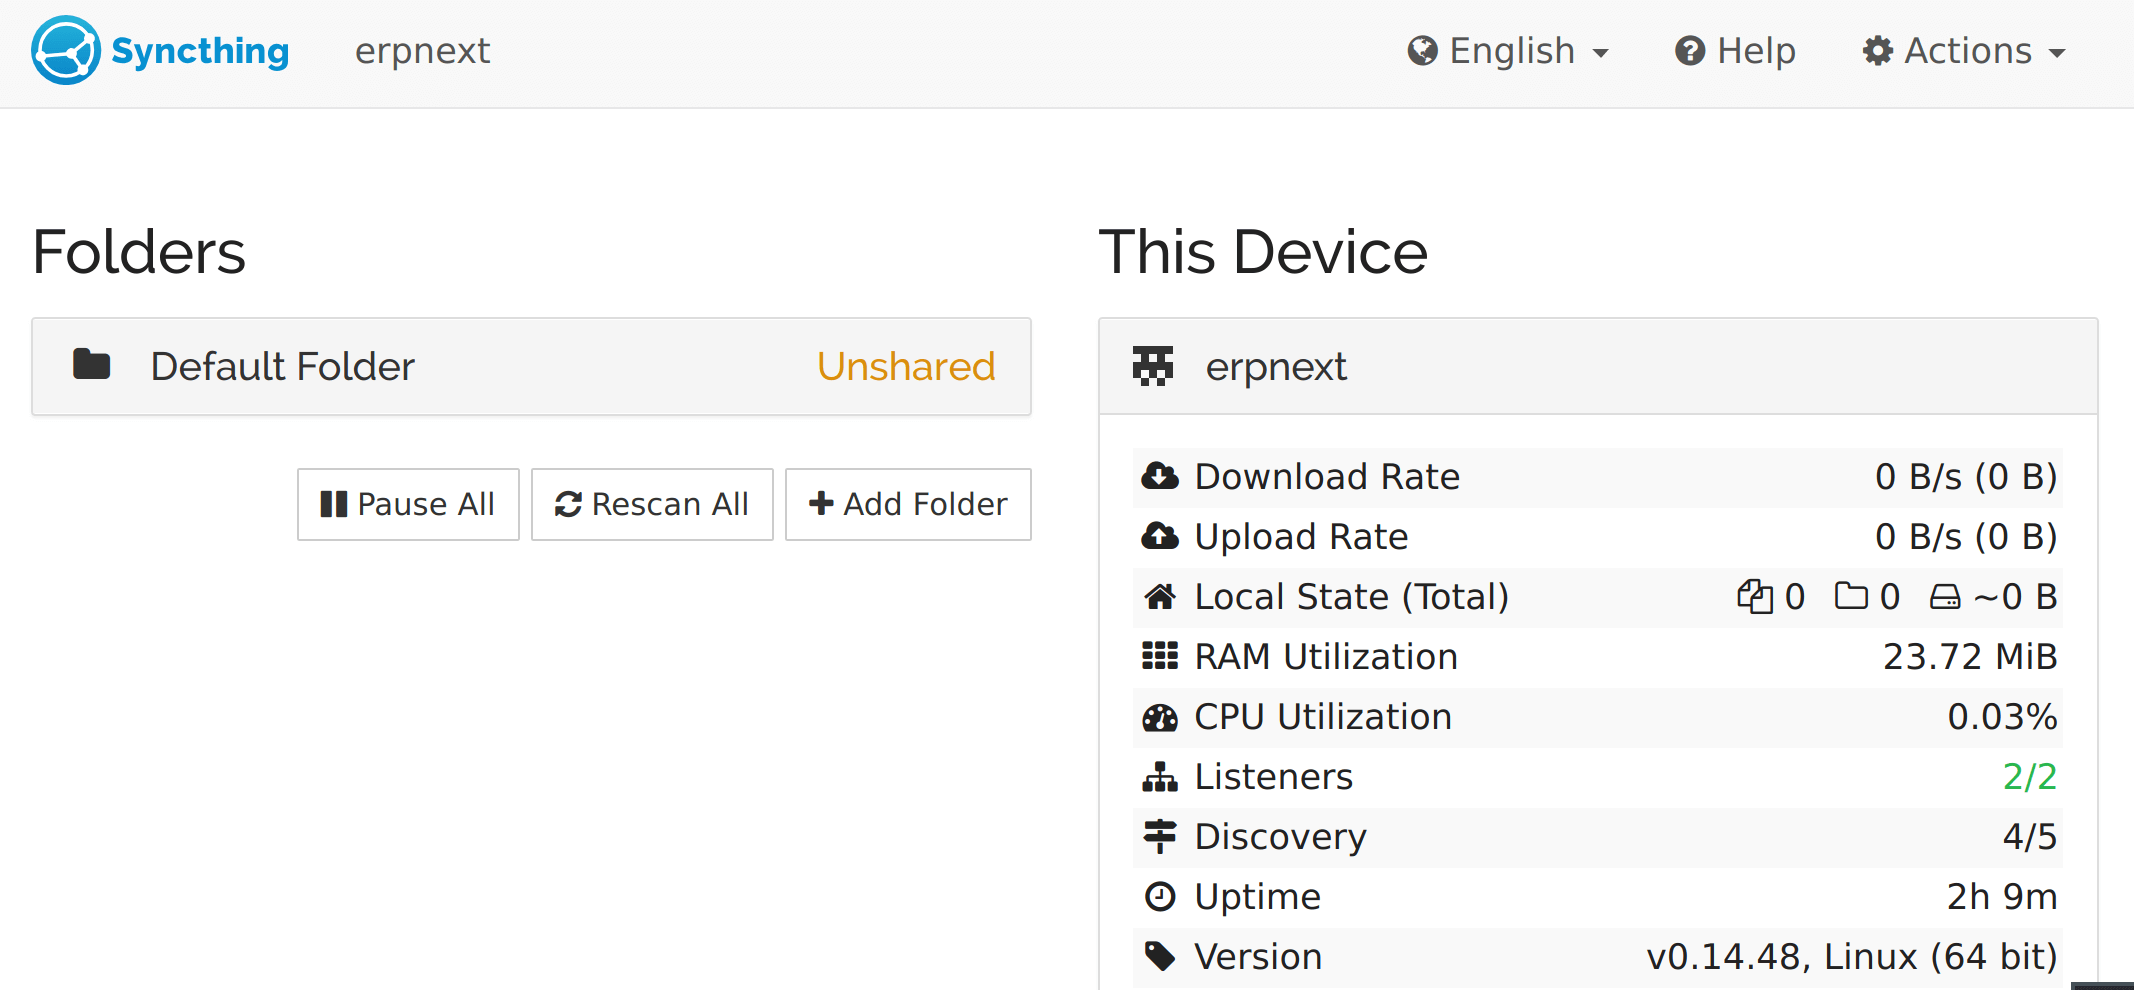
Accessing Syncthing UI
The Syncthing admin GUI is started automatically by systemd and is available on the Listen address configured, port 8384. If the -gui-address="ip:port" option is not provided, the service will run on https://localhost:8384/
$ sudo ss -tunelp | grep 8134
udp     UNCONN   0    0   [::]:35129  [::]:* users:(("syncthing",pid=260527,fd=16)) uid:1000 ino:4508134 sk:38 v6only:1
By default, the Syncthing admin interface is configured to allow remote access without a password.
Open the settings to set password: Settings > GUI
You’ll then be prompted to authenticate.
On accessing Syncthing GUI, you should see an interface like below:
Syncing data between two devices with Syncthing
For you to be able to sync data between two or more computers with
Syncthing, ensure Syncthing has been installed and configured on all
systems. Once setup is done, each device must be told about the other
device.
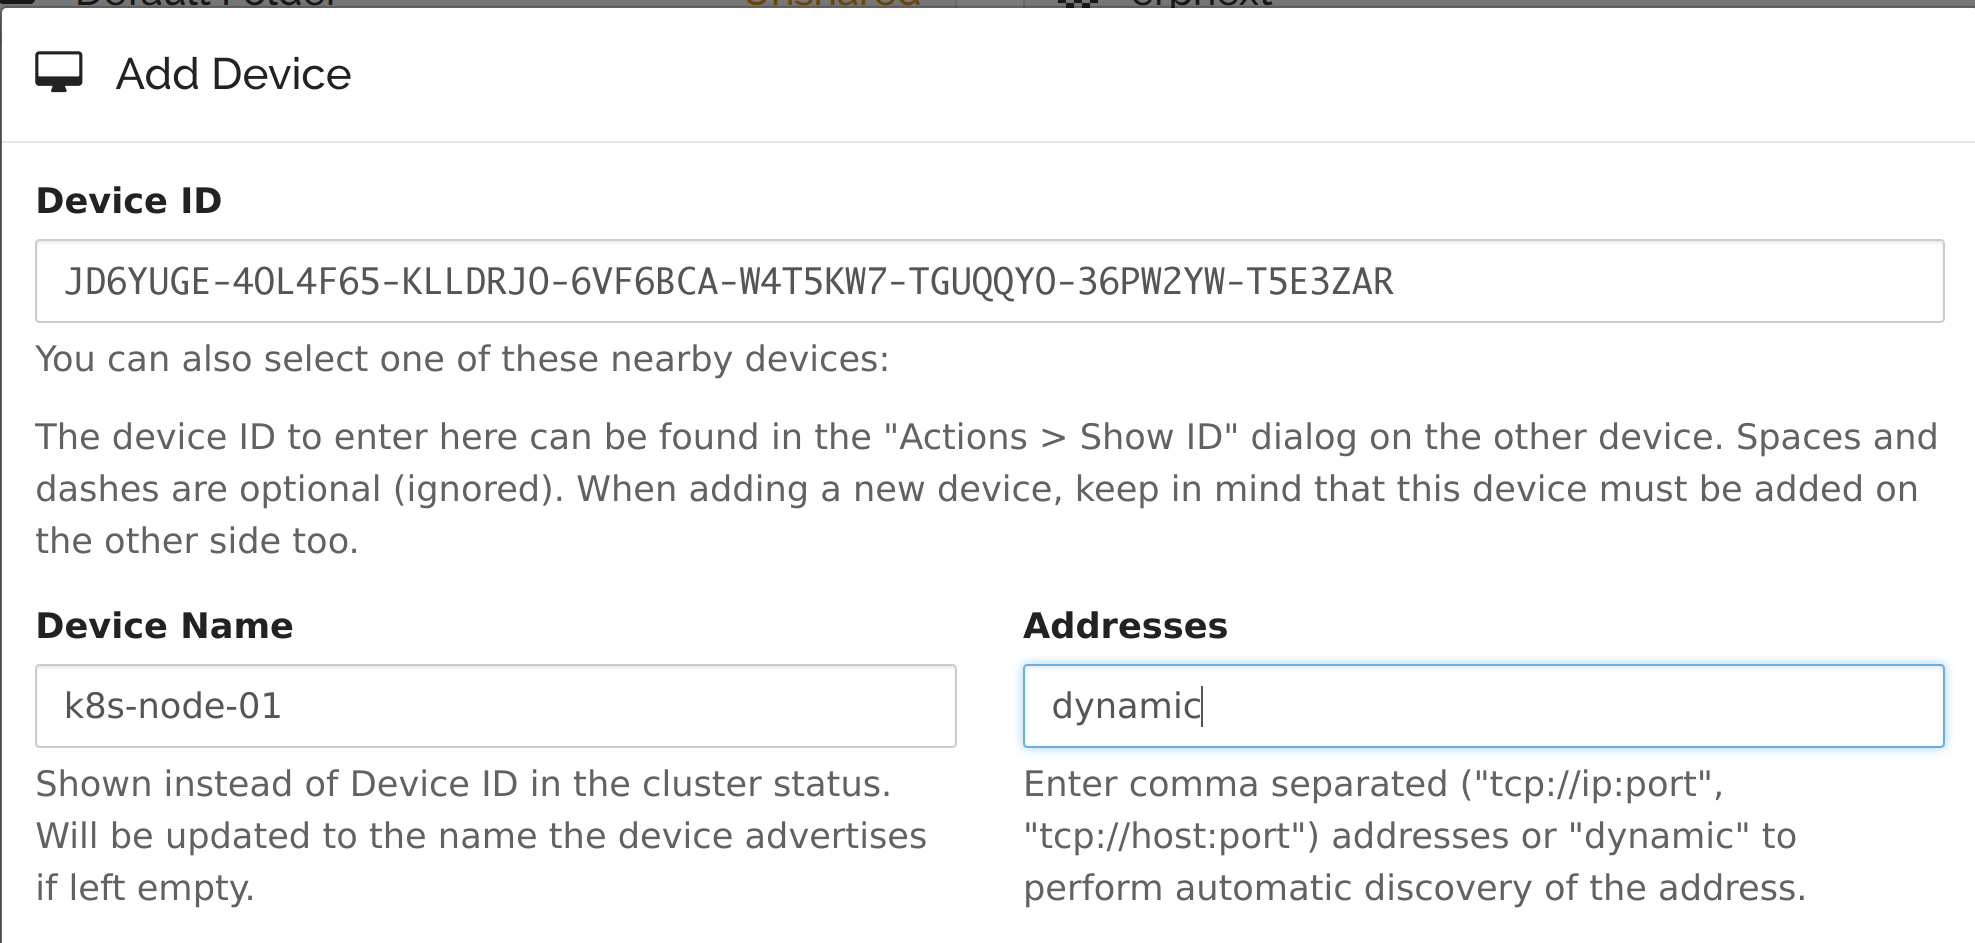
Syncthing Device ID
This is accomplished by exchanging “device IDs“. A
device ID is a unique, cryptographically-secure identifier that is
generated as part of the key generation the first time you start
Syncthing. Two devices will only connect and talk to each other if they
are both configured with each other’s device ID. Obtain Device ID from Actions > Show ID
Adding Syncthing Device ID
To get your two devices to talk to each other click “Add Remote Device” at the bottom right on both, and enter the device ID of the other side.
Also, select the folder(s) that you want to share. The device name is optional and purely cosmetic. It can be changed later if required. Once you click “Save” the new device will appear on right side of the GUI (although disconnected) and a prompt will be shown to indicate the need for a restart.
Note: The default folder being shared is ~Sync. When you have made changes like adding Sync directories, ensure you restart Syncthing on “Actions” > “Restart”.
Good luck and have fun! There is more documentation and if you run into trouble feel free to post a question in the support forum
Similar guides:
How To Configure AWS S3 CLI for Ceph Object Gateway Storage
Compress and Deduplicate Storage with Virtual Data Optimizer (VDO)


