Over the years, the use of python for data science has grown incredibly and keeps growing daily.
Data science is a vast field of study with a lot of sub-fields, of which data analysis is unarguably one of the most important of all these fields, and regardless of one’s skill level in data science, it has become increasingly important to understand or have at least a basic knowledge of it.
What is Data Analysis?
Data analysis is the cleansing and transformation of a large amount of unstructured or unorganized data, with the goal of generating key insights and information about this data which would help in making informed decisions.
There are various tools used for data analysis, Python, Microsoft Excel, Tableau, SaS, etc but in this article, we would be focusing on how data analysis is done in python. More specifically, how it ’s done with a python library called Pandas.
What is Pandas?
Pandas is an open-source Python library used for data manipulation and wrangling. It is fast and highly efficient and has tools for loading several sorts of data into memory. It can be used to reshape, label slice, index or even group several forms of data.
Data Structures in Pandas
There are 3 data structures in Pandas, namely;
- Series
- DataFrame
- Panel
The best way to differentiate the three of them is to see one as containing several stacks of the other. So a DataFrame is a stack of series and a Panel is a stack of DataFrames.
A series is a one-dimensional array
A stack of several series makes a 2-dimensional DataFrame
A Stack of several DataFrames makes a 3-dimensional Panel
The data structure we would be working with the most is the 2-dimensional DataFrame which can also be the default means of representation for some datasets we might come across.
Data Analysis in Pandas
For this article, no installation is needed. We would be using a tool called colaboratory created by Google. It is an online python environment for Data Analysis, Machine Learning, and AI. It is simply a cloud-based Jupyter Notebook that comes preinstalled with almost every python package you would be needing as a data scientist.
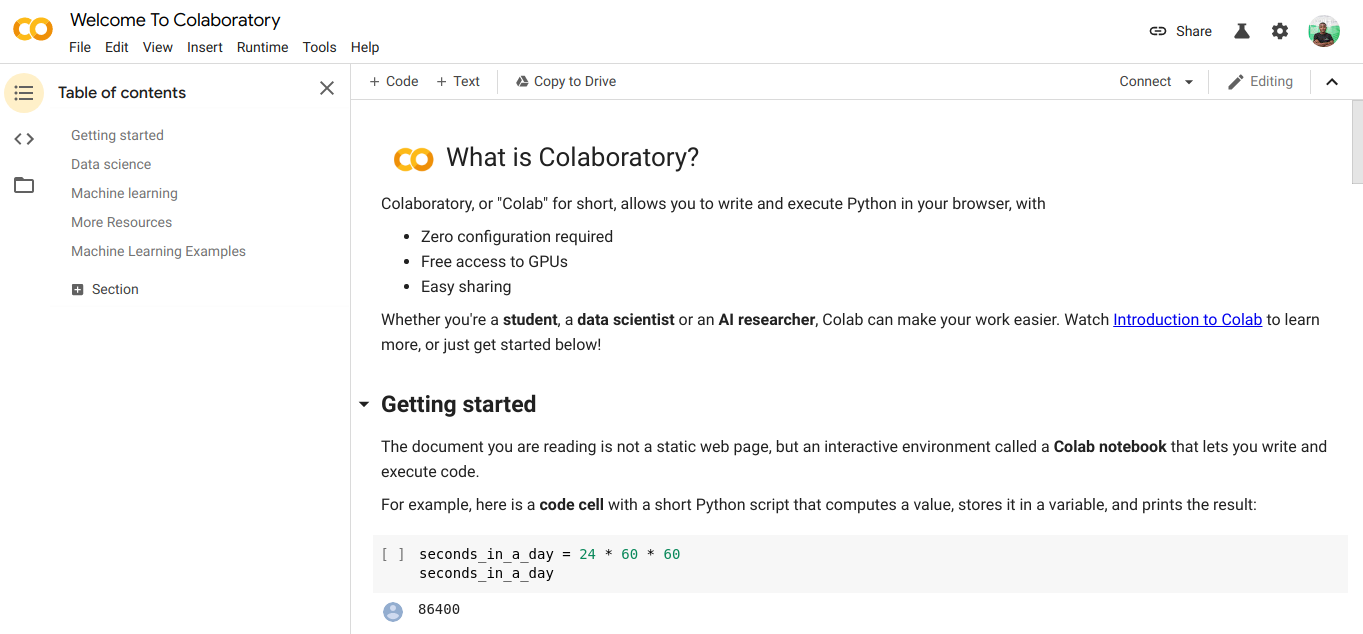
Now, head on to https://colab.research.google.com/notebooks/intro.ipynb. You should see the below.

By the top left navigation, click the file option and click on the “new notebook ”option. You would see a new Jupyter notebook page loaded in your browser. The first thing we need to do is to import pandas into our working environment. We can do that by running the following code;
import pandas as pdFor this article, we would be using a housing price dataset for our data analysis. The dataset we would be using can be found here. The first thing we would want to do is to load this dataset into our environment.
We can do that with the following code in a new cell;
df = pd.read_csv('https://firebasestorage.googleapis.com/v0/b/ai6-portfolio-abeokuta.appspot.com/o/kc_house_data.csv?alt=media &token=6a5ab32c-3cac-42b3-b534-4dbd0e4bdbc0 ', sep=',')The .read_csv is used when we want to read a CSV file and we passed a sep property to show that the CSV file is comma-delimited.
We should also note that our loaded CSV file is stored in a variable df .
We don’t need to use the print() function in Jupyter Notebook. We can just simply type in a variable name in our cell and Jupyter Notebook will print it out for us.
We can try that out by typing df in a new cell and running it, it will print out all the data in our dataset as a DataFrame for us.
But we don’t always want to see all the data, at times we just want to see the first few data and their column names. We can use the df.head() function to print the first five columns and df.tail() to print the last five. The output of either of the two would look as such;

We would want to check for relationships between these several rows and columns of data. The .describe() function does exactly this for us.
Running df.describe() gives the following output;

We can immediately see that the .describe() gives the mean, standard deviation, minimum and maximum values and percentiles of each and every column in the DataFrame. This is very useful particularly.
We can also check the shape of our 2D DataFrame to find out how many rows and columns it has. We can do that using df.shape which returns a tuple in the format (rows, columns).
We can also check the names of all the columns in our DataFrame using df.columns.
What if we want to select just one column and return all the data in it? This is done is a way similar to slicing through a dictionary. Type in the following code into a new cell and run it
df['price ']The above code returns the price column, we can go further by saving it into a new variable as such
price = df['price']Now we can perform every other action that can be performed on a DataFrame on our price variable since its just a subset of an actual DataFrame. We can do stuff like df.head(), df.shape etc..
We could also select multiple columns by passing a list of column names into df as such
data = df[['price ', 'bedrooms']]The above selects columns with names ‘price’ and ‘bedrooms’, if we type in data.head() into a new cell, we would have the following

The above way of slicing columns returns all the row elements in that column, what if we want to return a subset of rows and a subset of columns from our dataset? This can be done using .iloc and is indexed in a way similar to python Lists. So we can do something like
df.iloc[50: , 3]Which returns the 3rd column from the 50th row till the end. It’s pretty neat and just the same as slicing lists in python.
Now let’s do some really interesting stuff, our housing price dataset has a column that tells us the price of a house and another column tells us the number of bedrooms that particular house has. The housing price is a continuous value, so it’s possible we don’t have two houses that have the same price. But the number of bedrooms is somewhat discrete, so we can have several houses with two, three, four bedrooms, etc.
What if we want to get all the houses with the same number of bedrooms and find the mean price of each discrete bedroom? It’s relatively easy to do that in pandas, it can be done as such;
df.groupby('bedrooms ')['price '].mean()The above first groups the DataFrame by the datasets with identical bedroom number using df.groupby() function, then we tell it to give us just the bedroom column and use the .mean() function to find the mean of each house in the dataset.
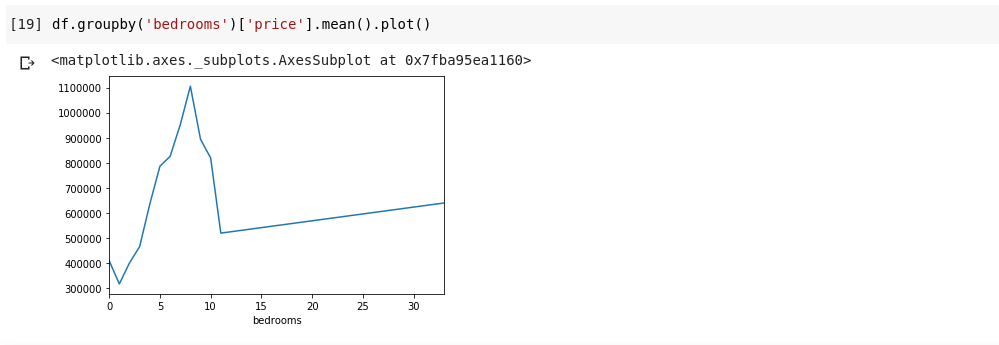
What if we want to visualize the above? We would want to be able to check how the mean price of each distinct bedroom number varies? We just need to chain the previous code to a .plot() function as such;
df.groupby('bedrooms ')['price '].mean().plot()We’ll have an output that looks as such;

The above shows us some trends in the data. On the horizontal axis, we have a distinct number of bedrooms (Note, that more than one house can have X number of bedrooms), On the vertical axis, we have the mean of the prices as regards the corresponding number of bedrooms on the horizontal axis. We can now immediately notice that houses that have between 5 to 10 bedrooms cost a lot more than houses with 3 bedrooms. It’ll also become obvious that houses that have about 7 or 8 bedrooms cost a lot more than those with 15, 20 or even 30 rooms.
Information like the above is why data analysis is very important, we are able to extract useful insight from the data that isn’t immediately or quite impossible to notice without analysis.
Missing Data
Let’s assume I’m taking a survey that consists of a series of questions. I share a link to the survey with thousands of people so they could give their feedback. My ultimate goal is to run data analysis on this data so I could get some key insights from the data.
Now a lot could go wrong, some surveyors might feel uncomfortable answering some of my questions and leave it blank. A lot of people could do the same for several parts of my survey questions. This might not be considered a problem but imagine if I were to be collecting numerical data in my survey and a part of the analysis required me to get either the sum, mean or some other arithmetic operation. Several missing values would lead to a lot of inaccuracies in my analysis, I have to figure out a way to find and replace this missing values with some values that could be a close substitute to them.
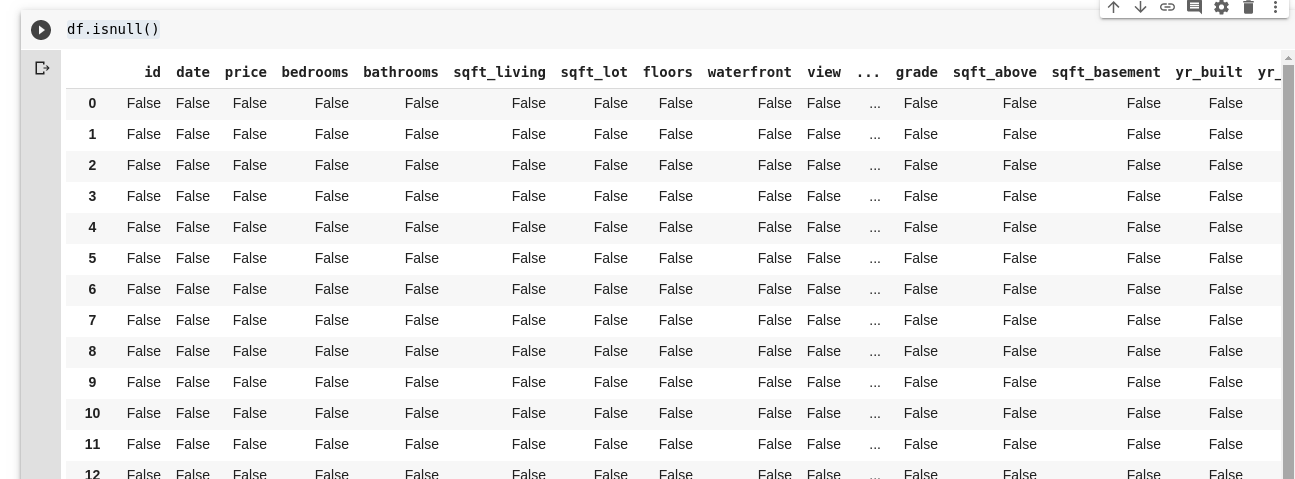
Pandas provide us with a function to find missing values in a DataFrame called isnull().
The isnull() function can be used as such;
df.isnull()This returns a DataFrame of booleans that tells us if the data originally present there was Truely missing or Falsely missing. The output would look as such;


We need a way to be able to replace all these missing values, most often the choice of missing values can be taken as zero. At times it could be taken as the mean of all other data or perhaps the mean of the data around it, depending on the data scientist and the use case of the data being analyzed.
To fill all missing values in a DataFrame, we use the .fillna() function used as such;
df.fillna(0)In the above, we’re filling all the empty data with value zero. It could as well be any other number that we specify it to be.
The importance of data can not be overemphasized, it helps us get answers right from our data itself!. Data Analysis they say is the new Oil for Digital Economies.
All the examples in this article can be found here.
To learn more in-depth, check out Data Analysis with Python and Pandas online course.


![Kirelos Blog How to Call a Function in Python [With Examples] How to Call a Function in Python [With Examples] programming language Python](https://kirelos.com/wp-content/uploads/2023/12/26798/how-to-call-a-function-in-python-with-examples-600x450.jpg)
