
AWS CloudFormation is a service that enables system administrators to set up and manage an entire collection of AWS resources – including their configurations, dependencies, and inter-relationships between them – in a single statement. They can also make changes to existing infrastructure without stopping or redeploying the applications running on top of it.
AWS Cloudformation allows you to configure your infrastructure as code. It is basically an infrastructure as a code engine that works in the cloud and helps users to provision and manage compute, storage, and other resources. A CloudFormation template is a JSON file with directives on how to create or update AWS resources. We can use AWS CLI, AWS SDKs like boto3, or AWS CloudFormation service to create templates.
CloudFormation provides many advantages like:
- Ease of use: CloudFormation uses a template format that allows you to describe all of your AWS resource’s attributes and relationships in one place.
- Go-to-market agility: CloudFormation allows you to build and deploy your AWS resources as code.
- High level of automation: CloudFormation transforms high-level code into a set of simple templates which can be used to create or update AWS resources.
If you’re looking to automate your workload deployments on AWS, using CloudFormation is one of the best ways to do it.
In this article, we’ll show you a gentle introduction to CloudFormation and use CloudFormation to automate your AWS resources. This guide uses S3 resources to demonstrate. After this tutorial, you’ll be able to create, update, and delete a number of AWS resources using CloudFormation. You can also learn how to begin creating your own CloudFormation template.
Prerequisites
In order to follow this tutorial, you need the following prerequisites:
- AWS CLI installed on your local machine in version 1.6.1 or higher version and configured with a default region. The same version should also be configured for Python 2.6 or 3 .
- A basic understanding of AWS services and some experience on AWS Console.
Creating Your First Stack
Now that you have the prerequisites ready, let’s start by configuring and creating your first stack.
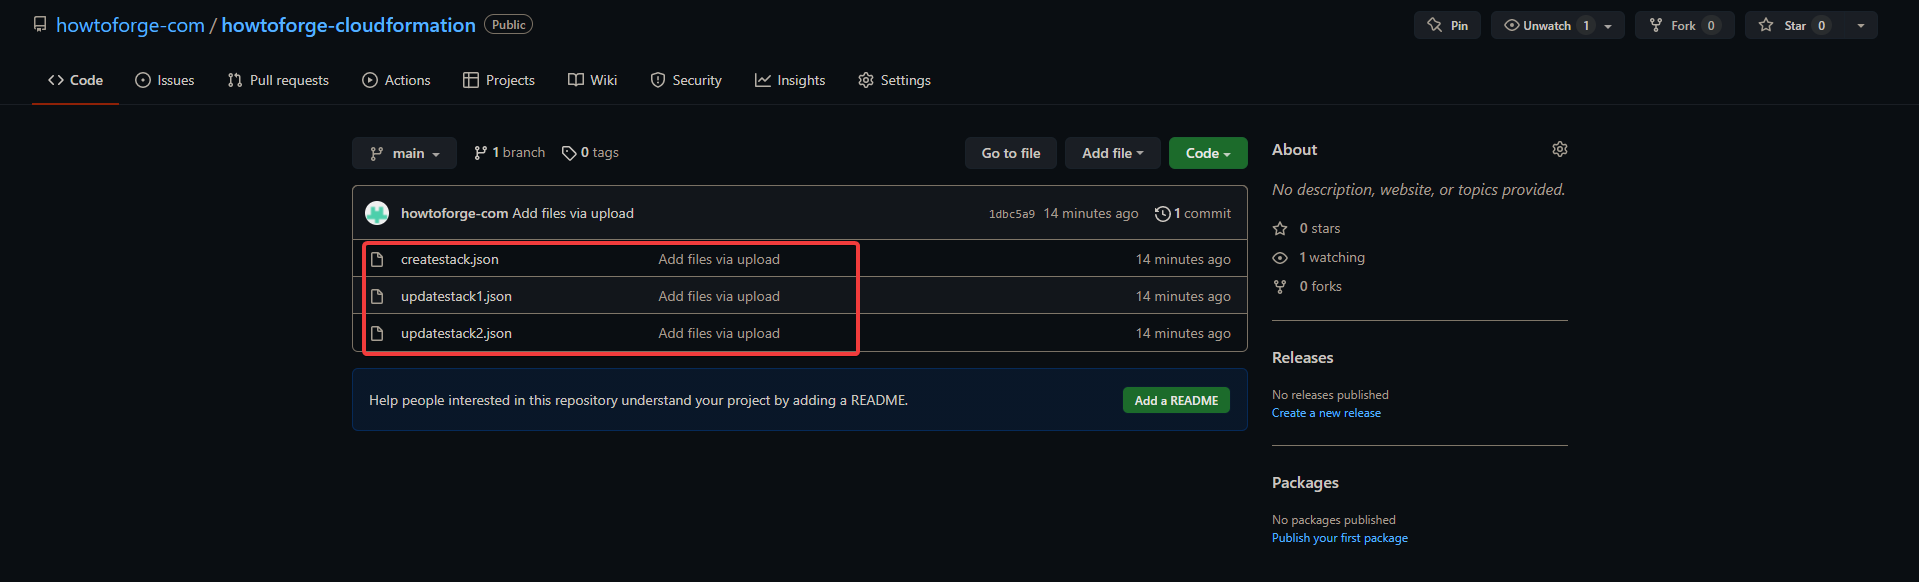
1. Open your favorite browser. Navigate to this GitHub repository and download three files to your local hard-disk drive.
- createstack.json
- updatestack1.json
- updatestack2.json
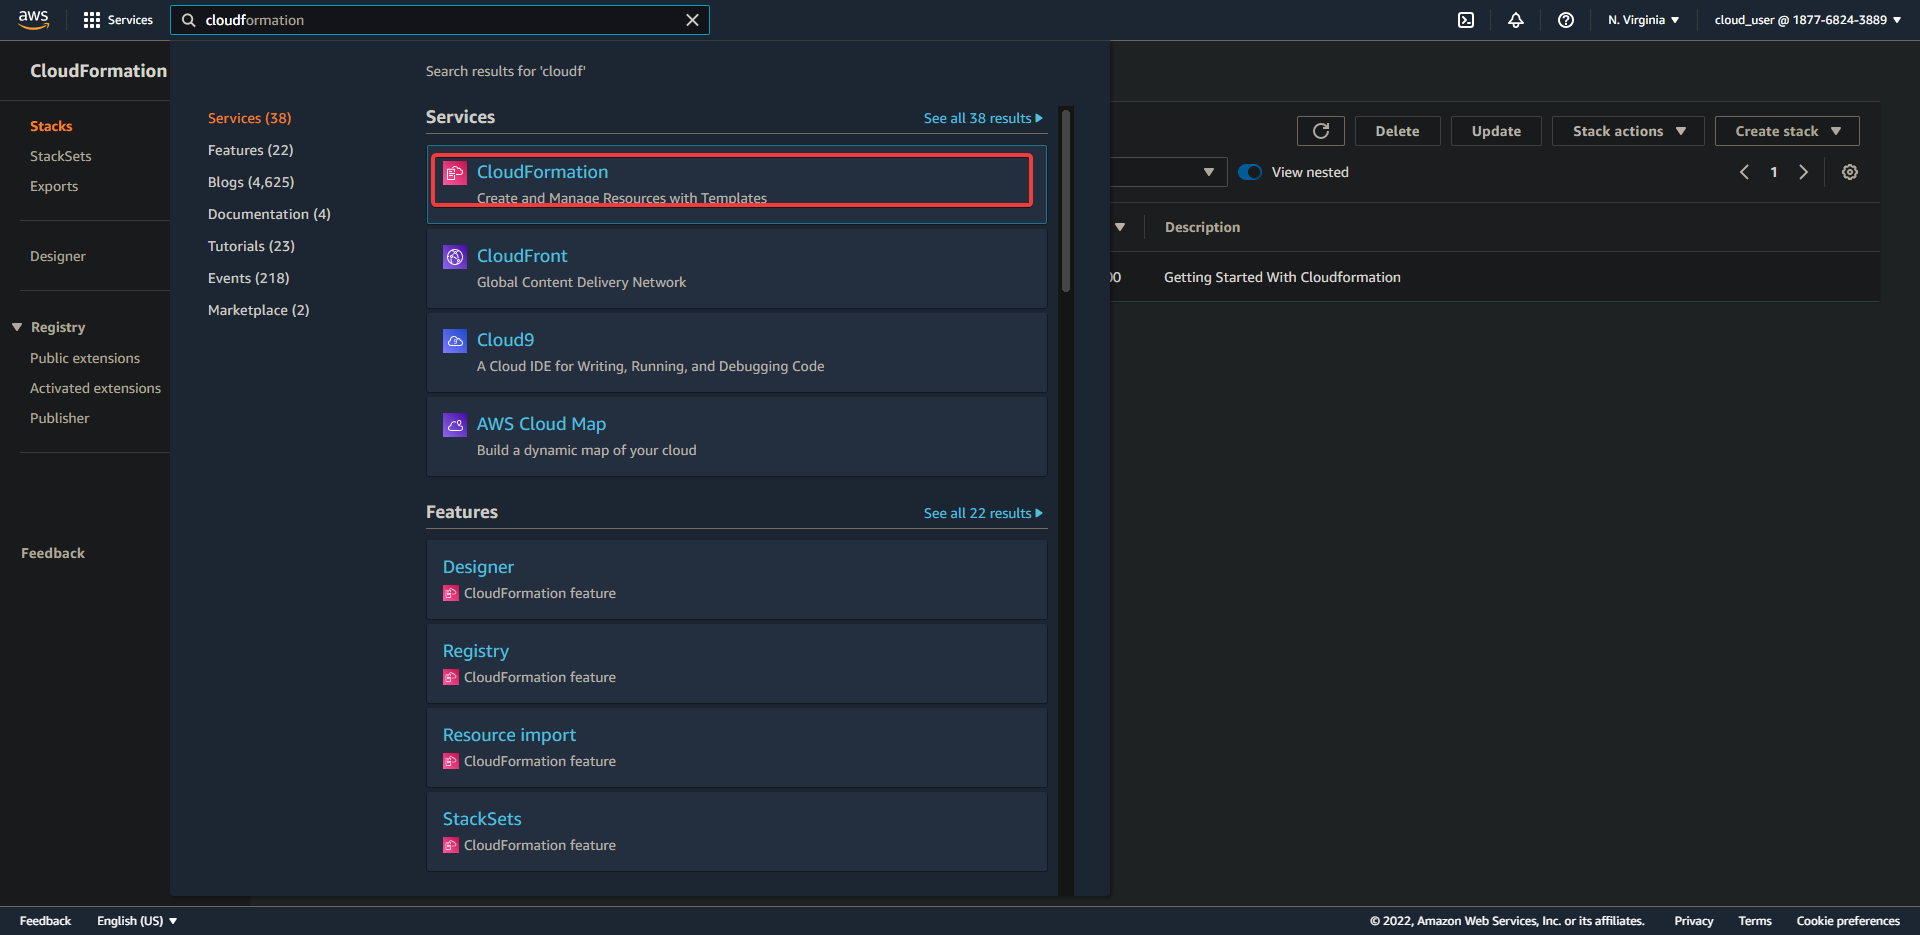
2. Now, navigate to your AWS Console —> CloudFormation.
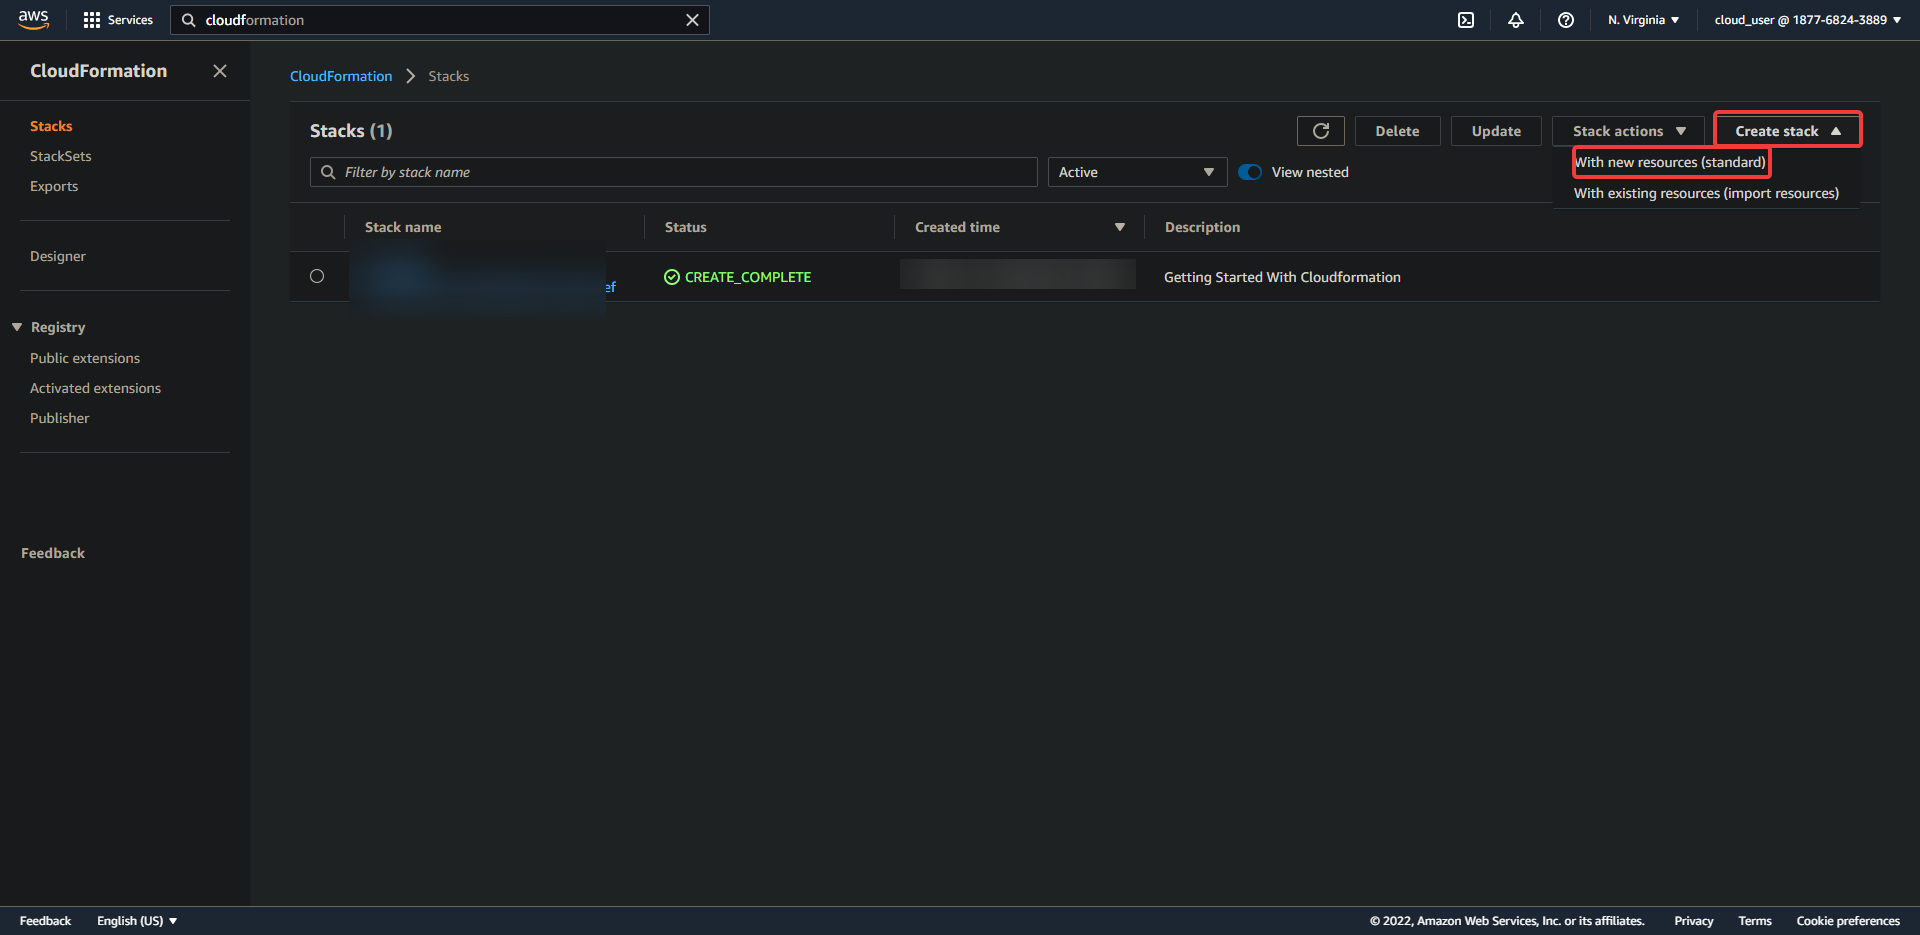
3. You will see the following screen. Click on Create stack —> With new resources.
4. You will see the following screen. Click on Template is ready —> Upload a template file —> Choose File —-> Choose your createstack.json file you downloaded earlier—> Next.
When you create a new stack, you must provide a template for your stack. You can do this in three ways:
- The template is ready: choose this option if you already have your template in hand. If not, go to the next option.
- Use a sample template: use this option to give you a head start on creating your template. The AWS user guide provides several examples of CloudFormation templates.
- Create a template in Designer: AWS CloudFormation Designer is the newest way to create your stack. It uses a drag-and-drop interface, similar to other popular tools like Sharepoint, to help you create your template.
This demo uses the first option, “Template is ready,” since you already have the templates in hand(the files you downloaded to your disk).
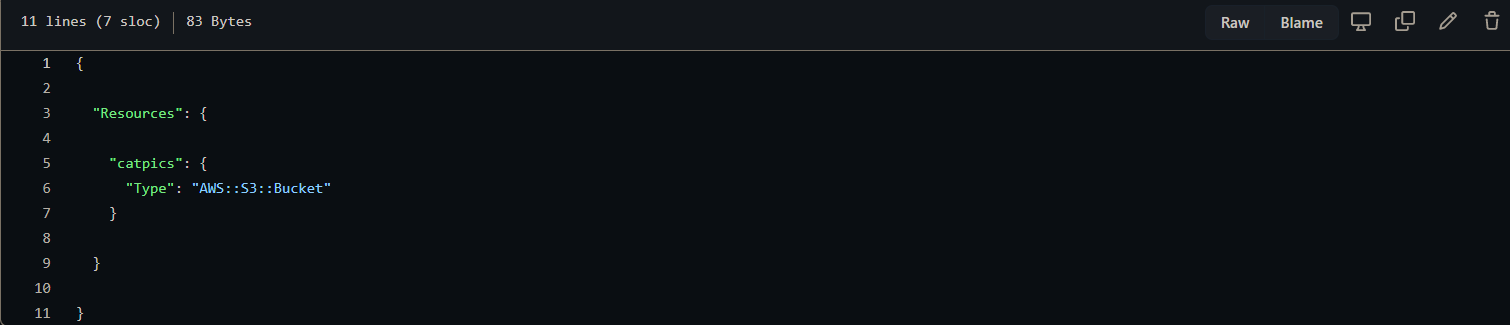
You can open the createstack.json file in your editor to take a look at it. You will see the following lines in the createstack.json file.
- “Resources”: { is the section that AWS CloudFormation creates. It’s a grouping of all the physical resources that you will be creating.
- “catpics”: is the logical resource, with its type being an S3 Bucket.
- “Type”: “AWS::S3::Bucket” is the physical resource that AWS CloudFormation will create.
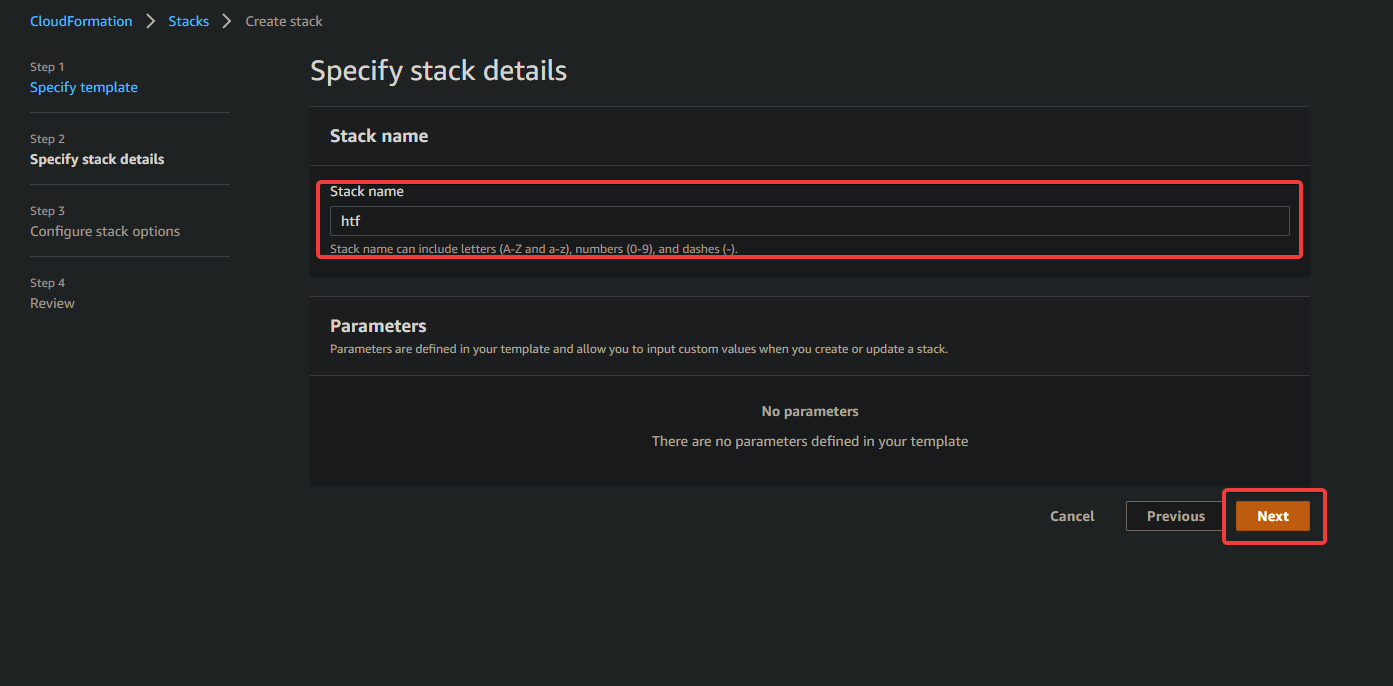
5. On the next screen, provide a name for your stack (htf) and click on Next. Every stack requires a unique name within the AWS region so that you can differ between them. You can’t use any special characters here, only letters, numbers, and underscores (no spaces). AWS automatically generates a unique stack ID for easy identification.
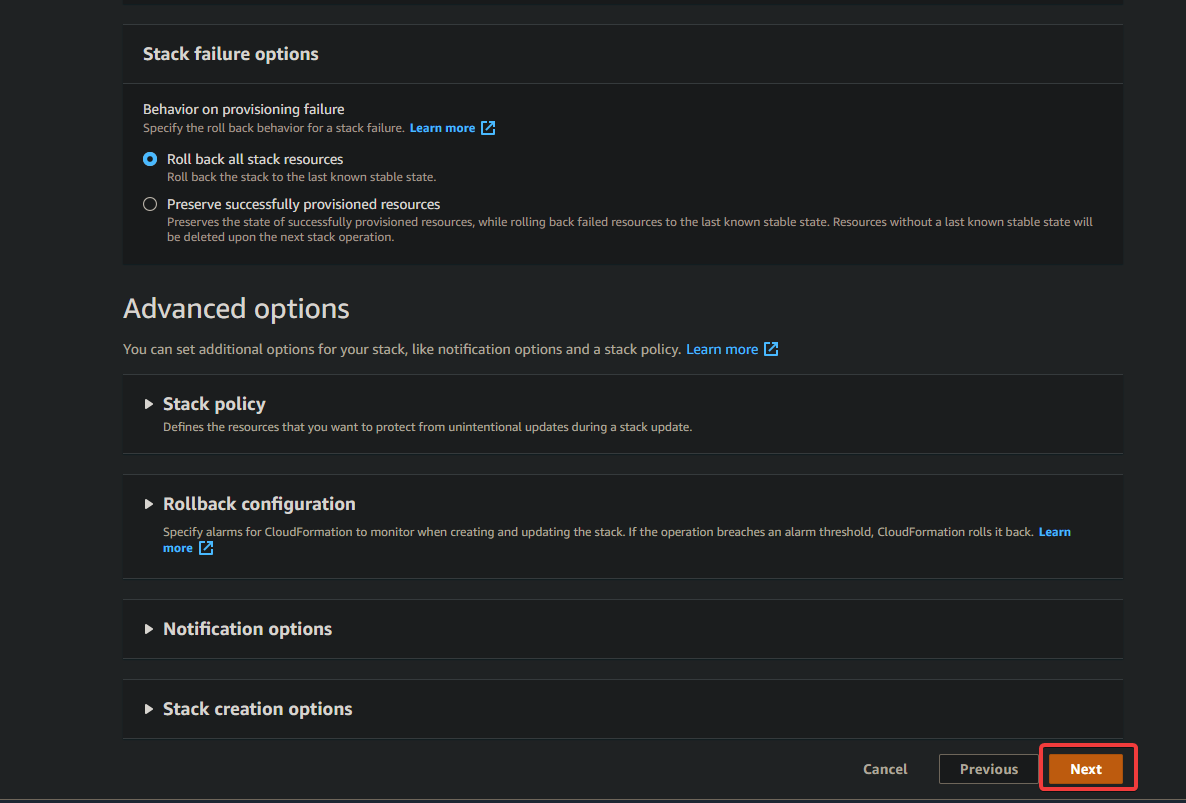
6. On the next screen, keep the default and click on Next.
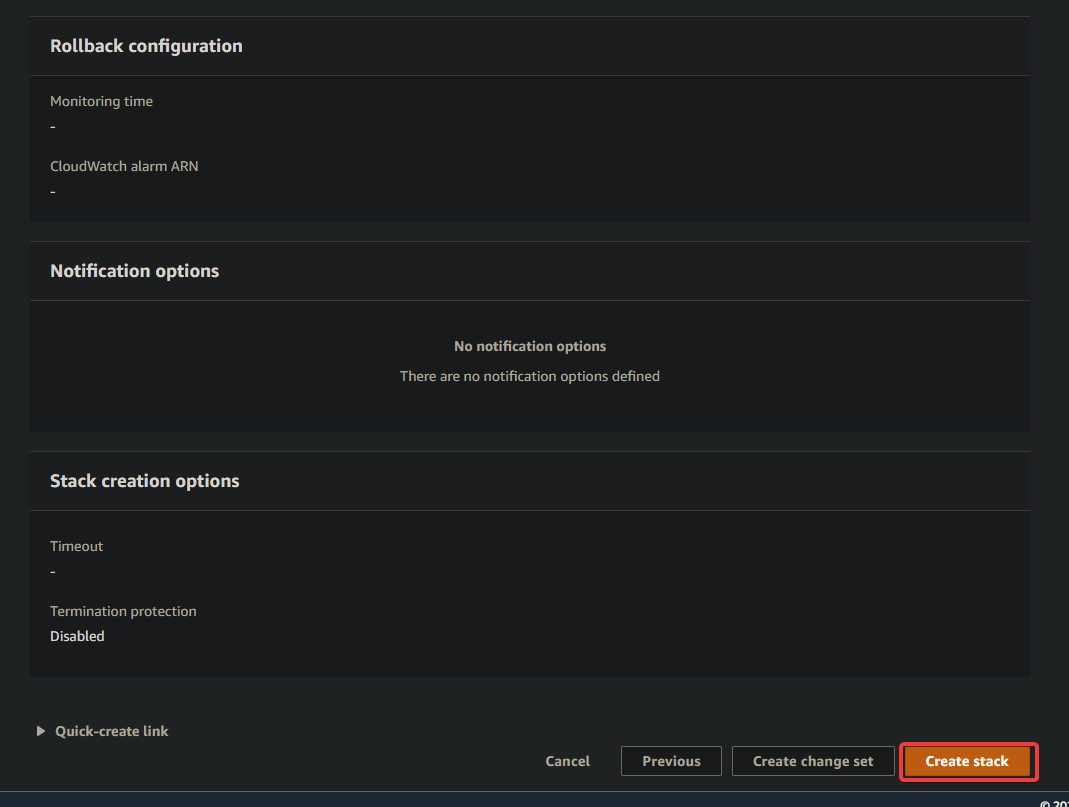
7. On the next screen, keep the default and click on Create stack.
At this point, AWS CloudFormation loads the template and creates the stack for you. CloudFormation goes through each and every section of the template and creates a corresponding physical resource for it. In some cases, AWS CloudFormation will do several check-ups on your template to ensure that everything is in place. If it finds something wrong, you will get an error message that describes what the problem is and how to fix it.
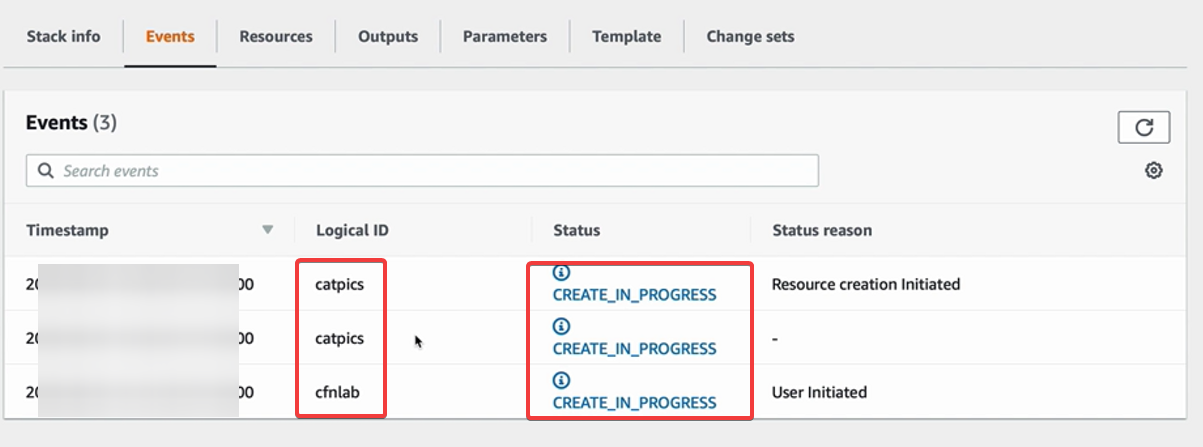
The creation process takes about 4-5 minutes to create it. You can see what’s going on by looking at the stack’s status on your CloudFormation dashboard, as shown below. You can see the catpics logical resources in the left-hand side, and in each of these resources, you can see the physical resources that AWS CloudFormation is creating for them (CREATE_IN_PROGRESS).
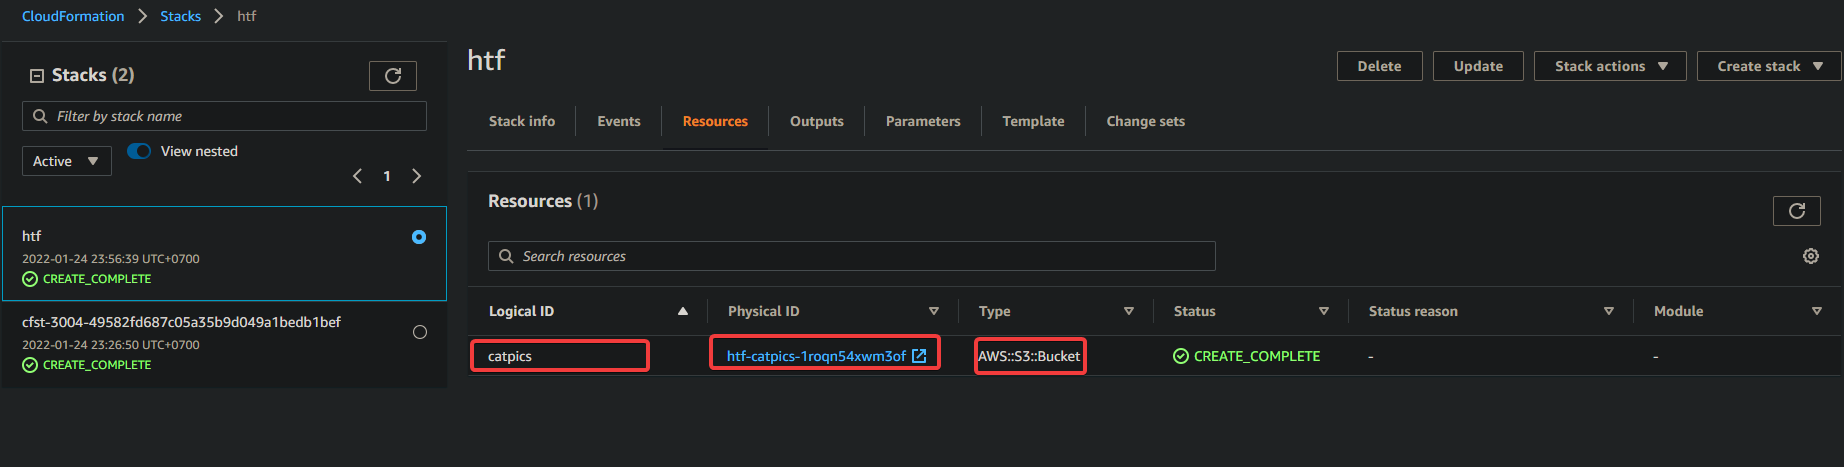
You can navigate to the resource tab to see the physical resources being created for this stack. In this case, it is an S3 Bucket named catpics with physical resources ID of htf-catpics-1roqn54xwm3of, as shown below.
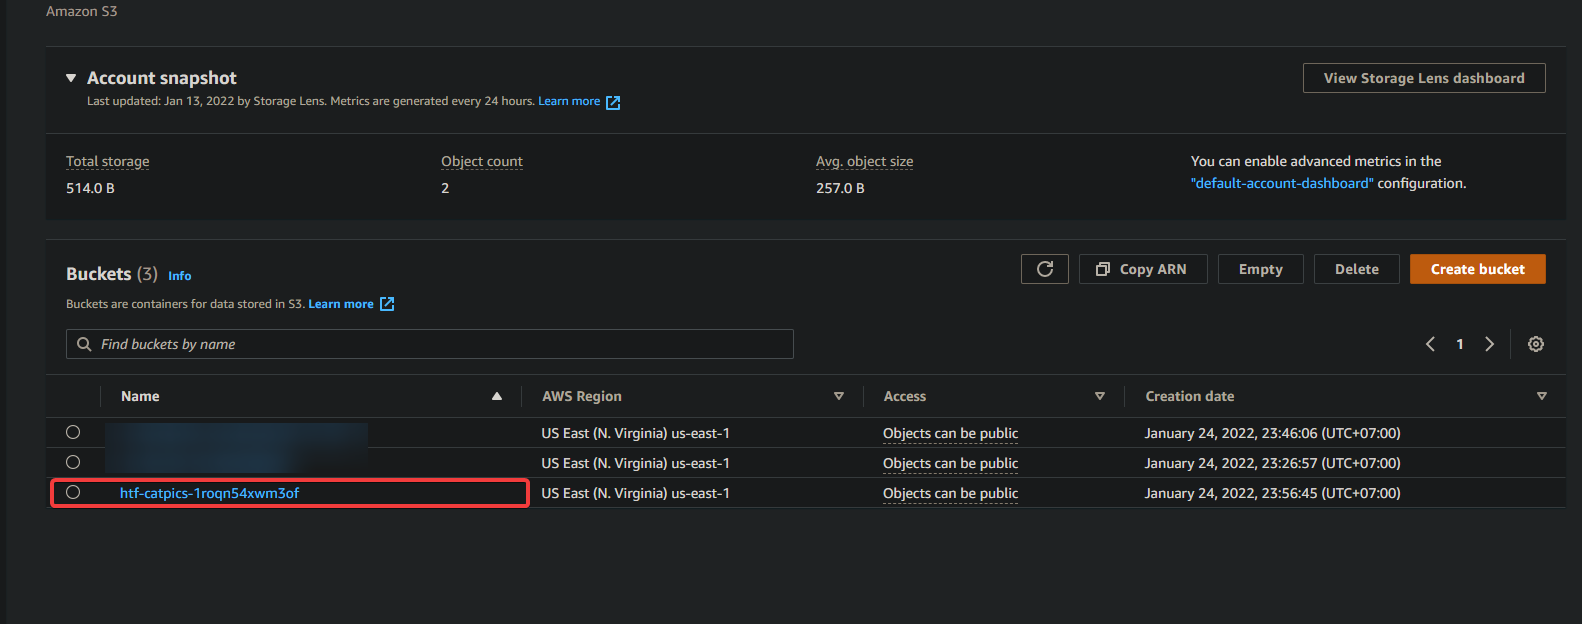
8. Now, navigate to your S3 dashboard. On your S3 dashboard, you can see the objects being created in the bucket. In this case, the stack name for the S3 bucket is htf-catpics-1roqn54xwm3of, as you can see below.
You can see that the name of the bucket is followed this pattern: your stack name(htf)-your logical stack name(catpics)-a random string(1roqn54xwm3of). This pattern is very important for you to know. When you don’t specify your physical resources’ IDs in the template, AWS CloudFormation uses this pattern to create the name for your resources. The power of this is that you can now use the same template to create multiple stacks; AWS CloudFormation will automatically handle naming them uniquely for you!
For a service like S3, a unique name is very important; the name of the bucket must be globally unique for you to store data into it. Your bucket names can not be the same. You will fail to push objects into the bucket if you try to name it with the same name.
It’s important to understand why this matters. Because with CloudFormation, it’s recommended not to explicitly name the physical resource’s ID in your template. Instead, let AWS CloudFormation create one automatically for you. This means you can re-use your template to create multiple stacks with different resources without worrying about naming conflicts. You can use your template one time, ten times, or a hundred, and CloudFormation will handle the naming changes accordingly.
Updating Your Stack
Now that you’ve created your first stack using AWS CloudFormation, let’s examine how to update the stack. How to update a stack is very important concept to understand, both for production usage or for your exam. You will probably be asked on the exam to change something in your template, or perhaps you need to update something in your stack.
In this section, you’re going to make some template changes, and use those updated templates to update your stack and evaluate what changes are made to your resources.
Generally, when updating stacks in CloudFormation. You’ll take the template that you used to create a stack and either add new resources, update existing resources, or remove existing resources.
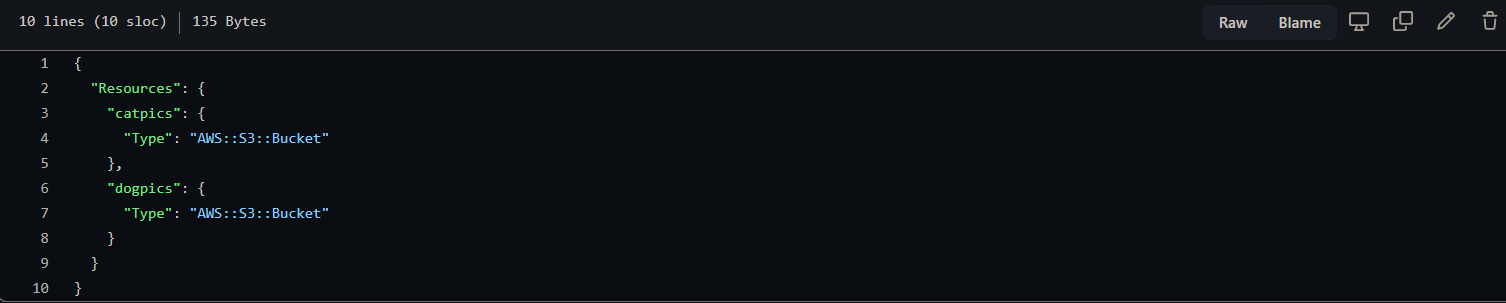
1. Open the updatestack1.json file you downloaded earlier in your editor, you will see the following code blocks. Let’s compare this template to the createstack.json template you used earlier. You can see that we will add an additional logical resource named dogpics. More importantly, no changes have been made to any existing logical resources, which is the existing catpics. The catpics resources have not been changed or removed. I will only add an additional logical resource, which is dogpics.
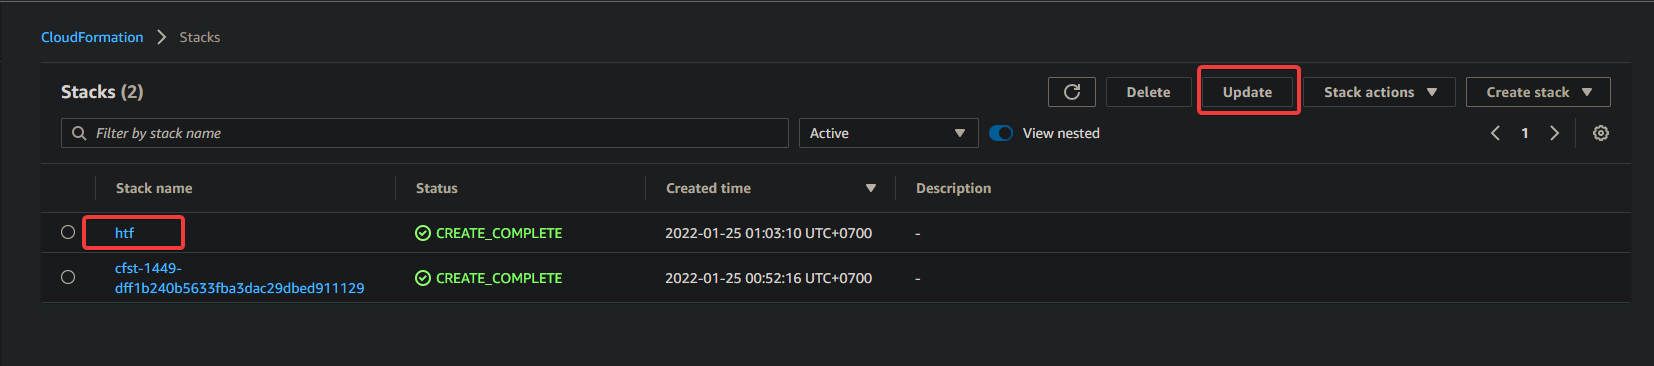
2. Navigate to your CloudFormation dashboard. Select your stack(htf) and click on Update.
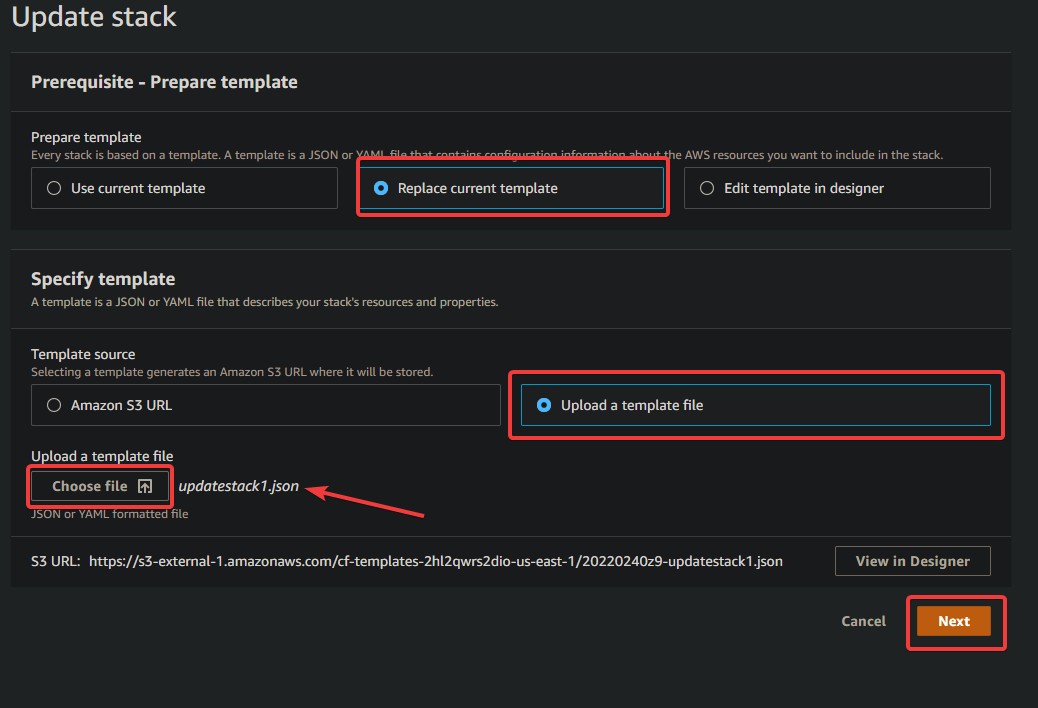
3. On the next screen, select Replace current template —> Upload a template file —> Choose File —> Select your updatestack1.json file —> Next.
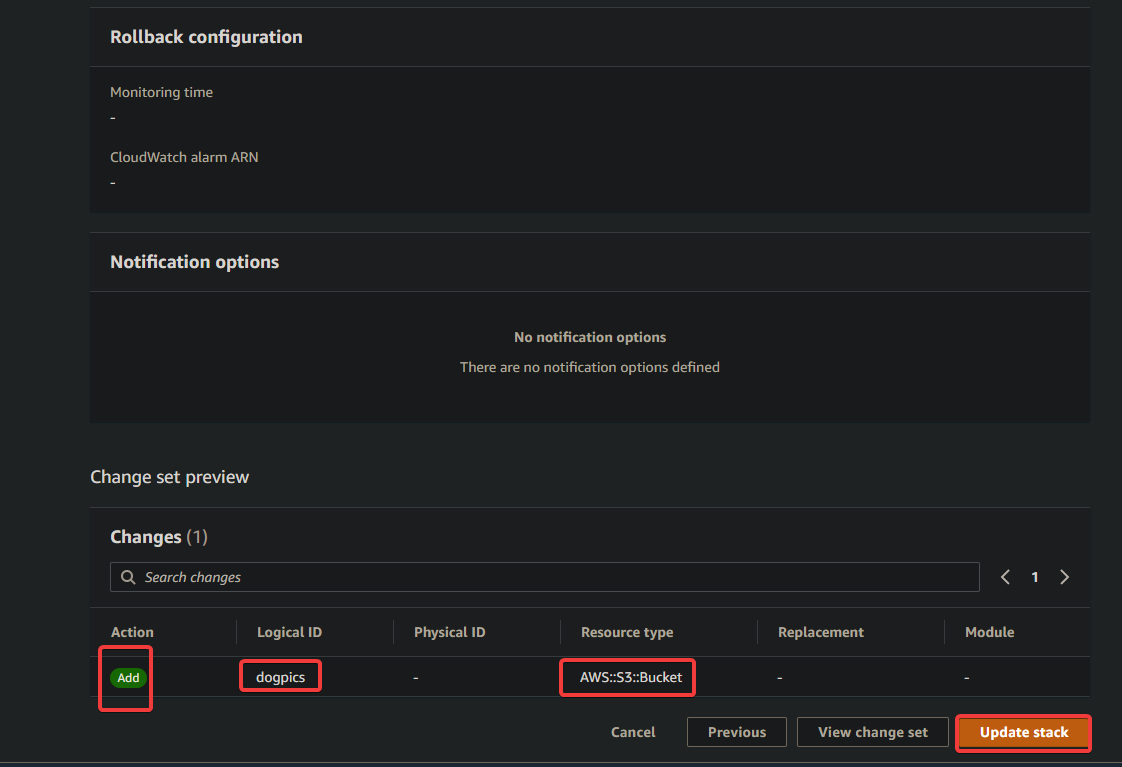
4. On the next screen, click on Next —> Next —> Update stack, as shown below. You can see that CloudFormation shows you the changes that will be made. In this case, we added a logical ID named dogpics. CloudFormation also shows us the action that will be performed(Add), and the Logical Resource type(AWS::S3::Bucket). The Replacement column is blank.
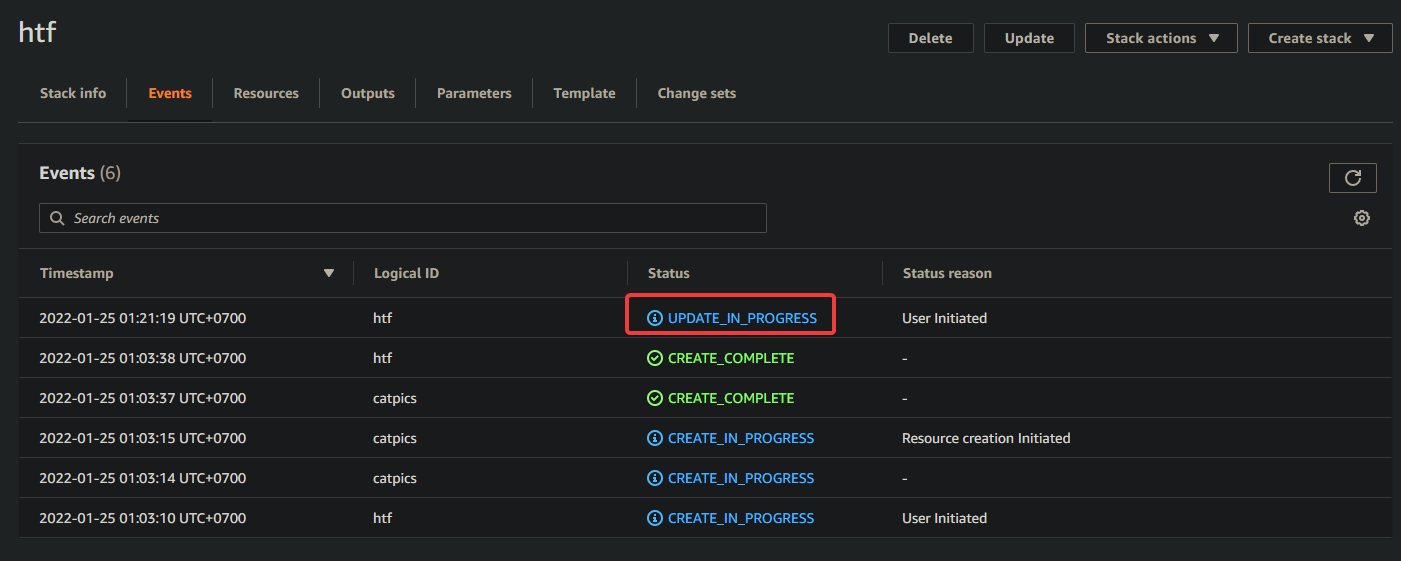
Just like when you’re creating a stack, you can look at the update events from the stack page. All the updates are being done from CloudFormation. In this case, it’s passed an additional logical resource ID, which is dogpics.
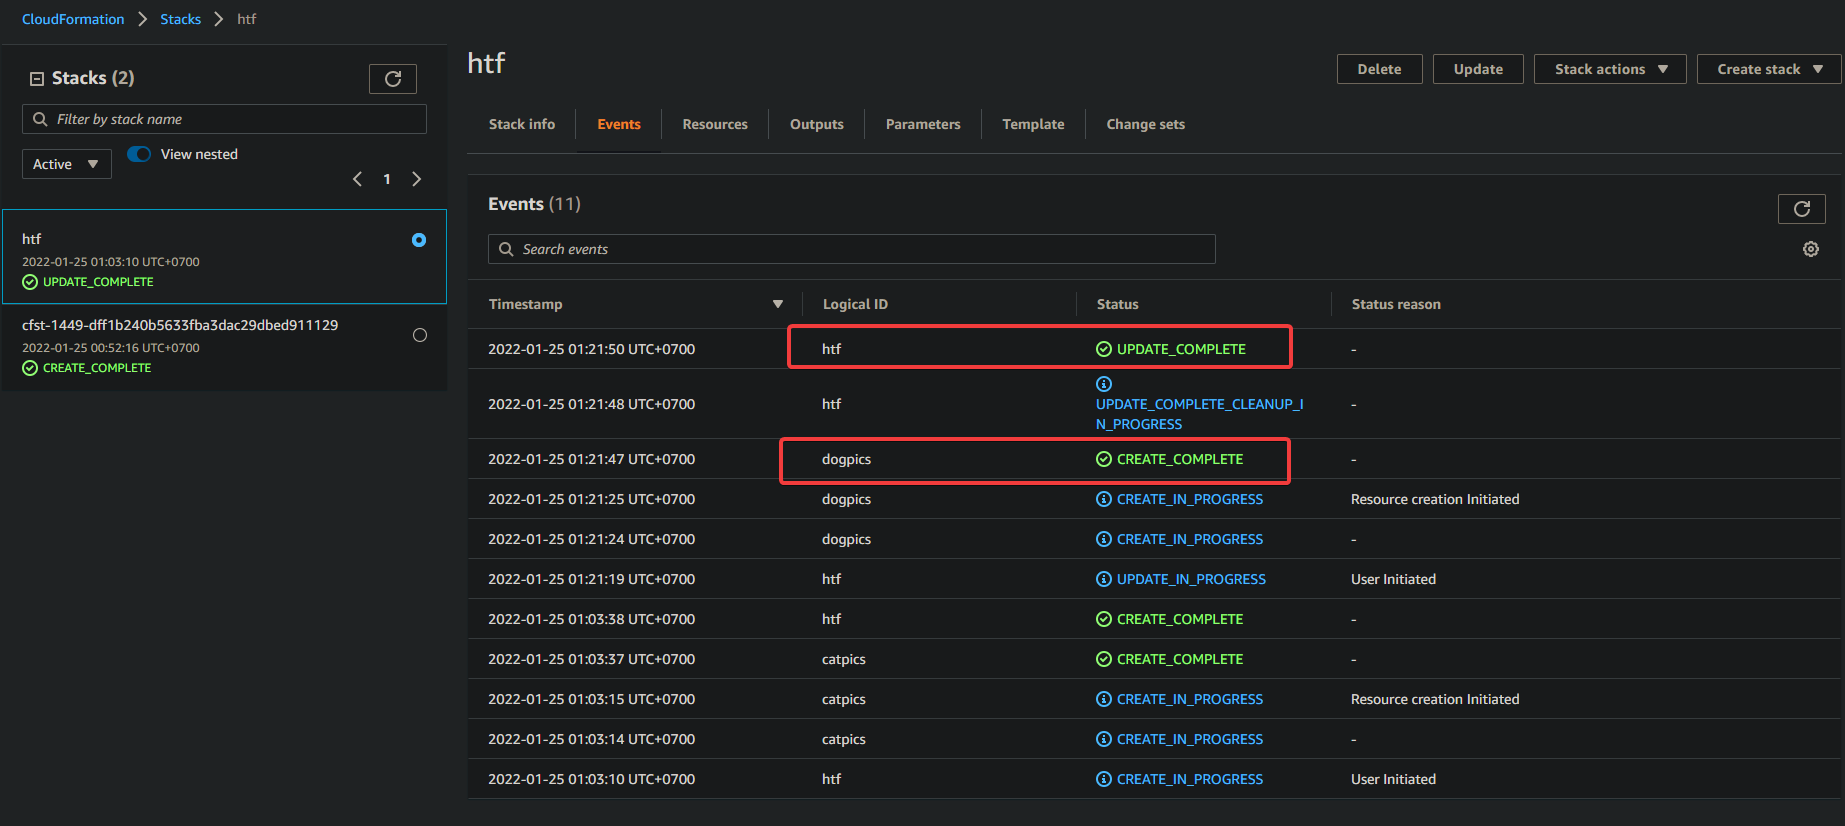
Once the updating process completes, you can see below that we have both the catpics and the dogpics resources in our stack.
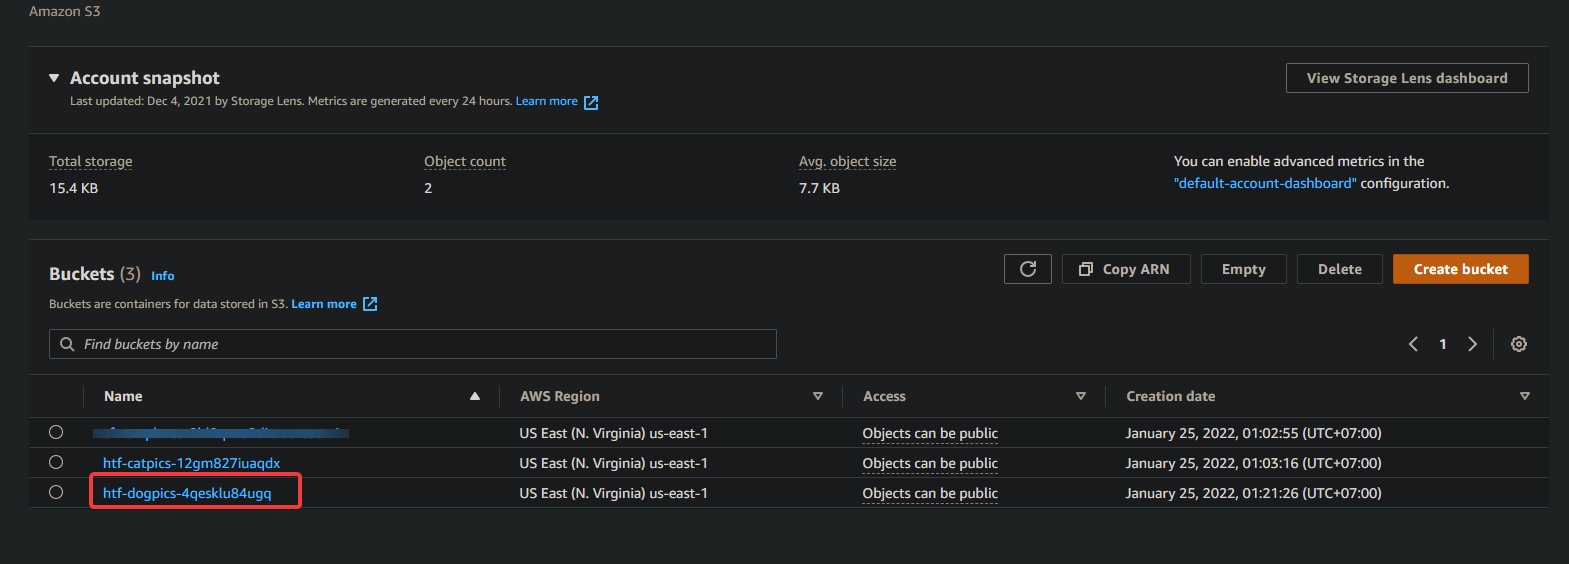
Navigate to your S3 dashboard, and you can see that an additional dogpics bucket named htf-dogpics-4qesklu84ugq was created. You can see that the naming of the bucket using the same pattern follows the stack name-logical stack name-random string.
At this point, we only add new logical resources to our resources, which is pretty simple and low risk. Now we will show you how to remove resources from your stack.
We will remove the dogpics resource from our stack. This is riskier than adding because deleting resources could break your stack. Since we are still learning, let’s practice this by deleting our dogpics resource to see what happens
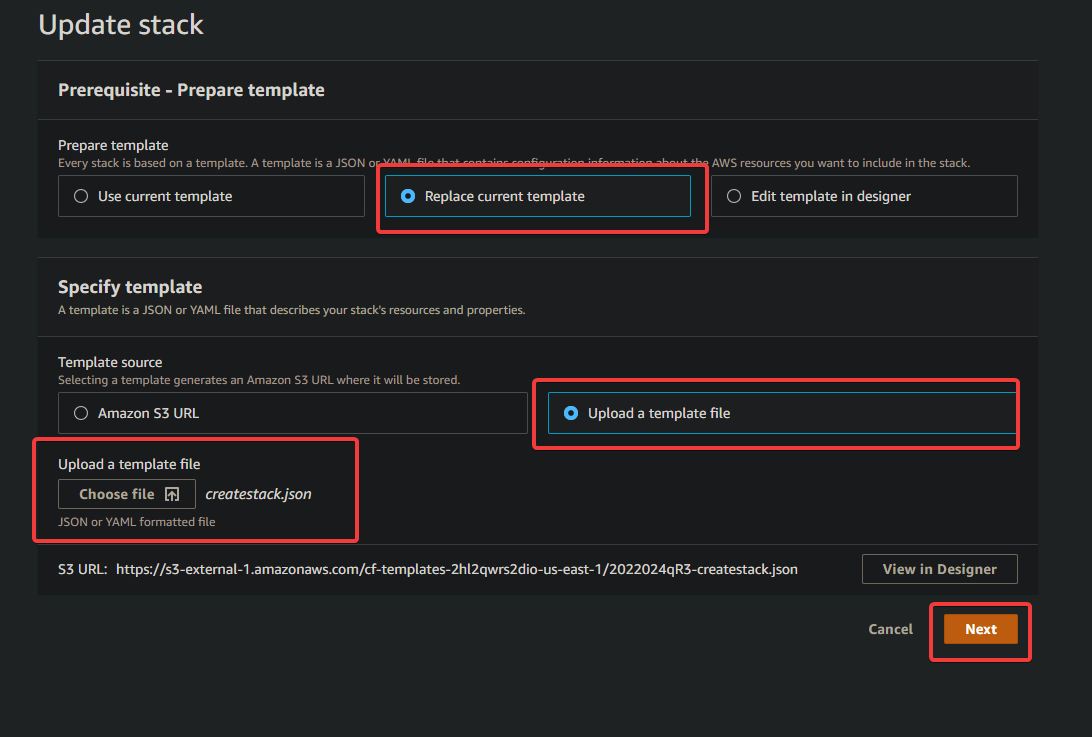
5. Navigate to your CloudFormation dashboard. Select your htf stack, click on Update —> Replace current template —> Choose file —> this time we will select the createstack.json file again —> Next —> Next —> Next.
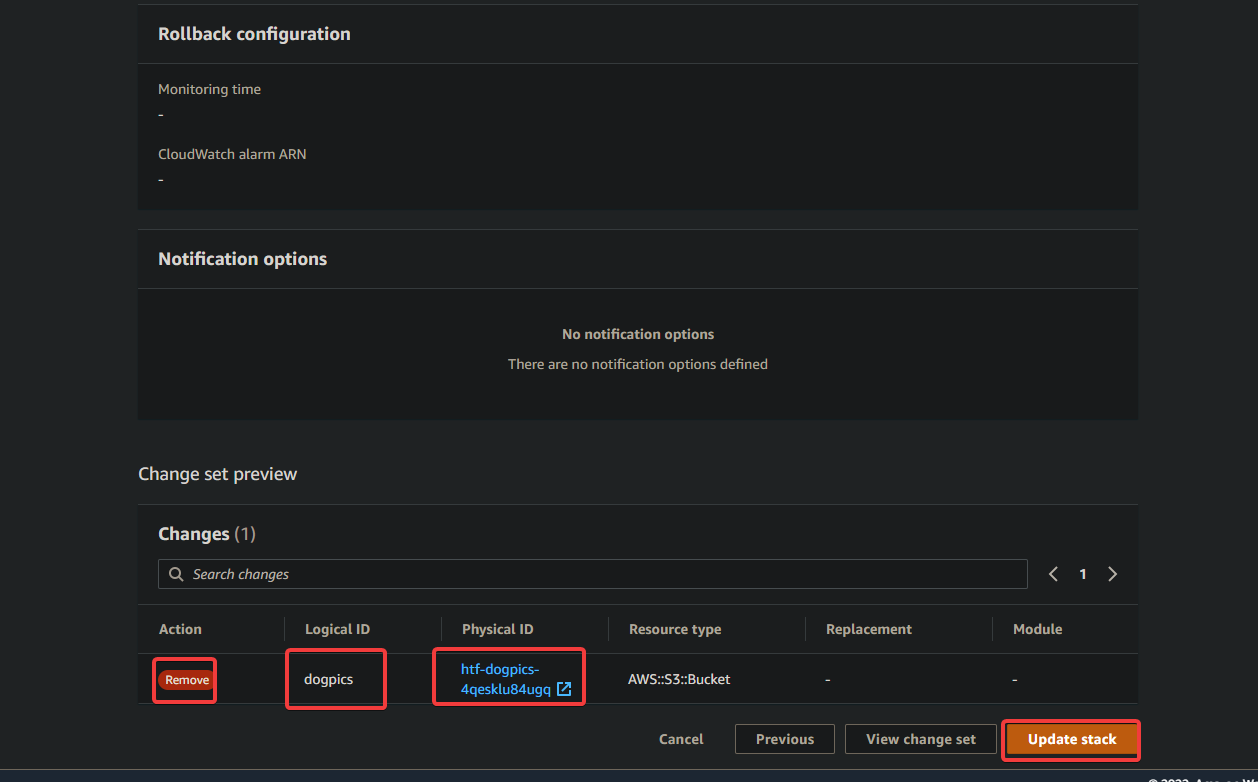
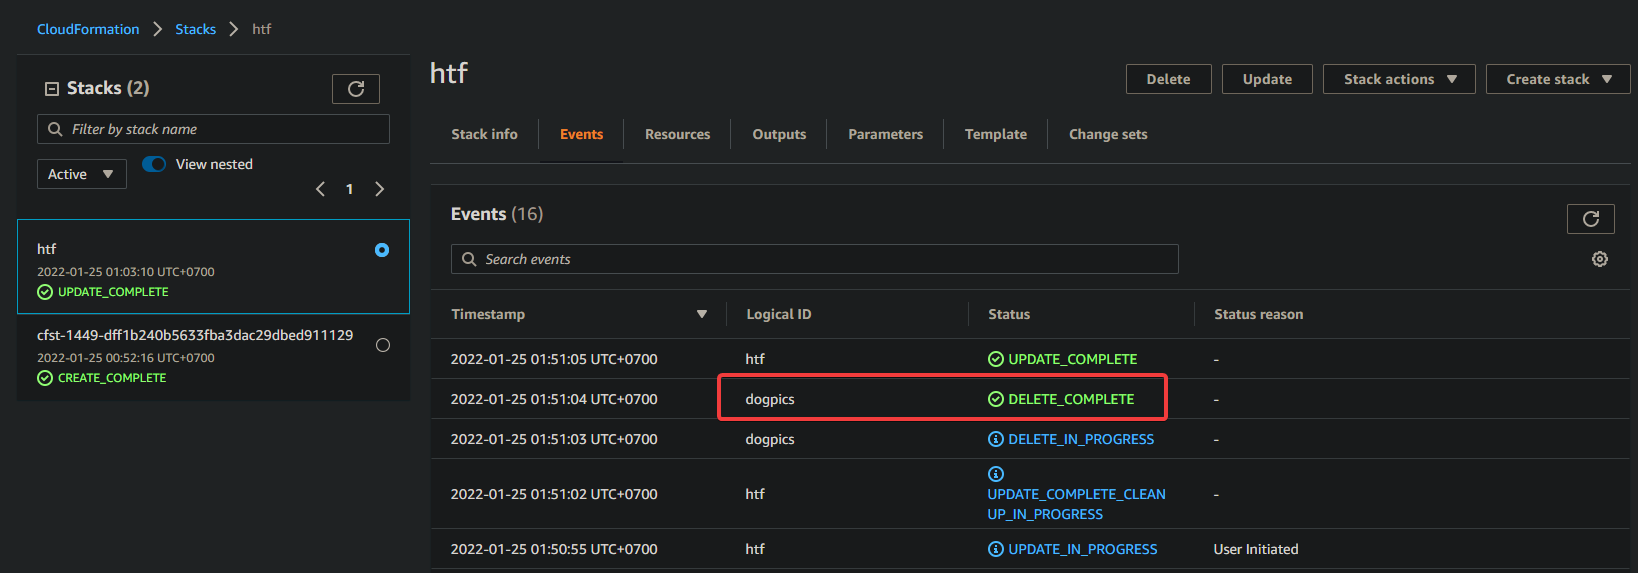
6. On the next screen, click Update stack. Under the Change Set Preview, you can see the Action column now is: Remove. In this case, CloudFormation removes the dogpics resource and the corresponding physical resources(htf-dogpics-4qesklu84ugq).
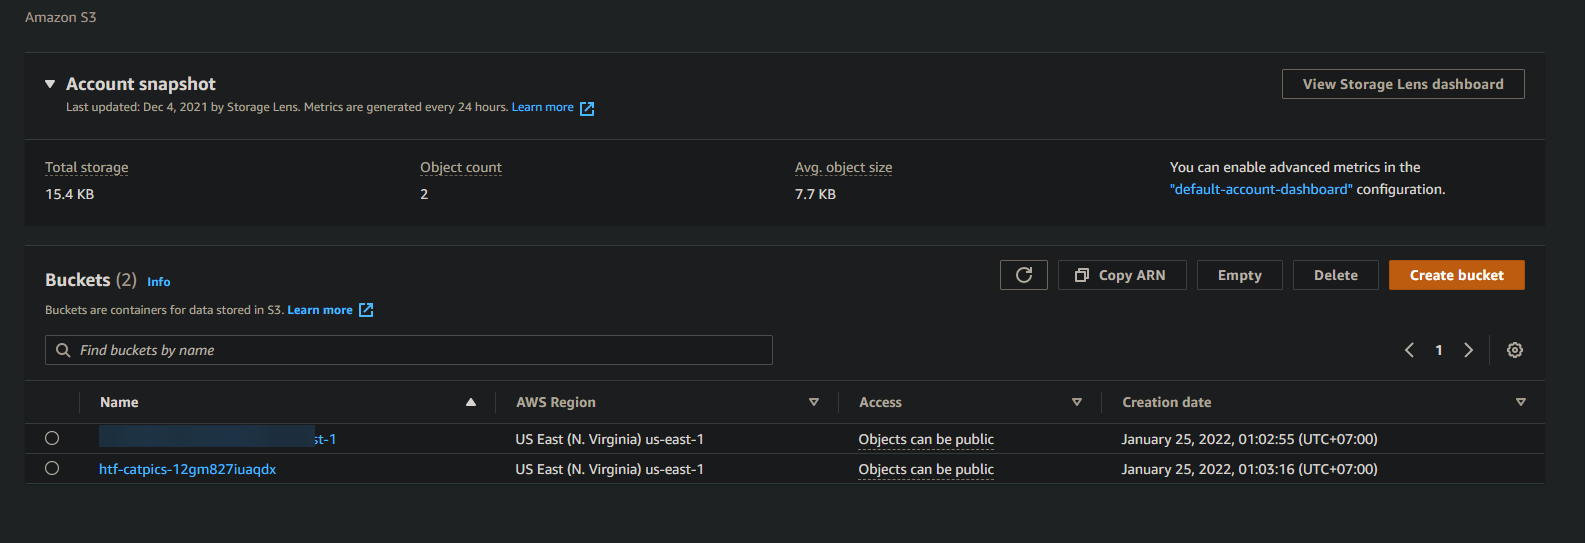
Navigate to your S3 dashboard, you can see that the dogpics bucket is now gone from your S3 dashboard.
You will the the DELETE_COMPLETE event in your Stack event.
Removing logical resources is a little bit risky because it can delete things, but that risk is only associated with logical resources that you removed from the template(the dogpics resources). So far, we haven’t made any changes to any of the other existing logical resources such as the catpics resources. So the catpics physical resources can’t be affected by any stack update. There is another option to update your stack. Using this option, we could change the configuration for an existing logical resource.
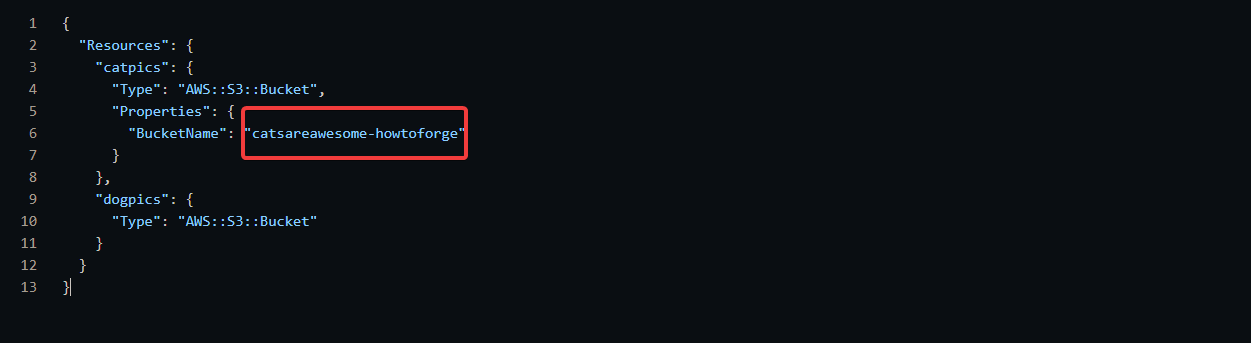
7. Open the updatestack2.json file you downloaded earlier in your editor, you will see the following code block.
The updatestack2.json file looks very similar to the createstack.json template you used earlier, except for two major differences. We again add the second logical resource, dogpics. But we’ve also made a change to catpics.
We’ve added an additional section of the configuration, which is called Properties, where we can define additional properties for a given logical resource. In this case, we will be creating an S3 bucket. We explicitly set the bucket name of the physical resource as catsareawesome–howtoforge.
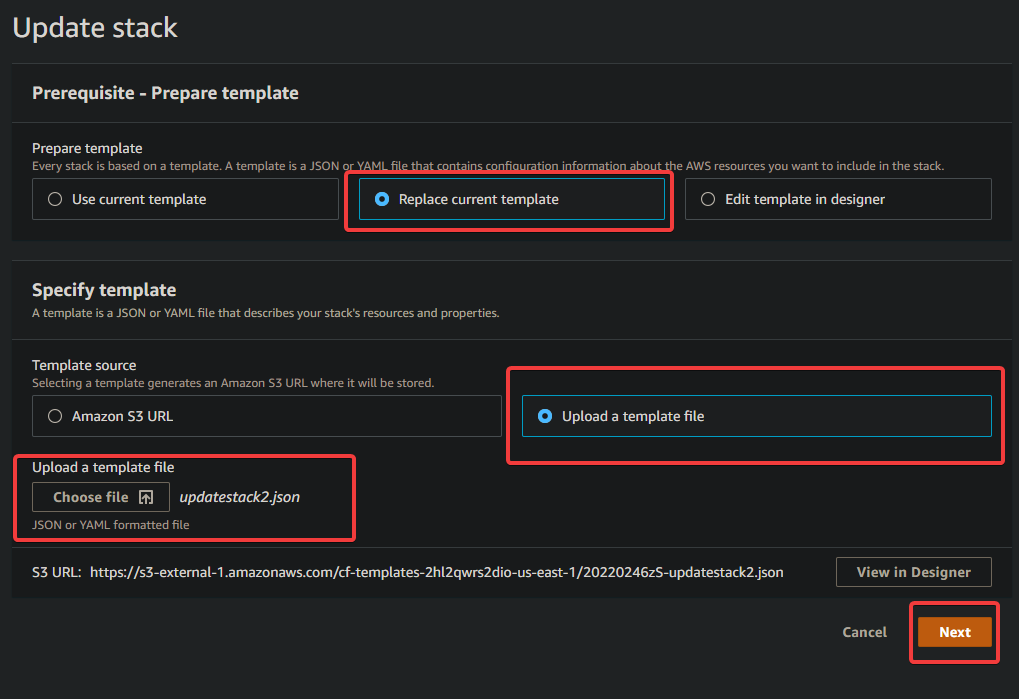
8. Navigate to your CloudFormation dashboard. Select your htf stack, click on Update —> Replace current template —> Choose file —> this time we will select the updatestack2.json file —> Next —> Next —> Next.
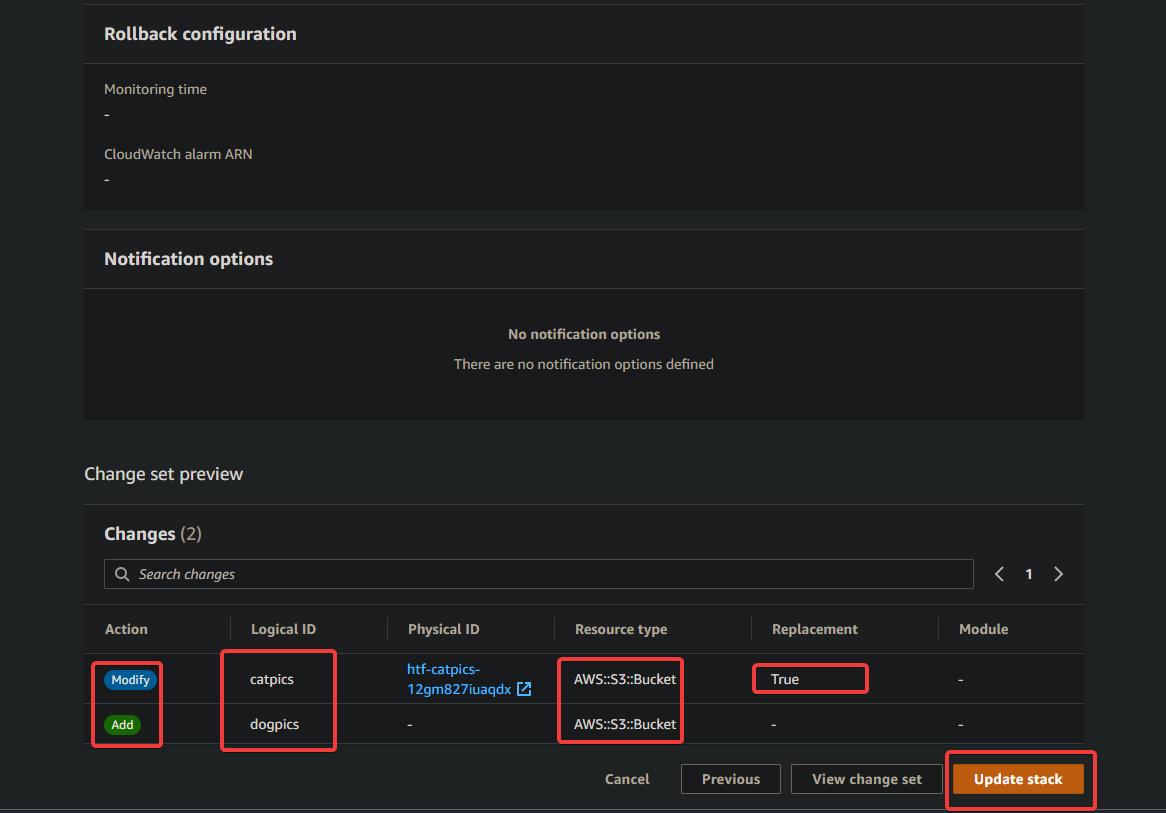
9. On the next screen, click Update stack. Notice the Change Set Preview panel, you can what the effect of this update is going to be.
The first change looks familiar. We’re going to add an additional logical resource for dogpics, which will be an S3 bucket. But we also see a Modify action. And modify is actually the riskiest thing that you could do to a CloudFormation stack.
The reason for that is the existing resources, which are in place and potentially in use by other environments, could be changed by the stack update. So modifying existing logical resources are potentially riskier to use.
There are 3 possibilities that a physical resource is affected when you update a stack this way. The first possibility is that a resource is updated without any disruption to service.
The second possibility is that the resource is updated and service is interrupted by some level of disruption. For example, when you update your stack for changing your EC2 instance size. When you do this, you will need to reboot your EC2 instance manually. A new AMI will be launched and you might experience some downtime. But once the new AMI is launched, your service will be available immediately.
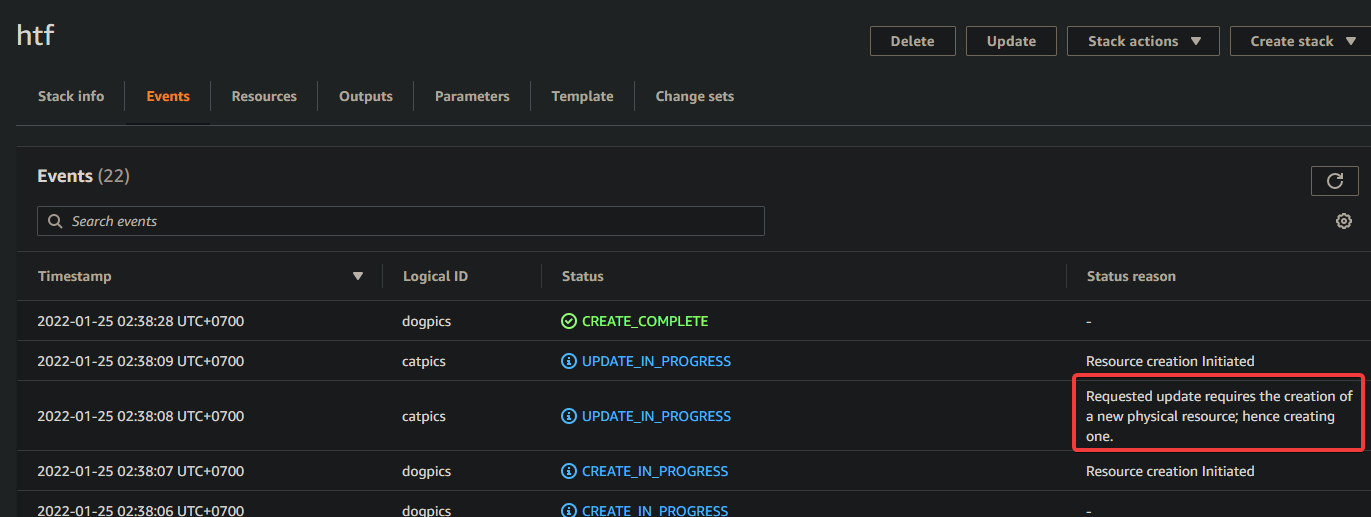
The final possibility is that the update will delete your entire existing physical resource and replace it with a new one(Replacement). This is the riskiest possibility when updating your CloudFormation stack. You should really pay attention when you do this. When this kind of replacement happens, you will the Replacement column is True, as shown in the screenshot below.
On your CloudFormation Stacks dashboard, you can see that it says “Requested update requires the creation of a new physical resource; hence creating one.” So CloudFormation deletes the existing resource and creates a new one.
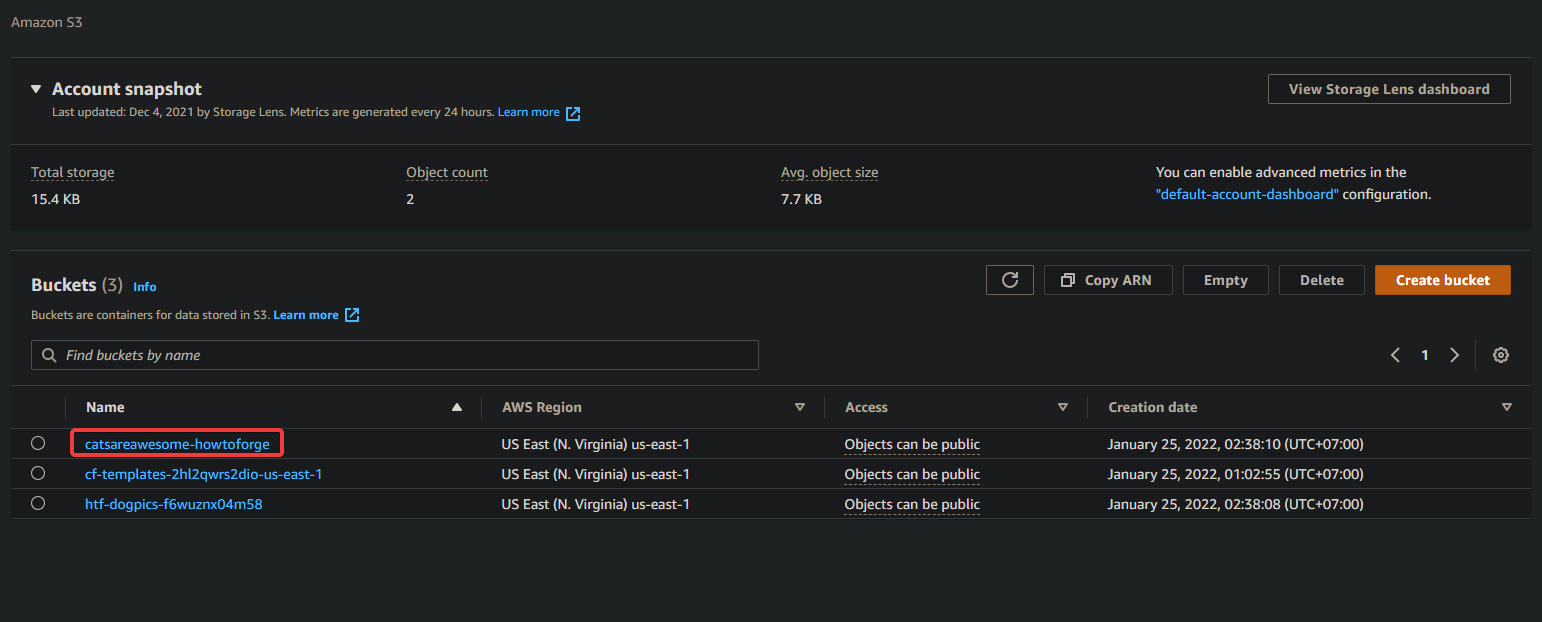
Navigate to your S3 dashboard, you will see that the catpics bucket is now gone, and a new one, catsareawesome–howtoforge, has been created. Note that we explicitly provide the physical name(catsareawesome-howtoforge) for a resource inside a CloudFormation template, it doesn’t apply any random characters to the resource name.
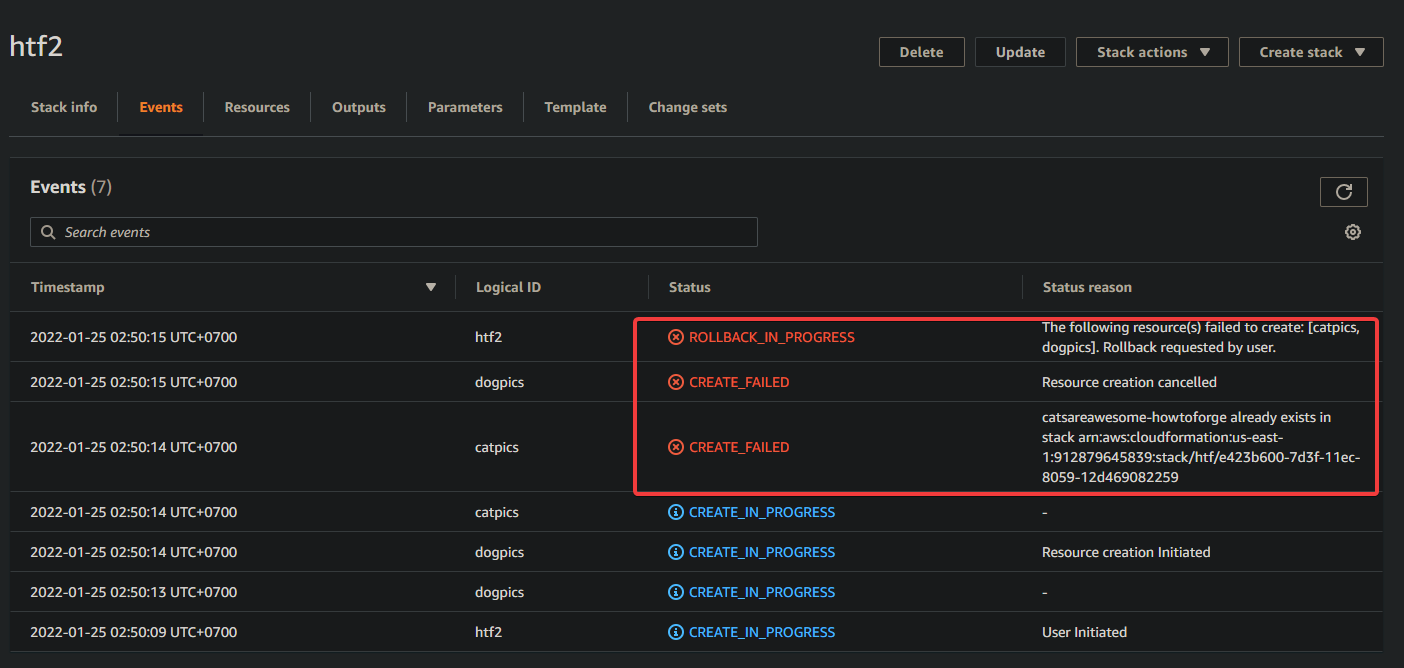
The problem with that is if we use this template to create another CloudFormation stack, it would fail because it would attempt to create another bucket with the exact same name. And you’re unable to have 2 buckets with the same name in any AWS accounts. You will get the following error when you attempt to create another bucket with the exact same name.
Deleting Your CloudFormation Stacks
Now that we’ve changed the template and updated our stack, we need to make sure that we delete the stack after we’ve completed working on it. If we don’t delete the unused stacks, it will remain in our CloudFormation Stack dashboard indefinitely. We would have to manually go in there and delete it.
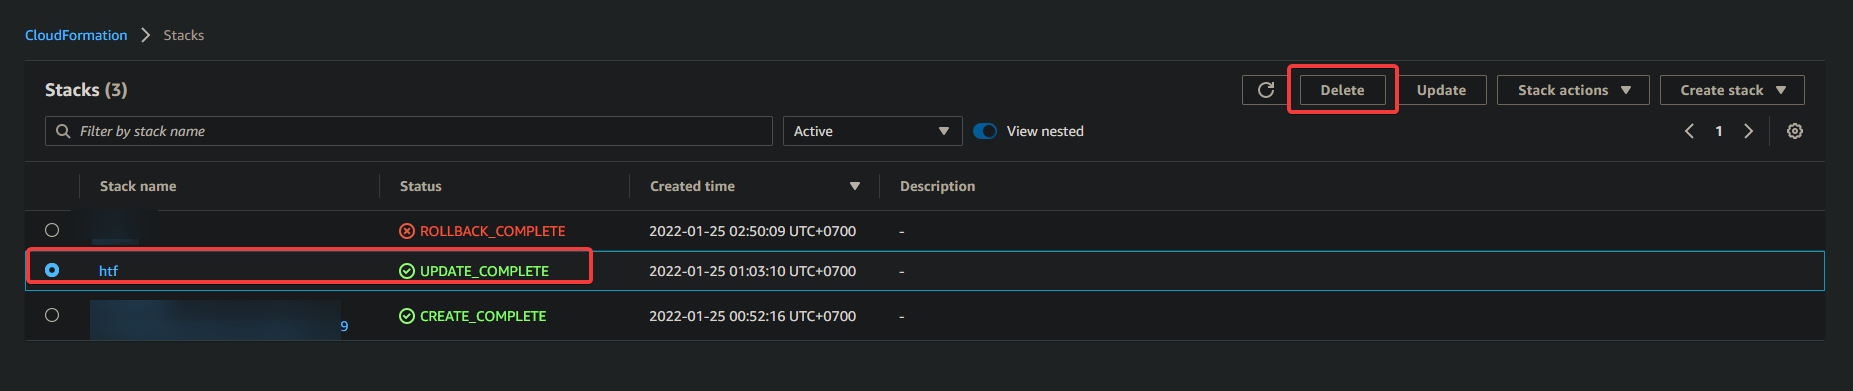
From your CloudFormation dashboard, select your stack, then select Delete. When CloudFormation deletes the stack, it also deletes all of the resources within that stack. There is no way to just delete one resource such as the S3 bucket or the EC2 instance. This action is done by design.
Conclusion
In this guide, we looked at how CloudFormation stacks are created and changed. We looked at some of the ways to change templates and how to update existing stacks. We then looked at some of the possibilities that are associated with updating stacks. And lastly, we looked at how to delete CloudFormation stacks after you’ve finished working on them.
Please leave a comment below if you have any questions or suggestions. Thanks for reading!


