Deja Dup is a simple and powerful backup tool for Linux operating systems. It provides an easy way to backup and restores data from the graphical interface. It uses duplicity to compress and encrypt the backup data using a password. By default, Deja Dup makes a full backup every three months and delete old backups after a particular period of time. It allows you to save the backup on the local directory as well as remote directory including, Google Drive, NFS, SSH, and Samba.
In this tutorial, I will show you how to install the Deja Dup backup tool on Debian, Ubuntu, and CentOS Linux.
Prerequisites
- A system running Linux desktop.
- A root password is configured on the server.
Install Deja Dup
By default, Deja Dup is included in the default repository of all major operating systems.
For Ubuntu and Debian operating systems, run the following command to install Deja Dup:
apt-get install deja-dup -y
For RHEL, CentOS, and Fedora operating systems, run the following command to install Deja Dup:
dnf install deja-dup -y
Backup Files with Deja Dup
In this section, we will show you how to backup files with Deja Dup.
To launch the Deja Dup, search for backups in the Application menu as shown below:
<img alt="Backups" data-ezsrc="https://kirelos.com/wp-content/uploads/2021/07/echo/p1.png60f7fc3ac44c8.jpg" ezimgfmt="rs rscb5 src ng ngcb5" height="421" loading="lazy" src="data:image/svg xml,” width=”750″>
Click on the Backups. You should see the Deja Dup interface:
<img alt="DejaDup" data-ezsrc="https://kirelos.com/wp-content/uploads/2021/07/echo/p2.png60f7fc3ae9835.jpg" ezimgfmt="rs rscb5 src ng ngcb5" height="426" loading="lazy" src="data:image/svg xml,” width=”750″>
Next, click on the Storage location to set the backup location as shown below:
<img alt="Backup Storage location" data-ezsrc="https://kirelos.com/wp-content/uploads/2021/07/echo/p3.png60f7fc3b0e327.jpg" ezimgfmt="rs rscb5 src ng ngcb5" height="425" loading="lazy" src="data:image/svg xml,” width=”750″>
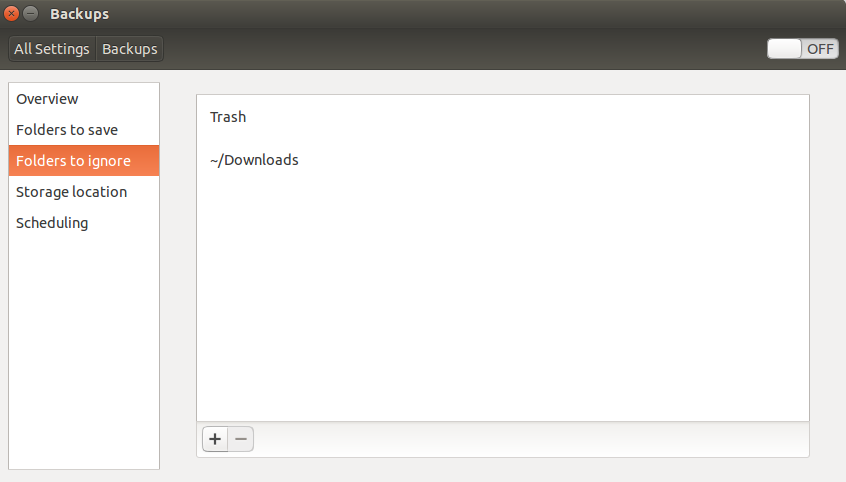
Provide your backup location and click on the Folder to ignore to define the folder that you want to exclude from the backup as shown below:
<img alt="Folders to Ignore" data-ezsrc="https://kirelos.com/wp-content/uploads/2021/07/echo/p5.png60f7fc3b30d98.jpg" ezimgfmt="rs rscb5 src ng ngcb5" height="427" loading="lazy" src="data:image/svg xml,” width=”750″>
Next, click on the Folder to save button to define the folder that you want to backup.
<img alt="Folders to be backed up" data-ezsrc="https://kirelos.com/wp-content/uploads/2021/07/echo/p6.png60f7fc3b503f0.jpg" ezimgfmt="rs rscb5 src ng ngcb5" height="428" loading="lazy" src="data:image/svg xml,” width=”750″>
Click on the icon and add the folder that you want to backup as shown below:
<img alt="Add folder to backup" data-ezsrc="https://kirelos.com/wp-content/uploads/2021/07/echo/p7.png60f7fc3b77388.jpg" ezimgfmt="rs rscb5 src ng ngcb5" height="426" loading="lazy" src="data:image/svg xml,” width=”750″>
Now, click on the Overview button and click on the Backup Now button to start your first backup:
<img alt="Backup overview" data-ezsrc="https://kirelos.com/wp-content/uploads/2021/07/echo/p2.png60f7fc3ae9835.jpg" ezimgfmt="rs rscb5 src ng ngcb5" height="426" loading="lazy" src="data:image/svg xml,” width=”750″>
<img alt="Set password for Backup" data-ezsrc="https://kirelos.com/wp-content/uploads/2021/07/echo/p8.png60f7fc3bb7cf4.jpg" ezimgfmt="rs rscb5 src ng ngcb5" height="429" loading="lazy" src="data:image/svg xml,” width=”750″>
Provide the password to protect your backup and click on the Continue button to start the backup. The backup time may vary depending upon the size of the data.
Schedule backup with Deja Dup
Deja Dup comes with a built-in program called “deja-dup-monitor” to schedule regular backups at specific intervals of time.
To enable the automatic backup, click on the Scheduling button and enable the automatic backup as shown below:
<img alt="Schedule backup" data-ezsrc="https://kirelos.com/wp-content/uploads/2021/07/echo/p10.png60f7fc3bdf71d.jpg" ezimgfmt="rs rscb5 src ng ngcb5" height="428" loading="lazy" src="data:image/svg xml,” width=”750″>Advertisement
Deja Dup only allows Daily and Weekly scheduling options.
Restore Files with Deja Dup
In this section, we will show you how to restore files with Deja Dup.
With Deja Dup, you can restore from any particular backup at any time.
To restore the backup, open the Deja Dup utility as shown below:
<img alt="Restore backup" data-ezsrc="https://kirelos.com/wp-content/uploads/2021/07/echo/p2.png60f7fc3ae9835.jpg" ezimgfmt="rs rscb5 src ng ngcb5" height="426" loading="lazy" src="data:image/svg xml,” width=”750″>
Now, click on the Restore button. You should see the following screen:
<img alt="Restore from" data-ezsrc="https://kirelos.com/wp-content/uploads/2021/07/echo/p11.png60f7fc3c331bb.jpg" ezimgfmt="rs rscb5 src ng ngcb5" height="427" loading="lazy" src="data:image/svg xml,” width=”750″>
Select your backup location and click on the Forward button. You should see the following screen:
<img alt="Restore from date" data-ezsrc="https://kirelos.com/wp-content/uploads/2021/07/echo/p12.png60f7fc3c5edf0.jpg" ezimgfmt="rs rscb5 src ng ngcb5" height="398" loading="lazy" src="data:image/svg xml,” width=”449″>
Select the date of your backup that you want to restore and click on the Forward button.
<img alt="Restore backup to" data-ezsrc="https://kirelos.com/wp-content/uploads/2021/07/echo/p13.png60f7fc3c897c4.jpg" ezimgfmt="rs rscb5 src ng ngcb5" height="399" loading="lazy" src="data:image/svg xml,” width=”447″>
Select the location on which you want to restore the backup then click on the Forward button.
<img alt="File restore summary" data-ezsrc="https://kirelos.com/wp-content/uploads/2021/07/echo/p14.png60f7fc3cb745a.jpg" ezimgfmt="rs rscb5 src ng ngcb5" height="399" loading="lazy" src="data:image/svg xml,” width=”450″>
Confirm your restore summary and click on the Restore button. You will be asked to provide your backup password:
<img alt="Enter backup password" data-ezsrc="https://kirelos.com/wp-content/uploads/2021/07/echo/p15.png60f7fc3ce4d7b.jpg" ezimgfmt="rs rscb5 src ng ngcb5" height="401" loading="lazy" src="data:image/svg xml,” width=”451″>
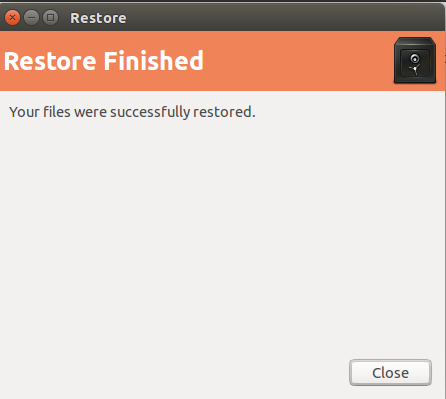
Provide your password and click on the Continue button. Once the backup has been restored successfully. You should see the following screen:
<img alt="Files restores successfully" data-ezsrc="https://kirelos.com/wp-content/uploads/2021/07/echo/p16.png60f7fc3d7a09b.jpg" ezimgfmt="rs rscb5 src ng ngcb5" height="399" loading="lazy" src="data:image/svg xml,” width=”446″>
Conclusion
In the above guide, you learned how to install Deja Dup and Linux and use it to backup and restore files. I hope this tool will help you to save a lot of time.
<img alt="Hitesh Jethva" data-ezsrc="https://kirelos.com/wp-content/uploads/2021/07/echo/hitesh-80.jpg60f7fc3dae6ef.jpg" ezimgfmt="rs rscb5 src ng ngcb5" src="data:image/svg xml,”>
About Hitesh Jethva
Over 8 years of experience as a Linux system administrator. My skills include a depth knowledge of Redhat/Centos, Ubuntu Nginx and Apache, Mysql, Subversion, Linux, Ubuntu, web hosting, web server, Squid proxy, NFS, FTP, DNS, Samba, LDAP, OpenVPN, Haproxy, Amazon web services, WHMCS, OpenStack Cloud, Postfix Mail Server, Security etc.


