Anaconda is an open-source platform that is used for R programming and Python. That contains a large number of packages and repositories. It is important in its functionality as it provides processing and computing data on a large scale and also to program in python language. a
The Anaconda provides an easily manageable environment for python applications. It provides a variety of tools for collecting data from various sources using machine learning and AI. With the help of Anaconda, we can deploy applications with a single button click.
This blog post will help you to install and use the Anaconda on the macOS system with step-by-step instructions.
Installing Anaconda3 on MacOS
A shell script is provided for installing Anaconda on the macOS system. We can download the shell script from the official website Follow the below steps to install Anaconda3 on macOS systems:
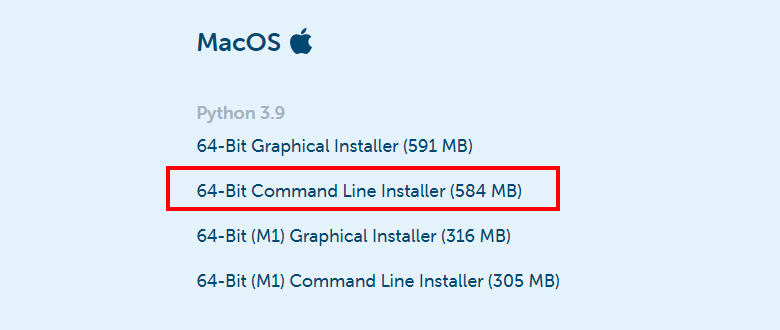
- Use the curl command line utility to download the Anaconda installer script from the official site. Visit the Anaconda installer script download page to check for the latest versions. Then, download the script as below:
curl -O https://repo.anaconda.com/archive/Anaconda3-2022.05-MacOSX-x86_64.sh
Download Anaconda3 Command Line Installer for macOS - Let’s move to the next step and execute the Anaconda installer script as below:
bash ~/Downloads/Anaconda3-2022.05-MacOSX-x86_64.sh
Start Anaconda installation on macOS Follow the wizard instructions to complete the Anaconda installation process. You need to provide inputs during the installation process as described below: Use the above command to run the downloaded installer script with the bash shell.
- Type “yes” to accept the Anaconda license agreement to continue.

Accept license terms to continue Anaconda installation on macOS - Verify the directory location for Anaconda installation on the macOS system. Just hit Enter to continue installer to that directory.

Confirm the Anaconda installation directory - Type “yes” to initialize the Anaconda installer on your system.

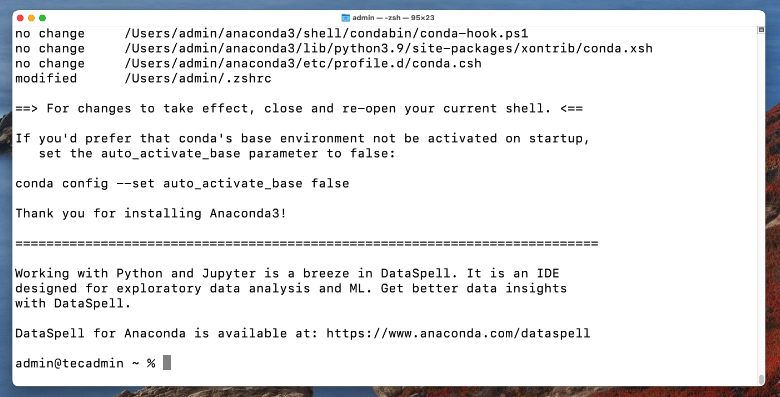
Initialize the Anaconda with conda init - You will see the below message on successful Anaconda installation on the macOS system.

Anaconda installation successfully on macOS - The Anaconda Installation Completed Successfully on your macOS system. The installer added the environment settings in
.bashrcfile. Now, activate the installation using the following command:source ~/.bashrc - Now we are in the default base of the programming environment. To verify the installation we will open conda list.
conda listOutput:
# packages in environment at /Users/admin/anaconda3: # # Name Version Build Channel _ipyw_jlab_nb_ext_conf 0.1.0 py39hecd8cb5_1 aiohttp 3.8.1 py39hca72f7f_1 aiosignal 1.2.0 pyhd3eb1b0_0 alabaster 0.7.12 pyhd3eb1b0_0 anaconda 2022.05 py39_0 anaconda-client 1.9.0 py39hecd8cb5_0 anaconda-navigator 2.1.4 py39hecd8cb5_0 anaconda-project 0.10.2 pyhd3eb1b0_0 anyio 3.5.0 py39hecd8cb5_0 appdirs 1.4.4 pyhd3eb1b0_0 applaunchservices 0.2.1 pyhd3eb1b0_0 appnope 0.1.2 py39hecd8cb5_1001 appscript 1.1.2 py39h9ed2024_0 ... ...
Enable/Disable Default Base Environment
You can also control whether or not your shell has the base environment activated each time it opens. The following commands only work if conda init has been run first
- The base environment is activated by default
conda config --set auto_activate_base True - The base environment is not activated by default
conda config --set auto_activate_base False
How to Update Anaconda on macOS
You can easily update the Anaconda and packages using the conda binary. To upgrade the Anaconda on your system, type:
conda update --all
Output:
Collecting package metadata (current_repodata.json): done
Solving environment: done

## Package Plan ##

  environment location: /home/tecadmin/anaconda3


The following packages will be downloaded:

    package                    |            build
    ---------------------------|-----------------
    anaconda-navigator-2.2.0   |   py39h06a4308_0         5.1 MB
    conda-4.13.0               |   py39h06a4308_0         895 KB
    conda-build-3.21.9         |   py39h06a4308_0         533 KB
    ------------------------------------------------------------
                                           Total:         6.5 MB

The following packages will be UPDATED:

  anaconda-navigator                   2.1.4-py39h06a4308_0 --> 2.2.0-py39h06a4308_0
  conda                               4.12.0-py39h06a4308_0 --> 4.13.0-py39h06a4308_0
  conda-build                         3.21.8-py39h06a4308_2 --> 3.21.9-py39h06a4308_0


Proceed ([y]/n)? y
Press “y” to proceed with the update process. The output will show you all the newly installed packages, or upgrading current ones and removing unnecessary ones.
How to Exit from Conda Terminal
Just type the following command from the Conda terminal to exit from it and get the regular terminal back.
conda deactivate
You can see the terminal is back to the normal:
How to Uninstall Anaconda
If you no longer used the Anaconda on your system. You can uninstall it by removing the installation directories and files created under the home directory.
rm -rf ~/anaconda3 ~/.conda
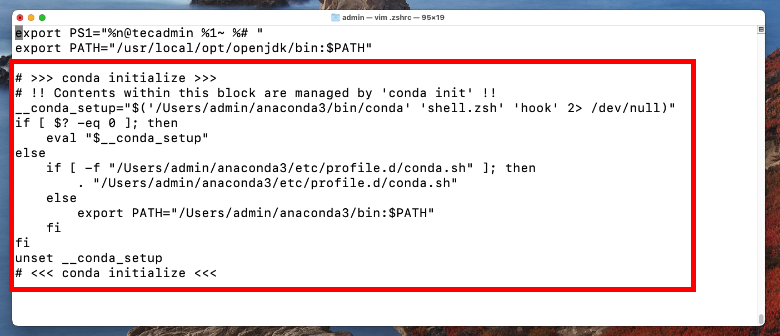
Then, edit the ~/.zshrc file:
vim ~/.zshrc
Navigate to the end of the file and remove the Anaconda environment configuration as shown below images.

Press ESC and type :wq and then press Enter button to save file.
Conclusion
You can use Anaconda to manage scientific computing, workloads for data science, analytics, and large-scale data processing. In this article, we have learned how to install anaconda on macOS from its original source.


