
BookWyrm is an open-source federated social network for book readers. It acts as an ad-free Goodreads alternative. It uses the ActivityPub protocol to send and receive user activity between other BookWyrm instances and other services that use the protocol like Mastodon. It offers a lot of features like book reviews, ratings, reading activity, book shelves such as “to-read”, “currently-reading” and “read”, book lists, and following other users and their reading progress. It also offers user moderation features like blocking or manually approving followers, and multiple privacy levels for statuses, shelves, and lists.
In this tutorial, you will learn how to install BookWyrm on a Rocky Linux 9 server.
Prerequisites
-
A server running Rocky Linux 9 with a minimum of 2GB of RAM and 2 CPU cores.
-
A non-root user with sudo privileges.
-
A Fully Qualified Domain Name (FQDN) like
bookwyrm.example.compointing to your server. -
An SMTP account with an email service like Amazon SES or Mailgun.
-
Make sure everything is updated.
$ sudo dnf update
-
Few packages that your system needs.
$ sudo dnf install wget curl nano unzip yum-utils policycoreutils-python-utils -y
Some of these packages may already be installed on your system.
Step 1 – Configure Firewall
The first step is to configure the firewall. Rocky Linux uses Firewalld Firewall. Check the firewall’s status.
$ sudo firewall-cmd --state
running
The firewall works with different zones, and the public zone is the default one that we will use. List all the services and ports active on the firewall.
$ sudo firewall-cmd --permanent --list-services
It should show the following output.
cockpit dhcpv6-client ssh
Allow HTTP and HTTPS ports.
$ sudo firewall-cmd --permanent --add-service=http
$ sudo firewall-cmd --permanent --add-service=https
Recheck the status of the firewall.
$ sudo firewall-cmd --permanent --list-services
You should see a similar output.
cockpit dhcpv6-client http https ssh
Reload the firewall to enable the changes.
$ sudo firewall-cmd --reload
Step 2 – Install Docker and Docker Compose
This step is required on both the server and the client machines.
Install the official Docker repository.
$ sudo dnf install yum-utils
$ sudo yum-config-manager
    --add-repo
    https://download.docker.com/linux/centos/docker-ce.repo
Install Docker.
$ sudo dnf install docker-ce docker-ce-cli containerd.io docker-buildx-plugin docker-compose-plugin
Enable and run the Docker daemon.
$ sudo systemctl enable docker --now
Check the status of the Docker service.
$ sudo systemctl status docker
? docker.service - Docker Application Container Engine
     Loaded: loaded (/usr/lib/systemd/system/docker.service; enabled; preset: disabled)
     Active: active (running) since Wed 2023-09-13 09:15:08 UTC; 6s ago
TriggeredBy: ? docker.socket
       Docs: https://docs.docker.com
   Main PID: 6425 (dockerd)
      Tasks: 9
     Memory: 33.2M
        CPU: 282ms
     CGroup: /system.slice/docker.service
             ??6425 /usr/bin/dockerd -H fd:// --containerd=/run/containerd/containerd.sock
Add your system user to the Docker group to avoid using sudo to run Docker commands.
$ sudo usermod -aG docker $(whoami)
Login again to your server after logging out to enable the change.
Step 3 – Install Git
BookWyrm needs Git for downloading the files and it is not available on Rocky Linux by default. Run the following command to install Git.
$ sudo dnf install git
Verify the installation.
$ git --version
git version 2.39.3
You can configure Git with your name and email address for further use. This step is optional though.
$ git config --global user.name "Your Name"
$ git config --global user.email "[email protected]"
Step 4 – Install Nginx
Rocky Linux 9 ships with an older version of Nginx. To install the latest version, you need to download the official Nginx repository.
Create and open the file /etc/yum.repos.d/nginx.repo for editing.
$ sudo nano /etc/yum.repos.d/nginx.repo
Paste the following code in it.
[nginx-stable]
name=nginx stable repo
baseurl=http://nginx.org/packages/centos/$releasever/$basearch/
gpgcheck=1
enabled=1
gpgkey=https://nginx.org/keys/nginx_signing.key
module_hotfixes=true

[nginx-mainline]
name=nginx mainline repo
baseurl=http://nginx.org/packages/mainline/centos/$releasever/$basearch/
gpgcheck=1
enabled=0
gpgkey=https://nginx.org/keys/nginx_signing.key
module_hotfixes=true
Once you are finished, save the file by pressing Ctrl X and entering Y when prompted.
Install Nginx.
$ sudo dnf install nginx
Verify the installation.
$ nginx -v
nginx version: nginx/1.24.0
Enable and start the Nginx server service.
$ sudo systemctl enable nginx --now
Check the service status.
$ sudo systemctl status nginx
? nginx.service - nginx - high performance web server
     Loaded: loaded (/usr/lib/systemd/system/nginx.service; enabled; preset: disabled)
     Active: active (running) since Wed 2023-09-13 09:16:59 UTC; 8s ago
       Docs: http://nginx.org/en/docs/
    Process: 8786 ExecStart=/usr/sbin/nginx -c /etc/nginx/nginx.conf (code=exited, status=0/SUCCESS)
   Main PID: 8787 (nginx)
      Tasks: 3 (limit: 22979)
     Memory: 2.8M
        CPU: 12ms
     CGroup: /system.slice/nginx.service
             ??8787 "nginx: master process /usr/sbin/nginx -c /etc/nginx/nginx.conf"
             ??8788 "nginx: worker process"
             ??8789 "nginx: worker process"
Step 5 – Install SSL
We need to install Certbot to generate the SSL certificate. We will use the Snapd package installer for that. Since Rocky Linux doesn’t ship with it, install the Snapd installer. It requires the EPEL (Extra Packages for Enterprise Linux) repository to work.
Install the EPEL repo.
$ sudo dnf install epel-release
Install Snapd.
$ sudo dnf install -y snapd
Enable and Start the Snap service.
$ sudo systemctl enable snapd --now
Install the Snap core package, and ensure that your version of Snapd is up to date.
$ sudo snap install core && sudo snap refresh core
Create necessary links for Snapd to work.
$ sudo ln -s /var/lib/snapd/snap /snap
$ echo 'export PATH=$PATH:/var/lib/snapd/snap/bin' | sudo tee -a /etc/profile.d/snapd.sh
Issue the following command to install Certbot.
$ sudo snap install --classic certbot
Use the following command to ensure that the Certbot command can be run by creating a symbolic link to the /usr/bin directory.
$ sudo ln -s /snap/bin/certbot /usr/bin/certbot
Verify the installation.
$ certbot --version
certbot 2.6.0
Generate the SSL certificate.
$ sudo certbot certonly --nginx --agree-tos --no-eff-email --staple-ocsp --preferred-challenges http -m [email protected] -d bookwyrm.example.com
The above command will download a certificate to the /etc/letsencrypt/live/bookwyrm.example.com directory on your server.
Generate a Diffie-Hellman group certificate.
$ sudo openssl dhparam -dsaparam -out /etc/ssl/certs/dhparam.pem 4096
Check the Certbot renewal scheduler service.
$ sudo systemctl list-timers
You will find snap.certbot.renew.service as one of the services scheduled to run.
NEXT                        LEFT          LAST                        PASSED       UNIT                         ACTIVATES     ------------------------------------------------------------------------------------------------------------------
Wed 2023-09-13 10:45:51 UTC 1h 25min left Wed 2023-09-13 09:19:00 UTC 1min 13s ago dnf-makecache.timer          dnf-makecache.service
Wed 2023-09-13 18:33:00 UTC 9h left       -                           -            snap.certbot.renew.timer     snap.certbot.renew.service
Thu 2023-09-14 00:00:00 UTC 14h left      Wed 2023-09-13 08:32:04 UTC 48min ago    logrotate.timer              logrotate.service
Do a dry run of the process to check whether the SSL renewal is working fine.
$ sudo certbot renew --dry-run
If you see no errors, you are all set. Your certificate will renew automatically.
Step 6 – Download BookWyrm
Create a directory for BookWyrm.
$ mkdir ~/bookwyrm
Switch to the directory.
$ cd ~/bookwyrm
Clone the BookWyrm application’s production branch from GitHub.
$ git clone https://github.com/bookwyrm-social/bookwyrm.git .
Switch to the production branch.
$ git checkout production
Create the environment file by copying the example file.
$ cp .env.example .env
Step 7 – Configure BookWyrm Environment File
Generate a secret key for BookWyrm.
$ openssl rand 60 | openssl base64 -A
kahYlt56TI2fZQwj0oX054u2aJE7bptHyInK4RXQadLLmXwGSDm8N1vW9uacA9N6FHoXPINPwOFTmnaT
Open the environment file for editing.
$ sudo nano .env
Configure the following variables.
SECRET_KEY="kahYlt56TI2fZQwj0oX054u2aJE7bptHyInK4RXQadLLmXwGSDm8N1vW9uacA9N6FHoXPINPwOFTmnaT"
DOMAIN=bookwyrm.example.com
[email protected]
POSTGRES_PASSWORD=Your_Password
POSTGRES_USER=bookwyrmuser
POSTGRES_DB=bookwyrm
POSTGRES_HOST=localhost

REDIS_ACTIVITY_HOST=localhost
REDIS_ACTIVITY_PORT=6379
REDIS_ACTIVITY_PASSWORD=Your_Redis_Password
REDIS_ACTIVITY_DB_INDEX=0

REDIS_BROKER_HOST=localhost
REDIS_BROKER_PORT=6379
REDIS_BROKER_PASSWORD=Your_Redis_Password
REDIS_BROKER_DB_INDEX=1

FLOWER_USER=username
FLOWER_PASSWORD=flowerpassword

EMAIl_HOST=
EMAIL_PORT=587
EMAIL_HOST_USER=AmazonSESUSER
EMAIL_HOST_PASSWORD=AmazonSESPASSWORD
EMAIL_USE_TLS=true
EMAIL_USE_SSL=false
EMAIL_SENDER_NAME=HowtoForge
EMAIL_SENDER_DOMAIN=example.com

## only enable it if you have a fairly powered server with a minimum of 2 CPU Cores and 2GB of RAM
ENABLE_PREVIEW_IMAGES=true
Let us go through all the variables in the environment file.
SECRET_KEY– the key which you generated aboveDOMAIN– the fully qualified domain name (FQDN) for your BookWyrn instance. In our case, it would bebookwyrm.example.com.POSTGRES_PASSWORD– PostgreSQL password configured in step 2.POSTGRES_HOST– set todbwhich is the service name of PostgreSQL in thedocker-compose.ymlfile.POSTGRES_USER– set tobookwyrmuserwhich you chose in step 2.POSTGRES_DB– set tobookwyrmas chosen in step 2.REDIS_ACTIVITY_HOSTandREDIS_BROKER_HOST– set them to localhost if you are hosting the Redis server on the same machine.REDIS_ACTIVITY_PORTandREDIS_BROKER_PORT– set them to the default Redis port 6379.REDIS_ACTIVITY_DBandREDIS_BROKER_DB– set them to 0 and 1 respectively. We will use different databases for both.REDIS_ACTIVITY_PASSWORDandREDIS_BROKER_PASSWORD– set them to the Redis password as chosen in step 3.FLOWER_USER– choose a username for the Flower service which is needed by BookWyrm.FLOWER_PASSWORD– choose a password for the Flower service.EMAIL_HOST– set to the SMTP host of the email service you are using.EMAIL_PORT– set to the SMTP port of the email service.EMAIL_HOST_USER– set to the SMTP username.EMAIL_HOST_PASSWORD– set to the SMTP password.EMAIL_USE_TLS– set it to true if your email service uses TLS.EMAIL_USE_SSL– set it to true if your email service uses SSL.EMAIL_SENDER_NAME– choose the name of the sender for the emails sent by your instance.EMAIL_SENDER_DOMAIN– set it to the domain name used by the email service.ENABLE_PREVIEW_IMAGES– set it to true if you want your instance to generate preview images automatically. However, make sure your server has ample CPU and RAM for this since this is an intensive process.
Once you are finished, save the file by pressing Ctrl X and entering Y when prompted.
Step 8 – Configure BookWyrm Docker File
Open the Docker compose file for editing.
$ nano docker-compose.yml
As you can see the docker file consists of both Nginx and Certbot services. But for our tutorial, we will use Nginx externally as a reverse proxy server. So we won’t be using the Certbot service in the file. Also, we need to change the Nginx service accordingly.
In the services >> nginx >> ports comment out the default ports and add the line ` – “8001:8001” as shown below. Also, comment out the certbot volumes under the Nginx service. The Nginx service should look like the following. And lastly, comment out the entire certbot service section.
services:
  nginx:
    image: nginx:latest
    logging: *default-logging
    restart: unless-stopped
    ports:
    #  - "80:80"
    #  - "443:443"
      - "8001:8001"
    depends_on:
      - web
    networks:
      - main
    volumes:
      - ./nginx:/etc/nginx/conf.d
    #  - ./certbot/conf:/etc/nginx/ssl
    #  - ./certbot/data:/var/www/certbot
      - static_volume:/app/static
      - media_volume:/app/images
  #certbot:
  #  image: certbot/certbot:latest
  #  command: certonly --webroot --webroot-path=/var/www/certbot --email ${EMAIL} --agree-tos --no-eff-email -d ${DOMAIN} -d www.${DOMAIN}
    #command: renew --webroot --webroot-path /var/www/certbot
  #  logging: *default-logging
  #  volumes:
  #    - ./certbot/conf:/etc/letsencrypt
  #    - ./certbot/logs:/var/log/letsencrypt
  #    - ./certbot/data:/var/www/certbot
There are no more changes required. Once finished, save the file by pressing Ctrl X and entering Y when prompted.
Step 8 – Configure Nginx and Nginx files
Make a copy of the Nginx production template file and set it to be used with the Nginx docker service.
$ cp nginx/production nginx/default.conf
Open the default.conf for editing.
$ nano nginx/default.conf
Replace the your-domain.com with your actual BookWyrm domain name in the first and third server blocks. In our case it is bookwyrm.example.com. If you aren’t using the www-your-domain.com version of your domain, remove it from the server_name. Also, comment out the location ~ /.well-known/acme-challenge block under the first server block.
Here is what your default.conf should look like.
include /etc/nginx/conf.d/server_config;

upstream web {
    server web:8000;
}

server {
    listen [::]:80;
    listen 80;

    server_name bookwyrm.example.com;

#    location ~ /.well-known/acme-challenge {
#        allow all;
#        root /var/www/certbot;
#    }

#     # redirect http to https
#     return 301 https://your-domain.com$request_uri;
}

# server {
....
}

# Reverse-Proxy server
 server {
     listen [::]:8001;
     listen 8001;

     server_name bookwyrm.example.com;

     location / {
         proxy_pass http://web;
         proxy_set_header X-Forwarded-For $proxy_add_x_forwarded_for;
         proxy_set_header Host $host;
         proxy_redirect off;
     }

     location /images/ {
         alias /app/images/;
     }

     location /static/ {
         alias /app/static/;
     }
 }
Once finished, save the file by pressing Ctrl X and entering Y when prompted.
Create and open the file /etc/nginx/conf.d/bookwyrm.conf for editing.
$ sudo nano /etc/nginx/conf.d/bookwyrm.conf
Paste the following code in it.
server {
    server_name bookwyrm.example.com;

    listen [::]:80;
    listen 80;

    # redirect http to https
    return 301 https://bookwyrm.example.com$request_uri;
}

server {
    access_log /var/log/nginx/bookwyrm.access.log;
    error_log  /var/log/nginx/bookwyrm.error.log;

    listen [::]:443 ssl http2;
    listen 443 ssl http2;

    server_name bookwyrm.example.com;

    # SSL code
    ssl_certificate /etc/letsencrypt/live/bookwyrm.example.com/fullchain.pem;
    ssl_certificate_key /etc/letsencrypt/live/bookwyrm.example.com/privkey.pem;
    ssl_trusted_certificate /etc/letsencrypt/live/bookwyrm.example.com/chain.pem;
    ssl_session_timeout 1d;
    ssl_session_cache shared:MozSSL:10m;
    ssl_session_tickets off;
    ssl_prefer_server_ciphers off;
    ssl_stapling on;
    ssl_stapling_verify on;
    ssl_dhparam /etc/ssl/certs/dhparam.pem;
    resolver 1.1.1.1 1.0.0.1 [2606:4700:4700::1111] [2606:4700:4700::1001] 8.8.8.8 8.8.4.4 [2001:4860:4860::8888] [2001:4860:4860::8844] valid=60s;
    resolver_timeout 2s;

    ssl_protocols TLSv1.2 TLSv1.3;
    ssl_ciphers ECDHE-ECDSA-AES128-GCM-SHA256:ECDHE-RSA-AES128-GCM-SHA256:ECDHE-ECDSA-AES256-GCM-SHA384:ECDHE-RSA-AES256-GCM-SHA384:ECDHE-ECDSA-CHACHA20-POLY1305:ECDHE-RSA-CHACHA20-POLY1305:DHE-RSA-AES128-GCM-SHA256:DHE-RSA-AES256-GCM-SHA384;

    location / {
        proxy_pass http://localhost:8001;
        proxy_set_header X-Forwarded-For $proxy_add_x_forwarded_for;
        proxy_set_header Host $host;
    }

    location /images/ {
        proxy_pass http://localhost:8001;
        proxy_set_header X-Forwarded-For $proxy_add_x_forwarded_for;
        proxy_set_header Host $host;
    }

    location /static/ {
        proxy_pass http://localhost:8001;
        proxy_set_header X-Forwarded-For $proxy_add_x_forwarded_for;
        proxy_set_header Host $host;
    }
}
Once finished, save the file by pressing Ctrl X and entering Y when prompted.
Open the file /etc/nginx/nginx.conf for editing.
$ sudo nano /etc/nginx/nginx.conf
Add the following line before the line include /etc/nginx/conf.d/*.conf;.
server_names_hash_bucket_size 64;
Save the file by pressing Ctrl X and entering Y when prompted.
Verify the Nginx configuration file syntax.
$ sudo nginx -t
nginx: the configuration file /etc/nginx/nginx.conf syntax is ok
nginx: configuration file /etc/nginx/nginx.conf test is successful
Restart the Nginx service to enable the new configuration.
$ sudo systemctl restart nginx
Step 9 – Install BookWyrm
Switch to the Bookwyrm directory.
$ cd ~/bookwyrm
Initialize the database. The command will take a few minutes to complete.
$ ./bw-dev migrate
Once complete, you will see a similar output.
..............................
  Applying django_celery_beat.0005_add_solarschedule_events_choices... OK
  Applying django_celery_beat.0006_auto_20180322_0932... OK
  Applying django_celery_beat.0007_auto_20180521_0826... OK
  Applying django_celery_beat.0008_auto_20180914_1922... OK
  Applying django_celery_beat.0006_auto_20180210_1226... OK
  Applying django_celery_beat.0006_periodictask_priority... OK
  Applying django_celery_beat.0009_periodictask_headers... OK
  Applying django_celery_beat.0010_auto_20190429_0326... OK
  Applying django_celery_beat.0011_auto_20190508_0153... OK
  Applying django_celery_beat.0012_periodictask_expire_seconds... OK
  Applying django_celery_beat.0013_auto_20200609_0727... OK
  Applying django_celery_beat.0014_remove_clockedschedule_enabled... OK
  Applying django_celery_beat.0015_edit_solarschedule_events_choices... OK
  Applying django_celery_beat.0016_alter_crontabschedule_timezone... OK
  Applying sessions.0001_initial... OK
Run the application by compiling the Docker image for BookWyrm, Celery, and Flower.
$ docker compose up --build
This process will take at least 10-15 minutes to finish depending on your server’s resources. Wait for it to finish compiling all the images. Your final output should look something like the following.
Once the process is complete, stop the process by pressing Ctrl C.
You should see something similar when the process is complete.
bookwyrm-nginx-1           | 2023/09/13 10:20:33 [notice] 30#30: http file cache: /var/cache/nginx/bookwyrm_cache 0.000M, bsize: 4096
bookwyrm-nginx-1           | 2023/09/13 10:20:33 [notice] 1#1: signal 17 (SIGCHLD) received from 30
bookwyrm-nginx-1           | 2023/09/13 10:20:33 [notice] 1#1: cache loader process 30 exited with code 0
bookwyrm-nginx-1           | 2023/09/13 10:20:33 [notice] 1#1: signal 29 (SIGIO) received
bookwyrm-redis_broker-1    | 1:M 13 Sep 2023 10:24:32.018 * 100 changes in 300 seconds. Saving...
bookwyrm-redis_broker-1    | 1:M 13 Sep 2023 10:24:32.018 * Background saving started by pid 21
bookwyrm-redis_broker-1    | 21:C 13 Sep 2023 10:24:32.022 * DB saved on disk
bookwyrm-redis_broker-1    | 21:C 13 Sep 2023 10:24:32.023 * Fork CoW for RDB: current 0 MB, peak 0 MB, average 0 MB
bookwyrm-redis_broker-1    | 1:M 13 Sep 2023 10:24:32.119 * Background saving terminated with success
^CGracefully stopping... (press Ctrl C again to force)
Aborting on container exit...
canceled
Initialize the application.
$ ./bw-dev setup
This process will finish with your admin code.
*******************************************
Use this code to create your admin account:
299f3181-e57e-4f16-94c9-51cfc427b8df
*******************************************
You can get the code at any time by running the following command.
$ ./bw-dev admin_code
*******************************************
Use this code to create your admin account:
299f3181-e57e-4f16-94c9-51cfc427b8df
*******************************************
The final step in installing BookWyrm is to start all the remaining containers.
$ docker compose up -d
You can check the status of your containers using the following command.
$ docker ps
You should get a similar output.
CONTAINER ID   IMAGE                    COMMAND                  CREATED        STATUS        PORTS                                               NAMES
083c2dfc81f4   nginx:latest             "https://www.howtoforge.com/docker-entrypoint.…"   26 hours ago   Up 26 hours   80/tcp, 0.0.0.0:8001->8001/tcp, :::8001->8001/tcp   bookwyrm-nginx-1
8618c3a7b460   bookwyrm-web             "gunicorn bookwyrm.w…"   26 hours ago   Up 26 hours   0.0.0.0:32768->8000/tcp, :::32768->8000/tcp         bookwyrm-web-1
3e67c639e21f   bookwyrm-celery_beat     "celery -A celerywyr…"   26 hours ago   Up 26 hours                                                       bookwyrm-celery_beat-1
86a774a5bb6d   bookwyrm-flower          "celery -A celerywyr…"   26 hours ago   Up 26 hours                                                       bookwyrm-flower-1
ac2ff1e91bb4   bookwyrm-celery_worker   "celery -A celerywyr…"   26 hours ago   Up 26 hours                                                       bookwyrm-celery_worker-1
bc6a64fac55c   redis                    "docker-entrypoint.s…"   26 hours ago   Up 26 hours   6379/tcp                                            bookwyrm-redis_activity-1
ef78760b967b   bookwyrm-db              "https://www.howtoforge.com/bookwyrm-entrypoin…"   26 hours ago   Up 26 hours   5432/tcp                                            bookwyrm-db-1
5ededaed00ab   redis                    "docker-entrypoint.s…"   26 hours ago   Up 26 hours   6379/tcp                                            bookwyrm-redis_broker-1
You can also check the status using the following command.
$ docker compose ps
The output this time will be a bit different though.
The next step is to access BookWyrm and set up your instance.
Step 10 – Access BookWyrm
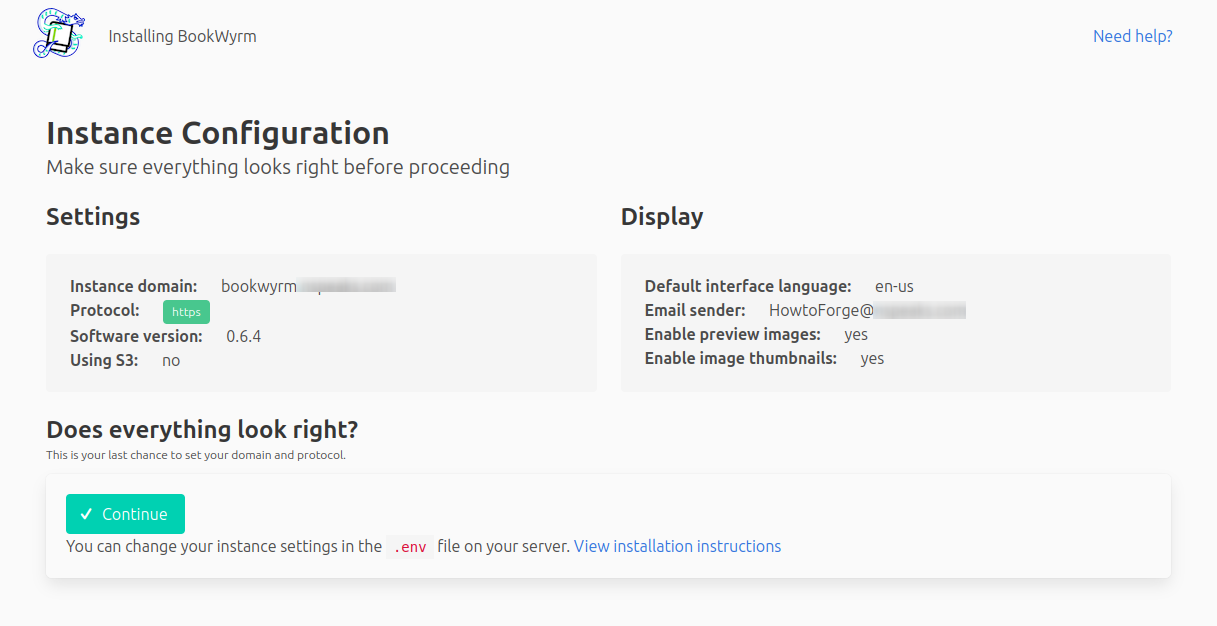
Open the URL https://bookwyrm.example.com in your browser and you will get the following page.
If everything seems okay, click the Continue button to proceed to the next page.
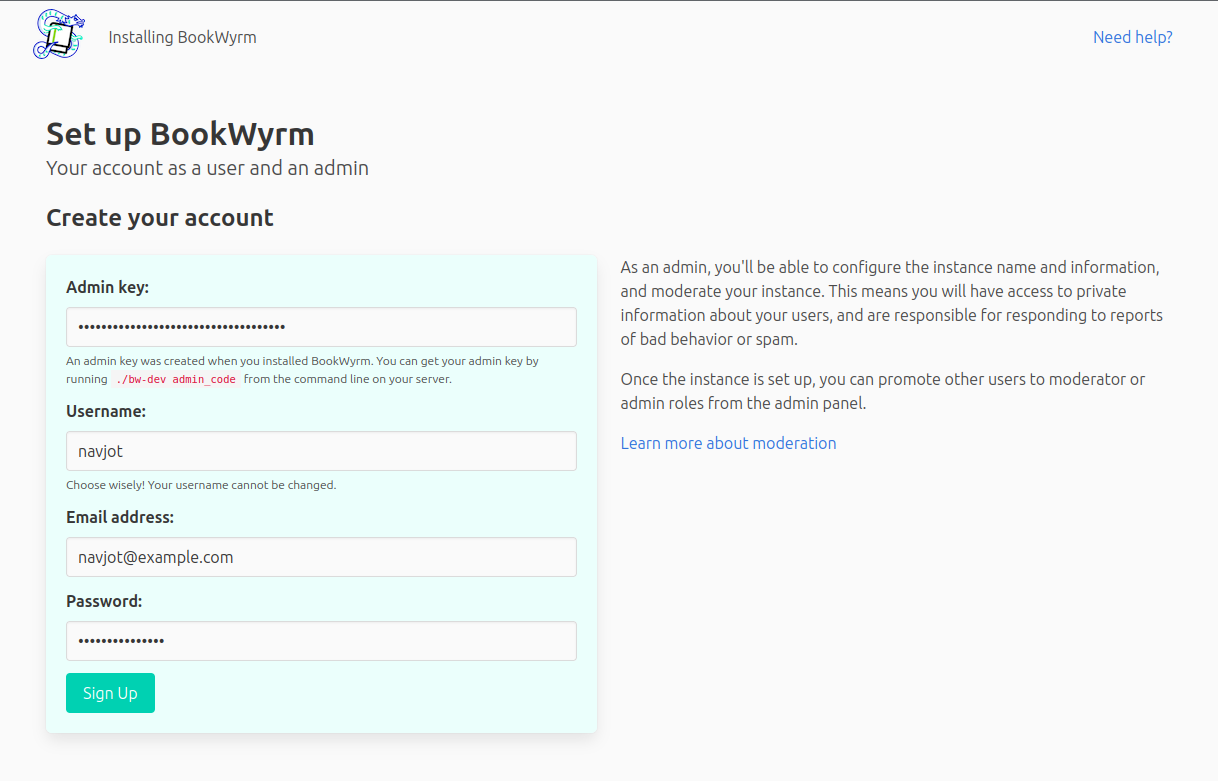
Fill in the admin key you got in the previous step along with the administrator account credentials. Click the Sign up button when finished to proceed to the next page.
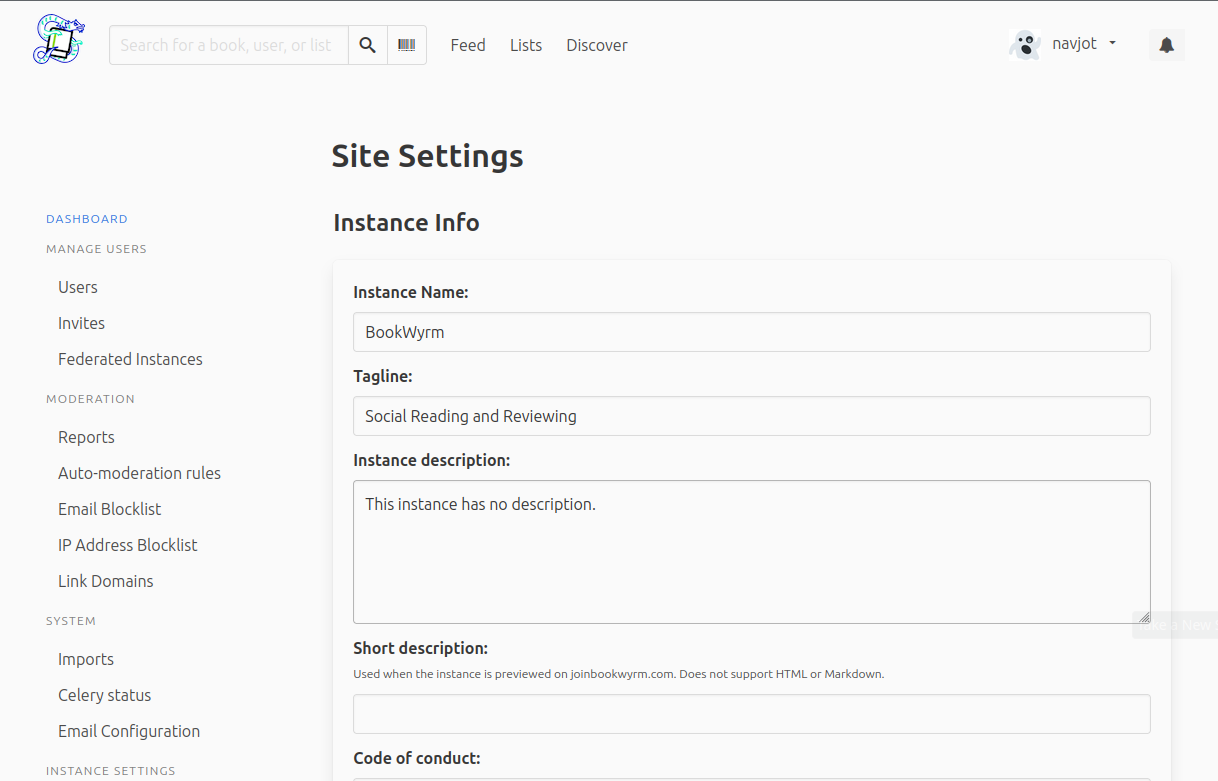
Here you will be asked to configure your site and add information and site policies.
Next, check your email settings by clicking the System >> Email Configuration from the left sidebar. Confirm your email settings listed on the page and click the Send test email button to send yourself a test email.
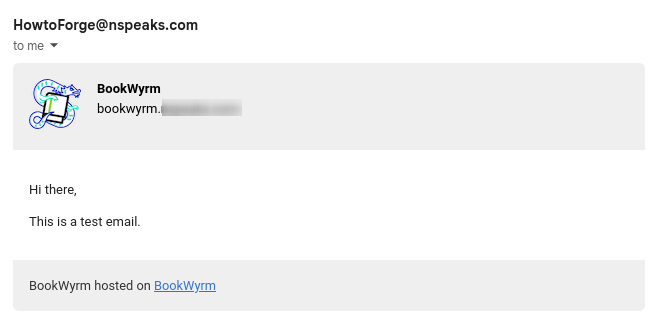
If the mail was sent successfully, you should receive the following mail.
You can also configure the remaining settings by accessing them from the left sidebar. Once you have done all that, your BookWyrm instance is ready for use.
Step 11 – Backup BookWyrm
BookWyrm ships with a Backup utility for its Docker installation. It also ships with an automatic backup pruning utility which cleans the backup folder automatically.
The backups are created inside the database container’s backups directory. The backups are created daily at midnight UTC. Run the following command to enter the container SSH shell.
$ docker exec -it bookwyrm-db-1 bash
Once inside the container, check the backup directory contents. This command will show backups only once 24 hours have passed from the time of the creation of the container.
$ ls backups -al
total 252
drwxr-xr-x. 2 root root     56 Sep 12 00:00 .
drwxr-xr-x. 1 root root     39 Sep 11 11:47 ..
-rw-r--r--. 1 root root 250380 Sep 12 00:00 backup_bookwyrm_2023-09-12.sql
-rw-r--r--. 1 root root     44 Sep 11 11:47 .env
Exit the shell.
$ exit
You can copy the backups to your local machine by running the following command.
$ docker cp bookwyrm-db-1:/backups
The automatic database pruning feature is disabled by default. To enable it, open the ~/bookwyrm/postgres-docker/cronfile file for editing.
$ nano ~/bookwyrm/postgres-docker/cronfile
Uncomment the final line by removing the hash (#) in front of it. Your cronfile should look like the following.
0 0 * * * /usr/local/bin/bookwyrm-backup.sh
# If uncommented, this script will weed the backups directory. It will keep the 14
# most-recent backups, then one backup/week for the next four backups, then one
# backup/month after that.
0 5 * * * /usr/local/bin/bookwyrm-weed.sh -d 14 -w 4 -m -1 /backups
Once finished, save the file by pressing Ctrl X and entering Y when prompted.
The above script will keep the last 14 backups.
Rebuild your instance.
$ cd ~/bookwyrm
$ docker compose up --build
Step 12 – Update BookWyrm
Updating your BookWyrm instance involves quite a few steps. First, pull the latest changes from the BookWyrm GitHub repository.
$ cd ~/bookwyrm
$ git pull
If there are conflicts, you will need to run git pull separately first.
Rebuild the images.
$ docker compose rebuild
Run Database migrations using the newly built Docker images.
$ docker compose run --rm web python manage.py migrate
Compile the BookWyrm themes.
$ docker compose run --rm web python manage.py compile_themes
Load any updated static files.
$ docker compose run --rm web python manage.py collectstatic --no-input
Shut down the existing containers.
$ docker compose down --remove-orphans
Restart the containers using newly built images.
$ docker compose up -d
Feeds for each user are stored in the Redis database. To re-populate a stream, run the following command.
$ ./bw-dev populate_streams
Or you can use the following command to re-populate the streams.
$ docker compose run --rm web python manage.py populate_streams
If it doesn’t work or things get broken, you can delete the stream data using the following command.
$ docker compose run --rm web python manage.py erase_streams
So far you have seen us using bw-dev command-line tool for BookWyrm. This tool can perform a lot of useful tasks and even run Docker commands. Some of the popular uses of the tool are as follows.
Confirm a user’s account manually
The following command confirms a user’s (username) email manually and marks it as active.
$ ./bw-dev confirm_email
Generate Preview images
If you enable the preview images option later, you will need to update them for the previously uploaded data. Run the following command to do the same.
$ ./bw-dev generate_preview_images --all
Generate Thumbnails for Book Covers
The following command generates thumbnails for the book covers.
$ ./bw-dev generate_thumbnails
These are some of the options. For a full list, consult the BookWyrm CLI manual.
Conclusion
This concludes our tutorial on installing the BookWyrm social network on a Rocky Linux 9 server. If you have any questions, post them in the comments below.


