CraftCMS is a free and open source content management system for creating intuitive, user-friendly and flexible websites and digital experiences. CraftCMS can be used for various purposes, from a simple content management system to eCommerce. It is written in PHP and based on the Yii-2 framework, Vuejs and Twig. It also supports the MySQL/MariaDB and PostgreSQL databases.
CraftCMS is a robust web framework with an automatically generated GraphQL API and can be extended with hundreds of modules and plugins.
In this tutorial we will show you how to install CraftCMS with Apache and MariaDB on Debian 11.
Requirements
- A Linux server with the latest version of Debian 11 Bullseye
- A root user and password or a user with sudo root privileges
- A domain name pointing to the IP address of your server
Installing the packages dependencies
First you need to install the LAMP stack on your Debian system. CraftCMS is a PHP-based application, so you will need to install PHP packages with some additional extensions that CraftCMS requires.
Install Apache and MariaDB Server on the Debian 11 system by running the following command:
sudo apt install apache2 mariadb-server mariadb-client -y
Once all packages are installed, run the following command to install the PHP packages with the additional extensions for CraftCMS.
sudo apt install php libapache2-mod-php php-common php-mysql php-gmp php-curl php-intl php-mbstring php-xmlrpc php-gd php-bcmath php-xml php-cli php-intl php-zip -y
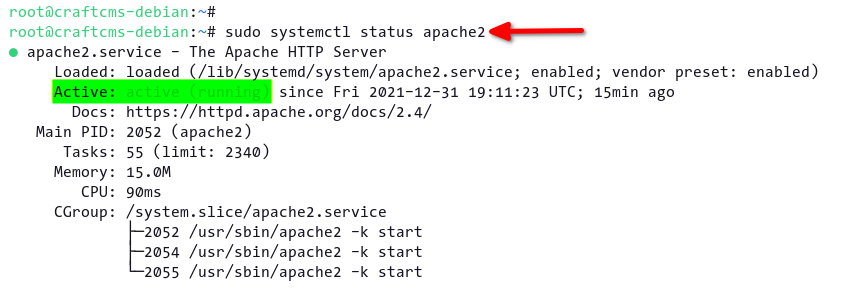
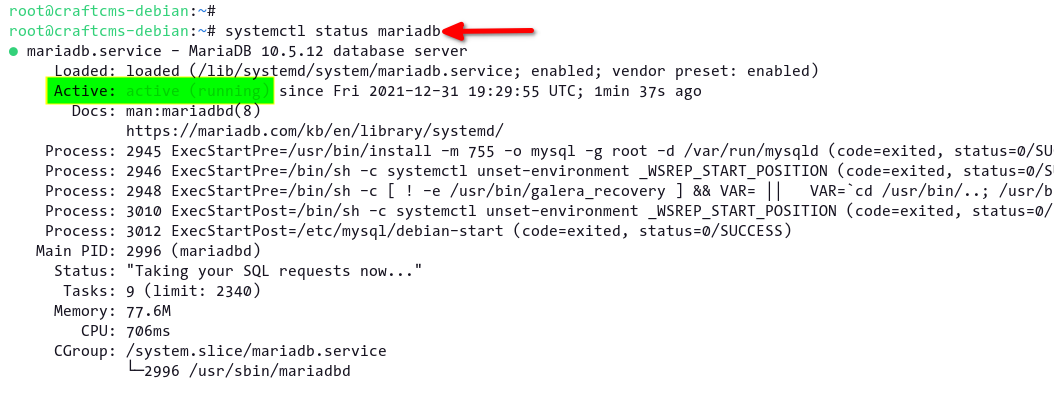
Next, check the MariaDB and Apache services with the following command. On Debian and Ubuntu systems, the Apache and MariaDB services are started automatically after installation.
sudo systemctl status apache2
sudo systemctl status mariadb
Now you can see that the Apache and MariaDB services are running on your Debian system.
Securing the MariaDB installation with the mysql_secure_installation script
If you are installing MariaDB for the first time, it is recommended to use the `mysql_secure_installation` command to set up the MariaDB root password and secure your MariaDB deployment.
Execute the `mysql_secure_installation` command to set up your MariaDB root password.
sudo mysql_secure_installation
You will be prompted to enter the current password for MariaDB. The default MariaDB installation comes without a password, press `ENTER` to continue.
To log into MariaDB to secure it, we'll need the current
password for the root user. If you've just installed MariaDB, and
haven't set the root password yet, you should just press enter here.
Enter current password for root (enter for none):
OK, successfully used password, moving on…
Now you will be prompted to set up the default authentication for the MariaDB root user. For security reasons, it is always recommended to use the authentication method“unix_socket” for the MariaDB root user.
Enter `Y` to enable MariaDB `unix_socket` authentication.
Setting the root password or using the unix_socket ensures that nobody
can log into the MariaDB root user without the proper authorisation.
You already have your root account protected, so you can safely answer 'n'.

Switch to unix_socket authentication [Y/n] Y
Enabled successfully!
Reloading privilege tables..
... Success!
Next, enter ‘Y‘ to confirm and set up the new password for the MariaDB root user. Make sure you use a strong password for your MariaDB root account.
You already have your root account protected, so you can safely answer 'n'.
Change the root password? [Y/n] Y
New password:
Re-enter new password:
Password updated successfully!
Reloading privilege tables..
... Success!
Enter “Y” again to remove the anonymous default user for MariaDB.
By default, a MariaDB installation has an anonymous user, allowing anyone
to log into MariaDB without having to have a user account created for
them.  This is intended only for testing, and to make the installation
go a bit smoother.  You should remove them before moving into a
production environment.
Remove anonymous users? [Y/n] Y
… Success!
Now type “Y“ to disable the remote login for the MariaDB root user. If you need the MariaDB remote login, use a different user and not the `root` user for the remote login.
Normally, root should only be allowed to connect from 'localhost'.  This
ensures that someone cannot guess at the root password from the network.
Disallow root login remotely? [Y/n] Y
… Success!
Remove the default database“test” and all its permissions by typing “Y” in the command prompt.
By default, MariaDB comes with a database named 'test' that anyone can
access.  This is also intended only for testing, and should be removed
before moving into a production environment.
Remove test database and access to it? [Y/n] Y
– Dropping test database…
… Success!
– Removing privileges on test database…
… Success!
Finally, reload all table permissions on the MariaDB server to apply the new settings.
Reloading the privilege tables will ensure that all changes made so far
will take effect immediately.
Reload privilege tables now? [Y/n] Y
… Success!
You have now secured the MariaDB installation by setting the default password for root, disabling remote login for root, and enabling unix_socket authentication for the root user.
Setting up the database and PHP for CraftCMS
In this step, you set up a new MariaDB database and a new user for CraftCMS. Then make some adjustments to the PHP configuration `php.ini`, which are required for the CraftCMS installation.
To set up the MariaDB database and the user, you must log into the MariaDB shell using the `mysql` command below.
sudo mysql -u root -p
Now run the following MySQL queries to create a new database `craftcms` and the user `craftuser` with the password `StrongPasswordCraftCMS`. Then allow the database user `craftuser` to access the database `craftcms` and reload all table permissions to apply the new settings.
CREATE DATABASE craftcms;
CREATE USER craftuser@localhost IDENTIFIED BY 'StrongPasswordCraftCMS';
GRANT ALL ON craftcms.* TO craftuser@localhost WITH GRANT OPTION;
FLUSH PRIVILEGES;
Enter `exit` to log out of the MariaDB shell.
exit
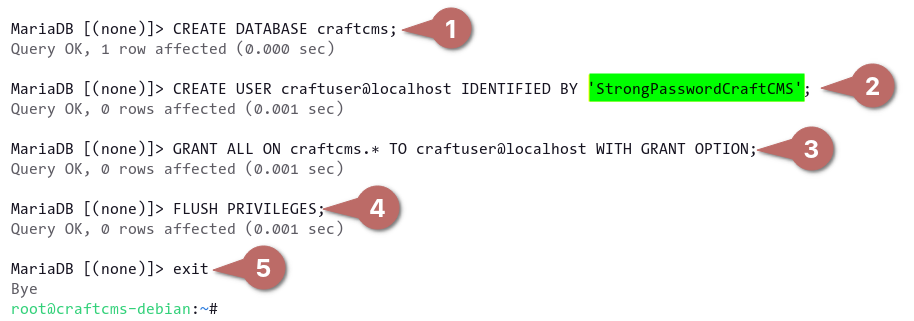
Next, change the PHP configuration `/etc/php/7.4/apache2/php.ini` with the nano editor.
sudo nano /etc/php/7.4/apache2/php.ini
Change the default settings with the following configuration for CraftCMS.
file_uploads = On
allow_url_fopen = On
short_open_tag = On
memory_limit = 512M
upload_max_filesize = 100M
max_execution_time = 360
date.timezone = Europe/Paris
Save the configuration and finish it.
Now, you have to restart the Apache2 service to apply the new changes in the `php.ini` configuration.
sudo systemctl restart apache2
Installing the composer
There are several ways to install CraftCMS, but the easiest is to install CfatCMS with the Composer tool. Composer is a package manager for PHP, similar to npm for Nodejs, pip for Python or gem for Ruby.
In this step, you will install the Composer tool on your Debian system.
First, run the following command to download the installer for Composer and verify the integrity of the installer file.
php -r "copy('https://getcomposer.org/installer', 'composer-setup.php');"
php -r "if (hash_file('sha384', 'composer-setup.php') === '906a84df04cea2aa72f40b5f787e49f22d4c2f19492ac310e8cba5b96ac8b64115ac402c8cd292b8a03482574915d1a8') { echo 'Installer verified'; } else { echo 'Installer corrupt'; unlink('composer-setup.php'); } echo PHP_EOL;"
You will receive a message like “Installerverified” if the installer is valid.

Now install Composer by executing the installation script. Then move the binary file of the Composer tool to `/usr/local/bin/composer`. This allows users to run the Composer tool easily.
php composer-setup.php
php -r "unlink('composer-setup.php');"
sudo mv composer.phar /usr/local/bin/composer

Finally, check your Composer version with the following command.
sudo -u www-data composer --version
sudo -u www-data composer -v
This will give you a detailed version of the Composer tool installed on your system. At the time of writing, the latest version of the Composer tool is v2.2.3.
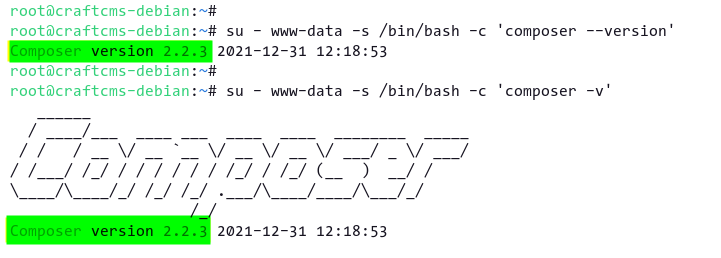
You now have the Composer tool installed on your system. In the next step, you can install CraftCMS.
Installing CraftCMS with the Composer tool
In this step, you install and configure CraftCMS with the Composer tool. First, set up the project directory for CraftCMS (including the correct permissions and ownership), then install CraftCMS on the Debian system and set up CraftCMS manually via the terminal.
Execute the following command to create a new project directory for CraftCMS. Make sure that the owner of the CraftCMS project directory is the user “wwww-data”. This will allow Apache2 and PHP to read all PHP scripts in the project directory.
mkdir -p /var/www/{.cache,.config,craftcms}
sudo chown -R www-data:www-data /var/www/{.cache,.config,craftcms}
As you can see in the command line, you create several directories. The `.cache` directory is used to store PHP packages, the `craftcms` directory is the main directory for the CraftCMS installation and the `.config` directory is used to store some additional configurations for the Composer tool.
Next, execute the following command to install CraftCMS in the `/var/www/craftcms` directory.
su - www-data -s /bin/bash -c 'composer create-project craftcms/craft /var/www/craftcms'
This command will download and install CraftCMS along with any PHP packages it depends on. When the installation is complete, you will receive the following output as shown in the screenshot below.
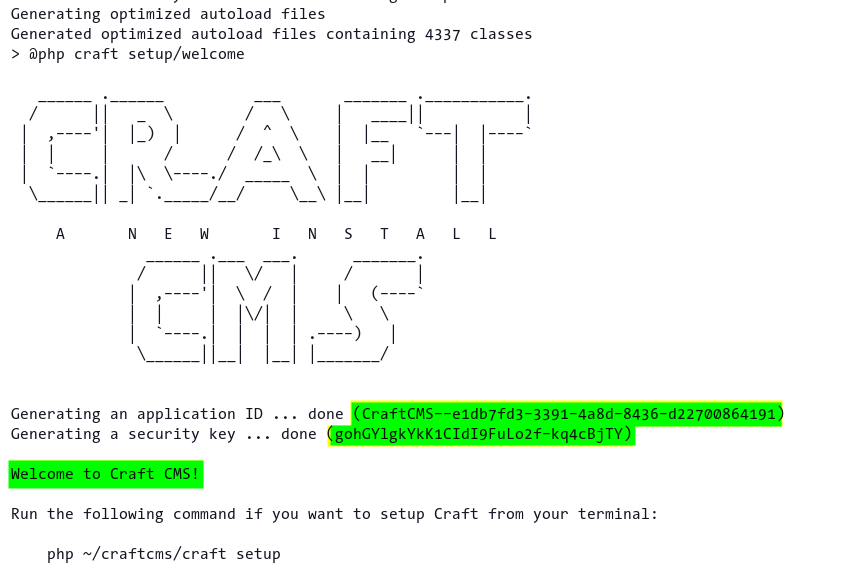
To set up your CraftCMS installation, run the following command. This is like the CraftCMS installation wizards, but on the command line and in terminal mode.
su - www-data -s /bin/bash -c 'php /var/www/craftcms/craft setup'
- For the standard database driver, enter“mysql“.
- Enter the detailed MariaDB database and the user for the CraftCMS installation.
- Type“Yes” to confirm the CraftCMS installation.
- Enter a new admin user, email and password for your CraftCMS. This is your admin account for CraftCMS. Make sure you use a strong password.
- Enter detailed information about your CraftCMS installation.
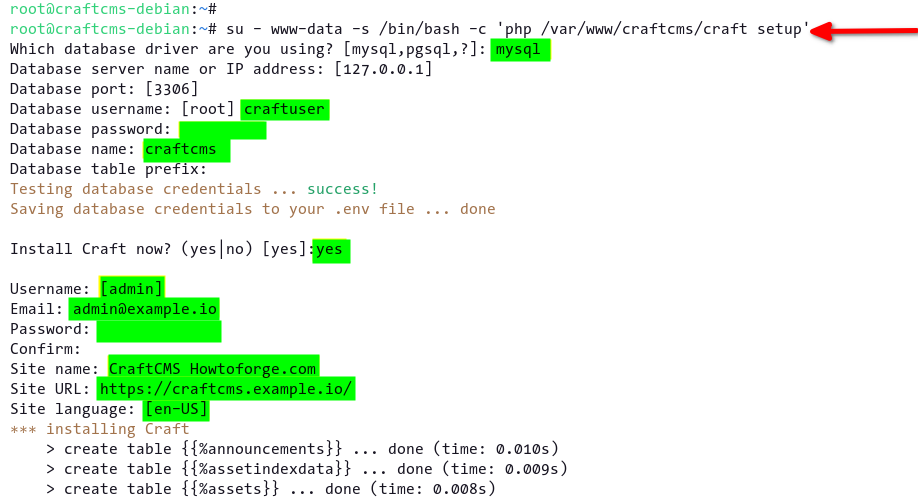
When the CraftCMS installation is complete, you will see the message“Craft successfully installed“, as in the screenshot below.

Set up Apache Virtual Host for CraftCMS
After you have installed the CraftCMS, you need to set up the Apache2 virtual host to make the CraftCMS accessible. In this example, you will set up the Apache2 virtual host for CraftCMS with SSL enabled. So make sure you have the SSL certificates for your domain name.
Before setting up the Apache2 virtual host, run the following command to enable the Apache module `rewrite` and `ssl`.
sudo a2enmod rewrite ssl
Then move the working directory to the directory `/etc/apache2/sites-available` and create a new configuration for the virtual host `craftcms.conf` with the editor nano.
cd /etc/apache2/sites-available/
sudo nano craftcms.conf
Copy and paste the following configuration. Make sure that you change the domain name and the path of the SSL certificates.
    ServerName craftcms.example.io
    Redirect permanent / https://craftcms.example.io/


ServerAdmin [email protected]
DocumentRoot /var/www/craftcms/web
ServerName craftcms.example.io

Protocols h2 http/1.1

SSLEngine On
SSLCertificateFile /etc/letsencrypt/live/craftcms.example.io/fullchain.pem
SSLCertificateKeyFile /etc/letsencrypt/live/craftcms.example.io/privkey.pem


Options FollowSymlinks
AllowOverride All
Require all granted


ErrorLog ${APACHE_LOG_DIR}/error.log
CustomLog ${APACHE_LOG_DIR}/access.log combined


RewriteEngine on
RewriteBase /
RewriteCond %{REQUEST_FILENAME} !-f
RewriteRule ^(.*) index.php [PT,L]
Save the configuration and finish it.
Now activate the configuration of the virtual host `craftcms.conf` and check the Apache2 configuration.
sudo a2ensite craftcms.conf
sudo apchectl configtest
If your Apache2 configuration is correct, you will see the message `SyntaxOK`.
Now restart the Apache2 service to apply the new configuration and the CraftCMS is now accessible.
sudo systemctl restart apache2
Check the CraftCMS installation
You have now completed the installation of CraftCMS. To check the CraftCMS installation, you can now access your domain name via your web browser.
Open your web browser and enter the domain name of your CraftCMS installation.
https://craftcms.example.io/
During the initial installation, you will be redirected to the CraftCMS admin page. Log in to the CraftCMS dashboard with your admin user and password.
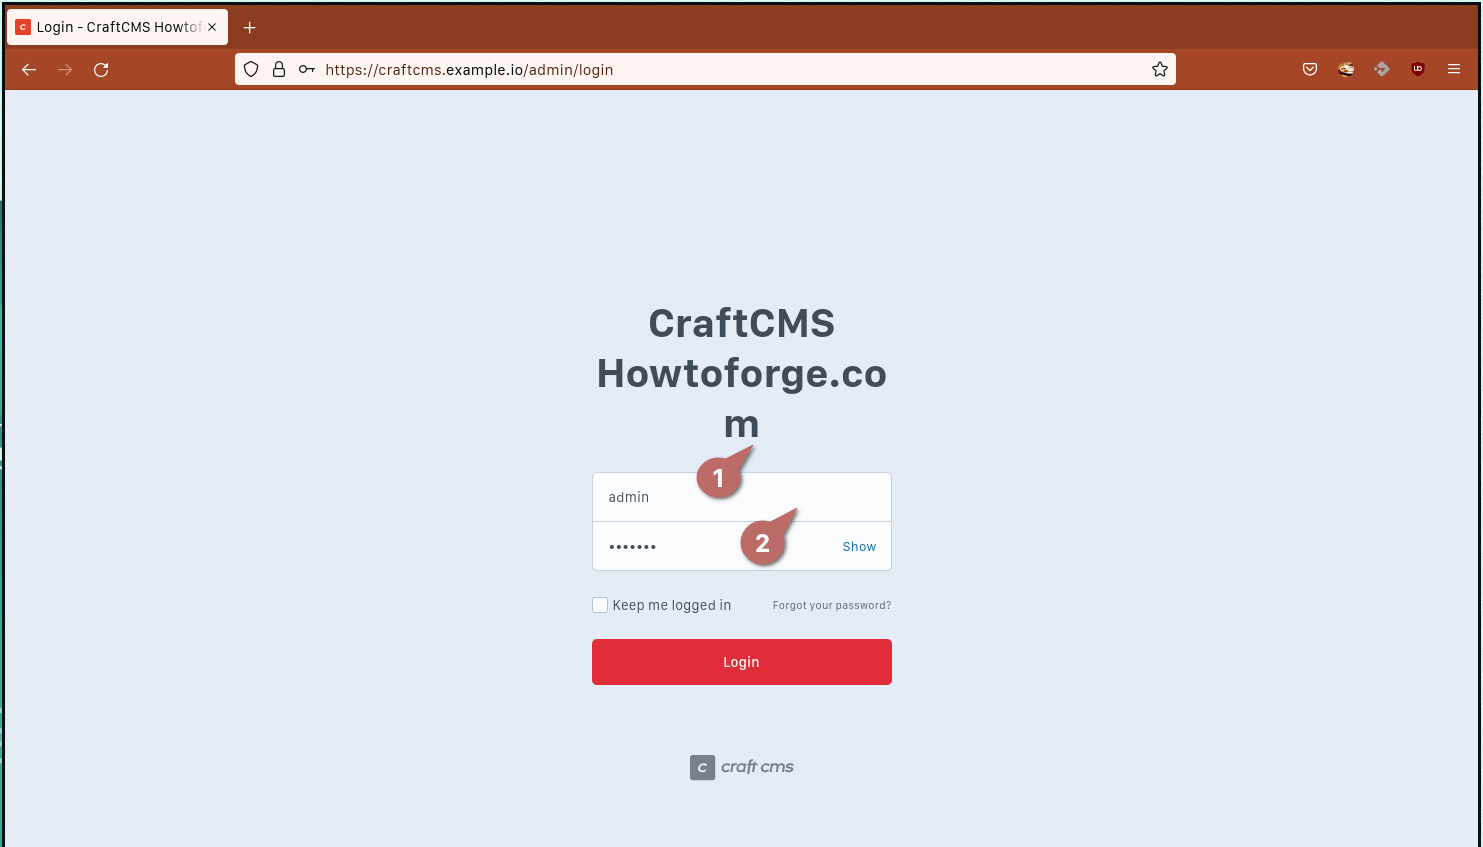
If your admin credentials are correct, you will see the CraftCMS dashboard as shown in the screenshot below.
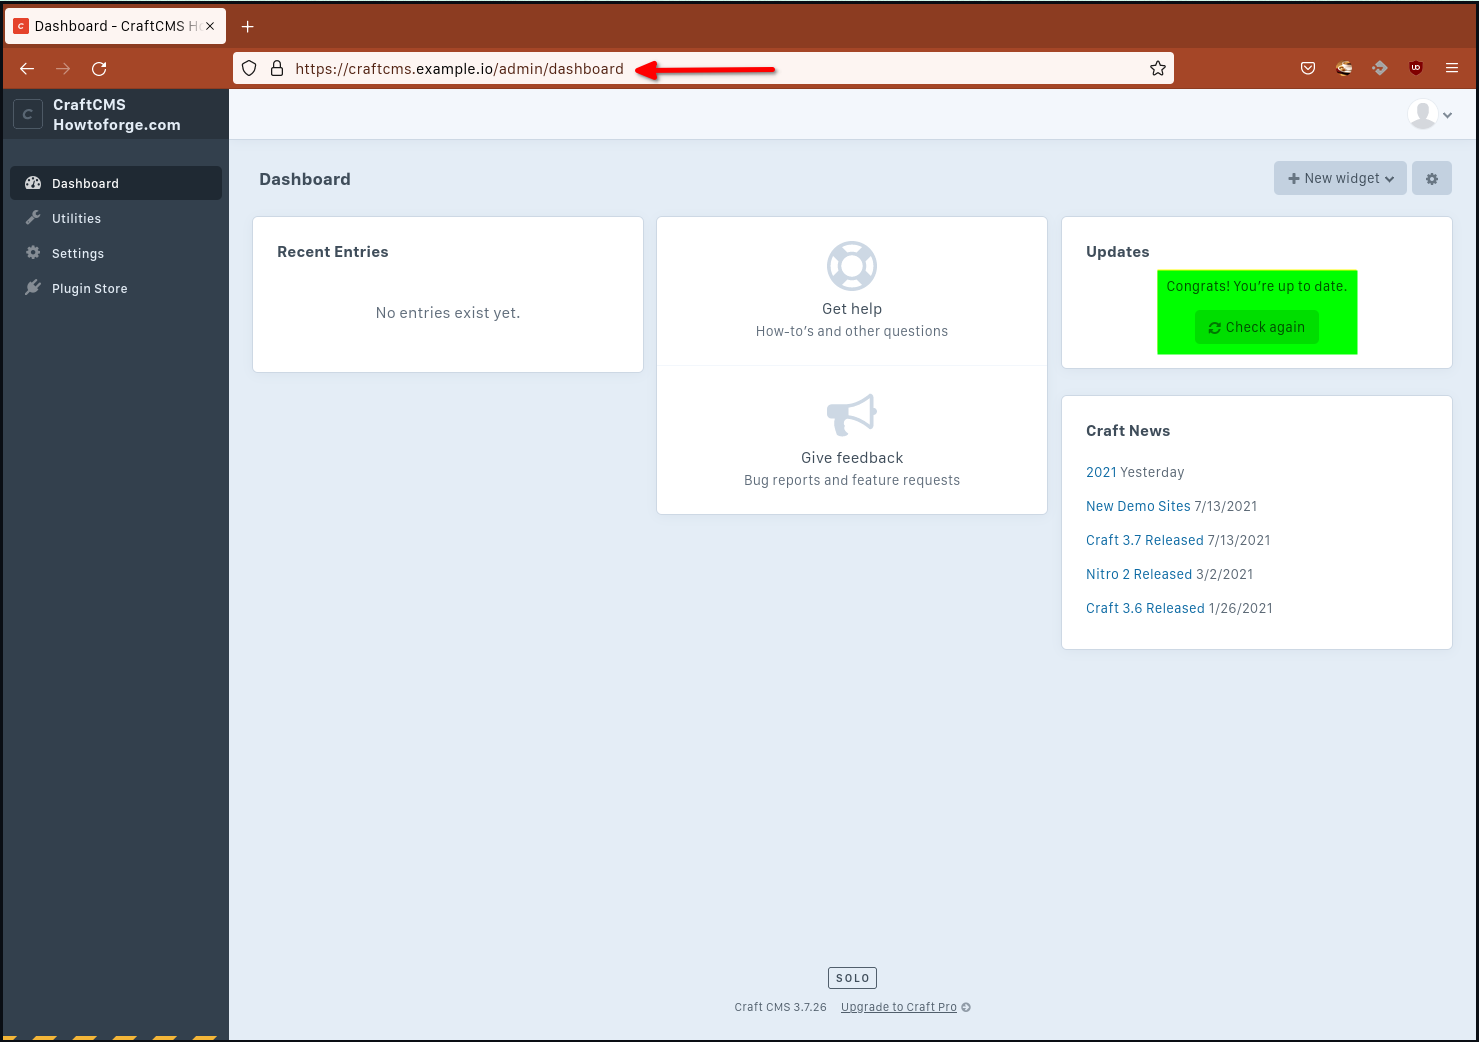
As you can see in the top right corner, your CraftCMS is up to date.
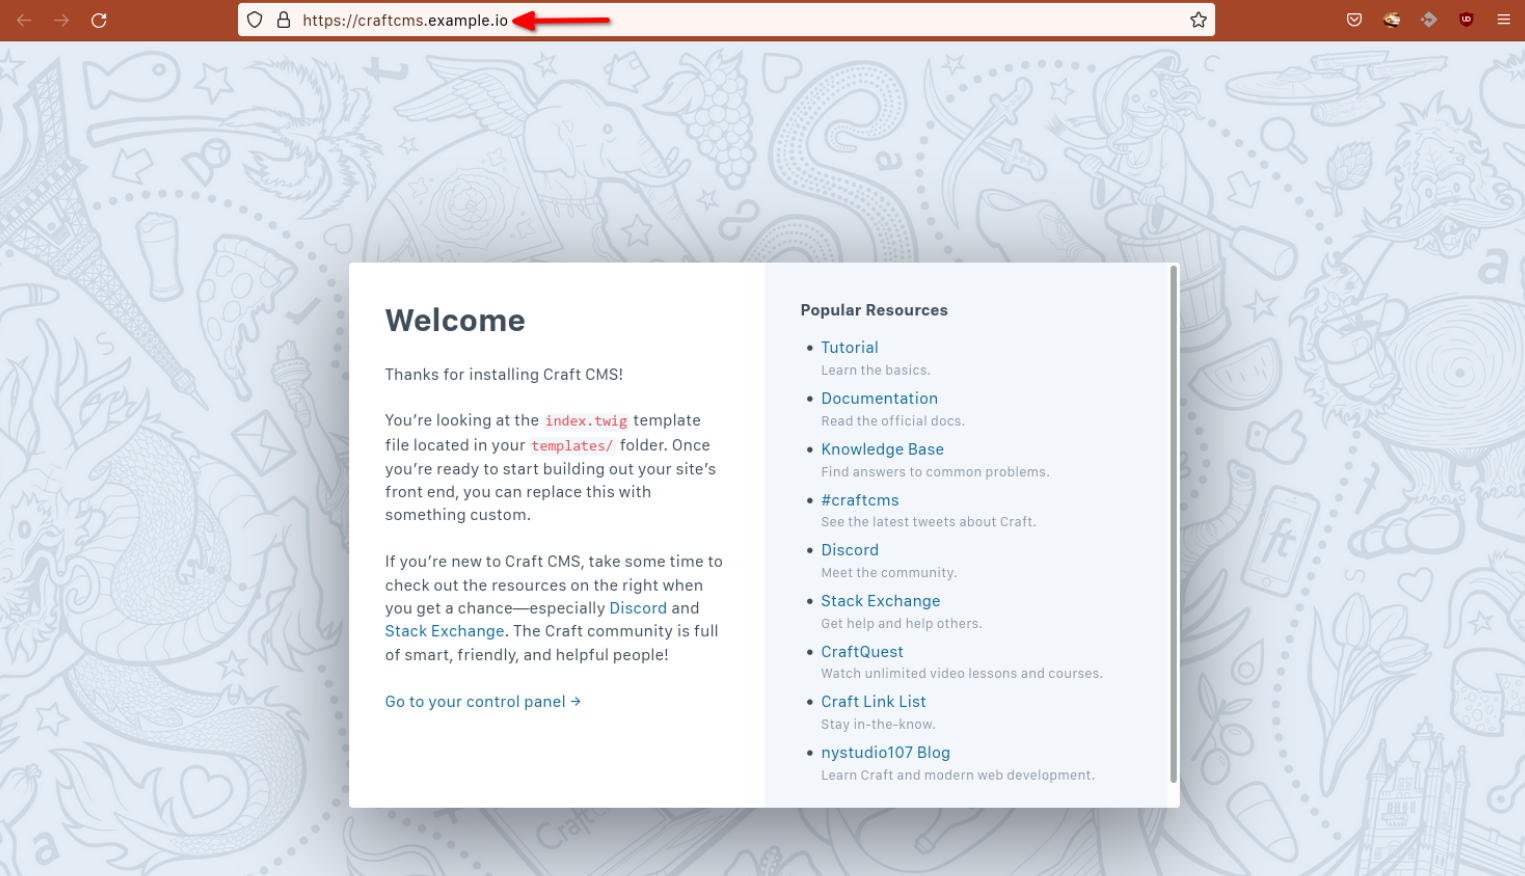
Next, open the main domain of your CraftCMS and you will see the default index page of CraftCMS.
Conclusion
Congratulations! You have now learned how to install CraftCMS with Apache2 web server and MariaDB database on the Debian 11 system. You can now try to add new content to your CraftCMS or take a look at the available plugins for CraftCMS and install them.
