We already know about two main transport layer protocols like TCP and UDP. For more information about TCP and UDP, you can check the reference section. In this article, we will learn how to send and receive UDP packets via the Linux command-line interface (CLI) using nc (mainly) command.
Expectations:
Here are the key points to learn from this article
- To understand nc command in Linux.
- Use nc command for sending and receiving UDP packets through network.
- Send some human readable sentences through nc command.
- Capture the UDP packet sent by nc command.
- Check network packet in Wireshark.
- Find out any other command other than netcat for Linux.
Netcat Command:
Netcat(nc) command is installed by default in Linux OS. Open one terminal [Shortcut Alt Ctrl t] and use below command to check if nc is present or not.
Here is the expected output
This is nc from the netcat-openbsd package. An alternative nc is available
in the netcat-traditional package.
usage: nc [-46bCDdhjklnrStUuvZz] [-I length] [-i interval] [-O length]
[-P proxy_username] [-p source_port] [-q seconds] [-s source]
[-T toskeyword] [-V rtable] [-w timeout] [-X proxy_protocol]
[-x proxy_address[:port]] [destination] [port]
This means nc command is already exist in Linux.
General Set Up Diagram:
Send UDP packet:
Let’s take an example like we will send UDP packet from System A to System B. So, in server-client concept, we have to run server at System B side and client at System A side.
Also we have valid IP addresses.
System A IP: 192.168.1.6
System B IP: 192.168.1.102
Start Server:
To start sever using nc command use below command in System B terminal
Here is the screenshot
This command does not have any output to show as of now. This is just listening mode on port 9999.
Start Client:
To connect to server using nc command use below command in System A terminal
$ nc -u 192.168.1.102 9999
Now system A has to connect to System B. So we have provided server IP address and port number.
Here is the screenshot
Check Connection:
We can check the below command for the confirmation about client connation to server port.
Here is the screenshot
Send UDP packets:
Now we can send udp packet from System A to B and vice versa.
Step 1:
Now go to system A and send any sentences like
“Hi i am from LinuxHint[System A 192.168.1.6]”
Screenshot:
Step 2:
We should able to see this in System B side. Here is the screenshot
We can also send UDP packets from System B to System A.
Step 1:
Go to System B and send sentence like
“Hi i am from LinuxHint[System B 192.168.1.102]”
Here is the screenshot from System B
Step 2:
Here is the screenshot from System A
Check packets in Wireshark:
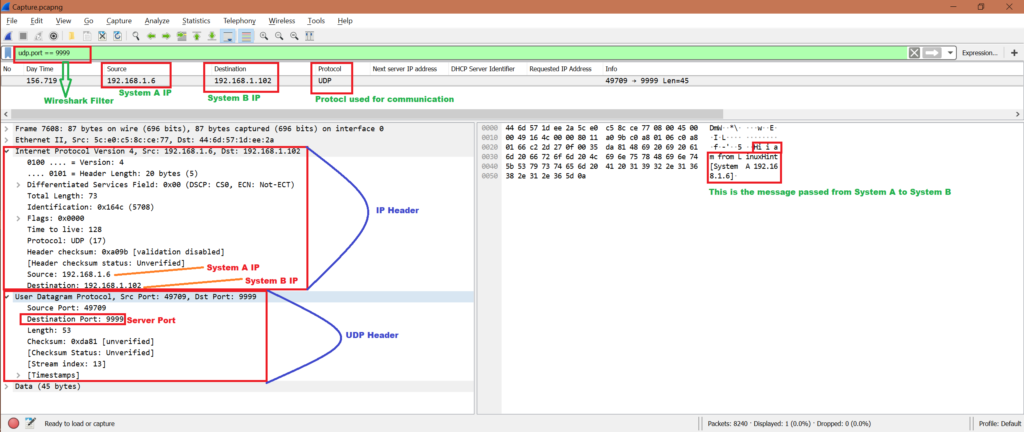
Now while we have been sending UDP packets from System A to System B and vice verse, we can start Wireshark in either System A or System B. Here we have the capture file, let’s do some analysis and confirm if this server and client communication used UDP protocol.
Note that,
- We will only analyse the first communication.
System A has sent “Hi i am from LinuxHint[System A 192.168.1.6]”
To
System B [192.168.1.102].
- Will use filter “udp.port == 9999” to get only related packets in Wireshark.
Refer below screenshot for analysis from Wireshark capture.
To know how to use Wireshark refer below link
https://linuxhint.com/wireshark_basics_how_to_use/
Other command to send UDP packets:
There is another method to send UDP packets
Run server at System B:
Run below command at System A:
$ echo -n “hello” >/dev/udp/192.168.1.102/8000
192.168.1.102: System B’s IP
8000: The server port
Message sent: “hello”
But we are able to send only one time “hello”. If we kill server and rerun then it’s working.
Conclusion:
From the above exercise we have learned the mechanism to send some messages using UDP protocol. And the best method is to use nc command in Linux.
References:
To understand TCP: https://linuxhint.com/tcp_packet_capture_analysis/
To understand UDP: https://linuxhint.com/udp_wireshark_analysis/
About the author

Bamdeb Ghosh
Bamdeb Ghosh is having hands-on experience in Wireless networking domain.He’s an expert in Wireshark capture analysis on Wireless or Wired Networking along with knowledge of Android, Bluetooth, Linux commands and python.


