
SSHFS (SSH File System) is an implementation of a File System in User Space (FUSE) that enables clients to mount remote filesystem over SSH connection. SSHFS uses the SSH File Transfer Protocol (SFTP) to mount the remote file system to the client machine, and connections between client and server are secure and encrypted.
SSHFS can be used as an alternative to the traditional FTP protocol. It’s secure by default through SSH connection and no additional packages or configurations are needed. The SSHFS works with a simple default SSH configuration.
In this tutorial, you will learn how to mount a remote directory in a secure way using the SSHFS between two Linux machines (client and server). This guide also includes how to set up chroot on SSHFS that will prevent users from accessing other users’ directories.
Prerequisites
To follow along with this guide, you’ll need two Linux machines, a client, and a server. You can use any Linux distribution, and make sure the server has an OpenSSH server installed, and you’ve got a non-root user with the sudo root privileges.
Installing SSHFS to Your Local Computer
By default, SSHFS packages are available on most Linux distributions, including Debian/Ubuntu, RHEL/CentOS/Rocky, and ArchLinux/Manjaro. You can easily install it using your system package manager. In this section, you’ll install SSHFS on your local/client machine.
First, update your package index list by running the following command.
# For Debian/Ubuntu
sudo apt update# For RHEL/CentOS/RockyLinux
sudo dnf check-update# For ArchLinux/Manjaro
sudo pacman -Syu
After your package index is updated, install the SSHFS package using your package manager as below. On Debian and Archlinux distribution, the package is named as ‘sshfs‘, but on RHEL based distribution, the package is called ‘fuse-sshfs‘.
# For Debian/Ubuntu
sudo apt install sshfs# For RHEL/CentOS/RockyLinux
sudo dnf install fuse-sshfs# For ArchLinux/Manjaro
sudo pacman -S sshfs
Now you’ve completed the installation of the SSHFS package on your local machine. Next, you’ll learn the basic command to mount and unmount remote directory/partition to your local machine using the SSHFS command.
Basic: Mount and Unmount using SSHFS
Before you get started with the SSHFS command, ensure you have got a Linux server with OpenSSH installed enabled on top of it. For the user authentication to the server, you can use SSH password-based authentication or SSH key-based authentication. But, you may take into consideration to use of SSH key-based authentication, which is more secure than password-based authentication.
In this section, you’ll learn the basic command of ‘sshfs’ for mounting remote directory/partition from the server to the local/client machine. Also, you’ll learn how to unmount sshfs from your local machine.
1. The basic command of ‘sshfs‘ for mounting a directory to the local machine through SSH protocol is below.
sshfs [email protected]:/remote/directory /local/directory
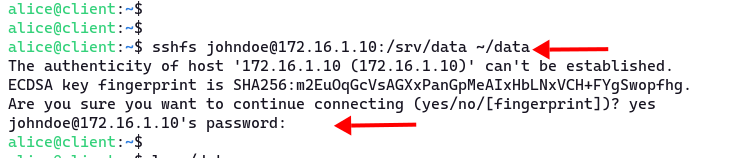
In practice, mount the remote directory ‘/srv/data‘ from the server ‘172.16.1.10‘ to the local machine directory ‘~/data‘. This example uses the SSH user ‘johndoe’.
sshfs [email protected]:/srv/data ~/data
Now you’ll be prompted for password authentication if you’re using the password-based authentication for your SSH.
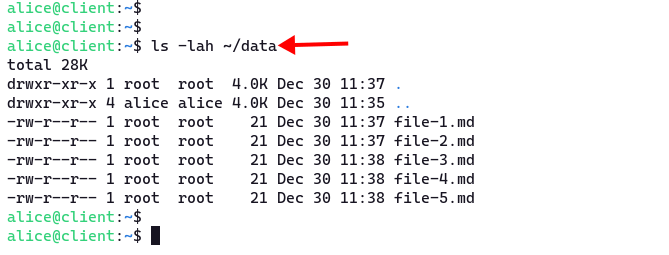
To verify, run the ‘ls’ command to the directory ‘~/data‘ on the local machine.
ls -lah ~/data
You’ll see a list of files from the remote server on your local machine.
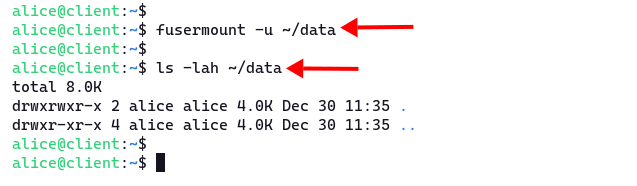
2. Now, to unmount the remote directory from your local machine, run the command ‘fusermount‘ as below. This command is used to mount and unmount FUSE filesystems.
fusermount -u ~/data
3. Another example of the ‘sshfs‘ command that you may be interested.
The ‘sshfs’ command with debugging option ‘-d‘. Whenever you get into trouble with the ‘sshfs’ command, use the additional option ‘-d’ to show all debug messages when making a connection to the server.
sshfs [email protected]:/remote/directory /local/directory -d
Now, if you’re running a server with a non-standard SSH port, you can add the option ‘-p’ followed by your SSH port.
sshfs [email protected]:/remote/directory /local/directory -C -p 2222
The option ‘-C‘ will enable compression, equivalent to the option ‘-o compression=yes’ in the ssh command.
For a complete reference, you can use the ‘–help’ option or using the SSHFS manpage.
sshfs --help
man sshfs
Setting Up Chroot on SSHFS
In this section, you’ll learn how to enable chroot on SSHFS, which can be achieved by configuring the SSH server and specifying the user and directory. The chroot environment will limit the directory access, but your user still can read and write on the mount directory.
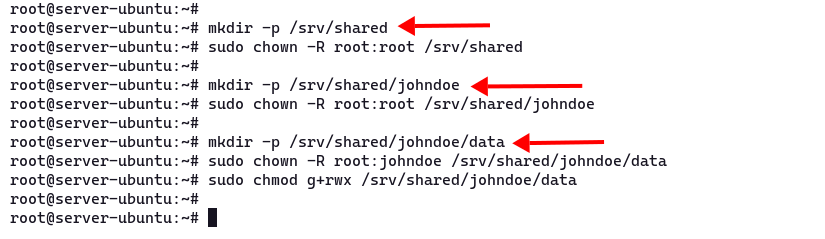
1. First, you’ll create a new chroot directory for your user and allow read and write access. In this guide, you’ll create a new shared directory ‘/srv/shared’, then create a new home directory and data directory for each user.
Run the following command to create a new main shared directory ‘/srv/shared’ and change the ownership to the user and group ‘root‘.
mkdir -p /srv/shared
sudo chown -R root:root /srv/shared
2. Now, create another directory for each user under the ‘/srv/shared’ directory. And make sure to change the ownership of that directory to the user and group ‘root‘.
mkdir -p /srv/shared/johndoe
sudo chown -R root:root /srv/shared/johndoe
3. Next, create the ‘data‘ directory inside the user home directory ‘/srv/shared/johndoe‘. Then change the ownership of that directory to the user ‘root‘ and group ‘johndoe‘. Lastly, allow the group ‘johndoe‘ to read and write on that directory.
mkdir -p /srv/shared/johndoe/data
sudo chown -R root:johndoe /srv/shared/johndoe/data
sudo chmod g rwx /srv/shared/johndoe/data
Now, you can mount the remote directory ‘/data‘, but it is equivalent to the directory ‘/srv/shared/johndoe/data’ on the server.
4. After you have created the chroot directory for your user, you’ll need to edit the SSH configuration ‘/etc/ssh/sshd_config’. Edit it using nano or your favorite text editor.
sudo nano /etc/ssh/sshd_config
Add the following lines to the file.
Subsystem sftp internal-sftp
Match User johndoe
       ChrootDirectory /srv/shared/%u
       ForceCommand internal-sftp
       AllowTcpForwarding no
       X11Forwarding no
The configuration ‘internal-sftp‘ will enable SSH to act as an SFTP server too. Then define the ‘ChrootDirectory‘ for user ‘johndoe‘ to the ‘/srv/shared/%u‘ directory. The ‘%u‘ means as username.
Save and close the file.
5. Next, run the following command to verify SSH configuration, and make sure you don’t get syntax errors. Then restart the SSH service to apply a new configuration.
sudo sshd -t
sudo systemctl restart sshd
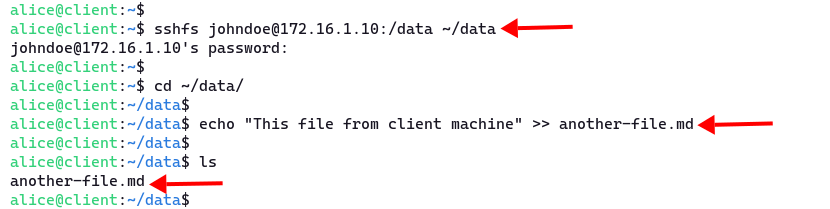
6. Now, back to the client/local machine, then mount the remote directory in the chroot environment. You should use the ‘/data’ directory, instead of the full path directory ‘/srv/shared/johndoe/data’. And you have the privileges to read, write, and execute to the ‘data’ directory.
sshfs [email protected]:/data ~/data
To verify the write access, create a new file on your client machine using the following command.
cd ~/data
echo "This file from client machine" >> another-file.md
Now, back to the server, navigate to the directory ‘/srv/shared/johndoe/data‘, check the available file on that directory.
cd /srv/shared/johndoe/data/
lscat another-file.md
You’ll see the file that you just created from the client machine.
In this section, you have created the chroot directory for SSHFS users and configured the SSH service to enable chroot.
Troubleshooting
If you get an error on the SSHFS connection, you can troubleshoot your connection using the following ways.
You can use the debug mode with option ‘-d’. With this option, you will see logs of your connection on your shell terminal.
Run the ‘sshfs‘ command with debug mode as below.
sshfs [email protected]:/data ~/mnt -d
Another way that you may try is by checking the SSH log on your server. Before using the ‘sshfs’ command, open a new terminal and connect to your server, then run the ‘tail‘ command to check the SSH log service.
On Ubuntu/Debian-based system, the SSH log is available at ‘/var/log/auth.log‘. And for RHEL/CentOS-based system, the SSH log is available at the ‘/var/log/secure’.
# For Ubuntu/Debian
tail -f /var/log/auth.log# For RHEL/CentOS
tail -f /var/log/secure
Conclusion
Congratulation! You have now learned how to use the SSHFS to mount a remote directory from the server to your local machine. Also, you’ve learned how to set up chroot environment on SSHFS, and how to troubleshoot your SSHFS connection.


